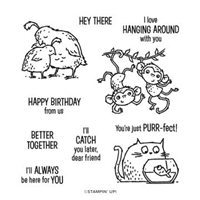
A child’s Birthday card is not one of the normal cards I make. But my sweet little cousin turned 2 this week so I had to make him a card. The card was a mix of Catch You Later and Party Puffins. Such Fun!
Stamps
As I said, this card is a mix of products. The monkeys are from the Catch You Later stamp set in the Mini Catalog. Hanging from a tree is perfect and adorable. They are stamped with Early Espresso and colored using Stampin’ Blends. For the banner sentiment I used the Banner Pick A Punch with the sentiment from Party Puffins. And the number 2 is from a long retired die set. But you always need something like that, especially for children and anniversaries.
Paper
A perfect addition for the monkeys I thought was the wood grain DSP. It is a piece from the Beauty of The Earth Designer Series paper. And the Pear Pizzaz matches the leaves on the tree limb. But the blue was just a color I felt looked right. I chose Pacific Point for a brighter blue and I believe it works with the other colors. Having the number in Pacific Point helps it to stand out a bit. My idea was for it to be hanging from the monkey’s tail, so squint your eyes if you do not quite see it like that ! LOL!!!
Inside View
The inside of the card needed some fun as well. Here is a view of that.
SAVINGS ARE IN BLOOM
CLICK ON THE PHOTO FOR A VIEW OF ALL ITEMS DISCOUNTED
WAVES OF THE OCEAN SUITE …EARLY RELEASE
CLICK ON THE PHOTO TO SEE THE COMPLETE SUITE OF PRODUCTS
ALL TOGETHER … SPECIAL BUNDLE
CLICK ON THE PHOTO TO SEE ALL OF THE PRODUCTS
HOST CODE
My March Host Code is JGGHP66J. Please use this code for orders under $150.00. I will have a small gift for those with orders over $50.00 in addition to the Perk Rewards Program. You can read all of the information at the top of the page in the Menu Bar under SHOP / Perks.
Thank you for stopping by today. I hope you enjoyed today’s project and will come back. I do read and reply to all of the comments individually. They mean a lot to me. Please reach out if you have a question.
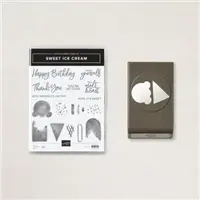
I needed a birthday card for a 1 year old little guy. I know he would not care about a card, but his Mom loves Disney. And I remembered seeing a card making the mouse ears from the Ice Cream Builder Punch. that was my start.
I made one of the Quick and Easy Shaker cards, with the added bonus of Micky Mouse Ice Cream. I used the Ice Cream Cone Builder Punch to punch a “scoop” from Bermuda Bay and Coastal Cabana cardstock. The ice cream stick is from the Sweet Ice Cream stamp set. The stamp set and punch come as a bundle with a 10% discount!
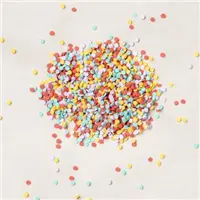
The “confetti” circle is from the Ice Cream Corner Designer Series Paper. I used the 2 1/4″ Circle Punch. The sentiment is from the stamp set. I used the scalloped oval of the Double Oval Punch to cut it out. That “You Melt My Heart” is so cute and unique. I think it would make a great card for anyone you are sending love to.
The shaker card is made using one of the Clear Envelopes. I cut a different piece of the Ice Cream Corner DSP to 4 X 5 1/4 and placed it inside the envelope. I then added quite a few of the Ice Cream Corner Sprinkles. I closed the envelope, with the closed part on the back side and folded the edges down for a tight fit. All I had to do now is add Tear & Tape to the back side and adhere it to the card base. Note: You have to be very careful as it is a One Shot to make it right type application. The Tear & Tape is not at all forgiving!! Ask me how I know! LOL!!
Once the shaker was put together, all I had to do is add the front pieces and I had an adorable little ice cream card. It just hints at Disney and Micky, but I know that’s what it is.
Thanks for stopping by today. I hope you will give this easy shaker card a try. And also remember to turn your ice cream scoop upside down for some mouse ears!
HOST CODE
My March Host Code is: B6JC9CHE Please use this code for orders under $150.00. I will have a small perk for those with orders over $50.00
I have been finishing my swap cards and 3D swaps for OnStage in Charlotte this weekend. Whooo!! I have been really far behind on all of that. But I am down to just putting the boxes together. They will get worked on during the ride up there tomorrow. I will share that project with you next week.
Before I get to my card, I snapped a picture of my gorgeous azalea bush that has decided to pop out in the last couple of days. Here it is.
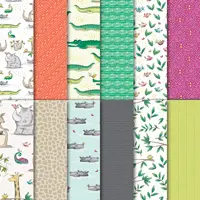
For todays card I have a really quick and sweet card. I have been using some Annual Catalog stamps this week and today continues that theme. I went with the Animal Expedition Designer Series Paper. It is so adorable! And the Label Me Pretty stamp set for the little sentiment.
The only stamping on this card is the sentiment. The sweet animals were punched from the Animal Expedition Designer Series Paper. How easy is that!!! I paired it with another piece of DSP from the same package. The base colors are Lemon Lime Twist and Berry Burst. They are both on the soon to be retiring list. They are in the 2017-2019 In Colors. So we have known they would be leaving us. I really do wish the Lemon Lime Twist could stay.
Thank you so much for visiting today. I will share my swaps next week. Please Like my FaceBook page, Blue Line Stamping, and you may get to see some sneak peeks at new products coming soon.
I was thrilled to receive one of these cute little calendars at OnStage in Orlando back in November. Brian King, my upline, and our InKing Royalty Team gathered with a Team from England and Netherlands one evening. During the evening we snacked , of course, and did a card exchange. Lotte Noordzig-Walther made these adorable A-Frame desk calendars and I could not wait to get home and try it. I finally ordered the calendars. (I got mine from Taylored Expressions.) But with the holidays, and the new products, I had pushed it to the corner of my desk. I made my first one last week and was thrilled. I had used retired DSP for the first attempt and now have created one with current products. So here it is>
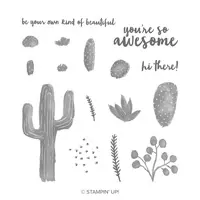
Flowering Desert, 148700
And here is a bit of the side view to see the A-Frame.
The one Lotte gave us had card stock as the base so you do not see the opposite side of the DSP. I obviously did not think of that when I used this DSP. But I loved the theme of sparkles and fabulous.
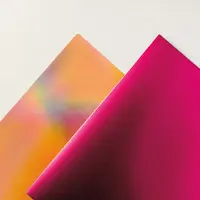
I used a variety of Foil Sheets on this. I needed it to match the DSP, which is Broadway Bound by the way. Behind the calendar is Silver Foil, behind the sentiment is Gold Foil , and the heart is from the Sale-A-Bration catalog. It comes in a pair of Grapefruit Grove and Lovely Lipstick Foil Sheets. I used the Lovely Lipstick for my heart. And isn’t that heart beautiful? It is from the Be Mine Stitched Framelits.
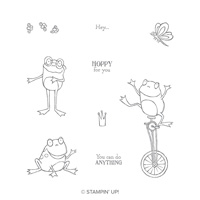
The sentiments are from Flowering Desert for the Awesome and So Hoppy Together for the You can do anything. Sometimes we need these subtle reminders that we are Awesome!!
Lotte’s directions on her blog are not in English. Luckily the measurements were in English. Her blog is www.alottestampingfun.nl . I have included the measurements below. The A-Frame is the main point and you can decorate it as you see fit.
I hope you have a wonderful day and Thank You for stopping by. Tomorrow is the Pals Blog Hop, so please come back and Hop Along with us and see all the great projects.
Measurements:
4 X 11 7/8
Score at 4 5/8, 9 1/4, 10 1/4, 11 1/4
Fold and burnish the score lines
Make a Mountain/Valley with he three close together scores. Place Tear & Tape on the end piece and attach it to the front of the A-Frame. They should lay down and line up perfectly.
Special Join Offer:
For the Ultimate Shopping Experience is to purchase the Starter Kit. Please read through the next items and think about it. If you love paper crafting as much as I do, I believe you will want to talk with me. I hope you will consider it.
There are 2 Starter Kit choices:
You create your own kit. You get to choose ANY Stampin’ Up! products (includes bundles) However, SAB and Host stamps are excluded from the Starter Kit (but not your next order)!
You will receive a 20% discount on all future purchases through July 31, 2019. But there is no obligation to ever order anything else.
It’s a great way to Get Your Feet Wet, so to speak. Just see if you like being a demonstrator.
Hobby Demonstrators are welcome. I was one for about ten years, and really still am!
You will be the first ones to see the new catalog when it debuts in June, plus preorder from it.
There are NO OBLIGATIONS to continue or ever place another order.
The First Bonus is that you become part of my Team. I would love to have you and enjoy sharing my love for stamping and paper crafting with you.
You become a member of my Upline, Brian King, and his InKing Royalty group. There are great ideas and thoughts shared on our Facebook page.
Now for the 2 options and the Bonuses:
The first option costs $99.00 and you get the usual $125.00 worth of products (of your choice) PLUS an additional $50.00 of product for a total of $175.00 at a cost of only $99.00 to you. And did I mention FREE shipping on that order? That is another 10% off.
The second option costs $129.00. You get the same amount of products as the first choice, ($125.00 worth of your choice of products, Plus the additional $50.00 of Free Products, FREE Shipping) and the AWESOME new Craft & Carry Tote which is valued at $50.00. Basically you are paying an added $30.00 for the Craft & Carry Tote.
(I had the option to purchase, and of course I did. It is well worth the $50.00 and is a Fabulous deal for $30.00)
Here is the Tote. It is a great size, has dividers that can be moved for whatever products you are carrying each use. There are two outside pockets that are large enough to hold punches, and much more. There is a zipper outside pocket. It has regular straps as well as a shoulder strap. It has the Stampin’ Up! logo. It is made of a great heavy weight canvas. And it is so Pretty!!
I am back from my awesome sightseeing tour down the west coast. We went from Seattle to San Francisco. I must say the Oregon Coast is simply breathtaking! All of the scenery and sights were wonderful.
Today I have a pretty quick card for you. I am trying to get back in the groove and have a lot of cards to make. So we will get right to it this morning.
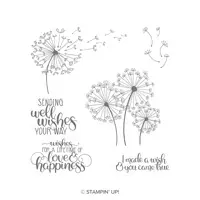
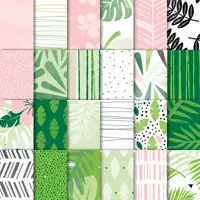
I used the beautiful Tropical Escape 6X6 Designer Series Paper Stack as the main color scheme for this card. I am really in love with this paper. The colors are so bright and are some surprising combinations. The colors I have used today are not something I would normally have put together. So keep this combination to try yourself.
The three triangles, or squares if turned another way, are a great way to have a different look with stamp sets. I chose the Dandelion Wishes set and stamped them very subtly with the Gray Granite. I used the Layering Squares to cut them and the Blushing Bride scalloped background.
Thank you for coming back to see me today! I really appreciate it.
There are two fabulous promotions going on right now.
By joining as a demonstrator in July, you will receive as a FREE bonus to your Starter Kit (The Best Shopping Deal!!) a complete set of a color family of Ink Pads. Yes, that is 10 ink pads at no charge!! WOW! And I would love to have you join my team. So please contact me and let’s discuss it. Ot simply click on the Join My Team button at the top of the page!
The second promotion is the Buy 3, Get 1 Free DSP Sale. Stampin’ Up!’s Designer Series Paper is the best DSP around, and the prettiest. So how could you go wrong when you get 1 free??? You could keep them all to yourself or share with a friend.
Welcome to InKing Royalty’s February Blog Hop! Today’s Blog Hop is filled to the brim with projects that celebrate birthdays. The opening line from The Beatles’ “Birthday” song ran through our heads as we joyfully created the birthday-themed creations we share with you today. After you read my post, I hope you’ll hop over to the next person on the list at the base of this post.
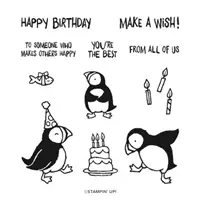
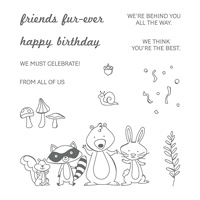
I made a Happy Birthday party card! I believe this is the “happiest” birthday card I have ever made. So it is very appropriate for a themed blog hop. The We Must Celebrate stamp set was the perfect set for what I envisioned.
We Must Celebrate, 145898
If you noticed that my animals are not in the line like their stamp is, you are very observatve. I cut them apart!! I know it is a shock to a lot of you, and it is the first time I have ever had the nerve to do this. I have to say that it will not be the last time I do it. I love the versatility it gives. And I cut them so that they nestle back together on a large clear block just like they originally were. A win/ win for me.
I colored the guys with the Stampin’ Blends, my favorite product right now. The DSP is the FREE Bubbles & Fizz DSP from Sale-A-Bration. The layers are Bermuda Bay and Calypso Coral. I made a banner and gave it a jaunty angle to go with my happy guys on the card.
The measurements are below the list of blog hop names. I have some funky measurements because I started with a piece of Whisper White that was on my desk and loved how it turned out. So I had to work with those measurements.
Thank you for stopping by today. I hope you’ll hop along to the next stop on the bloghop, Pam Morris at TapTapStamp. There’s lots of inspiration to be found in this group – and you don’t want to miss it!
Jackie
Thank you for hopping along with us. If you get stuck during the Blog Hop, please use this line-up as a guide:
Have you ever thought about becoming a Stampin’ Up! Demonstrator? During Sale-A-Bration is the perfect time to join. Not only are you getting the Ultimate Bundle ($125.00 worth of product for $99.00) but you also get to choose 2 additional stamp sets, up to $25.00 each. Additionally you will receive a 20% discount on any future purchases. Or, if you are just wanting to test drive the idea, you would not be required to make another purchase until July! There is no pressure for you to continue as a demonstrator. And there is no penalty if you decide not to continue. Please contact me and let’s talk about it. You can review the documents by clicking on the picture below.
The content in this blog is the sole responsibility of Jackie Beers as an Independent Stampin' Up! Demonstrator. The use of and content of classes, services or products offered is not endorsed by Stampin' Up!