I saw the card I have to share today on a reel from Little Lemon Press. Immediately I knew I had to try this Fun Fold. It is a combination of everything I love. There is a Fun Fold, DSP, and then some of my ideas to complete it. And did I mention it is actually very simple!! This is a triple win. Especially if you have a stash of DSP in your craft space. I will not even ask for a show of hands to that question!!
The paper itself is a winner as we all have said. This card has three layers of it. Next is number two, which is a simpler layer and could have some creativity added to it as well.
I used the simpler pattern for this second view. And then the inside is the final view.
There is more of the beautiful paper to see here as well.
Papers
Obviously the DSP is the star of this card. Especially since there is a variety of it. This is the Moonlit Floral Designer Series Paper. I chose one of the extra special sheets for the front. Not that they are not all gorgeous. Then the inside parts of the card is just one sheet that you see both sides of. I decided to use the side I consider to be the prettier one for the big inside view. And as I mentioned under the photos, I think some additional details could be added to the green on green layer.
The card base is Basic White. I used the normal weight, not the Thick since there were going to be layers of DSP on all parts. Then the inside sentiment area is also Basic White. I did use a small piece of Golden Glow cardstock for the front sentiment layer. It was perfect to match those little golden flowers.
There are also leaves of two of the greens included in the paper. I chose Mossy Meadow for the curly leaf. And then Old Olive for the fern looking leaf. They add so much texture to the card hanging off of the sentiment layer.
Stamp Bundle
The Stamps and Dies are the Fern & Flora Bundle. There are some sweet sentiments and then leaves and flowers, with a few butterflies in the stamp set. Then the Dies are extra detailed on the leaves. And there is a Die for the butterflies I used as well. Plus the sentiment frame is the perfect size. It has just enough of that “ticket” corner to add detail.
Extras
The Extras are minimal. You could count the butterflies as Extras since I have them floating around on the front and the one on the inside sentiment area. Even though I left that without a sentiment. I felt it be a Thankful card I would write my own message there. So the Bling is the real Extra. I went back to an all time favorite and used Rhinestones. You can never go wrong with Rhinestones. I added one on the head of each of the butterflies, except the one not die cut on the inside. A little bit of glow for this night shaded paper.
Measurements
The Little Lemon Press reel I saw included the measurements. But I will give the ones I used. The card base is Basic White cut 7 1/4 X 5 1/2 and scored at 3″. For the DSP layer on the front it is 3 X 5 1/2. The inside large DSP sheet measures 7 1/2 X 5 1/2 and is scored at 3 1/4. I cut the Basic White inside to 3 X 5 1/4. And the Golden Glow behind the die cut sentiment measures 2 1/2 x1 1/4. Please give this one a try. I think you will love it.
STAMPIN’ REWARDS
You will earn rewards on all orders over $20.00 in products The system will track your rewards for you. And they will be available for use on your next order, or you can save up for a larger purchase. All you need to do is on your first order is agree to participate. You will then begin receiving rewards on qualifying orders.
Orders of $50.00 or more you will still receive an appreciation gift from me. I appreciate you choosing me as your demonstrator!
COMMENTS
Please know that I love to hear from you and answer any questions you may have. My responses generally are not done here on the post. They are made using my phone as I have found it is easier to answer a question for you personally. So you will be receiving an email from me if you make a comment.
Thank you for stopping by today. I hope you enjoyed today’s project and will come back. I do read and reply to all of the comments individually. They mean a lot to me. Please reach out if you have a question.
Smile and Keep On Stamping,
Jackie
Online Exclusives
New Online Exclusives drop every other month. These are amazing products and are a supplement to the Annual and Mini Catalogs. This way you have access to even more New and Awesome products!
You can go directly to these in my Online Store by clicking HERE
I am continuing my group of cards made with the Love Notes Designer Series Paper. It is such a fun paper and makes cards in a snap. Today’s is EX-tra Fun I think.
Love Notes in a Cup
All of the papers, with the exception of the card base and layer, are the Love Notes DSP. As I have said several times, this paper is so much fun to use. It is like “what can I pair together next?”. Personally I was overjoyed when I saw these purple layers. Purple, along with orange, are my favorite colors. So this was meant to be.
The purple polka dot layer is so cute with the faded look going on. And the strip of plaid is the reverse of another sheet of the DSP I had trimmed. It matches the heart on the cup. And the two are what gave me the Flirty Flamingo as the card base and layer.
Extras
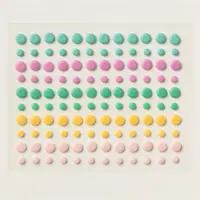
This is maybe the simplest of all of the Love Notes cards I have made. So there is only one extra today. But it is also a favorite that I am so happy is still an active product. It is the Purple Shimmer Gems. These are so pretty as they come in a variety of purples. Almost like the polka dot DSP, there are different shades of purple. They are a great embellishment to have on hand.
STAMPIN’ REWARDS
You will earn rewards on all orders over $20.00 in products The system will track your rewards for you. And they will be available for use on your next order, or you can save up for a larger purchase. All you need to do is on your first order is agree to participate. You will then begin receiving rewards on qualifying orders.
Orders of $50.00 or more you will still receive an appreciation gift from me. I appreciate you choosing me as your demonstrator!
COMMENTS
Please know that I love to hear from you and answer any questions you may have. My responses generally are not done here on the post. They are made using my phone as I have found it is easier to answer a question for you personally. So you will be receiving an email from me if you make a comment.
Thank you for stopping by today. I hope you enjoyed today’s project and will come back. I do read and reply to all of the comments individually. They mean a lot to me. Please reach out if you have a question.
Smile and Keep On Stamping,
Jackie
Online Exclusives
New Online Exclusives drop every other month. These are amazing products and are a supplement to the Annual and Mini Catalogs. This way you have access to even more New and Awesome products!
You can go directly to these in my Online Store by clicking HERE
I have a very floral card today. The new Impressions Abloom Bundle might have gotten me a little excited. If you like florals then it will be ok. 🙂
STAMPS & DIES
These flowers are so much fun to create. It is two step stamping for the different flowers. Stampin’ Up! has really created a beauty with this Impressions Abloom Bundle. The Dies cut perfectly and are really easy to line up with the image. This Bundle is another reason to please look at the Online Exclusives!!
I wanted to copy the flowers in the paper to hopefully have the appearance of the flowers falling off of the paper. So I used the same colors, or close to it ,to create my flowers. The first image I stamped is the detailed flower. These are all using Strawberry Slush. Next I used Bubble Bath for the solid image. For me, it is easier to see to align properly if I have stamped the darker image first.
The leaves are all Dies although there are stamps as well. I love the detailed cutting of the leaves for some additional texture. And finally the sentiment is also part of the stamp set. It is actually two different stamps. But because they are photopolymer it was very easy to stamp the bottom words beneath the Thanks. I went with Garden Green Ink for this.
PAPERS
This gorgeous floral paper is part of the Suite of products which includes the Bundle above. The Suite is titled the same as the DSP. It is Floral Impressions Designer Series Paper. I only used a strip of the DSP to keep from overloading on the floral print. I wanted the stamped images to pop. Of course the cardstock layers are from the DSP. The base is Strawberry Slush with a layer of the Garden Green. I also added some Strawberry Slush behind the sentiment. Anytime I fussy cut a sentiment and then try to fussy cut a layer, it does not go very well. This time is acceptable. LOL!!
EXTRAS
There are two Extras today. First is the Exposed Brick Embossing Folder. This gives some additional texture to the White layer that I wanted for the flowers. And of course there is Bling. Today I decided on Rhinestones. Since the new colors have embellishments I have been focussing on those lately. So this was a nice change of pace.
MAY STARTER KIT PROMOTION…….
STAMPIN’ REWARDS
The new Stampin’ Rewards begins on April 15. I think you will Love this new version. You will earn rewards on all orders over $20.00 in products The system will track your rewards for you. And they will be available for use on your next order, or you can save up for a larger purchase. All you need to do is on your first order after April 15th is agree to participate. You will then begin receiving rewards on qualifying orders.
Orders of $50.00 or more you will still receive an appreciation gift from me. I appreciate you choosing me as your demonstrator!
COMMENTS
Please know that I love to hear from you and answer any questions you may have. My responses generally are not done here on the post. They are made using my phone as I have found it is easier to answer a question for you personally. So you will be receiving an email from me if you make a comment.
Thank you for stopping by today. I hope you enjoyed today’s project and will come back. I do read and reply to all of the comments individually. They mean a lot to me. Please reach out if you have a question.
Smile and Keep On Stamping,
Jackie
Online Exclusives
New Online Exclusives drop every other month. These are amazing products and are a supplement to the Annual and Mini Catalogs. This way you have access to even more New and Awesome products!
You can go directly to these in my Online Store by clicking HERE
Before I get to the project of the day, I want to give you an update regarding one of the In Colors. You may have heard that there was a problem with the Cloud Cover Ink pad. The ink formula did not react well with the foam pad. After trying for a remake, it still is not up to Stampin’ Up! standards. So…..there will not be a Cloud Cover Ink Pad. The Stampin’ Blends and Marker are all great and good to go. A work around for the ink pad is to purchase the Ink Refill, and then use an uninked Stampin’ Spot. That has a different type pad and the ink is fine. Just hoping to offset any confusion as to why you cannot order that color ink pad on Tuesday.
Now for the fun part of the post. My card for today is a dark card. That is so opposite of my normal colors. I have mixed several new products from the Beautiful Gallery Suite of products and hope you like the finished project as much as I do.
STAMPS
This is a limited stamping card! The only stamping on the front is the sentiment. There are several layers and textures which make that simple statement appropriate. The sentiment is from the Beautiful Motifs stamp set. The majority of the products are from the Beautiful Gallery Suite. This is one of the two stamp bundles included in the suite. I did not however use the matching Die set.
The sentiment continues the darker look of the card with being stamped in Secret Sea Ink onto Gray Granite cardstock. These are not my normal color family for the entire card. But I am pleasantly surprised and pleased.
DIES
The Die set used today is part of the second bundle included in the Beautiful Gallery Suite. This one is the Gallery Blooms. The “frame” is one Die that cuts two frames as well as a center piece. The center piece was cut down to be the background layer for the sentiment. I did not use the stamp set from this bundle as it is only images with no sentiments.
EMBOSSING
This dry embossed background is very elegant at first glance. However it works well with the scene I have created with the pencil drawing art. It is the Damask Designs Embossing Folder. And it also is a part of the Beautiful Gallery Suite. Are you loving this diverse Suite of products yet??
PAPERS
The color scheme for today is Secret Sea as the card base and Gray Granite as the layers. These colors came from the “art” piece. This sheet with the pencil drawings is from the Beautiful Gallery Designer Series Paper. It is a different looking pack of papers. There are mostly “painting” type images on the one side and then complimentary, and more simple, designs on the reverse. As soon as I saw this drawing sheet I knew I had to use it. We have two different painting in our home that are this type and I love them.
EXTRAS
There are two additional Extras today. First is the bow on the sentiment. It was difficult to decide how to display the sentiment. After many different placements, I decided on this off center layout. It seemed the card needed “something”. And there was really no where to put “something”! So the idea came to make the sentiment stamped off center and add an embellishment to the longer end. As it turned out the off center stamping ended up with off center placement of the entire sentiment layer.
The second Extra is bling. I restrained myself and kept it simple. This card did not require a lot of bling. I went with the In Color 2025-2027 Flat Pearls. I chose the Secret Sea pearl to go along with the card stock color. I took on a bit of a different tone when placed with these darker colors. It is unique.
MAY STARTER KIT PROMOTION…….
STAMPIN’ REWARDS
The new Stampin’ Rewards begins on April 15. I think you will Love this new version. You will earn rewards on all orders over $20.00 in products The system will track your rewards for you. And they will be available for use on your next order, or you can save up for a larger purchase. All you need to do is on your first order after April 15th is agree to participate. You will then begin receiving rewards on qualifying orders.
Orders of $50.00 or more you will still receive an appreciation gift from me. I appreciate you choosing me as your demonstrator!
COMMENTS
Please know that I love to hear from you and answer any questions you may have. My responses generally are not done here on the post. They are made using my phone as I have found it is easier to answer a question for you personally. So you will be receiving an email from me if you make a comment.
Thank you for stopping by today. I hope you enjoyed today’s project and will come back. I do read and reply to all of the comments individually. They mean a lot to me. Please reach out if you have a question.
Smile and Keep On Stamping,
Jackie
Online Exclusives
New Online Exclusives drop every other month. These are amazing products and are a supplement to the Annual and Mini Catalogs. This way you have access to even more New and Awesome products!
You can go directly to these in my Online Store by clicking HERE
My card to share with you today is a Multitude of Thanks. Actually it is many versions of Thanks from different languages. I am using one of the Ephemera Pack cards. I am all about stamping, but you cannot beat these for a quick and adorable card.
EPHEMERA PACK
The Greetings For All Mix & Match Ephemera Pack is fabulous. There are two sides to each card, and there are two different sizes. One side is primarily a DSP like print and the other is for notes, borders, and similar to mine. I chose this wonderful Thanks card to spotlight as my focal layer. And I believe it does a great job at being worthy of the spotlight. Plus the ease of simply layering these says a lot when you need something quick. Or when you want to make a pack as a gift for a friend.
PAPERS
To add another layer of color, as well as you another of the Greetings For All cards, I have sliced one for background. The four strips you see in the background are also from this pack of cards. The zigzag stripes are one side and the bottom strip is the opposite side of the same card. I love the mix of colors.
The card base was pulled from these colors, along with all of the colors. Sadly I made this before the Boho Blue cardstock was sold out. However, Balmy Blue cardstock would work as the base, as well as any of the colors from the zigzag strips. I paired the blue with Pretty In Pink for a brighter color to pop the focal layer.
EXTRAS
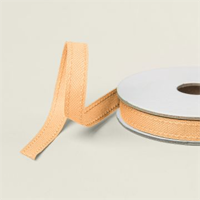
To keep this card going with the simple I used two Extras. The first is the Peach Pie Ribbon. A simple knot on the front is not too busy but highlights the orange in the zigzag pieces for even more color. And for the bling, I used the 2024-2026 In Color Resin Dots. A trio of the larger size in Pretty In Pink seemed to complete the card.
MEASUREMENTS
This card base measures 5 1/2 X 8 1/2 with the Pretty In Pink layer at 4 X 5 1/4. The strips are each 4 X 1. For the focal layer Pink, it is 3 1/8 X 4 1/8 and the card is 3 X 4.
STAMPIN’ REWARDS
The new Stampin’ Rewards begins on April 15. I think you will Love this new version. You will earn rewards on all orders over $20.00 in products The system will track your rewards for you. And they will be available for use on your next order, or you can save up for a larger purchase. All you need to do is on your first order after April 15th is agree to participate. You will then begin receiving rewards on qualifying orders.
Orders of $50.00 or more you will still receive an appreciation gift from me. I appreciate you choosing me as your demonstrator!
COMMENTS
Please know that I love to hear from you and answer any questions you may have. My responses generally are not done here on the post. They are made using my phone as I have found it is easier to answer a question for you personally. So you will be receiving an email from me if you make a comment.
Thank you for stopping by today. I hope you enjoyed today’s project and will come back. I do read and reply to all of the comments individually. They mean a lot to me. Please reach out if you have a question.
Smile and Keep On Stamping,
Jackie
Online Exclusives
New Online Exclusives drop every other month. These are amazing products and are a supplement to the Annual and Mini Catalogs. This way you have access to even more New and Awesome products!
You can go directly to these in my Online Store by clicking HERE
I have been back from an Amazing Stampin’ Up! OnStage Event for a couple of days. A fun time was had for sure. We all received the upcoming Annual Catalog as well as some sneak peeks at upcoming May Online Exclusives. There are some awesome products in both releases.
This is a reminder to please check out the Online Exclusives currently available. Samples are shown with each product the same as in the catalog. I will admit that it has taken me a bit of time to get used to looking online. But then I think that I do this with most of the places I shop regularly. So why not with SU!
The card I have to share today is a simple Thank You type card. It is for all of you. You have all supported me in some way with my business and I am very grateful! This is a simple layout that can be simplified or taken up a notch, depending on your time or wishes.
STAMPS
The stamped images are both from the Memorable Blooms stamp set. There is a bundled Die set, but I opted to stamp the floral image on the larger white layer. I had chosen the DSP first so colored the floral with Stampin’ Blends to match the paper. The flowers are Pretty In PInk with Pretty Peacock as the leaves.
To add the sentiment layer was a bit of a trial! The way everything layed out did not leave much room. So I got creative and left a straight edge along the top and sides with the bottom fussy cut. I actually like how it turned out. To create this, I first fussy cut the sentiment and then layered that onto the Pretty Peacock paper. Then it was fairly easy to fussy cut around the fussy cut. LOL!!!
PAPERS
There are actually two different sheets of DSP used. Both are from the Lily Pond Lane Designer Series Paper. This 6X6 pack is so fun with the lily pond and duck images on one side and complimentary design sheets on the reverse. I have used two of the reverse sides. The sentiment layer is a soft dotted pattern. And the strip of little flowers is what brought in the Pretty Peacock cardstock. I chose that as the thin layers and Pretty In Pink as the card base.
The card base measures 5 1/2 X 8 1/2. I added the thin layer of Pretty Peacock at 5 1/8 X 3 7/8. That left the Basic White layer to 5 X 3 3/4. And the DSP strip on the left only runs the length of the White. It measures 1 1/8 X 3 3/4.
EXTRAS
The DSP strip and the fussy cut sentiment added some extra touches to the card layout. So it really did not require a lot of Extras! It did require bling however. I went with the extra bling in 5 Rhinestone jewels. They are scattered around the flowers and a single one added to the sentiment.
HOST CODE
My FEBRUARY HOST CODE is S2EYAW9N. Orders of $50.00 or more will receive an appreciation gift from me. I appreciate you choosing me as your demonstrator!
Thank you for stopping by today. I hope you enjoyed today’s project and will come back. I do read and reply to all of the comments individually. They mean a lot to me. Please reach out if you have a question.
Smile and Keep On Stamping,
Jackie
New Scrapbooking Catalog
The newest addition to Stampin’ Up! is an Online catalog of Scrapbooking products. You can see the catalog by clicking the photo below and save it to your computer.
Online Exclusives
New Online Exclusives have dropped. There are Halloween, Fall, Christmas, and many that are great year round. Of course the new Designer Series Papers and Embellishments are fabulous as well!
You can go directly to these in my Online Store by clicking HERE
The content in this blog is the sole responsibility of Jackie Beers as an Independent Stampin' Up! Demonstrator. The use of and content of classes, services or products offered is not endorsed by Stampin' Up!