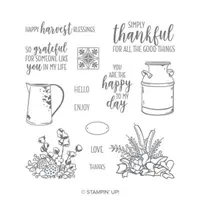
Oh My !! I knew as soon as I saw the Country Home stamp set that it had to come to my house. But actually playing with it is even better than I expected. And the milk can is my all time favorite. I have an old milk can that my Mother had probably 50 years ago. Another reason I love this set.
Country Home, 147678
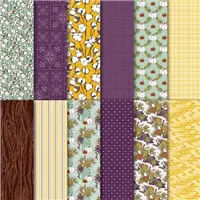
I paired this sweet set with the Country Lane Designer Series Paper, as well as the Subtle Dynamic Embossing Folder. I could not resist using the Cotton in the DSP to pair with the Cotton in the arrangement in the milk can.
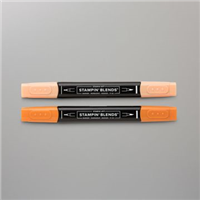
A great bonus to his sweet stamp set is that it is photopolymer. This makes aligning images so easy. I was able to perfectly align the flowers on the top of the milk can. Easy Peasy!! I stamped everything in Smoky Slate Ink to have a softer outline. Coloring everything with the Stampin’ Blends is so easy. They leave no lines and you do not need to be a professional to blend them. I thought of dried cotton stems so I went over those with the light Crumb Cake Blend. I don’t believe you can tell from the photo but I used Wink of Stella on the white for the cotton.
Thank you for visiting today! I hope you will return tomorrow and see another Country Home card. All of the supplies I used are listed at the bottom of the page. Please do not forget about Bonus Days!!! If you place an order during August, you will receive a $5.00 coupon for every $50.00 you spend at one time.
MEASUREMENTS:
The base card is 5 1/2 X 8 1/2 scored and folded in half
The first layer is 4 X 5 1/4
The Cotton DSP background is 2 7/8 X 4 1/8 and the DSP is 2 3/4 X 4
The milk can background is 2 1/4 X 4 1/8 and milk can layer is 2 1/8 X 4
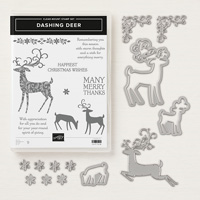
I have another of the Sneak Peek cards of the Holiday Catalog. The stamp set Dashing Deer is a beauty. There have been deer in past holiday stamp sets so I am sure you are asking why this one is so special. When you see the imprint on the body you will understand. Plus the matching Thinlits are just a WOW.
Dashing Deer Bundle, 149935
I am so in love with the body of the deer! That bit of built in shading is just a WOW to me. Yes, I know there are not any blue deer . That was my creative license at work:)
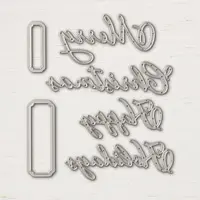
The “Merry” is from another Holiday Catalog set Merry Christmas to All. It is full of gorgeous sentiments and matching Thinlits. You will see a lot of cards using that set in the near future as well.
I kept this card very plain to showcase the beautiful deer. The DSP is from Under The Mistletoe in the Annual Catalog. A tip for you is to purchase the Multi-purpose Adhesive sheets, if you have not already done so. It makes adhering the “Merry”, and any similar pieces, just as simple as peeling off the backing paper. I am so happy Stampin’ Up! carries this product now. I am not great with glue and this is just the easy way of adoring intricate pieces.
Thank you so much for visiting today! I greatly appreciate it and hope you will return on Monday to see what I have created.
Once again I was unable to grab the icons for my supply list. I am so sorry. I will update the post as soon as I get this figured out. Technology is not my friend sometimes!
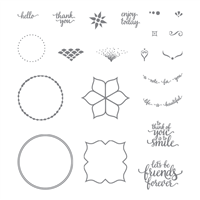
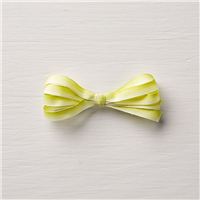
Today’s card is a sneak peek at one of the stamp sets I was anxious to get my hands on. It has a 3D look to the bow that intrigued me. And Yes, it really does have that look so it appears like a real bow. I am not sure if you can tell from the photograph though.
Wishing You Well, 147864
There are a couple of newer stamp sets that have this look, but the bow seems to really look 3D and I adore it! I see this stamp set in every season of the year. This one is definitely a keeper for me.
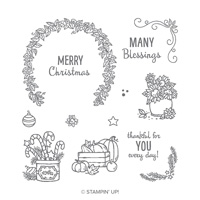
I love this sentiment as well. It is from the new Many Blessings stamp set. Today as a SU Demonstrator, we get to register for the Stampin’ Up! 30th Anniversary On Stage Celebration. I feel it is a Blessing that I get to do something that I love so much, and share it with all of you. Plus I have met some really amazing people, customers and fellow demonstrators, that have become great friends. So Yay for today.
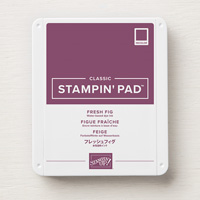
Now back to the card. I paired one of my favorite new colors, Mango Melody with Fresh Fig. I have not used Fresh Fig very often and each time I ask myself why I have not. It is a great color. The DSP is from the Country Lane Suite. Another Must Have stamp set, Bundle, I want it all!!!
The little sprigs were added for just a little texture. They are made with the new Sprig Punch which is part of the Frosted Suite. An unexpected, but nice add on for a lot of layouts.
Thank you for visiting today. I appreciate it very much. Normally my supplies are listed at the bottom of the page. But because these are not available yet, I had difficulties getting the links. Once I can figure that out I will update this post. So sorry!!
Welcome to InKing Royalty’s August Blog Hop! This year’s Blog Hop themes are inspired by popular songs – this month’s song is “Dog Days Are Over.” While we still feel the heat from a long, hot summer, August is a perfect time of year to start planning our Fall-themed cards. The projects in our hop will showcase Autumn, back-to-school and warm colors – you might even see a dog or two! We are excited to share our creations with you today! After you read my post, I hope you’ll hop over to the next person on the list at the base of this post.
I racked my brain for an End of Summer type card and kept coming up blank. Then I went out to fill the bird feeders and thought of the Blue Sunflower card I did previously. The light bulb came on!!! So I did an updated version of that. You can see the original card HERE. For the updated version I thought of a big sigh of relief . School has started back, all the before school and last minute chores are taken care of, and you can just take a breath and relax. That is relax for the few minutes before the holiday season begins!
Painted Harvest, 144783
I played around with different items across the front of this Double Z Fold Card. I kept coming back to the sentiment from Colorful Season “Just Breathe”. I love that and it totally described what my idea of the Hop Theme is. Since it was too large to stamp on the strip running across the front, I fussy cut around the sentiment. I was pleasantly surprised that I really like how it came out.
Here is a picture of the card opened.
I left the sentiment spot blank. I felt like there were actually two sentiments and that gives me room to write a short note to the recipient. But when you make it, feel free to add another sentiment! As always, the list of supplies I used are at the bottom of the post.
The base is 4 1/4 X 11, scored at 2 3/4, and 5 1/2. Z fold and burnish
The Mango pieces are 4 X 5 1/4, 2 @ 2 5/8 X 4
The Wood DSP pieces are 3 7/8 X 5 1/8, 1 @ 2 1/2 X 3 7/8, and a white at 2 1/2 X 3 7/8
The base strip is 1 X 11, scored at 2 3/4 and 5 1/2. Z folded and burnished
The strip pieces are: Mango: 7/8 X 5 1/8, 2 @ 7/8 X 2 1/2 . DSP is 3/4 X 5, 2 @ 3/4 X 2 3/8
Thank you for stopping by today. I hope you’ll hop along to the next stop on the bloghop, Robin Myren at Songbird Designs by Robin. There’s lots of inspiration to be found in this group – and you don’t want to miss it!
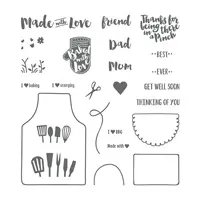
Today’s card is perfect for what I am going to be doing later this morning. Today is the day that Stampin’ Up! Demonstrators get to register for the 30th Anniversary Convention. WooHoo!! What is perfect is that I started today’s card without really thinking about that. The subconscious at work!
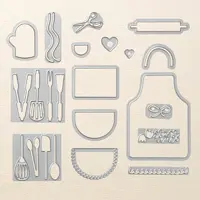
Apron Of Love, 145835
I was thrilled when this Apron Of Love set, with it’s matching Framelits, carried over to the new catalog. It has so much that can be related to an apron. To me, it brings back fond memories of an Aunt trying to teach me to cook. (Unfortunately it did not take!) I also remember my first Stampin’ Up! party/workshop I attended and the demonstrator wearing the SU apron. And yes, I do have a SU apron.
I made my apron a stamping apron and you can see the card sticking out of the pocket. It is paired with the Garden Impressions 6X6 Designer Series Paper. The colors are gorgeous in this DSP.
Yes, I do Love What I Do!!! And I hope you are inspired by today’s card. I have listed all of the supplies at the bottom of the post. This would have been a perfect card when the last Join Promotion was going on. Oh Well, it fits with my excitement of registering for OnStage. I get to hang out and stamp with my fellow demonstrators from around the country, and some from around the world!
Thank you for visiting today. I greatly appreciate each time you check out my posts.
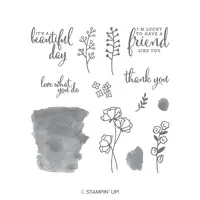
I am showcasing two great Stampin’ Up! products today. The beautiful Designer Series Paper, and the Amazing Stamparatus. I love, love, love both of these products. This is a card I shared with my Stamp Club yesterday to show them some special abilities of the Stamparatus.
I added the fourth color to my combination to make the flower pop. I love Blushing Bride, but it is a bit too shy to POP!
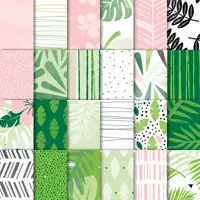
This Tropical Chic DSP is one of my favorites. I love bright colors and this is right up my alley. The flower from Colorful Seasons seem to be the perfect flower for this card. It fit perfectly with the size template I had made for the Stamparatus Wreath technique.
Here is a picture of my template. I think it pretty much explains the process to make your own very easily. Just find the center, line up the die, cut and turn it from square to diamond and cut again.
Wreath Template for Stamparatus
I hope you will give this technique a try. There are several videos already out there with directions so I did not create one. I would love to see your version if you decide to try it. I appreciate you stopping by today and hope you will return tomorrow. All of the supplies I used are listed at the bottom of the page.
MEASUREMENTS:
Base is 5 1/2 X 8 1/2 scored and folded in hald
Spruce layer is 5 3/8 X 4 1/8
DSP is 1 X 5 1/4, and 3 X 5 1/4
Square Spruce layer is 3 X 3
White layer is 2 7/8 X 2 7/8
Don’t forget that it is BONUS Days!! Check out the link below!
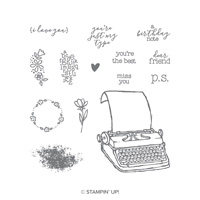
I was so excited when I saw this typewriter set in the new Annual Catalog. It reminded me of a favorite from a few years ago. I have made several Thank You 3X3 cards with it that I have not shown here. So today I have a full size card to share.
P.S. You’re The Best, 146516
I used only the stamps included in the stamp set. I love being able to complete a card with only one stamp set. The background blue layer is Balmy Blue stamped with Balmy Blue Ink. The blue of the center is Balmy Blue Ink applied with an Aqua Painter.
I stamped the typewriter and then used a mask to place over it to stamp the flowers. One flower is stamped and fussy cut out to give some depth. They were all colored using Stampin’ Write Markers.
Thank you so much for stopping by today! I hope you enjoyed yesterday’s Blog Hop card as well. Please be sure and check back on Monday, but also next Wednesday is the InKing Royalty Blog Hop. There will be lots more great ideas for you.
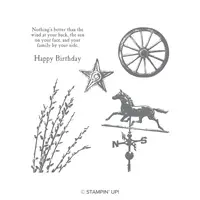
I came up with the layout for today’s card and had almost completed it when I saw Brian King’s card for the Global Design Project Sketch Challenge this week. My original card did not have a sentiment on it, but that was an easy fix.
Country Road, 147469
And here is the Sketch I CASED:
I try to make a few masculine cards, even when I do not need one to send out! It is sort of a challenge for myself. I love this stamp set and think of it as a flexible stamp set. I chose to use all of the pieces of the set on this card.
I love stamping and then cutting the pieces up into different shapes. Sometimes it works wonderfully, and other times not so much. My only concession to this one is the offsetting layers as opposed to them being even with each other. The star in the corner reminds me of the Conch that we used to see on chaps or a hat sometimes. The curly-cues are the little strip of card stock that was left over. I used my bone folder to break down the fibers and then peeled the piece into two pieces. It did cause issues with my photograph. The little curls wanted to leave a shadow on the card!
Thank you very much for visiting today! I appreciate it very much. A little directions are mixed in with the measurements. All of the supplies are listed at the bottom of the page.
MEASUREMENTS:
5 1/2 X 8 1/2, scored and folded in half
5 1/4 X 4
3 X 4 1/4 of White to stamp on. Then cut into strips of 1, 3/4, and 1 1/4(all are 4 1/4 long)
Background for strips are 1 1/8 , 7/8, 1 3/8 (all are 4 3/8 long)
Welcome to the Pals August, 2018 Blog Hop. We love to cut it out so this month our creations feature our favorite “cuts” using punches, Framelits and Thinlits from the current Stampin’ Up! catalog.
You may be starting the hop here or coming from a previous Pal’s blog. Either way, you’ve come to the right place. You’ll find the the full line-up below to help you move, or “hop” along from Pal to Pal.
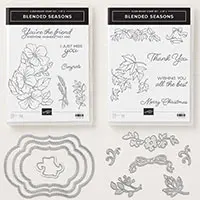
I have made a little bit special card for today’s blog hop. I normally stick with the basic folds and occasionally do a “Z” fold. But today I have made a Double Easel Fold. It is really quick and only takes a little more card stock than a simple card requires.
Blended Seasons Bundle, 149894
I LOVE the bright colors and especially the Die Cut layers from the Blended Seasons Bundle. The holly , sentiment, bow, extra leaves, and layers are all included in the bundle! There are also Fall leaves and a summer like flower. Can you see the endless possibilities here?
I CASED this card from fellow Stampin’ Up! Demonstrator Patty Bennett. You can see her video tutorial HERE. I have included basic instructions at the bottom of the post.
And here is a picture to showcase the Double Easel.
The card stands up beautifully, so it would be great for someone to easily display. This is a simple but WOW type card. I Love those kind. I hope you will give it a try. I have included the measurements below. A wonderful part of this card is the beautiful Designer Series Paper “Under The Mistletoe” from the Annual Catalog. I used one sheet of paper and just flipped the front piece for a different look. The best part…..you can get the needed pieces for three cards, with a bit left over, from one sheet of the DSP!!
MEASUREMENTS:
Card base is 4 1/4 X 11, scored and folded at 5 1/2
Second layer base is 4 X 10 1/4, scored at 2 1/2 and 5. Mountain/Valley fold this piece and attach the larger section to the card base. It should fit as a regular layer would.
DSP = 3 3/4 X 5, 3 3/4 X 2 1/4, 3 3/4 X 2 1/4 (The same size are for the two small sections. You can flip the DSP for the coordination you like best if you are using both sides of your DSP.
Decorate the front as you wish.
Thank you for visiting my blog today and I hope you will continue hopping along with us. I appreciate and love to read your comments, so please leave one. And please contact me if you have any questions.
Now it’s time to use the Blog Hop Line-up below to see what the rest of my Pals have created to inspire you.. Don’t forget to show us some love by commenting on our creations.
Mark your calendars for September 12, 2018 for the next Pals Blog Hop. We’ll inspire you with projects for the upcoming holidays and seasons including Autumn, Winter, Halloween, Thanksgiving or Christmas. Don’t miss the fun.
I have a very “Light” card for you today. The colors are soft, yet bright, and the focal point is similar to a stained glass window. I have become a great fan of the Painted Glass stamp set. And it just screams for you to use the Stampin’ Blends for the coloring.
Painted Glass, 147461
I love the more subtle shades on the “stained glass”. Last card I made with this set I went with the more Regal tones. You can see that card HERE. For that card I used the Graceful Glass 6X6 Vellum DSP.
On today’s card, I stamped the image using Tuxedo Black Memento Ink and colored it with the Stampin’ Blends in Daffodil Delight and Pumpkin Pie. I used both shades of each color. I spent some time debating on color the section that I left white. Finally I decided it worked best white to lighten up the look. I then used the 2″ Circle Punch to punch out the round window. I think it gives it a totally different look.
I carefully chose a sentiment that easily fit in the upper corner of the Whisper White layer. I did not want the DSP to fold back too far. This Happy Birthday has been a “Go To” sentiment for me. It is from the Southern Serenade stamp set. I love the font of the greeting.
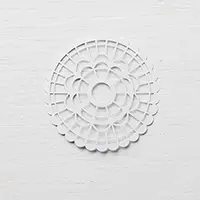
The Pearlized Doily was a perfect fit, and an unexpected background for the stained glass. I was very pleased with the outcome of my color matching today. I would not have considered pairing Grapefruit Grove with Pumpkin Pie. Now I am sold that it is a good pairing.
Probably my favorite part of this card is the Designer Series Paper. I am a great fan of Stampin’ Up!’s DSP. I believe most companies no long do Double-sided DSP. I am SO HAPPY that Stampin’ Up! does because cards like today must have the coordinating and double-sided DSP.
Thank you so much for visiting today! I appreciate your time and love to hear from you. All of the supplies I used are listed at the bottom of the page. Don’t forget to check out each of the August Specials as you scroll down to the list.
The content in this blog is the sole responsibility of Jackie Beers as an Independent Stampin' Up! Demonstrator. The use of and content of classes, services or products offered is not endorsed by Stampin' Up!