Welcome to the Stampin’ Pretty Pals’ Blog Hop! This month, the theme is “Wonderful Cards/Projects from the Garden” where our design team showcase projects from things found in a garden, such as flowers, vegetables, fruits, or even a garden scene. We really hope that you enjoy and will be inspired by them! As you hop from blog to blog, don’t forget to leave comments because we love hearing from you. Once you finish here, you will find the lineup at the end of my post to help you “hop” along from Pal to Pal.
I have to say that I LOVE flowers, but somewhere along the way I lost my green thumb! That being said, I think it makes me appreciate and love the Stampin’ Up! beautiful Designer Series Paper even more. Of course, the paper is the star of the card I have to share with you. And I have added a bit of a Fun Fold for good measure.
I am calling this card a Standing Double Easel Card. Instead of making the front easel section on a quarter piece of cardstock, I added it to the front of a regular size top folded card. This gives a much easier way to personalize and write a note to the recipient without trying to add that to the fun fold sections.
Paper
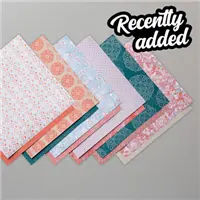
Since this is a garden theme, I chose my favorite of the flower papers currently available. The Hand-Penned Designer Series Paper is such a pretty “hand drawn” looking paper. The colors from the DSP created the additional colors I chose. The Cinnamon Cider is a bit unexpected at first, but them is very appropriate with the garden thinking.
Folded Card View
Folded, the card fits easily into a regular A2 envelope. The front folded section is Basic White and DSP, so not very much thickness is added.
Stamps
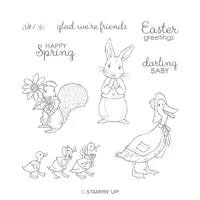
The Hand-Penned Petals stamp set matches the DSP extremely well. So much so that after I colored the stamped images with Stampin’ Blends, it almost blended in to the DSP! There are two different large images included in the stamp set. I stamped one of each image on the two focal layers using Memento Tuxedo Black Ink and then colored them similar to the flowers of the DSP.
The only sentiment showing is on the front of the inside section of the easel. A simple Thanks is all that was needed. It is stamped using the Cinnamon Cider Ink.
Finishing
To complete the card, I added one of the upcoming Mini Catalog Brushed Metallic Dots to the large front flower. These dots are fabulous!! When adhering the front stamped image, I found it best to lay the card flat and press the folds flat. The front stamped layer is the same size as the inside stamped layer. I lined up the front image directly over top of the inside one and then added adhesive to the bottom section only.
Measurements
The base card of Cinnamon Cider is a top fold cut to 4 1/4 X 11
The Basic White layer is cut to 4 X 9 3/4 and scored at 2 1/4 & 4 1/2
The large DSP piece is cut to 3 3/4 X 5
The two small DSP pieces are cut to 3 3/4 X 2, there is one on the front and one on the inside of the fold
The Mint Macaroon layer is cut to 2 1/2 X 4 1/4
The two Basic White stamped pieces are cut to 2 1/4 X 4
More inspiration awaits, so use the lineup below to visit the rest of the Design Team, because the Pals are excited to show you what they’ve created! Then, please mark your calendars for our next blog hop on August 11th. Our theme will be “My Happiest Season” when our Design Team creates a project showcase projects inspired by their favorite season of the year. Until then, have fun in your craft space.
I have a Waterfall Card to share today. To be honest, I had not made one of these in many years. But I had a request for a class I was doing for a group of ladies. They all loved it. I hope you will as well.
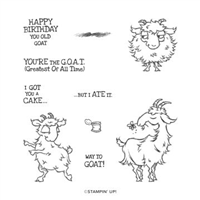
Waterfall Cards are so much fun to play with. However, there are several steps to getting them to work properly. The first thing you need is stamps that all work together. My preference has always been animal stamp sets. Having the same type animal in different positions and expressions is perfect. With that in mind, I chose the Way To Goat stamp set. These goats are so adorable to play with and are wonderfully drawn by the Stampin’ Up! Artists.
Stamps and Paper
I chose the Way To Goat because of the adorable little goats. I chose the DSP because of this pin stripe piece from the Well Suited Designer Series Paper. Goats are not at all sophisticated, but the color worked perfectly with the gray outline and white cardstock. But the more I looked at the card, the more I thought it was a perfect match!
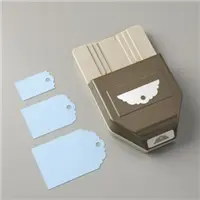
The yellow was for a touch of contrast with all of the gray. And it matches the flower the first goat you see is ready to eat. The tip of the pull end was punched using the Delightful Tag Topper Punch .
Measurements and Instructions
This picture shows the fully extended Waterfall. Click on the picture to get the PDF of instructions and more pictures.
This was my first time adding a PDF to the post. It did not go as well as planned. I will improve before I add the next one!!! If you have any questions, please contact me.
HOST CODE
My April Host Code is QGPT9TJG Please use this code for orders under $150.00. I will have a small perk for those with orders over $50.00
Welcome to InKing Royalty’s February Blog Hop! During this year’s blog hops, we are having fun with our stamping favorites – our favorite themes for seasonal cards and projects. This month’s projects feature balloons, so you are in for a celebratory treat. We are excited to share our creations with you today! After you read my post, I hope you’ll hop over to the next person on the list at the base of this post.
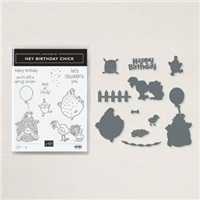
I believe balloons are a definite Fun item. Anything that makes me Smile is fun. So I have combined the smile inducing, adorable, Happy Birthday Chick stamp set with a Fun Fold to share for this Blog Hop Challenge.
This is the first time I have made this Fun Fold. There are a couple of names that I have seen in looking for it on various card sites. So I chose to call it the Corner Fold. It worked perfectly to show off the balloons. And since the little chicks are shouting Happy Birthday, the balloons are appropriate.
Here is the inside view and you can see the fold as well.
I LOVE the chick with the balloon hanging off her tail! You can see the corner pieces under the chick and above her. Those fold inside the card when it is closed. I positioned the chick to lay down with the fold and not be seen when the card is closed. The three balloons from the closed card are attached on the back side of the fold.
The chicks are all stamped with Memento Tuxedo Ink and colored with the Stampin’ Blends. All of the colors will be listed in the supply list. They are all cut out using the matching Dies in the bundle. The Happy Birthday from the front is stamped and punched out using the Classic Label Punch.
I chose to have a background for the balloons as the strings are not really sturdy. I used the 2″ Circle Punch for this. All of the DSP is from the Ice Cream Corner Designer Series Paper. I think it worked perfectly for this birthday card.
Thank you for stopping by today. I hope you’ll hop along to the next stop on the blog hop, Ann Murray at Murray Stamps Ink. There’s lots of inspiration to be found in this group – and you don’t want to miss it!
Thank you for hopping along with us. If you get stuck during the Blog Hop, please use this line-up as a guide:
Welcome to InKing Royalty’s January Blog Hop! During this year’s blog hops, we are having fun with our stamping favorites – our favorite themes for seasonal cards and projects. This month’s projects feature hearts, so prepare yourself for lots and lots of love. We are excited to share our creations with you today! After you read my post, I hope you’ll hop over to the next person on the list at the base of this post.
There are so many “heart” stamps to choose from! I had narrowed it down to about three, when I ran across a set still on my desk. I knew this was the perfect one, even though a tad out of the norm when you think about hearts. Or at least the way I was originally thinking.
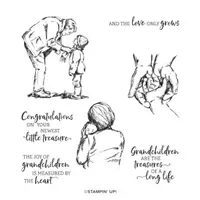
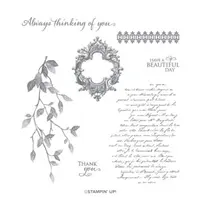
The center heart is the one that caught my eye and made me decide on this direction! It is from the new to the Mini Catalog Treasures of Life stamp set. Oh My! I am not a parent or grandparent, (except for 4 legged varieties) but I still fell in love with this set. And luckily I have friends who have recently become first time grandparents.
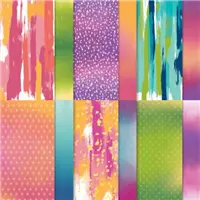
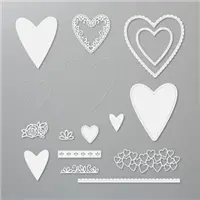
The DSP is the unexpected Artistry Blooms Designer Series Paper. I pulled the other colors from that paper. To cut the hearts I used the Be Mine Stitched Dies. The main hearts as well as the ones on the bottom are from the die set.
Here is a view of the inside. I cut around the negative to give a frame to the sentiment. I decided one more heart was needed. This also shows another view of the Fun Fold.
I cased this Fun Fold from fellow demonstrator Susie Wood. If you follow me at all, you know I love fun folds. This one is a keeper.
Measurements:
Base of Coastal Cabana is 4 1/4 X 9 scored at 5 1/2
Base layers are Highland Heather cut 4 X 4, and 1 5/8 X 4
DSP is cut 3 7/8 X 3 7/8 and 1 1/2 X 3 7/8
White inside layer is 3 1/2 X 4
Thank you for stopping by today. I hope you’ll hop along to the next stop on the blog hop, Ann Murray at Murray Stamps Ink. There’s lots of inspiration to be found in this group – and you don’t want to miss it!
Thank you for hopping along with us. If you get stuck during the Blog Hop, please use this line-up as a guide:
Hello, welcome to the Stampin’ Pretty Pals’ Blog Hop! This month our Design Team created projects featuring “Sale-A-Bration Products.” We hope you enjoy and will be inspired by them! Don’t forget to leave comments. We love hearing from you! At the end of my post, you will find the full line-up to help you “hop” along from Pal to Pal.
Sale-A-Bration is one of my favorite times of the year! I love getting FREE products for purchasing things I love! And I have a “Bundle” of things I have fallen in love with to share with you today.
I have used the Berry Blessings stamp set and the Berry Delightful Designer Series Paper. These two are a Bundle in the Sale-A-Bration Catalog. The bundle is FREE with a $100.00 purchase. My photo does not do the beauty of the DSP justice. The colors are very vibrant!
For the center stamped area, I used a separate piece of White cardstock to stamp on. The outline of the leaves is Garden Green with the inside being Granny Apple Green. The berries are outlined with Pacific Point and the inside is Balmy Blue. I also added a few extra berries using a “stamped off” Highland Heather over the Balmy Blue. I fussy cut those and added a few with dimensionals overtop of the center stamped ones and then scattered a few on the “bridge” in place of an embellishment.
The gorgeous plaid blue DSP is the flip side of the berry DSP. I decided I wanted contrast instead of all of the panels being the same. The two sentiments I have used are part of the Berry Blessings stamp set. I stamped those using Memento Tuxedo Black Ink to stand out from the bright colors of the DSP. And of course… I used the Double Oval Punch. It seems as if I have used that punch on every card I have made since it debuted!!
This fold will still fit inside an A2 envelope. Here is a photo of it flattened for inserting into an envelope.
You can see that the left side is folded and the right side is flattened out. It will do this in either direction. So depending on how you decorate, it will still flatten out. The size of the flattened version is 4 1/4 X 5 1/2, so normal size of a card.
I had a request for a Bridge Fold Card for a class I am doing soon. After figuring out what it was, I have really enjoyed making this card using that fold. My favorite thing is different Folds!
I have the measurements for you and would love to see your version of this Fun Fold.
Base of the card is cut to 8 X 4 1/4 (Tip: cut the 3″ off of the 11″ side before cutting in half for the 4 1/4. You can use this piece for the inside and the bridge piece)
Score on the 8″ side at 1 1/4, 2 1/2, 5 1/2, and 6 3/4.
The inside White layer is 2 3/4 X 4
The four sections cardstock layer is 1 1/8 X 4 1/8
The four DSP sections are 1 X 4
The base of the Bridge is 1 X 5 1/2
The cardstock layer is 7/8 X 5 3/8
The DSP layer is 3/4 X 5 1/4
Thank you for stopping by today! I hope you enjoyed my project and will give it a try.
More inspiration awaits! Use the Blog Hop Line-up below to visit the rest of this month’s Design Team. My fellow Pals are excited to show you what they’ve created! Mark your calendars for our next blog hop on February 10th when our theme will be “Birthday Bonanza” where the design team will be sharing birthday projects that celebrate our family and friends. Don’t miss the fun! Until then, please stay safe and have fun in your craft room.
Welcome to InKing Royalty’s April Blog Hop! During this year’s blog hops, we are enjoying a year of celebrations. This month’s projects celebrate Springtime, so I hope you are ready for gorgeous Spring colors, flowers and butterflies – and maybe some sweet baby animals. We are excited to share our creations with you today! After you read my post, I hope you’ll hop over to the next person on the list at the base of this post.
I tried looking in my yard for “Spring” ideas and could only find flowers , birds, and squirrels. Those are all great, but I wanted something different. I opened Facebook to take a break and the first post that popped was a fellow demonstrator with a Kite on the front of a card. The post was from For The Love Of Stamping. As soon as I saw the kite, it reminded me of the Graduation Cap card I did two weeks ago. So I took her idea and designed my own kite card. I used the fold I had created for the other card. New kite flying memories in the making.
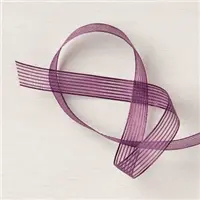
My color choices came from the Woven Threads Designer Series Paper. I debated on the order of the three colors and finally ended with this one. It was more due to the gorgeous Seaside Spray Metalic Ribbon. It looked best on the Purple Posy card stock . 🙂
The kite is a miniature of the Graduation Cap Card and opens as that one did. Here is a view of the open kite.
If you look closely at the bottom tip of the kite, you can see a tiny piece of a clear velcro dot. The thickness of the card stock for the kite made it not want to remain closed. So a tiny piece of a cirlce velcro dot was added there. You really do not notice it even in person.
The card itself does open and has a sentiment there as well. The opening of the kite is just a bonus!
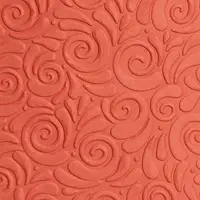
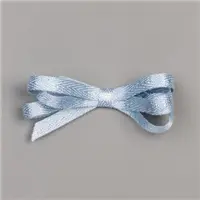
The embossed area is from the Swirls and Curls Embossing Folder and fits with the flying the kite in the wind theme. I finished the card with the Happy Spring sentiment from the Fable Friends stamp set layered on circles. The kite string is the Seaside Spray Metalic Ribbon along with a bow from the Whisper White Seam Binding Ribbon. The finishing touch is the Basic Pearl that I colored using the Light Purple Posy Stampin’ Blend to add to the sentiment.
I appreciate you checking my blog today and hope you will leave a comment. I have added a link to the Graduation card and some directions for the kite below the Blog Hop Lineup. Please continue hopping!
Thank you for stopping by today. I hope you’ll hop along to the next stop on the bloghop, Jennifer Spiller at Westside Paper Creations. There’s lots of inspiration to be found in this group – and you don’t want to miss it!
Thank you for hopping along with us. If you get stuck during the Blog Hop, please use this line-up as a guide:
Click HEREto go to the Graduation Cap Card. The top fold of the kite is the same as the fold on that cap. The other measurements are listed here. If you have any questions, please contact me and I will be happy to assist you.
Directions:
Card base is 4 1/4 X 11, scored at 5 1/2
layers are 4 X 5 1/4, and 3 7/8 X 5 1/8
Kite piece is 2 1/2 X 7 1/2 scored at 3 3/4. Then like the graduation card, make a mark at 2 1/4 and 5 1/4 on each side and make a scored X using the marks.
Also make a mark on each end of the kite layer at 1 1/4
Fold on all the score lines and then cut from the end center mark to the side mark. Do this on each side to make the bottom point of the kite.
The inside of the kite and the top of the kite are the same measurements. Each is 2 1/4 X 3 3/8. Make marks at the top and bottom of the 2 1/4 side at 1 1/8. On each long side make a mark at 1 3/8 on each side.
Cut from the top to the side mark on both sides and the bottom to the side mark on each side. This makes the pointed ends for the kite.
HOST CODE
My April Host Code is HKP6K3Z4. Please use this code for orders under $150.00. I will have a small perk for those with orders over $50.00.
The content in this blog is the sole responsibility of Jackie Beers as an Independent Stampin' Up! Demonstrator. The use of and content of classes, services or products offered is not endorsed by Stampin' Up!