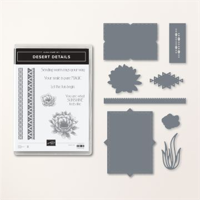
Today’s project showcases one of my favorite products from the Mini Catalog. And it is not sold out!! It is the Desert Details Bundle. This also is my design for the Make My Monday Challenge, which is “Frame It”. My frame is a bit different but I love it.
Here is the link for the Make My Monday Challenge. You can see all of the other designers’ ideas as well as enter the challenge yourself.
Details
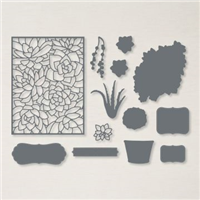
Since the challenge was to Frame It, I am showcasing the awesome Dies with the Desert Details Bundle. The first of the front layers is the Cajun Craze card stock. But the next is one of the frames in the Desert Details Dies. I love the indented points! Additionally all of the other front pieces are cut using various of the same Die set. I especially love the design the hello is stamped on. It is such an interesting shape.
Papers
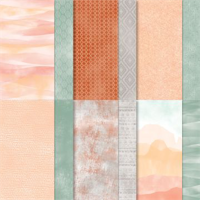
All of the papers used are from the Delicate Desert Designer Series Paper or colors from it. Calypso Coral is the card base, with DSP layers, and then Cajun Craze. The front Die cuts are Evening Evergreen and Soft Succulent, along with some DSP there as well.
Bundle
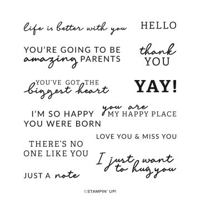
The bundle was mentioned under details. But I do love this stamp set and especially the Dies. The fun shapes are amazing. Plus I like the simpler type sentiments. And the fact the Hello fit on that small die cut shape was perfection.
Finishes
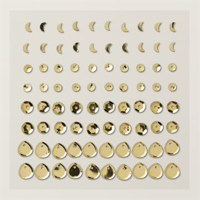
There are several added touches to this card. The front has the Linen Thread looped behind the catcus flowers. That is very soutwest looking. And I added some of the Gold Faceted Sequins to give some bling to the front.
The best part is that this card is a fun fold. It is a Double Z Fold. And is quite simple to make. Just remember that you use the folds opposite of each other. The long section on the base card has the shorter section of the layer, and vise versa. Here is a look at the card open.
From this view you can see exactly what I meant about the opposite direction of the base and layer. What you do not see is that I added a second white panel between the front and the sentiment on the back for you to write a short note.
Measurements
The Calypso Coral card base is 4 1/4 X 11 and scored at 2 3/4 and 5 1/2. The Cajun Craze layer is 3 1/2 X 10 and scored at 2 1/2 and 5. My two inside White layers are 2 1/4 X 3 1/4. Decorate how you wish.
Thank you for stopping by today!!
RETIRING LISTS. CLICK ON THE ICON TO GET THE FULL PDF.
Online exclusives are here to stay! Click on the photo and be taken directly to them in my online store. If you place an order, please use my Host Code listed just below.
HOST CODE
My APRIL Host Code is ZE6UJ4TF. Please use this code for orders under $150.00. I will have a small gift for those with orders over $50.00 in addition to the Perk Rewards Program. You can read all of the information at the top of the page in the Menu Bar under SHOP / Perks.
Thank you for stopping by today. I hope you enjoyed today’s project and will come back. I do read and reply to all of the comments individually. They mean a lot to me. Please reach out if you have a question.
I have a fun card to share with you today. It is a card designed by my upline, Brian King, for a team creative day. It is made from Brian’s directions, but with a twist. I added a gift card slot to mine.
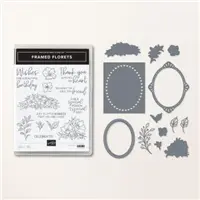
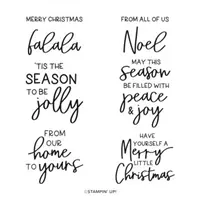
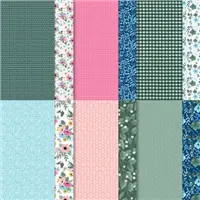
Isn’t this card adorable? Brian designed it with the Framed Florets Bundle and matching Framed Florets Designer Series Paper. The sentiment is from an additional stamp set that is only available now in this special sneak preview. That set is the Framed and Festive set. This fun fold is a square Joy Fold Card. Here are the open versions.
As I said, I added a gift card slot. That Is what I like to do as I tend to give quite a lot of them throughout the year. And here is the final open view.
You can see where I added the gift card. When adhering the DSP piece on the inside, I used Tear & Tape to the bottom and fold edges. That makes a much stronger hold and allows the gift card to simply slip between the cardstock and DSP. I may have to see what other cards can use this new idea!
I did not add an inside sentiment. However I did take a scrap from the DSP and fussy cut the little flowers on the inside layer. Sometimes those scraps can really make a difference on the cards.
Framed Florets Suite available now.
Here is all of the information on this beautiful suite of products. The Framed Florets stamp set will also be available in the January Mini Catalog. However the Framed and Festive stamp set along with the DSP are only available while supplies last. Sadly the gold swirl embellishments are already gone.
Birthday Organizer Kit
DETAILS
Kit includes one 8″ x 10″ (20.3 x 25.4 cm) monthly planner with space to record birthdays each month as well as a pocket sleeve to hold birthday cards.
Includes 12 full-size birthday cards, 6 of 2 designs, and 12 coordinating envelopes.
Includes Glue Dots, Stampin’ Dimensionals, Adhesive-Backed Embellishments, and Tear & Tape Adhesive
Includes die-cut florals and pieces ready for you to use—no prep work required!
Includes sticker sentiments and die-cut labels in Dutch, English, French, and German
My November Host Code is XUE6MDFV. Please use this code for orders under $150.00. I will have a small gift for those with orders over $50.00 in addition to the Perk Rewards Program. You can read all of the information at the top of the page in the Menu Bar under SHOP / Perks.
Thank you for stopping by today. I hope you enjoyed today’s project and will come back. I do read and reply to all of the comments individually. They mean a lot to me. Please reach out if you have a question.
I have a fun card to share with you featuring the Sweet Candy Cane Bundle. Plus it can be used to hold a gift card as well! That is a win!
Fold
This is an “oldy but goody” type fold. In the past the matchbook cards were small and used for treats or a note. I made this one full size. And as I said at the top of the page, it allows for a gift card to be tucked inside. Here is a view of the open card.
This view shows the closure flap at the bottom clearer than the closed card. I stapled the flap about 1/2″ in from each end and approximately in the middle going top to bottom. That allows the middle section to be open and room for a gift card to be slipped in. I stapled first with the smooth part of the staple on the back. The bumps are on the front and covered with card stock and DSP. This card base is a piece of Pool Party cut to 4 1/4 X 11 and scored at 3/4 and 6 1/8.
Candy Cane
The sweet candy cane on the front is from the Sweet Candy Canes stamp set. How appropriate is that? LOL!! If you are unfamiliar with this stamp set, it contains two candy canes facing opposite directions, leaves, and fun sentiments. Plus the matching Dies are the Candy Canes Dies, and it contains the two directional candy cane dies. This gives a lot more possibilities without trying to mirror stamp.
The sentiment, front and inside, are from the candy cane set as well. And the pretty sentiment layer is a great find in the Potted Succulent Dies. Sometimes I forget to look through other die sets for great shapes to use. For a little more pop, I added two of the little leaves from the Candy Canes Dies on the front. They are cut from Granny Apple Green card stock. These little leaves are also stamps in the set, as are the ones next to the inside sentiment. You get a lot of bang for your buck with this bundle!
Paper
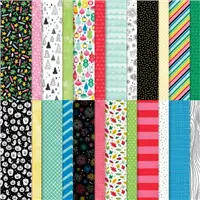
I know I have been using this wonderful paper pack quite a lot lately. But it is a huge pack and is great for cards for classes or multiples. This piece is a favorite with all the bright colors to choose from to coordinate colors. It is the Celebrate Everything Designer Series Paper. And there are “anytime” papers as well as all of the Fall holidays. The strip of DSP across the closure flap is the flip side of this piece. How convenient is that!!
SALE
Remember that the Seasonal Sale is ongoing through the 18th! There are over 150 products from the Annual Catalog discounted here. Plus you can get bundles cheaper than the regular bundle price by ordering the stamp and dies separately! Please keep that in mind! By clicking on the picture below you will get the full PDF of the sale items and the prices.
Birthday Organizer Kit
DETAILS
Kit includes one 8″ x 10″ (20.3 x 25.4 cm) monthly planner with space to record birthdays each month as well as a pocket sleeve to hold birthday cards.
Includes 12 full-size birthday cards, 6 of 2 designs, and 12 coordinating envelopes.
Includes Glue Dots, Stampin’ Dimensionals, Adhesive-Backed Embellishments, and Tear & Tape Adhesive
Includes die-cut florals and pieces ready for you to use—no prep work required!
Includes sticker sentiments and die-cut labels in Dutch, English, French, and German
My November Host Code is XUE6MDFV. Please use this code for orders under $150.00. I will have a small gift for those with orders over $50.00 in addition to the Perk Rewards Program. You can read all of the information at the top of the page in the Menu Bar under SHOP / Perks.
Thank you for stopping by today. I hope you enjoyed today’s project and will come back. I do read and reply to all of the comments individually. They mean a lot to me. Please reach out if you have a question.
The Seasonal Sale begins today and runs through the 18th!!!!
I mentioned yesterday that I had attended a Stampin’ Up! Event over the weekend. So today I am sharing the card I made for a swap in our group. This is a layout I have used previously and received a lot of love for. Hopefully this one is as well received. The sweet layout and fold is the star of the show.
Paper and Stamps
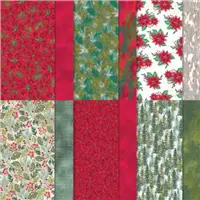
Even though I said the layout is the star of this card, the stamp set and paper are pretty great as well. This piece of DSP is from the Boughs of Holly Designer Series Paper. I pulled all of my colors from this particular sheet from the paper pack. It is a mix of greens, white, and Poppy Parade. The pop of Poppy Parade is the subtle dots. But the greens are swirled around. I chose to use Shaded Spruce and Old Olive from the choices.
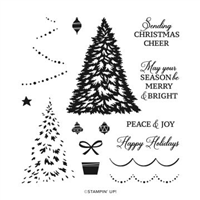
This beautiful tree is a mix of both of those greens. All of the stamps used, with the exception of the sentiment, are from the Trimming The Tree stamp set. The tree is a two step stamp and I used the Shaded Spruce for the outside and the Old Olive for the inside. The star is stamped with Crushed Curry Ink and has a single Basic Pearl in the center for some bling.
The sentiment is from the Peaceful Deer stamp set. I just love the simplicity of it, as well as the mix of fonts. Mixed fonts are one of the things I look for in sentiments. There was not a lot of room for adding a sentiment. So I simply made a banner by stamping on the strip of White and then using paper snips to flag each end. Those flags do not need to be perfect either!
Views
Here is a look at the first inside layer of the card. This may jog your memory for when I used this layout previously. On this inside image, I reversed the colors of the tree and the background layer.
I know it is hard to imagine, but this tree is the inside tree stamp of the tree on the front of the card! It is supposed to be for adding depth and detail to the larger tree. Personally I thought it was a cute tree on it’s own. So I added the garland included in the set to give it more of a real tree look. The garland is stamped using Crushed Curry and the finishing touch on this tree is a bow of Poppy Parade. It is in the set as well. And now the rest of the card…….
And there is that detail tree again! I just stamped it a bit lower and in the corner but left bare here.
Layout
After seeing all of the views I hope you remembered my card using this same layout. If not, you can click HERE to see it. It looks totally different I believe. The only differences in the measuremnts between these two cards is the two tree layers. These are based on the size of the images. I try to insure the inside image and layers are a bit smaller than the front ones. That makes hiding the inside one behind the front quite a bit easier. Since that is the only difference in the measurements, I have added the PDF I made for the Cottage Rose version here for you. CLICK HERE for the pdf.
Sale
In case you did not copy the list from yesterday’s post, you can get it here by clicking on the photo. You will get the complete pdf of all products on the Sale list.
Birthday Organizer Kit
DETAILS
Kit includes one 8″ x 10″ (20.3 x 25.4 cm) monthly planner with space to record birthdays each month as well as a pocket sleeve to hold birthday cards.
Includes 12 full-size birthday cards, 6 of 2 designs, and 12 coordinating envelopes.
Includes Glue Dots, Stampin’ Dimensionals, Adhesive-Backed Embellishments, and Tear & Tape Adhesive
Includes die-cut florals and pieces ready for you to use—no prep work required!
Includes sticker sentiments and die-cut labels in Dutch, English, French, and German
My November Host Code is XUE6MDFV. Please use this code for orders under $150.00. I will have a small gift for those with orders over $50.00 in addition to the Perk Rewards Program. You can read all of the information at the top of the page in the Menu Bar under SHOP / Perks.
Thank you for stopping by today. I hope you enjoyed today’s project and will come back. I do read and reply to all of the comments individually. They mean a lot to me. Please reach out if you have a question.
Welcome to our Fun Fold Blog Hop! All of the Stampin’ Up Demonstrators involved love Fun Folds and sharing them with all of you. Once you have finished my blog post there is a list at the bottom for you to continue Hopping along to see the other creations. We are hoping you love them and will leave some comments.
The Fun Fold that I have chosen to share with you today is a Buckle Fold. It has been around for quite a while and is a variation of a Double Fold that has even more variations. That is what is so fun about card making! For a Fun Fold, I went with a fun holiday and chose Halloween.
Fun Fold
If you are a regular follower of my blog, I always say I begin with the paper. Since this was a Fun Fold Hop, I decided on the fold and then went looking for everything else that would fit. So I am going to begin with the fold basics.
The card base is Gorgeous Grape cardstock that is cut 4 1/4 X 8 5/8 and scored at 3 1/8. And the beautiful DSP is from the Butterfly Kisses Designer Series Paper cut to 2 7/8 X 4, Those colors are what decided the Gorgeous Grape and the layer of calypso Coral. The Calypso Coral layer is cut to 3 3/4 X 3 3/4. And the White layer is cut to 3 1/2 X 7 and scored at 3 1/2.
To make the Buckle, I used the Sending Dies. There is a long and narrow sentiment die which fit perfectly. Actually It was the longest die that is narrow I have in my collection! After measuring the die length, the height of the White piece was determined and that my focal images would fit on it. Adhere the DSP piece prior to die cutting the slit. Layer the folded white onto the Calypso Coral layer and hold in place to ensure the “buckle” works. Here is a closeup view of the buckle part.
The white piece easily slips through the slit to hold the card closed. Other than getting the die centered on that front piece of the card, this is a simple card to make.
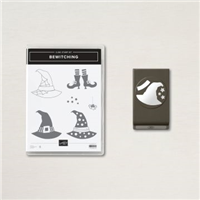
Stamps
Now that the card is basically complete it is all down to the fun decorations. The Bewitching Bundle, stamp set and Witch Hat Builder punch, are so cute. One of the hardest things was choosing which hat to use! By going with the mostly solid hat, I could just punch the hat using Basic Black cardstock. Stamping the hat on scrap in Gorgeous Grape and punching it out only the hat band gave a more colorful one. It is colored with Stampin’ Blends. The leggings and shoes are stamped and colored with Stampin’ Blends also.
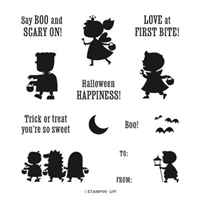
The front of the card sentiment is the little “BOO”. It was stamped and die cut with the smallest of circles. Both the Boo and the inside sentiment are from the second cute Halloween stamp set. This one is the Scary Cute (how appropriate) set.
Embellishments
By raising the hat with Stampin’ Dimesnionals, it gives a bit of depth to the card. And did you notice all of the stars? Those are on the punch as well. The black ones came when I punched out the black hat. And the purple ones were made with just a corner of a scrap of Gorgeous Grape cardstock. They are all adhered around but needed something. So all but the smallest received a Rhinestone, including the little BOO. Even witches need bling!
Thank you for reading my post today! It is very much appreciated. Below is the list of other designer who have more Fun Folds for you to check out.
Click on either catalog photo and you will be taken to my Online Store where you can download either or both catalogs.
HOST CODE
My August Host Code is H9KF4JUC. Please use this code for orders under $150.00. I will have a small gift for those with orders over $50.00 in addition to the Perk Rewards Program. You can read all of the information at the top of the page in the Menu Bar under SHOP / Perks.
Thank you for stopping by today. I hope you enjoyed today’s project and will come back. I do read and reply to all of the comments individually. They mean a lot to me. Please reach out if you have a question.
Today’s card is using the sweet paper from the Happy Forest Friends. This is a Smile card from that happy paper, but also a Fun Fold.
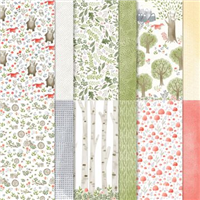
Paper
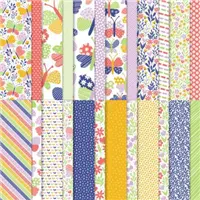
This card is a Fun Fold and actually the paper is more the star of the show. So I am starting with the beautiful Happy Forest Friends Designer Series Paper. As I show the open view, you will see that the same pattern carries across the entire card. The only different piece is the one showing on the left above. That space needed to be a complimentary pattern, instead of the same.
All of the colors used are pulled from the woodsy piece of the DSP. Soft Suede, the rarely used So Saffron, and Poppy Parade all work so well together. Here is a view of the open card.
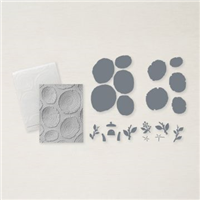
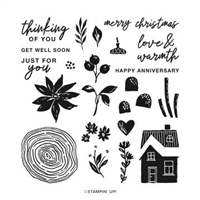
Stamps, Dies & Embossing
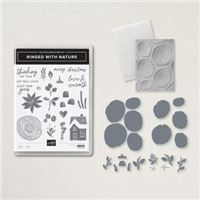
It took a variety of products to get the details on this card that I was looking for. The stamps used are from the Ringed With Nature stamp set. Even the little leaf on the inside writing section is from the set. And those tree rings are so fun! They are part of the Tree Rings Hybrid Embossing Folder. This includes the embossing folder, along with ten tree rings that create five double layer rings like I used.. But also includes little twigs and leaves dies. It is an awesome set of Dies and can be bundled with the Ringed With Nature Stamp Set.
The focal layer is two of the tree rings, which fit perfectly together. Sadly you must zoom in on the photo to the great details of the rings, but in person it is easy to see. The sentiment is from the stamp set as well. It was stamped using Poppy Parade for a bit more Pop! For the final touch I added one of the 2021-2023 Opal Rounds for a touch of bling and to show a bit more of the “yellow” look.
Measurements:
This is a FunFold that is super easy to make. For the base card you need a piece of 5 1/2 X 8 1/2 cardstock that is scored at 1 1/2 and 4 1/4. Fold and burnish to a Z fold. The focal layer So Saffron is cut to 2 3/4 X 5 1/4 with DSP at 2 1/2 X 5. The left side front has So Saffron at 2 3/8 X 5 1/4 with complimentary DSP at 2 1/8 X 5. There is an inside narrow piece that has layer as 1 1/4 x 5 1/4 and the DSP at 1 X 5. And the back section has So Saffron cut to the standard inside size of 4 X 5 1/4. Then there is a DSP on the left cut to 1 7/8 x 5 and a White at 1 3/4X 5.
Mini Catalog and Sale-A-Bration
Click on either catalog photo and you will be taken to my Online Store where you can download either or both catalogs.
HOST CODE
My August Host Code is H9KF4JUC. Please use this code for orders under $150.00. I will have a small gift for those with orders over $50.00 in addition to the Perk Rewards Program. You can read all of the information at the top of the page in the Menu Bar under SHOP / Perks.
Thank you for stopping by today. I hope you enjoyed today’s project and will come back. I do read and reply to all of the comments individually. They mean a lot to me. Please reach out if you have a question.
The content in this blog is the sole responsibility of Jackie Beers as an Independent Stampin' Up! Demonstrator. The use of and content of classes, services or products offered is not endorsed by Stampin' Up!