Here is another of my cards that are inspired by my cleaning out my craft room. I have a Love/Hate relationship going on with it right now!! I am enjoying looking through the old cards. Today’s idea came from a gift tag and I scaled it down to fit the Everyday Label Punch.
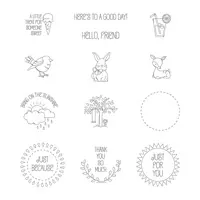
A Good Day, 145873
And here is the little insert :
A Good Day, 145873
When I was trying to resize the little envelope to fit the Everyday Label Punch, I realized I need to challenge myself in math more often. Oh My!!! It took quite a bit longer than was necessary. In the long run, I believe the time was well spent. I am happy with how this card came out.
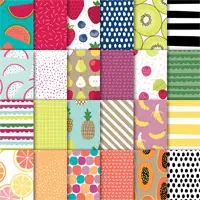
The color inspiration was the Tutti-Fruitti 6 X 6 DSP. Although I used Pacific Point instead of Night of Navy, the strawberry DSP was my inspiration. The little ice cream cone on the note is (at least in my mind) strawberry ice cream. HaHa!
MEASUREMENTS:
Base card is 11 X 4 1/4 scored and folded in half
The strips of Pacific Point are 1/4 X 5 1/2 each
The DSP is 3 X 5 1/2
The envelope is 5 X 2 3/4, score at 1/2″ down each long side, and at 2 3/8 across the center.
Fold and burnish all the lines.
When folded in half, one side is longer than the other. Cut each 1/2 side scores off of the longer end.
Miter the corners on the 1/2 sides that are left
Use the 1/2″ circle punch to make the little half notch for easier tag removal
Add Fast Fuze on the sides. Place the punched piece inside as you close so that you have easy sliding room.
Use the hand held 1/8″ punch to punch a hole in the end of the tag and add the desired ribbon.
Thank you very much for visiting today! I hope you enjoyed this little card. If you have any questions, please do not hesitate to contact me. The supplies I used are listed at the bottom of the page.
Have you ever thought about becoming a Stampin’ Up! Demonstrator? During Sale-A-Bration is the perfect time to join. Not only are you getting the Ultimate Bundle ($125.00 worth of product for $99.00) but you also get to choose 2 additional stamp sets, up to $25.00 each. Additionally you will receive a 20% discount on any future purchases. Or, if you are just wanting to test drive the idea, you would not be required to make another purchase until July! There is no pressure for you to continue as a demonstrator. And there is no penalty if you decide not to continue. Please contact me and let’s talk about it. You can review the documents by clicking on the picture below.
Life is indeed beautiful. It snowed here in the Atlanta area yesterday for the third time this winter. That is extremely unusual for us. And when I woke up and looked out the window it was just beautiful. Of course I did not have to get out in it since I am retired! I am sure some of my friends had a different viewpoint. So when I made this card the sentiment reminded me of my feelings earlier in the day.
A Mother’s Flair, 145905
I hope you love that sentiment as much as I do! It is perfect for so many occasions. I had to consider this stamp set for a bit, but I am so happy that I purchased it. On first glance it is a Mother’s Day set, and my Mom passed away many years ago. But I kept being drawn to the individual stamps. I finally gave in and I am so now in love with it. I already have a couple more cards planned using individual stamps.
I may have gone a little overboard with the different shapes. I tried just using the Stitched Shapes Framelits. But it made the pieces too large. So I had to rethink it and ended up using a variety of the layering pieces. I hope it gives you ideas for different cards though.
I hope you enjoyed my very bright card. Thank you very much for visiting today! The supplies I used are listed at the bottom of the page.
JOIN MY TEAM
Have you ever thought about becoming a Stampin’ Up! Demonstrator? During Sale-A-Bration is the perfect time to join. Not only are you getting the Ultimate Bundle ($125.00 worth of product for $99.00) and you also get to choose 2 additional stamp sets, up to $25.00 each. Additionally you will get a 20% discount on any future purchases. Or, if you are just wanting to test drive the idea, you would not be required to make another purchase until July! There is no pressure for you to continue as a demonstrator. And there is no penalty if you decide not to continue. Please contact me and let’s talk about it. You can also click on the photo below to see the documents.
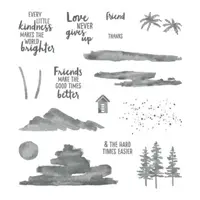
The sentiment on today’s card is one of my favorite. This is one of my New Year’s Resolutions, just more kindness. And I am back using the Waterfront Stamp Set again. There are so many beautiful examples made with this stamp set. I am continuing to try to emulate some of them. Today’s card is supposed to be a calming mountain scene.
Waterfront, 146386
You will laugh when you read what my inspiration for this card was! The DSP in the background which is from Naturally Eclectic DSP. It wasn’t the vibrant colors, but the faded tones. I saw sky fading down to grass. The mountains are where I grew up and looking over a field towards the mountains is peaceful. So that is where I was headed.
The stamping with this set is definitely a “just go for it” type deal. And the best part is that you can make many different scenes with this one set. I have done a couple that you can see HERE, and HERE. I hope you will give this set a try and see what scenes you can create. As a bonus, the sentiments are some of the best in the catalog. You cannot beat a perfect sentiment.
Thank you so much for visiting with me today. I very much appreciate it. And if you have any questions, please do not hesitate to contact me.
Have you ever thought about becoming a Stampin’ Up! Demonstrator? During Sale-A-Bration is the perfect time to join. Not only are you getting the Ultimate Bundle ($125.00 worth of product for $99.00) but you also get to choose 2 additional stamp sets, up to $25.00 each. Additionally you will get a 20% discount on any future purchases. Or, if you are just wanting to test drive the idea, you would not need to make another purchase until July! There is no pressure for you to continue as a demonstrator. And there is no penalty if you decide not to continue. Please contact me and let’s talk about it.
Sometimes making a regular card is very difficult for me. More the idea than the execution! LOL!!! But today I have gone a step further and made what I call a Double Card. It is simple and easy, just takes a minute to get the placement correct. Please let me know what you think.
Southern Serenade, 145921
If you can tell from the photograph, there is an oval cut in the front layers so that you see the flower on the inside of the card. When you open the front flap, you see just the flower, and then it opens again to show the sentiment and where you sign. That is why it is called a Double Card. The next two photos show this probably better than I explained it.
So after all of that, I think it is really an unusual card and a nice way to showcase a larger stamp. The most difficult part of this card is lining up the layers so that the ovals are properly lined up. I found that securing the top and middle layer together with temporary adhesive and then cutting is the best. I cut the size of the black layer first. Then cut the larger oval in just the white layer. The die leaves a small indented frame around the opening and this is very helpful in lining up your larger oval. I then repeated the process with the black layer and the base layer by temporarily adhering them and cutting the same size oval from the base layer. Theoretically all will now line up properly….. Hopefully!!
The background stamp is Sahara Sand and is stamped off first. The flower is stamped in Memento Tuxedo Black and then colored with markers.
Thank you so much for visiting today! I hope you liked this little bit different card. The supplies I used are listed at the bottom of the post.
MEASUREMENTS:
Base card in Sahara Sand is 8 1/2 X 5 1/2 folded in half
One of the benefits of being a Stampin’ Up! Demonstrator is getting to play with the new products first. Today’s card is one of those sets. When I saw the cards Brian King had made for a Stampin’ Up! event, I couldn’t wait to get my hands on it.
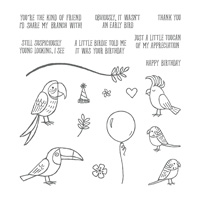
Bird Banter, 145852
I do believe this little guy is precious! The best thing about this stamp set is some of the unusual sentiments. I believe reading this sentiment upon receiving the card would just make me smile. And isn’t that why we make cards? Of Course it is!!
My bird is somewhat colorful I know. I chose the card base to go with the branch so it wasn’t the only brown. But after coloring the bird, I decided he needed a bright color to make him shine. That is the reason for the Pumpkin Pie. And the leafy DSP from Whole Lot of Lovely just seemed to fit perfectly.
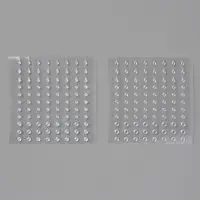
The one special item I used for the first time today are the Glitter & Clear Epoxy Shapes. They are tiny little shapes of clear epoxy. You get two sheets. One is clear and the other glitter. I used one of the clear over the bird’s eye. It looks like I added one of the squiggly eyes. I hope you can see it in the photo. I will definitely be using these little guys again soon.
Thank you for visiting with me today! I very much appreciate it. The supplies I used are listed at the bottom of the page. Clicking on any item will take you directly to my online store.
Reminder: There are only a few days left to place your reservation for the stamparatus. You will receive it before it goes live in the 2018 Annual Catalog in June.
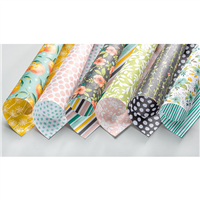
Throughout the making of my Christmas cards I have been sharing I used a lot of Stampin’ Up!’s wonderful designer series paper. I have really gotten into using the paper as a background instead of using an embossing folder. So, I have consciously been trying to not do that for a change of the look of my cards. That idea went out the window when I received my pre-order for the 2018 Occasions Catalog. All of the paper you will see soon is gorgeous!! This is my first card with the new Picture Perfect Party Designer Series Paper.
Picture Perfect Party Designer Series Paper, 145559
Isn’t this DSP just a “WOW” ? I wanted to make some Thank You cards for the Christmas gifts I have/will receive. When I saw this paper, I thought it would be perfect. But then I could not bring myself to cover up that beautiful paper. So I just made a simple banner to run across the center, and decided that was a finished product. So super quick and easy. And since I need several of these, that is an added bonus!!
Thank you so much for visiting today. I hope you have an amazing day and get some stamping accomplished in there. The supplies I used are listed at the bottom of the page.
The content in this blog is the sole responsibility of Jackie Beers as an Independent Stampin' Up! Demonstrator. The use of and content of classes, services or products offered is not endorsed by Stampin' Up!