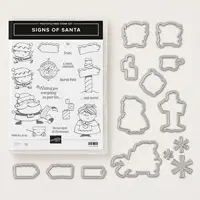
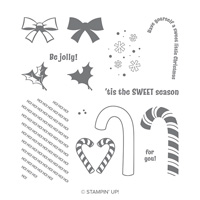
Collecting Santas has been one of my favorite things for many years. I have added the Signs of Santa Bundle to my collection. Just kidding, but it is the Perfect Santa!! It is so adorable! And the framelits are a great pairing. I hope my bright card will get you in the Santa mood.
Signs of Santa Bundle, 149967
I stamped Santa and colored him with Stampin’ Blends by following the Santas on the DSP. But I couldn’t stop there. I added two different versions of the Santa Workshop DSP for added Christmas Brightness. I may have gone a bit overboard on the brightness!!
Thank you so much for stopping by today. I hope you like Santa and the very versatile layout used in the card. As always, the complete list of products are at the bottom of the post.
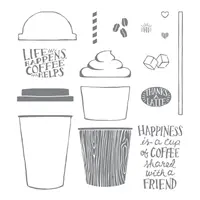
Happiness is anytime spent with friends, at least to me anyway. So today’s card is a simple stamping ,#SimpleStamping, as Sara mentioned several times at OnStage. What makes this one seem so easy is the photopolymer stamp set Coffee Cafe. It is a favorite of mine that I hope stays around for quite some time.
Coffee Cafe, 143677
As I mentioned above, the photopolymer stamp set is so easy to line up the sentiment inside the cup outline. And it is just as easy to add the dollop of whipped topping on top. Yes, I realize this is more a dessert than a cup of coffee!! Isn’t that the best kind?
I tied together the Coffee Cafe stamp set from the annual catalog with a designer series paper from the Holiday catalog. I love mixing products. Also, all of the stamping is from the single stamp set. Sometimes I wonder if I confuse customers with multiple stamp sets. I like to occasionally show a “one stamp set” type card.
The picture doesn’t really do the heart in the center of coffee very clearly. I punched a Cherry Cobbler heart using the Cookie Cutter punch. I believe it is very fitting to match the hearts I added in the whipped topping.
Thank you very much for visiting today. I hope you enjoyed this quick #SimpleStamping card. Please come back tomorrow for a new project. As always, the complete supply list is at the bottom of the post.
One more thing……If you are interested in the Stamparatus carry bag, it is listed further down, you can begin ordering soon. I recommend ordering as soon as it is available as it is while supplies last.
Today’s card is a quick and easy one. I think it will bring a smile to your face though. Who doesn’t like Candy Canes at Christmas? It is part of the tradition. And I paired this with the Swirls and Curls Embossing Folder. Oh My! I do not know why I have not used this previously. It is so festive.
Candy Cane Season, 147692
I was happy with my #SimpleStamping card. And once again , the photopolymer stamp made the lining up of the candy canes super easy to do. I borrowed the Merry Christmas from the Host Rewards stamp set Hung With Care. The two stamps were just perfect and all the card needed.
Thank you for checking on my project today. I hope you liked it and can use this simple layout for a card of your own. I hope you will check back on Monday for another project.
I hope you enjoyed yesterday’s InKing Royalty Blog Hop! I am amazed at the wonderful projects we see each month. Thank you for Hopping Along with us.
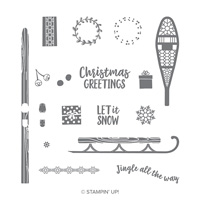
For today’s card, I am back to Christmas. I love the rustic, country, warm and cozy feeling this card gives me. Hopefully you will get some of those feelings as well. It reminds me of childhood Christmas cards.
Alpine Adventure, 147742
The Alpine Adventure has matching dies, but I did not use them on this card. I was going for a more simple look. I did add the Corrugated Embossing Folder, a 2″ piece, behind my sled of gifts. And please forgive my bells attached to the sentiment. They did not show up very well, so I went over them with the Black Stampin’ Write Marker. Now they almost show up too much! I never know when to leave it well enough alone.
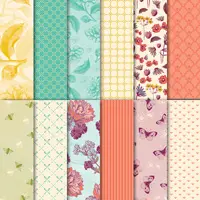
The Alpine stamp set is photopolymer which made the lining up of the gifts on the sled super easy. And what’s not to love about the Festive Farmhouse Designer Series Paper. That plaid is perfect for so many projects.
Thank you so much for stopping by today! I really appreciate it. Please come back tomorrow for another new project.
Welcome to InKing Royalty’s November Blog Hop! This year’s Blog Hop themes are inspired by popular songs – this month’s song is “We are Family.” As you might guess, our Blog Hop today is filled with projects that are inspired by family – we have a wide variety of projects today! We are excited to share our creations with you today! After you read my post, I hope you’ll hop over to the next person on the list at the base of this post.
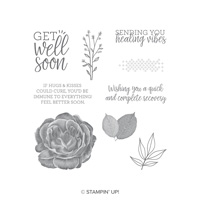
I have created a gift card holder that is simple and a bit different than my normal ones. For this one, I got the idea from a swap I received in Orlando that held a candy bar. You can be sure that I will be sharing one of those with you in the near future as well!! But today, I have a simple gift card holder that is made for a birthday instead of holiday.
Healing Hugs, 146530
And here is the inside.
The gift card attaches to the backside of the “Treat Yourself” piece with a couple of glue dots. I realize you cannot see the ribbon behind the front layer. I punched through the front and back, at the same time, using the Detailed Trio Punch. The ribbon is then pushed through front to back and the insert pushes the ribbon down into the card.
I loved this when I saw it pull out a candy bar. Who Wouldn’t !!! And I immediately thought of the gift card as an alternative. I am not the mathematical wizard the my friend Julie DiMatteo (The Paper Pixie) is, but I finally got the measurements figured out to hold the card. I was so proud 🙂
I have got all of the measurements listed below for you. I hope you like this idea and will give it a try. Please let me know if you have any questions. Thank you for visiting my blog today! I greatly appreciate it.
One the 5 1/2″ side, score at 1 1/4, 3 3/4, 4 3/4,
Cut off the bottom tabs created by the 1″ score, except for the center one. That is the front of your holder. Add Tear & Tape down the narrow scored piece and fold together. Then add tape and fold up the one flap.
Punch through both layers of the holder with the Detailed Trio Punch.
Ribbon is 14″
Insert is 2 1/4″ X 3 3/4″
Front panel is 3 7/8 X 1 7/8 and 3 3/4 X 1 3/4
Thank you for stopping by today. I hope you’ll hop along to the next stop on the bloghop, Jennifer Spiller at Westside Paper Creations. There’s lots of inspiration to be found in this group – and you don’t want to miss it!
Thank you for hopping along with us. If you get stuck during the Blog Hop, please use this line-up as a guide:
First let me highlight the Extravaganza Sale! Today begins the Tools and Inks portion. Now is the great time to stock up on Ink Pads, Marker, Stampin’ Blends, as well as trimmer blades, a new trimmer, or one of my favorite- the Simply Scored!! Click Here for today’s link.
Ok, now to today’s gorgeous card. This is a fun card to make because it involves embossing! I know some of you may be a bit intimidated by embossing. I know I was in the beginning. Trust me, the more you do it, the more comfortable you become. Just always remember your Embossing Buddy. It is named that for a reason!! And I always keep a small little detail paint brush around as well.
Merry Christmas To All, 147702
I love the simple elegance of this card. And thankfully the gold foil does the work to make it elegant, because I definitely am not!! Besides the gold foil, the Festive Farmhouse DSP is perfect to pair with the Mossy Meadow and Cherry Cobbler colors.
I cut out the sentiment with the layering ovals dies for a different shape on the card. The foil is cut with the Banner Triple Punch. And that is all it took. I love simple!!
Thank you for stopping by today. I greatly appreciate it. Please come back tomorrow for the December InKing Royalty Blog Hop! You will find a lot of inspirations from my fellow Royals.
The content in this blog is the sole responsibility of Jackie Beers as an Independent Stampin' Up! Demonstrator. The use of and content of classes, services or products offered is not endorsed by Stampin' Up!