I realized as I was typing this post that I am using the Mosaic Mood Designer Series Paper two posts in a row. Sorry about that. But it may give you ideas of your own for this gorgeous paper.
The shades of green in this sheet of the DSP is just WOW! And I love the specks of Soft Suede thrown in. I had to layer the Soft Suede to help those specks pop a bit more. The shading on the tree is from the stamp itself. I love that Stampin’ Up! has done this effect on several stamp sets. It is like you used two step stamping but really didn’t need to. A win for sure.
The tag on the tree is from the Cup Of Cheer Dies. The perfect layering is one of my favorites. I simply added the little bow using a couple of strands of the Linen Thread and attached it with a glue dot. I would be lost without the glue dots.
I have listed all of the supplies at the bottom of the post. If you shop with me and spend under $150.00, please use the Host Code below. Any order of $50.00 and over in product will receive a small gift from me. And don’t forget the DSP Sale! All of the DSP choices that are included in the sale are listed on the flyer below. You can click on it to enlarge it.
Thank you for stopping by today. Please return tomorrow for the monthly Pals Blog Hop. There are always a lot of gorgeous projects for your pleasure.
HOST CODE
My September Host Code is VYHZ6ZM2. Please use this code for orders under $150.00. I will have a small perk for those with orders over $50.00.
Happy Monday to you! I have a really simple gift card holder to share today. I saw a sign over the weekend at a craft fair that said it was only something like 14 weekends until Christmas. Oh My!! Of course this gift card holder could be made for any occasion. The one I have made is a birthday one.
It took me a bit but I now really like this Mosaic Mood Designer Series paper. I love the texture of how it feels and looks. And here is the inside of the card.
As you can see, both the outside and the inside are really simple. The hardest part was deciding to put the ribbon just as an outside wrap that slides off. I originally was going to run it underneath the top layer. Then I thought of bow difficulties, etc. So went with it as just a band.
Directions:
Card base measures 4 X 9 3/4, scored at 3 1/4 and 6 1/2
From the top of the 6 1/2 score, cut diagonally to the bottom right edge.
Fold and burnish all of the score lines. Fold the angle to the inside and secure Only At The Bottom with Tear & Tape.
The inside layer is 3 X 3 3/4
The Front base layer is 3 X 3 3/4 and the DSP is 2 7/8 X 3 5/8
I started with a 15″ piece of Petal Pink Organdy Ribbon. Wrap it somewhat loosely around the card and tie a know. Trim ends.
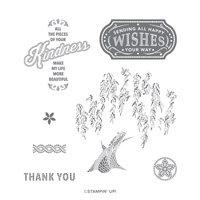
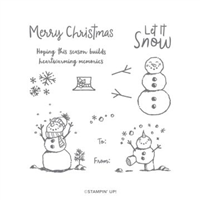
Stamp the sentiment ,which is from #Elfie, and punch with the 1″ Circle Punch.
Punch the background with the 1 1/4″ Scallop Circle Punch.
Use a handheld hole punch to make a hole at the top of the circle layers and run a piece of Linen Thread through it.
Wrap the linen thread around the Petal Pink Ribbon underneath one of the ribbon ends. Pull tightly, tie a knot, and trim the knot very close.
Thank you for visiting today! I hope you will give this gift card a try. This is one that would be great to have in a variety of colors just to have on hand.
Even thought I mentioned most products in the directions, I have them listed at the bottom of the page and that will take you to my On Line store. My September Host Code is listed below. Don’t forget that the DSP sale is going on right now! WooHoo.
HOST CODE
My September Host Code is VYHZ6ZM2. Please use this code for orders under $150.00. I will have a small perk for those with orders over $50.00.
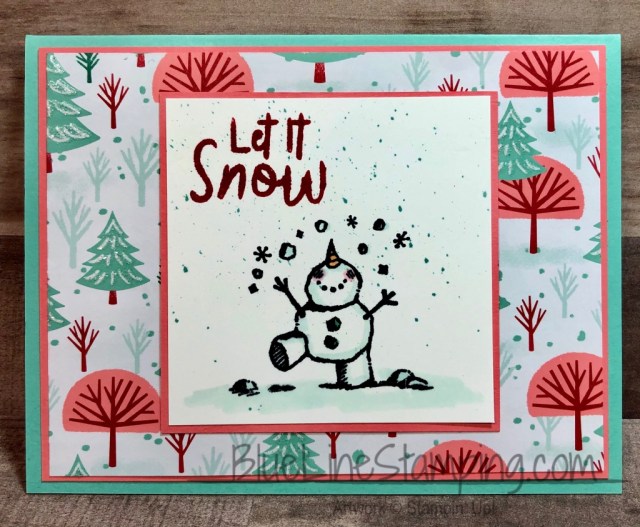
It is no where near ready to snow here in Georgia! Sadly we are still in the 90s here. But…..having received my pre-order of the Let It Snow Designer Series Paper and the Snowman Season stamp set, I could not wait to give it a try. I am pretending it is cool weather.
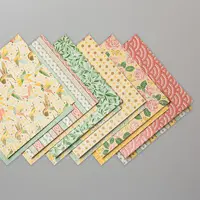
I really do like the different colors in this pack of DSP. There is Real Red and Shaded Spruce in it. But there are also Coastal Cabana and Flirty Flamingo as well. I love these. This sheet of paper is a perfect balance for me.
The snowman looks like he is having a blast playing in the snow. I colored him with the Stampin’ Blends in Light colors. I added the Real Red for the sentiment and then thought it needed “something”. So I used the Splatter technique with the Stampin’ Write Marker to Flick color onto the white layer. That made me happy!
Thank you for coming by today. I hope you will return again on Monday for more new projects.
Measurements:
Base layer is 5 1/2 X 8 1/2 folded in half
Flamingo layer is 5 1/4 X 4
DSP layer is 5 1/8 X 3 7/8
Sentiment background is 3 1/8 X 3 1/8
White layer is 3 X 3
HOST CODE
My September Host Code is VYHZ6ZM2. Please use this code for orders under $150.00. I will have a small perk for those with orders over $50.00.
I have a #simplestamping type card today. It is just paper and ink with a little bow added. You know how I love designer series paper. This card uses those leftover pieces that you may think are too small to use.
I have said several times how much I love the 2019-2021 InColor DSP. My love of the paper resulted in quite a few of these little strips. So I decided to make them the focal point of a Thank You card for a sweet friend.
I chose the A Big Thank You stamp set. The fonts and sentiments are wonderful. I used the small heart to give a border down the side. It is stamped in Rococo Rose Ink on the card stock. The sentiment is from the same set and is backed by a different scrap of the DSP.
The only additional thing I added was the little bow. It is the Thick Whisper White Baker’s Twine that I attached using a glue dot.
Thank you so much for stopping by today. I have had some issues with the email version of my post the last two days. That should be fixed now thanks to the wonderful Brian Watt at Integrant Services!!
Measurements:
Base is 5 1/2 X 8 1/2
sentiment layer is 1 7/8 X 1 3/8 for DSP and 1 3/4 X 1 1/4 for Whisper White
The strips are 2 @ 1/2 X 4 1/2, and 1 @ 1/2 X 4
HOST CODE
My September Host Code is VYHZ6ZM2. Please use this code for orders under $150.00. I will have a small perk for those with orders over $50.00.
Happy New Catalog Day!! Today is the launch of the Holiday Catalog. WooHoo!! I love the suites and products. Please let me know if you have any questions. Also, the Designer Series Paper Special begins today. I have a picture under Updates at the bottom which lists the papers on sale.
Now on to today’s project. I am sharing one of the new Designer Series Papers from the Holiday Catalog on this card.
I adore this DSP!! It is photos on one side and silver designs on the opposite side. I used my current favorite color of Seaside Spray for the base as well as the New Metallic Ribbon in Seaside Spray. The ribbon is in the Holiday Catalog as well.
The card is an idea I got from seeing a money envelope at the Dollar Tree. I did not measure it, I should have!! But I just played with it until I liked the angles. I am working on my first video and it is this angle. I will go ahead and try to explain so you can recreate it.
Directions:
The base is 4 1/4 X 11, scored at 3 3/4 and 7 3/4. Fold and burnish on the score lines.
The shorter of the ends will be the top. Fold the bottom up and leave the top out flat.
Place the score line of the top on the 1″ mark of your cutter, and place the opposite point in the cutting groove. (You have to slide it away from the top bar to have room for the folded card to lay.
When you cut this, you create the angle. Even though it was from the 1″, the distance down on the short side is actually 1 1/8″. I have no idea why that is, but it works out.
Cut DSP to 3 5/8 X 4 1/8 for bottom and 3 X 4 1/8 for top angle.
With the top DSP, place it with the top against the top bar of the cutter, turn it counterclockwise and place it at the 1″ mark. Make a tick mark just beyond the cutting track on the edge of the paper. (This way you cut you are cutting just to the left of the tick mark and it will be cut away.) Now place the tick mark in the cutting track and also the opposite corner. Make your cut. This will fit perfectly on the angle flap.
I hope these directions are clear enough. I will try to have the video very soon. I think this is a super cute card and can be adjusted to different sizes once you have the basics.
Thanks for checking in today and I hope you are enjoying the new catalog. Please come back tomorrow.
HOST CODE
My September Host Code is VYHZ6ZM2. Please use this code for orders under $150.00. I will have a small perk for those with orders over $50.00.
I apologize for being so late posting today. It has been a crazy morning. But it has allowed me to update my blog with the DSP Sale Flyer! WooHoo! This is one of my favorite times of the year. It is the very popular Buy 3, and Get 1 Free on Select Designer Series Paper. The flyer is at the end of the post so you can see which ones to choose from. My September Host Code is at the bottom as well.
Another AWESOME bit of news is tomorrow is the beginning of the Holiday Catalog! I cannot wait for you to be able to order these wonderful items. I want it all!!
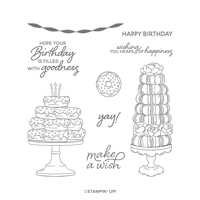
Now on to today’s project. It is a Happy card, and great for showers of any kind.
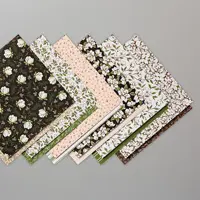
I love this stamp set! It is the Birthday Goodness set that has donuts and macarons. What is not to LOVE?? I wanted to do a variety of colors because I love the different flavors of macarons. However, the choice of paper made me settle on just two.
I chose the Petal Pink and Mossy Meadow to go with the Daffodil Delight roses. The designer series paper is a reverse side of one of the Magnolia Lane DSP.
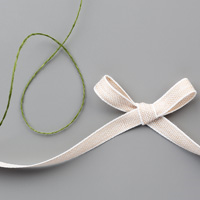
The adorable ribbon combo is actually a Ribbon Combo (HaHa!) from the Magnolia Suite of products. It is Magnolia Lane Ribbon Combo and is the great linen like ribbon with a Mossy Meadow Baker’s Twine to match.
Thank you for checking in today. Be sure and check out the DSP Sale the starts tomorrow and add it to your list from the Holiday Catalog. If you do not have a Holiday Catalog and would like one, please contact me and I will get one to you.
HOST CODE
My September Host Code is VYHZ6ZM2. Please use this code for orders under $150.00. I will have a small perk for those with orders over $50.00.
The content in this blog is the sole responsibility of Jackie Beers as an Independent Stampin' Up! Demonstrator. The use of and content of classes, services or products offered is not endorsed by Stampin' Up!