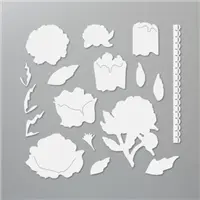
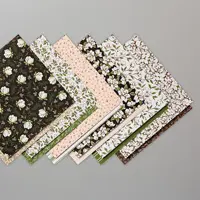
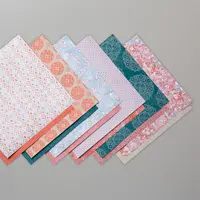
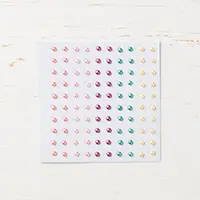
I have another first on today’s card. Not a super first, but a step for myself. A few weeks ago I shared a card using one of the Kits. It was the Watercolor one. That was the first time I had used a kit project. (You can see that post HERE) And today I have used die cut / punch outs from one of the DSP. It is similar to what the kits contain. To say I was impressed with the paper and the colors is an understatement. I was amazed and in love. So much that it is the star of today’s card.
PAPERS
The amazing DSP pack this gorgeous bouquet comes from is the Wildflower Birthday Designer Series Paper. There are two sheets of punch outs just as there are two sheets of each pattern paper. All of these punch outs are as pretty as this bouquet. I hope you see why it is the star of the card. Now I am ready to give all of the kits another look.
This is also the second time in recent days that I have used Blueberry Bushel for the card base. This bright color pops on it’s own. And it really pulls the bits of blue from the bouquet. The blue is the first thing I notice now.
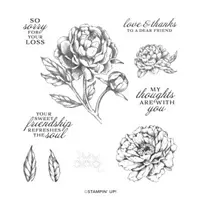
STAMPS
The bouquet really is impressive and fills the front of the card. So there was not a lot of need, or room, for a sentiment layer. However I wanted to add one. So I went with this simple sentiment using two different stamps from the Sentimental Park stamp set. Because they are photopolymer, it was so easy to stamp the bottom sentiment and then add the top centered above it. To give the Basic White strip a touch of extra, I flagged each end with my paper snips.
EXTRAS
This bouquet is beautiful but it still needed something behind it. To add some additional texture I went with the Distressed Tile Embossing Folder. I think it adds just the right background without taking away from the bouquet.
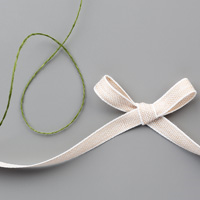
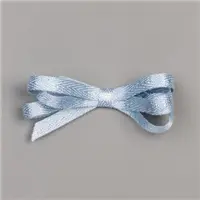
To add bling to match the gold from the bouquet, I added a trio of the Gold Textured Adhesive Dots along with a bow from the Gold Twisted Thread. This thread is easy to work with and a great way to add some shine to a card.
HOST CODE
My FEBRUARY HOST CODE is S2EYAW9N. Orders of $50.00 or more will receive an appreciation gift from me. I appreciate you choosing me as your demonstrator!
Thank you for stopping by today. I hope you enjoyed today’s project and will come back. I do read and reply to all of the comments individually. They mean a lot to me. Please reach out if you have a question.
Smile and Keep On Stamping,
Jackie
New Scrapbooking Catalog
The newest addition to Stampin’ Up! is an Online catalog of Scrapbooking products. You can see the catalog by clicking the photo below and save it to your computer.
Online Exclusives
New Online Exclusives have dropped. There are Halloween, Fall, Christmas, and many that are great year round. Of course the new Designer Series Papers and Embellishments are fabulous as well!
You can go directly to these in my Online Store by clicking HERE
The card I am sharing today is a special one. It was made as a shower card for a sweet young lady I consider to be my Goddaughter. And of course her fiance as well . Pink is not really one of her wedding, or shower, colors. But pink and a peony just seem to go together.
Stamp Sets
The star of this card is the peony. It is from the Prized Peony stamp set and has matching Dies but is no longer a Bundle. The Peony is stamped with Versamark onto Basic White cardstock. I then used White Embossing Powder to heat emboss the image. Next was the fun part. It is an old technique that we used to use the sponges to create. However, now we have the awesome Blending Brushes. I used Polished Pink Ink and a Blending Brush to cover the entire embossed image. After adding the color, I went back over the flower with a tissue and wiped the ink off of the White embossing.
Not to leave well enough alone, I tried a different technique as an addition for the leaves. Using the Just Jade Light Stampin’ Blend, I did basically the same thing except just over the leaves. I then used a tissue to wipe it off of the embossed area. It is not as dark as I anticipated, but I like the subtle shading it gives.
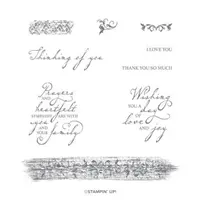
For the sentiment I found this sweet one in the Color & Contour stamp set. I stamped it using the Polished Pink Ink. The ink color matches the darker areas in the Designer Series paper.
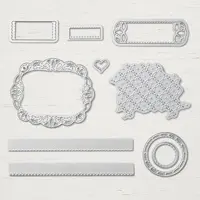
Dies and Punches
To cut out the peony image, I used the matching Die set that is aptly named Peony Dies. It really does allow the peony to be the star of the card. After choosing the band of Gold Foil to ground the peony, it left me without an area to stamp the sentiment. Since I love punches, and have all of the current ones, I checked all that would fit the size I needed. The one that fit the bill the best was the Essential Tag Punch. It has just enough of a defining shape without competing with the flower and paper. I did trim about 1/2″ off the bottom as it was a tad larger than I needed.
Paper
It is hard to believe that this fabulous paper is my final area to comment on. For once the Expressions In Ink Designer Series Paper is NOT the star of the card. That is really hard to believe. Because this card was for a special occasion, I went wild with the Gold Foil. That is not something I normally do. Usually less is better. However, when dealing with the gorgeous DSP and the veins of gold, I had to have gold as the background layer. Then I needed a grounding of some kind for the peony and tag. So add a strip of gold instead of a piece of ribbon as I normally would.
The finishing touch is a scattering of tiny Pearls. There are more than I normally would use, but they add to the elegance. I also used the Simply Elegant Trim (It has both Silver and Gold Trim in the Combo pack) to make a tiny bow for the tag. I hope you are as happy with this final result as I am!
The 2nd Sale-A-Bration Is Ending !!
Only today and tomorrow to take advantage of the FREE SAB products. Did you know that purchasing the Prized Peony stamp set and matching Peony Dies would qualify you for one of the $50.00 Free products? That is a great deal !!
Join My Team Promotion During Sale-A-Bration!!
HOST CODE
My September Host Code is NWZNBFH2. Please use this code for orders under $150.00. I will have a small gift for those with orders over $50.00 in addition to the Perk Rewards Program. You can read all of the information at the top of the page in the Menu Bar under SHOP / Perks.
Thank you for stopping by today. I hope you enjoyed today’s project and will come back. I do read and reply to all of the comments individually. They mean a lot to me. Please reach out if you have a question.
I hope you had an enjoyable Valentine Day yesterday. We do not get too excited about these holidays. It was just a nice, relaxing, and WET, day. I am ready to go out and see sunshine!!! I am happy we just have rain and not the snow and storms some are having. I hope all of you are safe and dry!
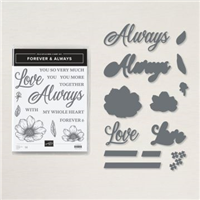
Today’s card is an extra Valentine card I made but did not share. It could also be for a wedding. I paired a few different products from the Forever & Always Bundle and suite.
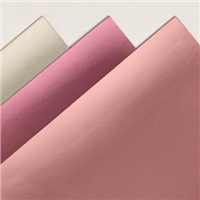
I mixed several blingy pieces on this card. I began with the card base of Blushing Bride cardstock. Next is a layer of the Love You Always Foil Sheet, which is blush or champagne color. The foil is topped with True Love Designer Series Paper in the polka dot.
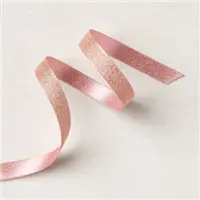
I added a banner with an angle cut made from the Love You Always Foil sheet. It is wrapped with a ribbon bow from the Blushing Bride Metalic Ribbon. The ribbon is beautiful! The back is Blushing Bride and the front is a mixture of blush and gold. I had to fiddle with my bow to keep only the front of the ribbon showing. It is well worth the fiddling time!
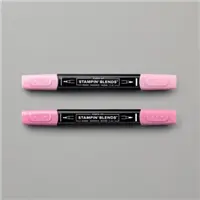
For the focal areas, I stamped the flowers from the Forever & Always Bundle and colored with Rococo Rose Stampin’ Blends. The leaves are colored using Just Jade Stampin’ Blends.
I went a bit rogue on the “LOVE”. I had used the Blush Foil, but wanted to bring out the gold in the ribbon. So I used Gold Foil to cut the background of the LOVE. (If I had a do over, I would use the blush for this as well)
Measurements:
Blushing Bride card base is 4 1/4 X 11
Foil layer is 3 7/8 X 5 1/8
DSP layer is 3 3/4 X 5
Angle Foil is 2 1/2 X 3 7/8 with a 1″ angle cut (place a mark at 1″ on the right side and put the mark on the cutting line. place the opposite corner on the cutting line as well, cut from mark to point)
Thank you for stopping by today. I hope you like my mix of products and will give these items another look in the catalog. Please let me know if you have any questions.
HOST CODE
My February Host Code is: MRYR7XY2 Please use this code for orders under $150.00. I will have a small perk for those with orders over $50.00
I apologize for being so late posting today. It has been a crazy morning. But it has allowed me to update my blog with the DSP Sale Flyer! WooHoo! This is one of my favorite times of the year. It is the very popular Buy 3, and Get 1 Free on Select Designer Series Paper. The flyer is at the end of the post so you can see which ones to choose from. My September Host Code is at the bottom as well.
Another AWESOME bit of news is tomorrow is the beginning of the Holiday Catalog! I cannot wait for you to be able to order these wonderful items. I want it all!!
Now on to today’s project. It is a Happy card, and great for showers of any kind.
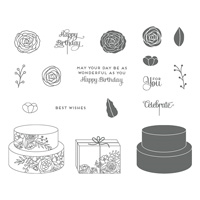
I love this stamp set! It is the Birthday Goodness set that has donuts and macarons. What is not to LOVE?? I wanted to do a variety of colors because I love the different flavors of macarons. However, the choice of paper made me settle on just two.
I chose the Petal Pink and Mossy Meadow to go with the Daffodil Delight roses. The designer series paper is a reverse side of one of the Magnolia Lane DSP.
The adorable ribbon combo is actually a Ribbon Combo (HaHa!) from the Magnolia Suite of products. It is Magnolia Lane Ribbon Combo and is the great linen like ribbon with a Mossy Meadow Baker’s Twine to match.
Thank you for checking in today. Be sure and check out the DSP Sale the starts tomorrow and add it to your list from the Holiday Catalog. If you do not have a Holiday Catalog and would like one, please contact me and I will get one to you.
HOST CODE
My September Host Code is VYHZ6ZM2. Please use this code for orders under $150.00. I will have a small perk for those with orders over $50.00.
I hope you love the Woven Heirlooms suite of products as much as I do. Partly because I think it is a fabulous suite. And partly because I have another card from it to share with you today. This will be the last of my favorite piece of the DSP, because I am out of it. It is on my next order list though!!
As I have said before, this is an awesome set but additionally it has made me fall in love with the Seaside Spray InColor. It is a beautiful blue with just a hint of a purple, at least in my opinion. Having used it so much with the DSP, it has become a fast favorite. To top that off, Stampin’ Up! added a Seaside Spray Metallic Ribbon to the Holiday Catalog. WooHoo!!! As you can see from the photo, it has a touch of shimmer to it.
Since I love the designer series paper so much, and the added beauty of the Seaside Spray Metallic Ribbon, I had to have an equally gorgeous sentiment. I love this sentiment, which is from the Woven Heirlooms stamp set . I believe it is great for a birthday or wedding, and maybe other occasions. And I love the fonts used in the sentiment as well. To showcase the sentiment I looked through my dies and found the Stitched Labels Die. The sentiment fit perfectly and the die really stands out on the card. Yay!!
Thank you so much for visiting today. Please come back tomorrow for another new project. Also, please remember that the Stampin’ Up! Join Promotion is coming to an end on Saturday. I truly love being a demonstrator, I love Stampin’ Up! products, and most of all I love all of the friendships I have made because of it. I would be happy to answer any questions you have if you are thinking about becoming a demonstrator. It was one of the best decisions I have ever made! And I would love to have you join my team.
HOST CODE
My August Host Code is VYEQARFN. Please use this code for orders under $150.00. I will have a small perk for those with orders over $50.00.
UPDATES:
Joining Stampin’ Up! and my TEAM is always a good idea. Now there are some good incentives to do it during July and August. For the price of the Starter Kit, which is the ULTIMATE BUNDLE!!!!, you receive an additional $30.00 of products, plus a $10 coupon.
The Starter Kit is $99.00. For that amount, you normally receive $125.00 in product. During July and August, you will receive $155.00 in product. This includes FREE SHIPPING, and an additional $10.00 Coupon to be used the following month. There are NO requirements to ever place another order. However, if you do decide to use your discount and place other orders, you will receive a 20% discount on every order.
If you are thinking about joining, even the first hint of a thought, I would love to talk with you about it. Please reach out to me and I will tell you all the reasons I Love Stampin’ Up!
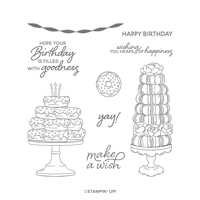
Today I have once again used the Cake Soiree stamp set. I have paired it with the fabulous Gorgeous Grape from the Color Revamp. This is a beautiful color and if you are a fan of purples, then this one is definitely for you.
Cake Soiree, 145745
Please forgive the smudge under the cake! Somehow by simply laying on my craft table waiting for me to take the photograph it got a smudge! I cannot even blame it on one of the cats!!
I colored the cake with the Stampin’ Blends. And WOOHOO they are back in stock to catch up on the backorders and I am anxiously awaiting the availability of the additional colors. I do LOVE the Stampin’ Blends. The background layer of Pear Pizzaz is embossed with the Ruffled Impressions Embossing Folder. This gives almost a 3D effect in person.
There are three new items on this card as well. The 5/8″ Polka Dot Tulle Ribbon, which comes in Whisper White and Very Vanilla, and the Detailed Trio Punch. Both are awesome! The ribbon is very easy to work with and added just enough of an additional element. The Detailed Trio Punch is super! It punches the little flower you see here. It also punches a ribbon hole as well as is a corner rounder. And it is super easy to use. If you had the trio punch from a few years ago, it might have been a little difficult to actually punch. At least mine was. This one is super easy and I love the little flower! As well as the corner rounder since the old one retired. Oh…..I forgot the 3rd item. It is the Share What You Love Pearls. And they are gorgeous. I added several of them to my cake and the flowers.
Thank you for stopping by today. I hope you like this card. I see it as a birthday or a bridal shower. All of the supplies I have listed at the bottom of the page. I hope you have a great rest of your day!
It is still a great time to become a Stampin’ Up! Demonstrator. I would love to have you join my team. A great perk for demonstrators this time of year is getting to see the new catalog first. Then we get to order and play with the new products a month early. For me, that is one of the best parts of being a SU Demonstrator. Of course, the discount helps! If you are interested, please contact me and let’s talk.
The content in this blog is the sole responsibility of Jackie Beers as an Independent Stampin' Up! Demonstrator. The use of and content of classes, services or products offered is not endorsed by Stampin' Up!