Apologies everyone. I have been busy and am out of the routine of posting. UGH!! However, I do have a pretty card to share with you. This is a mix of products that could be to show love to anyone, a wedding, or for upcoming Valentine’s Day. I was really happy how it turned out.
Endless Love Bundle
There are several “hearts” on this one. For me the die cut hearts are the best. Thee are from the Endless Love Bundle. The center of the large heart was not wasted. It is on the inside of the card. You can see it, along with the sentiment from the bundle. This wonderful paper is from the Regal Distressed Designer Series Paper. I think this paper is so pretty and was thrilled when I checked to make sure it was still avaialble.
Fun Fold
To continue the fun, I also made this one as a bookfold. Fun Folds are always the best. And when they are easy, that is the top of the line for me. To make a bookfold is so easy. Cut a piece of cardstock to 4 1/4 X 11 and score at 4 1/2 and 5 1/2. Then adhere the area between the two scores lines to the back of the card. You can see that in the first photo easier I believe. When I wrapped my ribbon, it is adhered between the layers.
Vellum
The second star of the card is the embossed vellum. Vellum is great for a die cut layer but can be a bit tricky when embossing. You may be able to see the couple of tiny tears on edges where there was a heart. For me this is not a problem at all. I love the special look it gives and after all it is a handmade card. This wonderful embossing folder is one I have used previously. It is the Hearts of Love 3D Embossing Folder. I need to say that vellum is difficult to adhere without the adhesive showing through. I have the most amount of adhesive behind the heart. Then I added light touches of multi purpose glue on the corners using a small brush. Put the glue on your silicone mat and then pick it up with the brush.
Extras
There are only two extras today. The first is the pretty ribbon. This is the Gold and White Ribbon. I love the flecks of gold throughout. Of course this has it matching the gold in the DSP as well as a special look for this Valentine card. The second extra is a retired product. But I have several packages of the Heart Sequins. If you loved them as much as I do/did, then you may have some left as well. If not, any gold embellishment would easily replace them.
STAMPIN’ REWARDS
You will earn rewards on all orders over $20.00 in products The system will track your rewards for you. And they will be available for use on your next order, or you can save up for a larger purchase. All you need to do is on your first order is agree to participate. You will then begin receiving rewards on qualifying orders.
Orders of $50.00 or more you will still receive an appreciation gift from me. I appreciate you choosing me as your demonstrator!
COMMENTS
Please know that I love to hear from you and answer any questions you may have. My responses generally are not done here on the post. They are made using my phone as I have found it is easier to answer a question for you personally. So you will be receiving an email from me if you make a comment.
Thank you for stopping by today. I hope you enjoyed today’s project and will come back. I do read and reply to all of the comments individually. They mean a lot to me. Please reach out if you have a question.
Smile and Keep On Stamping,
Jackie
Online Exclusives
New Online Exclusives drop every other month. These are amazing products and are a supplement to the Annual and Mini Catalogs. This way you have access to even more New and Awesome products!
You can go directly to these in my Online Store by clicking HERE
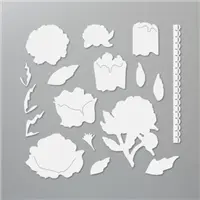
I have another first on today’s card. Not a super first, but a step for myself. A few weeks ago I shared a card using one of the Kits. It was the Watercolor one. That was the first time I had used a kit project. (You can see that post HERE) And today I have used die cut / punch outs from one of the DSP. It is similar to what the kits contain. To say I was impressed with the paper and the colors is an understatement. I was amazed and in love. So much that it is the star of today’s card.
PAPERS
The amazing DSP pack this gorgeous bouquet comes from is the Wildflower Birthday Designer Series Paper. There are two sheets of punch outs just as there are two sheets of each pattern paper. All of these punch outs are as pretty as this bouquet. I hope you see why it is the star of the card. Now I am ready to give all of the kits another look.
This is also the second time in recent days that I have used Blueberry Bushel for the card base. This bright color pops on it’s own. And it really pulls the bits of blue from the bouquet. The blue is the first thing I notice now.
STAMPS
The bouquet really is impressive and fills the front of the card. So there was not a lot of need, or room, for a sentiment layer. However I wanted to add one. So I went with this simple sentiment using two different stamps from the Sentimental Park stamp set. Because they are photopolymer, it was so easy to stamp the bottom sentiment and then add the top centered above it. To give the Basic White strip a touch of extra, I flagged each end with my paper snips.
EXTRAS
This bouquet is beautiful but it still needed something behind it. To add some additional texture I went with the Distressed Tile Embossing Folder. I think it adds just the right background without taking away from the bouquet.
To add bling to match the gold from the bouquet, I added a trio of the Gold Textured Adhesive Dots along with a bow from the Gold Twisted Thread. This thread is easy to work with and a great way to add some shine to a card.
HOST CODE
My FEBRUARY HOST CODE is S2EYAW9N. Orders of $50.00 or more will receive an appreciation gift from me. I appreciate you choosing me as your demonstrator!
Thank you for stopping by today. I hope you enjoyed today’s project and will come back. I do read and reply to all of the comments individually. They mean a lot to me. Please reach out if you have a question.
Smile and Keep On Stamping,
Jackie
New Scrapbooking Catalog
The newest addition to Stampin’ Up! is an Online catalog of Scrapbooking products. You can see the catalog by clicking the photo below and save it to your computer.
Online Exclusives
New Online Exclusives have dropped. There are Halloween, Fall, Christmas, and many that are great year round. Of course the new Designer Series Papers and Embellishments are fabulous as well!
You can go directly to these in my Online Store by clicking HERE
The card I am sharing today is a special one. It was made as a shower card for a sweet young lady I consider to be my Goddaughter. And of course her fiance as well . Pink is not really one of her wedding, or shower, colors. But pink and a peony just seem to go together.
Stamp Sets
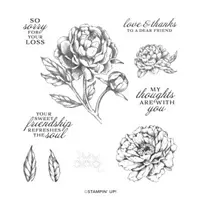
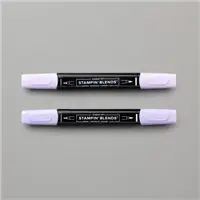
The star of this card is the peony. It is from the Prized Peony stamp set and has matching Dies but is no longer a Bundle. The Peony is stamped with Versamark onto Basic White cardstock. I then used White Embossing Powder to heat emboss the image. Next was the fun part. It is an old technique that we used to use the sponges to create. However, now we have the awesome Blending Brushes. I used Polished Pink Ink and a Blending Brush to cover the entire embossed image. After adding the color, I went back over the flower with a tissue and wiped the ink off of the White embossing.
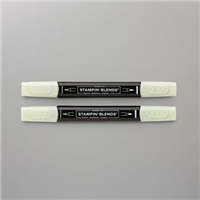
Not to leave well enough alone, I tried a different technique as an addition for the leaves. Using the Just Jade Light Stampin’ Blend, I did basically the same thing except just over the leaves. I then used a tissue to wipe it off of the embossed area. It is not as dark as I anticipated, but I like the subtle shading it gives.
For the sentiment I found this sweet one in the Color & Contour stamp set. I stamped it using the Polished Pink Ink. The ink color matches the darker areas in the Designer Series paper.
Dies and Punches
To cut out the peony image, I used the matching Die set that is aptly named Peony Dies. It really does allow the peony to be the star of the card. After choosing the band of Gold Foil to ground the peony, it left me without an area to stamp the sentiment. Since I love punches, and have all of the current ones, I checked all that would fit the size I needed. The one that fit the bill the best was the Essential Tag Punch. It has just enough of a defining shape without competing with the flower and paper. I did trim about 1/2″ off the bottom as it was a tad larger than I needed.
Paper
It is hard to believe that this fabulous paper is my final area to comment on. For once the Expressions In Ink Designer Series Paper is NOT the star of the card. That is really hard to believe. Because this card was for a special occasion, I went wild with the Gold Foil. That is not something I normally do. Usually less is better. However, when dealing with the gorgeous DSP and the veins of gold, I had to have gold as the background layer. Then I needed a grounding of some kind for the peony and tag. So add a strip of gold instead of a piece of ribbon as I normally would.
The finishing touch is a scattering of tiny Pearls. There are more than I normally would use, but they add to the elegance. I also used the Simply Elegant Trim (It has both Silver and Gold Trim in the Combo pack) to make a tiny bow for the tag. I hope you are as happy with this final result as I am!
The 2nd Sale-A-Bration Is Ending !!
Only today and tomorrow to take advantage of the FREE SAB products. Did you know that purchasing the Prized Peony stamp set and matching Peony Dies would qualify you for one of the $50.00 Free products? That is a great deal !!
Join My Team Promotion During Sale-A-Bration!!
HOST CODE
My September Host Code is NWZNBFH2. Please use this code for orders under $150.00. I will have a small gift for those with orders over $50.00 in addition to the Perk Rewards Program. You can read all of the information at the top of the page in the Menu Bar under SHOP / Perks.
Thank you for stopping by today. I hope you enjoyed today’s project and will come back. I do read and reply to all of the comments individually. They mean a lot to me. Please reach out if you have a question.
I hope you had an enjoyable Valentine Day yesterday. We do not get too excited about these holidays. It was just a nice, relaxing, and WET, day. I am ready to go out and see sunshine!!! I am happy we just have rain and not the snow and storms some are having. I hope all of you are safe and dry!
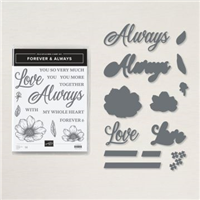
Today’s card is an extra Valentine card I made but did not share. It could also be for a wedding. I paired a few different products from the Forever & Always Bundle and suite.
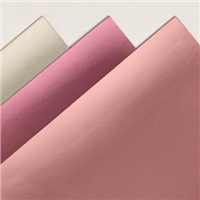
I mixed several blingy pieces on this card. I began with the card base of Blushing Bride cardstock. Next is a layer of the Love You Always Foil Sheet, which is blush or champagne color. The foil is topped with True Love Designer Series Paper in the polka dot.
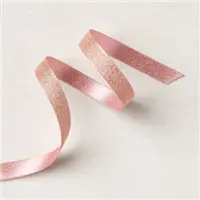
I added a banner with an angle cut made from the Love You Always Foil sheet. It is wrapped with a ribbon bow from the Blushing Bride Metalic Ribbon. The ribbon is beautiful! The back is Blushing Bride and the front is a mixture of blush and gold. I had to fiddle with my bow to keep only the front of the ribbon showing. It is well worth the fiddling time!
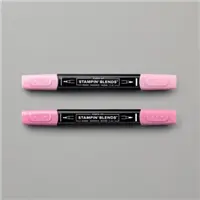
For the focal areas, I stamped the flowers from the Forever & Always Bundle and colored with Rococo Rose Stampin’ Blends. The leaves are colored using Just Jade Stampin’ Blends.
I went a bit rogue on the “LOVE”. I had used the Blush Foil, but wanted to bring out the gold in the ribbon. So I used Gold Foil to cut the background of the LOVE. (If I had a do over, I would use the blush for this as well)
Measurements:
Blushing Bride card base is 4 1/4 X 11
Foil layer is 3 7/8 X 5 1/8
DSP layer is 3 3/4 X 5
Angle Foil is 2 1/2 X 3 7/8 with a 1″ angle cut (place a mark at 1″ on the right side and put the mark on the cutting line. place the opposite corner on the cutting line as well, cut from mark to point)
Thank you for stopping by today. I hope you like my mix of products and will give these items another look in the catalog. Please let me know if you have any questions.
HOST CODE
My February Host Code is: MRYR7XY2 Please use this code for orders under $150.00. I will have a small perk for those with orders over $50.00
Last week I posted a question on my Facebook page, Blue Line Stamping, asking what stamp sets you would like to see. Sadly I did not receive much of a response. If you are a regular follower of mine here, please take a minute to Like my Facebook page as well. I would appreciate it.
One of the sets that was requested was Forever & Always. So I am sharing a card using those products today. You can never go wrong with Black & White (plus a touch of color). And that is what I have used.
Normally I would not use quite as much color with my black and white card, but I felt the flowers and the love needed the two colors. You cannot see it from the full picture but the Basic Black background is embossed using the Parisian Flourish 3D Embossing Folder.
Here is a close up.
It really is beautiful in person. The details of the embossing worked wonderfully on the black. The flowers are colored using the Purple Posy Stampin’ Blends with the centers being the Light Blackberry Bliss Stampin’ Blend. Plus I added one of the Pastel Pearls to each center.
The leaves are colored using Old Olive Stampin’ Blends. I also added the background of the “Love” using Old Olive cardstock. The LOVE is Purple Posy cardstock attached to Foam Adhesive Sheet and then die cut. This is the best way for a simple adhering of the thin letters as well as giving it a raised look.
The strip of DSP is from the True Love Designer Series Paper. I wanted to add a grounding strip for the flower layers. The flowers are adhered to a die cut from the Stitched So Sweetly Dies. I used the largest of the scalloped layers.
Thank you for visiting today. I hope you enjoyed the card. I have all of the products I used listed at the bottom of the page. Remember that we are almost finished with this first round of Sale-A-Bration. It ends on February 28th.
HOST CODE
My February Host Code is: MRYR7XY2 Please use this code for orders under $150.00. I will have a small perk for those with orders over $50.00
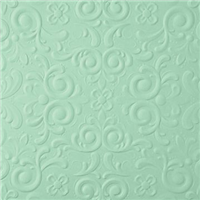
Today I am sharing one of the New Release Sale-A-Bration Items. It is subtle on the card, and that is a great definition of the item. Have you guessed what it is? Yes, It is the So Very Vellum. And it is more beautiful in person. I love the soft colors.
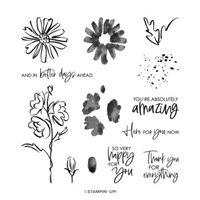
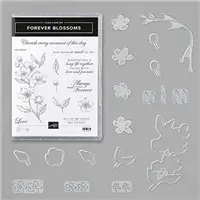
The vellum comes with this embossing already done for you. All of the sheets have the same embossing. The vellum I chose for the background is the Soft Sea Foam one. I used the Highland Heather Vellum for the flowers. They are die cut using the Dies from Forever Blossoms Bundle. The embossed vellum gives an added definition to the petals.
The stamp is from the Forever Blossoms stamp set. It also is die cut using the bundled dies. That is such a great focal point for any design you could come up with.
I stamped in Smoky Slate Ink and then colored with Soft Sea Foam and Purple Posy Stampin’ Blends. For the bow, I used the Whisper White Crinkled Seam Binding Ribbon. It is simply wonderful to work with. I don’t usually do multiple loops with ribbon, but this is so silky and thin I went for it.
Thank you for stopping in today. I have new projects each day to share with you. And this coming Wednesday is the InKing Royalty Blog Hop, you will not want to miss that.
Sale-A-Bration is heading towards the final month. Please don’t miss out on a great opportunity to get an awesome amount of product for very little money! And the fun of joining my team, as well as InKing Royalty. We share a great community of stampers and you could be part of it!!
The Ultimate Bundle is the Stampin’ Up! Starter Kit. During Sale-A-Bration you get the extra value for your $99.00. If you have a wish list or are ready to place an order and it totals close to 99.00, please read this first.
There is NO OBLIGATIONS to do anything beyond ordering the kit. You pay $99.00 + tax and receive $125.00 of your choice of products + any stamp set from the annual or mini catalog (the most expensive one is the Well Said set with a $45.00 price) + the Mini Paper Cutter, a $26.50 value + the 6X6 DSP sampler pack (48 sheets of DSP) an $11.50 value + a Paper Pumpkin Kit with a value of $22.00 + FREE Shipping which is usually 10% of the order and would add another $23.00 value here. This equals over $230.00 value + business supplies added in at no cost. That is an awesome deal!! And you never have to purchase another thing. But while you are trying it out, and you have until the end of July before your trial period runs out, you are part of my Team! As well as my upline’s team. We have Facebook groups to share our projects and assist each other. I would love to talk with you about this opportunity.
HOST CODE
My February Host Code is 66YQVJQC. Please use this code for orders under $150.00. I will have a small perk for those with orders over $50.00.
The content in this blog is the sole responsibility of Jackie Beers as an Independent Stampin' Up! Demonstrator. The use of and content of classes, services or products offered is not endorsed by Stampin' Up!