Happy Valentine’s Day everyone! I hope you have shared at least one of your hand made card filled with love. I think all of our hand made cards are filled with love personally. But today is a special one. I looked for a set that maybe would not scream Valentine’s Day. And I believe I found it for today’s card.
STAMPS
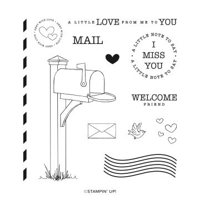
The stamp set I found to spread love is the Sending Love stamp set. I only used the stamps with no Dies. And all of the stamps used are from this one set. The mail box is the main aspect and is not exactly colored traditionally! All of the coloring is done using Stampin’ Blends. I used Smoky Slate for the post but topped it with Highland Heather. And added Granny Apple Green for the mail box itself. I know this would not fly in most communities, but it can work in this card’s world.
To add the sentiment was a question for me. I knew I would have to cut it as this is one long sentiment. It really would not look proper being larger than the focal panel. There was this scrap of Peach Pie on my desk and the answer presented itself. I stamped on the Peach Pie and then simply cut the sentiment in half. This brought out yet another color of the DSP in a fun way. Plus pairs perfectly with the mail box theme.
PAPERS
These sheets of DSP are both from the Toadstool Garden Designer Series Paper. This is a Free 6X6 paper pack in Sale-A-Bration. With a qualifying order this is one of the products you can choose. SAB goes through the end of the month so you still have time to get some of the freebies!
I pulled all of the colors from the toadstool sheet of DSP. The Peach Pie was a surprise addition but I love how it helps those mushrooms to pop. The card base is Granny Apple Green. That striped sheet is a mix of Fresh Freesia and Highland Heather. Those are the colors I tried to add in to the mailbox panel.
EXTRAS
The trio of shimmer gems are all from the 2024-2026 In Color Shimmer Gems. I used different shades of the pink/purple and then a Peach Pie one as well. This is a more whimsical card where it does not require elegant bling!
LAYERS
The card base measures 4 1/4 X 11 and is scored at 5 1/2. The two DSP strips are 2 1/2 X 5 1/8 for the left side and 2 X 5 for the right side. For the focal layer there is a thin layer of Granny Apple that measures 2 3/4 X 4 3/8 with the Basic White layer being 2 3/8 X 4 1/4.
HOST CODE
My FEBRUARY HOST CODE is S2EYAW9N. Orders of $50.00 or more will receive an appreciation gift from me. I appreciate you choosing me as your demonstrator!
Thank you for stopping by today. I hope you enjoyed today’s project and will come back. I do read and reply to all of the comments individually. They mean a lot to me. Please reach out if you have a question.
Smile and Keep On Stamping,
Jackie
New Scrapbooking Catalog
The newest addition to Stampin’ Up! is an Online catalog of Scrapbooking products. You can see the catalog by clicking the photo below and save it to your computer.
Online Exclusives
New Online Exclusives have dropped. There are Halloween, Fall, Christmas, and many that are great year round. Of course the new Designer Series Papers and Embellishments are fabulous as well!
You can go directly to these in my Online Store by clicking HERE
I am so behind on making birthday cards this month. That being said I am taking a break from Valentine today and sharing one of the birthday cards. It is a mix of gorgeous DSP patterns from the Floral Delight Designer Series Paper pack. Why use just one sheet when they all layer so well!
PAPERS
These beautiful sheets of paper are from the Floral Delight Designer Series Paper pack. I chose the floral sheet first as the star of the card. Then I thought to look for a green that would layer instead of using card stock. This linen look sheet was perfect! Next for a sentiment strip I found the checked yellow piece. It was actually a scrap from a previous card. I always save my scraps for just this purpose.
The card base is Pool Party cardstock. It is shown in the floral layer as little highlights. To add a bit more of the Pool Party I used a scrap to stamp the Happy Birthday. It seems to tie the card together. For one last touch of cardstock I used a scrap of Old Olive to die cut the small leaf outline. It helps tie in with the floral leaves of the DSP.
STAMPS
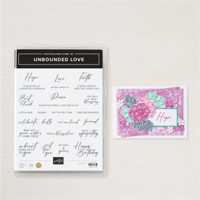
The only stamping on this card front is the sentiment. The papers are so great that there was no need. And this makes it a pretty quick and easy card to make. This elegant font of Happy Birthday is from the Unbounded Love stamp set. It can stand alone as it is bold enough with the beautiful font to gain attention.
EXTRAS
There are two Die cut pieces for this card that count as extras. First is the little leaf next to the sentiment . It and the sentiment shape are from the Mixed Labels Die set. The sentiment layer is a great size plus the detailed edging really takes it up a notch. And the final extra is the bling. I restrained myself and with only one piece of bling. A single Pearl on the sentiment layer seemed plenty with all of the floral pattern.
LAYER MEASUREMENTS
The card base is cut to 5 1/2 X 8 1/2. None of the DSP pieces are directional, but if they were they should be cut landscape. The green pattern is cut 5 X 3 3/4 with the floral cut to 4 1/4 X 3. For the strip of checked DSP it measures 4 X 3/4 and then is angle cut on each end.
HOST CODE
My FEBRUARY HOST CODE is S2EYAW9N. Orders of $50.00 or more will receive an appreciation gift from me. I appreciate you choosing me as your demonstrator!
Thank you for stopping by today. I hope you enjoyed today’s project and will come back. I do read and reply to all of the comments individually. They mean a lot to me. Please reach out if you have a question.
Smile and Keep On Stamping,
Jackie
New Scrapbooking Catalog
The newest addition to Stampin’ Up! is an Online catalog of Scrapbooking products. You can see the catalog by clicking the photo below and save it to your computer.
Online Exclusives
New Online Exclusives have dropped. There are Halloween, Fall, Christmas, and many that are great year round. Of course the new Designer Series Papers and Embellishments are fabulous as well!
You can go directly to these in my Online Store by clicking HERE
I have mixed two of the heart stamp sets that are current with Stampin’ Up!. The Adoring Hearts stamp set and the Hearts of Elegance Dies. Add some gorgeous DSP and you have a lovely card.
STAMPS
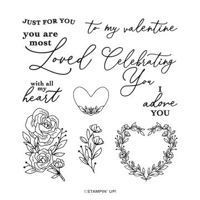
The focal heart is made from the two products mentioned at the beginning. The sweet sentiment and the flowers are from the Adoring Hearts stamp set. I had the idea of the paper and heart but what to be the focal part was a problem. As soon as I looked through the stamps in the stamp set I found exactly what would fit.
These are stamped after the heart is cut. That makes placement very easy. The flowers are stamped with Memento Tuxedo Black Ink and colored using Old Olive and Pretty In Pink Stampin’ Blends.
DIES
The heart die cut is from the Hearts of Elegance Die set. Is it a part of the bundle with the DSP and the Gold Twine. There are two large hearts, a solid and an outline. Then there are a series of layering dies. This is the second largest of those.
PAPERS
To help the marbled sheet of DSP stand out I used a second sheet from the pack. These are both from t he Marbled Elegance Designer Series Paper. I was not sure in the beginning how well they would work together. After layering the White I was sure I had chosen correctly to help everything stand out.
The card base is Pretty In Pink which is the lightest color in the marbled DSP. The layers measure 4 X 5 1/4, 3 7/8 X 5 1/8, then 2 3/4 X 4 and 2 5/8 X 3 7/8. The heart was from a scrap of Basic White.
EXTRAS
There are two extras to complete this card. I wanted to carry on with the gold. So I chose the Gold Twisted Twine. It is wrapped around the marbled layer three times. I then added a triple strand bow to the front. I tucked the heart behind the twine thinking it looked better that way.
The bling is a subtle one. I went with a single bling for a change. This is the Regal Foiled Adhesive Dots. There are four colors and I chose the pinkish one. (That is a technical term:)
HOST CODE
My FEBRUARY HOST CODE is S2EYAW9N. Orders of $50.00 or more will receive an appreciation gift from me. I appreciate you choosing me as your demonstrator!
Thank you for stopping by today. I hope you enjoyed today’s project and will come back. I do read and reply to all of the comments individually. They mean a lot to me. Please reach out if you have a question.
Smile and Keep On Stamping,
Jackie
New Scrapbooking Catalog
The newest addition to Stampin’ Up! is an Online catalog of Scrapbooking products. You can see the catalog by clicking the photo below and save it to your computer.
Online Exclusives
New Online Exclusives have dropped. There are Halloween, Fall, Christmas, and many that are great year round. Of course the new Designer Series Papers and Embellishments are fabulous as well!
You can go directly to these in my Online Store by clicking HERE
I have another first on today’s card. Not a super first, but a step for myself. A few weeks ago I shared a card using one of the Kits. It was the Watercolor one. That was the first time I had used a kit project. (You can see that post HERE) And today I have used die cut / punch outs from one of the DSP. It is similar to what the kits contain. To say I was impressed with the paper and the colors is an understatement. I was amazed and in love. So much that it is the star of today’s card.
PAPERS
The amazing DSP pack this gorgeous bouquet comes from is the Wildflower Birthday Designer Series Paper. There are two sheets of punch outs just as there are two sheets of each pattern paper. All of these punch outs are as pretty as this bouquet. I hope you see why it is the star of the card. Now I am ready to give all of the kits another look.
This is also the second time in recent days that I have used Blueberry Bushel for the card base. This bright color pops on it’s own. And it really pulls the bits of blue from the bouquet. The blue is the first thing I notice now.
STAMPS
The bouquet really is impressive and fills the front of the card. So there was not a lot of need, or room, for a sentiment layer. However I wanted to add one. So I went with this simple sentiment using two different stamps from the Sentimental Park stamp set. Because they are photopolymer, it was so easy to stamp the bottom sentiment and then add the top centered above it. To give the Basic White strip a touch of extra, I flagged each end with my paper snips.
EXTRAS
This bouquet is beautiful but it still needed something behind it. To add some additional texture I went with the Distressed Tile Embossing Folder. I think it adds just the right background without taking away from the bouquet.
To add bling to match the gold from the bouquet, I added a trio of the Gold Textured Adhesive Dots along with a bow from the Gold Twisted Thread. This thread is easy to work with and a great way to add some shine to a card.
HOST CODE
My FEBRUARY HOST CODE is S2EYAW9N. Orders of $50.00 or more will receive an appreciation gift from me. I appreciate you choosing me as your demonstrator!
Thank you for stopping by today. I hope you enjoyed today’s project and will come back. I do read and reply to all of the comments individually. They mean a lot to me. Please reach out if you have a question.
Smile and Keep On Stamping,
Jackie
New Scrapbooking Catalog
The newest addition to Stampin’ Up! is an Online catalog of Scrapbooking products. You can see the catalog by clicking the photo below and save it to your computer.
Online Exclusives
New Online Exclusives have dropped. There are Halloween, Fall, Christmas, and many that are great year round. Of course the new Designer Series Papers and Embellishments are fabulous as well!
You can go directly to these in my Online Store by clicking HERE
I am sharing a card made with a couple of the new additions to the Sale-A-Bration options. The new additions are all wonderful products and some are from current catalogs. That is not a regular occurrence. My card idea showcases the new Beautiful Butterflies Bundle and the Happy Labels Punch.
STAMP BUNDLE
The Beautiful Butterflies Bundle is a winner in my book. It includes the awesome stamp set with gorgeous butterflies. (The smallest is shown lighting on my banner) Plus a matching Die set, and a Hybrid Embossing Folder. I have used the embossing folder as my layer here. You can see the amazing details.
This background needed a bold sentiment as I wasn’t really adding a focal layer of the normal kind. The sentiment and the butterfly are from the stamp set. The butterfly is fussy cut as there is not a matching Die for it. But it is a quick one to cut out.
The stamp set is the only part of the bundle that has been added to the Sale-A-Bration options. If you choose this, with a qualifying order, remember to use the product number on the flyer or on your computer in the options. Do not use the catalog product number.
PAPERS
This idea of a simple but bold card first started with what color to use. I chose Granny Apple Green as the card base and Lemon Lolly for the layer. With some colors, the Lemon Lolly seems very light and does not really stand out. I was very pleased that it does stand out with the Granny Apple Green. To make a different type layer for the sentiment, I also used more of the Granny Apple Green. Color wise this is a simple card with only a couple of colors and no pattern papers.
EXTRAS
The first Extra is the second of the new Sale-A-Bration Options. It is the Happy Labels Pick A Punch. I cut the two layers for the sentiment and then punched the ends of both using the larger of the ticket look. The White is 3 3/4 X 3/4 and the Granny Apple Green is 4 X 1, or roughly those dimensions before punching.
To add sparkle and bling I went with two different options, but both are silver. The first is the ribbon. It is the White and Silver Ribbon. I love the shine it brings to the card. And then to add more silver shine, I opted to use the adhesive backed Sparkle Gems. These have several base colors and I used the silver one. You should see three of them scattered around.
Sale-A-Bration Additions for February
HOST CODE
My FEBRUARY HOST CODE is S2EYAW9N. Orders of $50.00 or more will receive an appreciation gift from me. I appreciate you choosing me as your demonstrator!
Thank you for stopping by today. I hope you enjoyed today’s project and will come back. I do read and reply to all of the comments individually. They mean a lot to me. Please reach out if you have a question.
Smile and Keep On Stamping,
Jackie
New Scrapbooking Catalog
The newest addition to Stampin’ Up! is an Online catalog of Scrapbooking products. You can see the catalog by clicking the photo below and save it to your computer.
Online Exclusives
New Online Exclusives have dropped. There are Halloween, Fall, Christmas, and many that are great year round. Of course the new Designer Series Papers and Embellishments are fabulous as well!
You can go directly to these in my Online Store by clicking HERE
The content in this blog is the sole responsibility of Jackie Beers as an Independent Stampin' Up! Demonstrator. The use of and content of classes, services or products offered is not endorsed by Stampin' Up!