The Friendly Seagulls stamp set from Sale-A-Bration is one that makes me smile every time I look at it. I am a huge french fry fan and apparently so are these guys. This card is one that only takes a couple of products to create. And when you add a Free stamp set, it is definitely a winner!
STAMPS
There is one additional stamp set used in addition to Friendly Seagulls. It is the texture around the edges of the Crumb Cake card base. This stamp is from the Lovely & Sweet stamp set. I used tone on tone to add this texture.
The Friendly Seagull is stamped on a scrap Basic White and then fussy cut. He is colored with Stampin’ Blends. The french fry box is as well. I love the flock of birds in the top left as an addition for distance. And stamping them off of the “scene” area is something I like to do. I have a painting that has part of the picture painted on the matting. This made me think of that.
The sentiment is fun and bold. So it needed to stand alone. I stamped the two parts and then did straight cuts, no fussy cutting, to keep it simple. The way they are placed makes it seem as if the seagull is shouting out his love of fries. Except for having his mouth full of them. 🙂
PAPERS
This is one of the simplest cards in regard to papers. There are only two. The Crumb Cake card base and then the Basic white for everything else. I used scraps for the seagull, fries, and sentiments. Since I stamp almost every day, I have a ton of scraps from cutting paper. I try to keep them under control but White is the one that can quickly become overloaded!
EXTRAS
The special part of the card is the Pool Party square. This is such a fun and easy technique. I inked the Clear Block D with Pool Party ink, stamped off, and then stamped onto my square of Basic White. And that is my ocean. To add some texture, and bling, I added a trio of the Antique Pearls to the bottom. The seagull is popped up with dimensionals and the fries are glued down. So the pearls are in between the two in terms of height.
HOST CODE
My FEBRUARY Host Code is S2EYAW9N. Orders of $50.00 or more will receive an appreciation gift from me. I appreciate you choosing me as your demonstrator!
Thank you for stopping by today. I hope you enjoyed today’s project and will come back. I do read and reply to all of the comments individually. They mean a lot to me. Please reach out if you have a question.
Smile and Keep On Stamping,
Jackie
New Scrapbooking Catalog
The newest addition to Stampin’ Up! is an Online catalog of Scrapbooking products. You can see the catalog by clicking the photo below and save it to your computer.
Online Exclusives
New Online Exclusives have dropped. There are Halloween, Fall, Christmas, and many that are great year round. Of course the new Designer Series Papers and Embellishments are fabulous as well!
You can go directly to these in my Online Store by clicking HERE
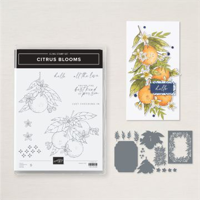
I have matched the Citrus Blooms set with the fun Sale-A-Bration Fruit Salad DSP. They are perfect pairing for a sweet card.
Speaking of SAB, have you seen the new February additions? Oh My!!! There are several from Current catalogs in the list. Just remember that there are different product numbers on the SAB sheet for these products. If you use the catalog number they will show up as a price and not Free. Here is the flyer.
Now here is the focus of today’s post.
STAMPS& DIES
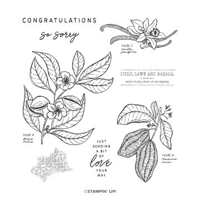
The Citrus Blooms stamp set from the Annual Catalog seemed a great pairing to go with these fun papers. Plus I just love the fruit images. And I love to color. This orange is colored with Stampin’ Blends to look somewhat like an orange.
Those little stars, I believe they are supposed to be little flowers, are from the matching Die set. I think they make a great addition of color and texture for the card. And the sentiment is from the set as well. I think it is an especially nice sentiment for a friend or as a Thank You.
PAPERS
These two different DSP pieces are from the Fruit Salad Designer Series Paper pack from Sale-A-Bration. The color are what made me look for a piece of fruit to pair with them. That and the Fruit Salad name of course! I paired Lemon Lime Twist for the card base with Basic White between the DSP layers. The addition of the Daffodil Delight stars ties everything together easily.
EXTRAS
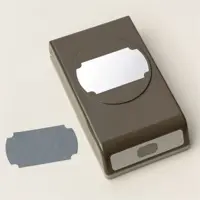
There are actually a few Extras today. First is the punch for the sentiment. This is the Labeled With Love Punch. It is a great size and I really like the touches on the ends for a little more detail. The stars probably count as some extra. But I still had to add some bling. So there are a scattering of Gold Textured Adhesive Dots to add some shine.
MEASUREMENTS
To give you info on the layers, I have the measurements for you. The card base is 4 1/4 X 11, folded at 5 1/2. The first White layer is 4 X 5 1/4. And the yellow DSP is 3 7/8 X 5 1/8. The second White is 3 1/4 X 4 1/2 with the green at 3 1/8 X 4 3/8. You all know how much I love layers!!
HOST CODE
My January Host Code is KSG3THS3. Orders of $50.00 or more will receive an appreciation gift from me. I appreciate you choosing me as your demonstrator!
Thank you for stopping by today. I hope you enjoyed today’s project and will come back. I do read and reply to all of the comments individually. They mean a lot to me. Please reach out if you have a question.
Smile and Keep On Stamping,
Jackie
New Scrapbooking Catalog
The newest addition to Stampin’ Up! is an Online catalog of Scrapbooking products. You can see the catalog by clicking the photo below and save it to your computer.
Online Exclusives
New Online Exclusives have dropped. There are Halloween, Fall, Christmas, and many that are great year round. Of course the new Designer Series Papers and Embellishments are fabulous as well!
You can go directly to these in my Online Store by clicking HERE
I have a simple and sweet card for you today. The Book fold is a Fun Fold that is really easy to make. It is paired with a quick stamped image for a simply sweet card. I added a touch of humor in the sentiment as the final touch.
Here is the open view
STAMPS
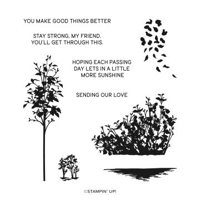
There are two stamp sets on this card. The tree image is from the Delicate Forest stamp set. I love the simpleness of the tree. This image has been used previously on a sympathy card. I thought the more shadow look of the tree was perfect. And I was headed that way today. But decided that it really did not need to be a sympathy. It works for any type card. And I love stamping on the DSP. The Pebbled Path Ink does lend it to a shadow look though. I also used the small tree stamp to adorn the inside of the card. You can see that in the second photo. This type card can get by without an inside sentiment I think.
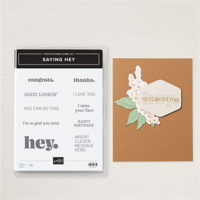
The fun sentiment is from the Saying Hey stamp set. This may be one that you have overlooked in the Annual Catalog. It includes the basic sentiments that we all want like Happy Birthday, but also some really fun ones like today’s. I believe this is a great way to tell someone you miss them.
PAPERS
These two DSP sheets are both from the Everyday Skies Designer Series Paper. This is a 6X6 pack of papers that have fabulous sky images on one side and then complimentary patterns on the opposite. Both of these are the reverse side of papers. I paired them with Pretty In Pink for the card base. This paper pack is an Online Exclusive.
The Bookfold is a simple card base. The Pretty In Pink is 11 X 4 1/4. Score it at 4 1/4 and then 5 1/2. Fold on both score lines and then add adhesive between the two. This makes the “spine” of the book. Easy Peasy!
EXTRAS
The sentiment layer is a big extra. These layering Dies are from the Mixed Labels Dies that are a Bundle in the Online Exclusives. I love the different little details around the edges. Another simple Extra is the White Frayed Grosgrain Ribbon. A little knot and it is a nice touch added to the spine. For an added bonus, this ribbon is on the Last Chance List at almost half price. And to compliment more of the White, I added a scattering of Pearls around the front layer.
HOST CODE
My January Host Code is KSG3THS3. Orders of $50.00 or more will receive an appreciation gift from me. I appreciate you choosing me as your demonstrator!
Thank you for stopping by today. I hope you enjoyed today’s project and will come back. I do read and reply to all of the comments individually. They mean a lot to me. Please reach out if you have a question.
Smile and Keep On Stamping,
Jackie
New Scrapbooking Catalog
The newest addition to Stampin’ Up! is an Online catalog of Scrapbooking products. You can see the catalog by clicking the photo below and save it to your computer.
Online Exclusives
New Online Exclusives have dropped. There are Halloween, Fall, Christmas, and many that are great year round. Of course the new Designer Series Papers and Embellishments are fabulous as well!
You can go directly to these in my Online Store by clicking HERE
I have had the Ocean Friends Bundle for a month and this is the first time I have inked it up. That is shocking! Now I see a lot more crabs in my future. And choosing the colors is such a fun task to make the crab your own.
I apologize for the darkness. not sure what is going on with my photography.
STAMPS& DIES
The Ocean Friends stamp set is such a cute set. The crab and lobster are a perfect mix of real and fun. Plus the sentiments are sweet like this Hello, Friend. The seaweed behind the crab is part of the stamps. It did not have a matching Die but was not difficult to fussy cut. The crab did have a Die and was easy to cut.
There are different thoughts regarding two step stamping. I go back and forth with which should be stamped first the solid or the outline. For me on the crab it was easier to line things up with stamping the outline first. I used Pumpkin Pie for the outline. Then I was able to line up the solid with the top near the eyes and the bottom legs. Peach Pie was used for the solid shape. But everyone has their own technique.
PAPERS
The adorable starfish paper is one of the amazing sheets from the pack of Friends of The Ocean Designer Series Paper. Those colors are a mix of exactly my colors. I wanted to use more of it, but also wanted the embossing folder. The compromise of this strip surprised me at how well it stands out. I paired it with bright colors that come from the paper. Again the dark photography doesn’t do it justice. The card base is Lemon Lime Twist with the embossed layer being Summer Splash.
The measurements are 5 1/2 X 8 1/2 for the card base. With the layer being 5 X 3 3/4. And the strip of DSP is 4 3/4 2. I liked giving the waves some show off space but still have enough of the starfish paper showing.
EXTRAS
The main of the extras is an embossing folder that is part of the ocean Suite. It is the Soft Waves Embossing Folder. The swirls are amazing, and perfect for the images. Of course the bling matches well also. The Antique Pearls are scattered around the waves for some shine there.
HOST CODE
My January Host Code is KSG3THS3. Orders of $50.00 or more will receive an appreciation gift from me. I appreciate you choosing me as your demonstrator!
Thank you for stopping by today. I hope you enjoyed today’s project and will come back. I do read and reply to all of the comments individually. They mean a lot to me. Please reach out if you have a question.
Smile and Keep On Stamping,
Jackie
New Scrapbooking Catalog
The newest addition to Stampin’ Up! is an Online catalog of Scrapbooking products. You can see the catalog by clicking the photo below and save it to your computer.
Online Exclusives
New Online Exclusives have dropped. There are Halloween, Fall, Christmas, and many that are great year round. Of course the new Designer Series Papers and Embellishments are fabulous as well!
You can go directly to these in my Online Store by clicking HERE
I have a Bookmark Card using the new For The Books Stamp set as the highlight. The basics are pretty simple and offer so many ways to decorate. This is a case from Connie Stewart and is fairly quick to make.
Stampin’ Up!, For The Books, Jackie Beers
STAMPS
There are actually two different stamp sets used on today’s card. First is the new For The Books set. These stacked books on the front, along with the adorable glasses, are from the stamp set. I also added additional books on the inside as well as a fun sentiment from the set. Plus the bookmark itself has a funny sentiment that is perfectly fitting.
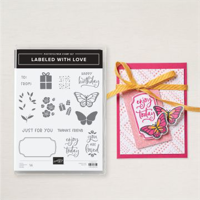
The front sentiment is from the Labeled With Love stamp set. This set has some “go to” stamps for me. The front one is one of those, as is the inside Happy Birthday. It is small and a nice mix of fonts. Here are the other two views of this card.
The addition of the strip of the DSP helps give the books a shelf to sit on. And I love that fun 5 star rating!
The DSP is added to all aspects of the card, including the bookmark. And this is another of the fun sentiments from the For The Books stamp set.
PAPERS
This card base was pulled from the DSP of course. The base is Basic Beige, which is a fabulous Neutral to have on hand. But the star is this Timeless Plaid Designer Series Paper. Sadly it is still out of stock, but supposed to be back before long. I added a layer of Boho Blue cardstock behind the front DSP and to back the books on the front.
EXTRAS
There are several Extras today. First is the Forever Plaid 3D Embossing Folder on the front bookmark holder. I felt this was appropriate to pair with the DSP. Next is the Heartfelt Hexagon Punch for the stack of books. I also punched from Boho Blue and cut that piece in half to act as a layer behind the White. It needed a bit of color to stand out some.
To finish off the bookmark, I used one of the Postage Stamp Dies to cut the bookmark sentiment. And added the Beige and Wild Wheat Ribbon as the ribbon pull. Finally, because there really were a lot of extras, the bling is a trio of the 2024-2026 Shimmer Gems.
HOST CODE
My January Host Code is KSG3THS3. Orders of $50.00 or more will receive an appreciation gift from me. I appreciate you choosing me as your demonstrator!
Thank you for stopping by today. I hope you enjoyed today’s project and will come back. I do read and reply to all of the comments individually. They mean a lot to me. Please reach out if you have a question.
Smile and Keep On Stamping,
Jackie
New Scrapbooking Catalog
The newest addition to Stampin’ Up! is an Online catalog of Scrapbooking products. You can see the catalog by clicking the photo below and save it to your computer.
Online Exclusives
New Online Exclusives have dropped. There are Halloween, Fall, Christmas, and many that are great year round. Of course the new Designer Series Papers and Embellishments are fabulous as well!
You can go directly to these in my Online Store by clicking HERE
The content in this blog is the sole responsibility of Jackie Beers as an Independent Stampin' Up! Demonstrator. The use of and content of classes, services or products offered is not endorsed by Stampin' Up!