I have been all about simple cards so far this week and today is no exception! This one truly is a #simplestamping card.
Cutest Crew
The Cutest Crew stamp set has to be one of the “cutest” stamp sets in a while. It has both cats and dogs, and they are adorable! I love both, actually most animals, so of course it was immediately on my list when it first debuted. I used the little birds, which I had really not even looked at originally, along with the sweet sentiment. Both are stamped using Memento Tuxedo Black and the birds are given a touch of color with some Stampin’ Blends. I also stamped the birds on the inside layer of the card for added fun.
Blending
This is a super simple card but I wanted to add a touch of extra to it. So I stamped the birds and the sentiment and then did something I do not often do. I used Blending Brushes to create the background colors. Pool Party is used for the sky and Old Olive for the grass.
Even if you are new to Blending Brushes and Blending Ink on your paper, this is an easy one to do. I will say “always…begin with the brush off of your cardstock”. And less is more. You can add more color, but cannot take away. Start with just a bit of color on your brush, rub it on your Grid Paper, then slide it across the grid paper and onto your cardstock. This alleviates the dark spots that happen. And if that happens don’t fret over it. An embellishment or some darker shading next to it can camouflage that. After all, these are handmade!!
Papers
I chose the Cute As A Bug Designer Series paper to go with my sweet layer. The two sheets compliment each other and are both bright and cheerful. I layered the two pieces, which each measures 5 1/8 X 1 7/8, on to a Basic White that measures 5 1/4 X 4. Two cover any joining issues, I added a strip of Old Olive that is 5 1/4 X 1/4. The only Extra today is a single Brushed Brass Butterfly. These went on the Last Chance List and were immediately scooped up. So sadly they have all flown away. They will be missed by me!
To carry the fun theme to the inside, I layered the Basic White onto a piece of Poppy Parade cardstock. And added only the Pool Party blending over them
STAMPIN’ REWARDS
You will earn rewards on all orders over $20.00 in products The system will track your rewards for you. And they will be available for use on your next order, or you can save up for a larger purchase. All you need to do is on your first order is agree to participate. You will then begin receiving rewards on qualifying orders.
Orders of $50.00 or more you will still receive an appreciation gift from me. I appreciate you choosing me as your demonstrator!
COMMENTS
Please know that I love to hear from you and answer any questions you may have. My responses generally are not done here on the post. They are made using my phone as I have found it is easier to answer a question for you personally. So you will be receiving an email from me if you make a comment.
Thank you for stopping by today. I hope you enjoyed today’s project and will come back. I do read and reply to all of the comments individually. They mean a lot to me. Please reach out if you have a question.
Smile and Keep On Stamping,
Jackie
Online Exclusives
New Online Exclusives drop every other month. These are amazing products and are a supplement to the Annual and Mini Catalogs. This way you have access to even more New and Awesome products!
You can go directly to these in my Online Store by clicking HERE
My card I have to share today is made from the same template as yesterday. I wanted to show you how different the same base can appear. Having a simple Go To template can be a lifesaver when we need a quick card. Quick does not mean it is not a wonderful card.
Encircled With Love stamp set
The sweet sentiment I chose for this card is one that I love. It is simple, sweet, and says you care about the recipient. To go along with my Valentine idea card, I stamped using Real Red Ink. The hearts in the paper are Real Red, Strawberry Slush and Bubble Bath. This stamp set, Encircled With Love, is in the Annual Catalog in the DVD style case. Now Stampin’ Up! has issued it in the new style cases as well. If you choose the new style, be aware that it is a different product number. The new style case number is 169090.
Made With Love Designer Series Paper
These strips are the same as yesterday’s card and measure 1 X 5. This time I placed the card in landscape layout and used two different patterns from this fun DSP. To center the strips I used my grid paper to place the center one and then came in from each side. I thought I would make a simpler one and leave off the layer behind the strips.
Extras
To create the focal layer I used the 1 3/4′ and 2″ Circle Punches. The 2″ is Strawberry Slush with the stamped image cut with the 1 3/4″. I love circles for a clean and simple card. To add a bit more texture I also used the Bubble Bath Faux Linen Ribbon as I did yesterday. Instead of a small neat bow I went with a large and looser bow behind the sentiment layer. And for my bling Rhinestones were called in. The sentiment has three little star shapes. So a trio of rhinestones, one on each star, seemed the perfect fit.
STAMPIN’ REWARDS
You will earn rewards on all orders over $20.00 in products The system will track your rewards for you. And they will be available for use on your next order, or you can save up for a larger purchase. All you need to do is on your first order is agree to participate. You will then begin receiving rewards on qualifying orders.
Orders of $50.00 or more you will still receive an appreciation gift from me. I appreciate you choosing me as your demonstrator!
COMMENTS
Please know that I love to hear from you and answer any questions you may have. My responses generally are not done here on the post. They are made using my phone as I have found it is easier to answer a question for you personally. So you will be receiving an email from me if you make a comment.
Thank you for stopping by today. I hope you enjoyed today’s project and will come back. I do read and reply to all of the comments individually. They mean a lot to me. Please reach out if you have a question.
Smile and Keep On Stamping,
Jackie
Online Exclusives
New Online Exclusives drop every other month. These are amazing products and are a supplement to the Annual and Mini Catalogs. This way you have access to even more New and Awesome products!
You can go directly to these in my Online Store by clicking HERE
This fun title is actually a stamp. The first time I saw it I laughed out loud, and still do when I see it. And that is what I think our cards should do. Maybe not laugh out loud, but bring a smile or happiness to someone. Plus the way I have used it today is another “almost” no stamping card.
STAMPS
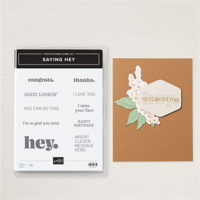
This fun sentiment is from the Saying Hey stamp set. Sadly it is on the Last Chance list. But if you do not have it, then it is not sad. It is currently marked down to $15.30. That is a steal for some fun and unusual sentiments. I thought this sentiment was perfect for the frame and the adorable little mouse. (They are only adorable when not real!!!) It is stamped on Basic Beige cardstock to go along with the other softer and antique looking colors. Then I just fussy cut it to keep it small and to fit on the frame.
PAPERS
These papers are once again from the Storybook Moments Designer Series Paper and sticker pack. The Wild Wheat background so reminds me of old timey wallpaper! Then the frame is from one of the sheets that has multiple different tags and small size images. As soon as I saw it, I went to the sticker page to see what would work inside the frame. Most of these stickers are the storybook animals. But this mouse seemed just right.. She is raised using Stampin’ Dimensionals to help her stand out from the frame
The card base color is pulled from the frame. I chose Flirty Flamingo. Then decided it required a layer between the wallpaper. Basic Beige seemed to go along with the antique as I said regarding the sentiment. So a thin layer breaks up those two darker colors.
EXTRAS
To add bling to this scene I have created was a little difficult. I went through all of my embellishments and most seemed to blend in more than stand out. When I came to the Antique Pearls, they were on my desk and not in the container, I knew these were the bling. They also fit with the antique look. I decided that a trio of them across the top of the frame would be the perfect location.
STAMPIN’ REWARDS
The new Stampin’ Rewards begins on April 15. I think you will Love this new version. You will earn rewards on all orders over $20.00 in products The system will track your rewards for you. And they will be available for use on your next order, or you can save up for a larger purchase. All you need to do is on your first order after April 15th is agree to participate. You will then begin receiving rewards on qualifying orders.
Orders of $50.00 or more you will still receive an appreciation gift from me. I appreciate you choosing me as your demonstrator!
Thank you for stopping by today. I hope you enjoyed today’s project and will come back. I do read and reply to all of the comments individually. They mean a lot to me. Please reach out if you have a question.
Smile and Keep On Stamping,
Jackie
New Scrapbooking Catalog
The newest addition to Stampin’ Up! is an Online catalog of Scrapbooking products. You can see the catalog by clicking the photo below and save it to your computer.
Online Exclusives
New Online Exclusives drop every other month. These are amazing products and are a supplement to the Annual and Mini Catalogs. This way you have access to even more New and Awesome products!
You can go directly to these in my Online Store by clicking HERE
A great way to let someone know we are thinking of them is by sending a card. And today’s card is Sending Love & Hugs! What a great combination.
Stamps and Dies
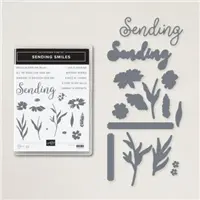
This card is one that I consider a Smile card. It brings a smile to my face with the fun colors and sentiment. Hopefully it does to you and the recipient as well. Plus it has SMILE in the name. The Sending Smiles Bundle is a die bundle. It includes the flowers and sentiments I used with additional pieces as well. Another nice thing about this card is that it was made using only the one stamp set. All of the sentiments which pair with the “Sending” are just as cute as this one is.
For the Dies used, most are from the Bundle. This includes the flowers, stems, sentiment shape, and the double layer of “Sending”. Additionally I used one of the Scallop Contours Dies for the shape of the background. Those scallops fit the personality of the other pieces.
Paper and Color
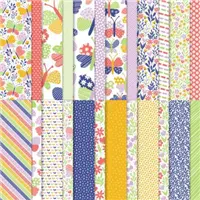
Strangely enough for me, the stamp set came before the DSP this time. But in deciding what colors to use for the flowers, I looked at different DSP to get them. And I found this sweet piece from the Butterfly Kisses Designer Series Paper. The bold hearts are a perfect match.
The flowers are Fresh Freesia stamped onto Fresh Freesia cardstock. The leaves and stems are Parakeet Party, as is the sentiment layer. Since these colors are softer, I wanted a bolder color for the large layer. And the Starry Sky fit perfectly. Again, I chose that from looking at which color stood out the most on the DSP piece.
Extra Touches
The two layers for the “sending” sentiment are what really makes this card I believe. And I will admit to having had to die cut two of the top layer. The first time I failed to add some of the Adhesive Sheets to the cardstock prior to cutting. Those letters are really too fine, and it’s a long word, for me to attempt to add liquid glue. So an adhesive sheet is a time and sanity saver for me!!
The final touch for the card was adding a little bit of bling. This time I used a couple of the Glossy Dots. They come in a variety of colors on one sheet and a variety of sizes. There are two of the small ones one each end of the sentiment and a large one on the largest flower.
Mini Catalog and Sale-A-Bration
Click on either catalog photo and you will be taken to my Online Store where you can download either or both catalogs.
HOST CODE
My August Host Code is H9KF4JUC. Please use this code for orders under $150.00. I will have a small gift for those with orders over $50.00 in addition to the Perk Rewards Program. You can read all of the information at the top of the page in the Menu Bar under SHOP / Perks.
Thank you for stopping by today. I hope you enjoyed today’s project and will come back. I do read and reply to all of the comments individually. They mean a lot to me. Please reach out if you have a question.
I have a monochromatic, sort of, card to share today. There is only one different color used. I have been in a bit of a whimsical card making mode the last few days. This one I believe is adorable. I hope you do as well!
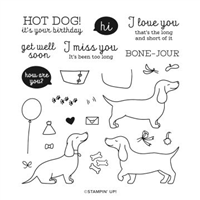
There were no cute pups harmed in the making of this card! LOL!!! As soon as I saw the sentiment in this Hog Dog stamp set, I knew I wanted to “stretch” the cute pup. I hope you all see this the same way I do.
I began by stamping the pup with Soft Suede Ink and coloring with both of the Cinnamon Cider Stampin’ Blends. I fussy cut around the pup leaving just a hair of a border. The difficult part was cutting him in half. To get the length I needed, I placed the stamp in the center of a strip of DSP and then layed the pup down on each side. The sentiment is stamped using Cinnamon Cider Ink.
For the Stitched Rectangle, I used the third largest rectangle and cut the ends and bottom section. I then moved the DSP piece up to the top as much as was needed and matched the end stitchings again. It takes just a minute of close looking to get the stitches lined back up. But it is well worth the trouble to get a stitched piece the size you need.
The card base is Coastal Cabana with a piece from the Playing With Pattern Designer Series Paper. I added the darker Bermuda Bay border to break up the two similar colors. The same is true for the focal layers.
For a finishing touch I added a collar to the pup with a scrap piece of Bermuda Bay and a stamped heart. I had to trim both to appear to fit the pup. The heart appears to be partially beneath his ear. Or at least I hope it appears that way! The balloon is in the stamp set along with the heart. I fussy cut the ballon and added string from the Snail Mail Twine Combo.
Thank you so much for stopping by today. I hope you enjoyed my touch of whimsy.
Here are the measurements:
5 1/2 X 8 1/2 card base
5 1/4 X 4 border layer
5 1/8 X 3 7/8 DSP
4 1/2 X 2 1/4 focal border layer
Pup layer used 3rd largest Stitched Rectangle Die and just cut to fit. Approximately, 4 3/8 X 2 1/8.
Reminder that several of the products on the Last Chance List have gone away. Don’t let your favorite get away from you. You can click on the picture below to go to the PDF. But the supplies have changed quite a bit. The best bet would be simply choose the Shop Now button at the top of the page and one of the sidebars on the Stampin’ Up! Website is the Last Chance Items. If you do place an order with me, and I would greatly appreciate it, please use the Host Code below the picture.
HOST CODE
My April Host Code is QGPT9TJG Please use this code for orders under $150.00. I will have a small perk for those with orders over $50.00
The content in this blog is the sole responsibility of Jackie Beers as an Independent Stampin' Up! Demonstrator. The use of and content of classes, services or products offered is not endorsed by Stampin' Up!