You are getting a couple of sneak peeks of upcoming Online Exclusives. I have gone a bit overboard on the demonstrator pre order on this upcoming release. It is fabulous. The card I am sharing is a case of the sample card when this goes Live next month.
STAMPS
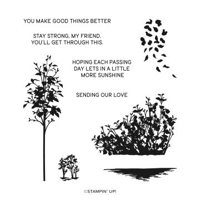
These trees are from the upcoming Online Exclusive stamp set Wooded Acres. I love the simple tree textures. However there is almost the exact stamp, but with full leaves, included in the set. It is a two stamp set. And after this card I am really excited to play with it even more.
The trees are stamped using Pebbled Path Ink. I believe it gives it the far off in the distance look without being too bold. If you look at the trio of trees on the bottom right and add them to the edge of the left side, that is the length of the stamp. So you can see how I stamped it off the paper with every inking.
The sentiment is from another of the preorder Online Exclusives. It is from a large Suite of products. This sentiment is from the Textured Notes stamp set. And like I said, it is a large Suite that you will fall in love with if you like natural and texture.
PAPERS& INKS
There are no special papers today. I used Berry Burst cardstock as the base with Wild Wheat cardstock for the narrow layer. Then I created the stamped background with inks and blending brushes. In my mind, it is a sunset view in the mountains.
The bottom section is a light coloring using Wild Wheat Ink. Next is the sunset using Berry Burst Ink. Finally the sky is Misty Moonlight. All of the colors were done fairly lightly.
EXTRAS
To tie in all of the ink colors I added the Natural Tones Linen Thread in the dark blue. I had used the other two ink colors with matching paper. But had not used a blue paper. So a wrap around and a bow took care of the blues.
The final touch is the bling! I used the Sale-A-Bration Purple Adhesive Sequins scattered around. There are different shades of purple/pink sequins in the package. I used three different shades to go along with my color shading.
HOST CODE
My FEBRUARY HOST CODE is S2EYAW9N. Orders of $50.00 or more will receive an appreciation gift from me. I appreciate you choosing me as your demonstrator!
Thank you for stopping by today. I hope you enjoyed today’s project and will come back. I do read and reply to all of the comments individually. They mean a lot to me. Please reach out if you have a question.
Smile and Keep On Stamping,
Jackie
New Scrapbooking Catalog
The newest addition to Stampin’ Up! is an Online catalog of Scrapbooking products. You can see the catalog by clicking the photo below and save it to your computer.
Online Exclusives
New Online Exclusives have dropped. There are Halloween, Fall, Christmas, and many that are great year round. Of course the new Designer Series Papers and Embellishments are fabulous as well!
You can go directly to these in my Online Store by clicking HERE
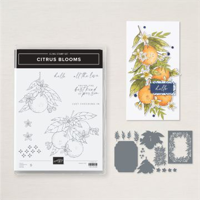
I have matched the Citrus Blooms set with the fun Sale-A-Bration Fruit Salad DSP. They are perfect pairing for a sweet card.
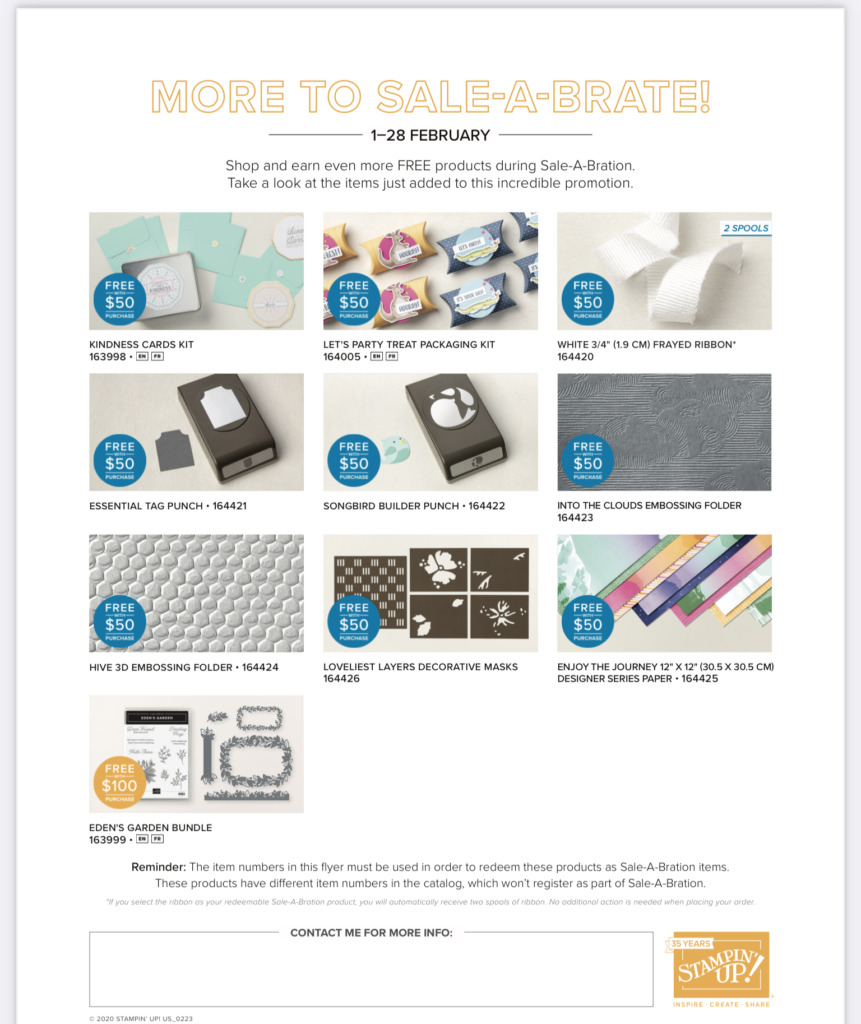
Speaking of SAB, have you seen the new February additions? Oh My!!! There are several from Current catalogs in the list. Just remember that there are different product numbers on the SAB sheet for these products. If you use the catalog number they will show up as a price and not Free. Here is the flyer.
Now here is the focus of today’s post.
STAMPS& DIES
The Citrus Blooms stamp set from the Annual Catalog seemed a great pairing to go with these fun papers. Plus I just love the fruit images. And I love to color. This orange is colored with Stampin’ Blends to look somewhat like an orange.
Those little stars, I believe they are supposed to be little flowers, are from the matching Die set. I think they make a great addition of color and texture for the card. And the sentiment is from the set as well. I think it is an especially nice sentiment for a friend or as a Thank You.
PAPERS
These two different DSP pieces are from the Fruit Salad Designer Series Paper pack from Sale-A-Bration. The color are what made me look for a piece of fruit to pair with them. That and the Fruit Salad name of course! I paired Lemon Lime Twist for the card base with Basic White between the DSP layers. The addition of the Daffodil Delight stars ties everything together easily.
EXTRAS
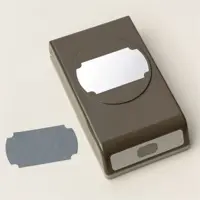
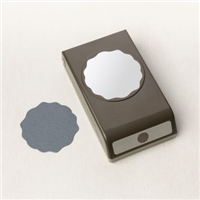
There are actually a few Extras today. First is the punch for the sentiment. This is the Labeled With Love Punch. It is a great size and I really like the touches on the ends for a little more detail. The stars probably count as some extra. But I still had to add some bling. So there are a scattering of Gold Textured Adhesive Dots to add some shine.
MEASUREMENTS
To give you info on the layers, I have the measurements for you. The card base is 4 1/4 X 11, folded at 5 1/2. The first White layer is 4 X 5 1/4. And the yellow DSP is 3 7/8 X 5 1/8. The second White is 3 1/4 X 4 1/2 with the green at 3 1/8 X 4 3/8. You all know how much I love layers!!
HOST CODE
My January Host Code is KSG3THS3. Orders of $50.00 or more will receive an appreciation gift from me. I appreciate you choosing me as your demonstrator!
Thank you for stopping by today. I hope you enjoyed today’s project and will come back. I do read and reply to all of the comments individually. They mean a lot to me. Please reach out if you have a question.
Smile and Keep On Stamping,
Jackie
New Scrapbooking Catalog
The newest addition to Stampin’ Up! is an Online catalog of Scrapbooking products. You can see the catalog by clicking the photo below and save it to your computer.
Online Exclusives
New Online Exclusives have dropped. There are Halloween, Fall, Christmas, and many that are great year round. Of course the new Designer Series Papers and Embellishments are fabulous as well!
You can go directly to these in my Online Store by clicking HERE
I have a simple and sweet card for you today. The Book fold is a Fun Fold that is really easy to make. It is paired with a quick stamped image for a simply sweet card. I added a touch of humor in the sentiment as the final touch.
Here is the open view
STAMPS
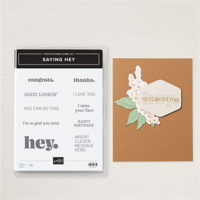
There are two stamp sets on this card. The tree image is from the Delicate Forest stamp set. I love the simpleness of the tree. This image has been used previously on a sympathy card. I thought the more shadow look of the tree was perfect. And I was headed that way today. But decided that it really did not need to be a sympathy. It works for any type card. And I love stamping on the DSP. The Pebbled Path Ink does lend it to a shadow look though. I also used the small tree stamp to adorn the inside of the card. You can see that in the second photo. This type card can get by without an inside sentiment I think.
The fun sentiment is from the Saying Hey stamp set. This may be one that you have overlooked in the Annual Catalog. It includes the basic sentiments that we all want like Happy Birthday, but also some really fun ones like today’s. I believe this is a great way to tell someone you miss them.
PAPERS
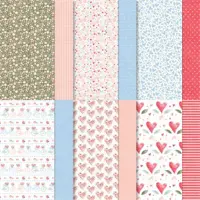
These two DSP sheets are both from the Everyday Skies Designer Series Paper. This is a 6X6 pack of papers that have fabulous sky images on one side and then complimentary patterns on the opposite. Both of these are the reverse side of papers. I paired them with Pretty In Pink for the card base. This paper pack is an Online Exclusive.
The Bookfold is a simple card base. The Pretty In Pink is 11 X 4 1/4. Score it at 4 1/4 and then 5 1/2. Fold on both score lines and then add adhesive between the two. This makes the “spine” of the book. Easy Peasy!
EXTRAS
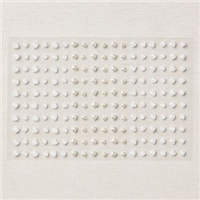
The sentiment layer is a big extra. These layering Dies are from the Mixed Labels Dies that are a Bundle in the Online Exclusives. I love the different little details around the edges. Another simple Extra is the White Frayed Grosgrain Ribbon. A little knot and it is a nice touch added to the spine. For an added bonus, this ribbon is on the Last Chance List at almost half price. And to compliment more of the White, I added a scattering of Pearls around the front layer.
HOST CODE
My January Host Code is KSG3THS3. Orders of $50.00 or more will receive an appreciation gift from me. I appreciate you choosing me as your demonstrator!
Thank you for stopping by today. I hope you enjoyed today’s project and will come back. I do read and reply to all of the comments individually. They mean a lot to me. Please reach out if you have a question.
Smile and Keep On Stamping,
Jackie
New Scrapbooking Catalog
The newest addition to Stampin’ Up! is an Online catalog of Scrapbooking products. You can see the catalog by clicking the photo below and save it to your computer.
Online Exclusives
New Online Exclusives have dropped. There are Halloween, Fall, Christmas, and many that are great year round. Of course the new Designer Series Papers and Embellishments are fabulous as well!
You can go directly to these in my Online Store by clicking HERE
I hope you are as excited as I am for the new Annual Catalog to be LIVE!!!!! My wallet is not quite as happy, but my heart is. Waiting on the new items is the hardest part. So I have a few new products to share with you in today’s card.
Stamps
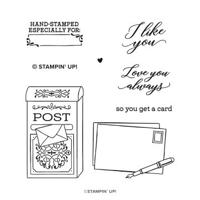
If you have been following me for very long, you know that I love the whimsical and just different stamp sets. This stamp set is not really different, but it spoke to me. And I am so happy it did. I believe this is the perfect image for a number of reasons. It is on page 117 of the new catalog. To make the post box a little brighter, I decided to add the touches of blue. The POST is stamped again on scrap with the Azure Afternoon Ink Pad. It is cut close to the letters and then overlayed over the black letters. I wanted it to stand out more and that was a simple way to do that. The pretty plaque on the box is colored with the Azure Afternoon Stampin’ Blends.
A simple Note is a great reason for a card. Especially when the sentiment is so elegantly scripted for the I Like You sentiment. To go along with that sweet front sentiment, the inside one is even better. Sadly I forgot to take a picture of it. But it is a very plain block letter that says “so you get a card” !! I love that! You get classy and simple all in one card.
Layers and Colors
The card base is Basic White to go along with the image layers. And the first thin Basic Black layer is to add to the pop of the black with the post box and the sentiment. The pretty layer is the Azure Afternoon card stock embossed using the Quatrefoil Tile Embossing Folder. In my mind it somewhat is similar to the plaque on the post box.
Dies
The fun shapes for the image and sentiment are from the Countryside Corners Dies. There are five dies like the image one and then two small for sentiments. They are a great size for most images and for layering. The sentiment piece is another example of a use of the die. It is the smaller of the 5 same shaped ones. I die cut it and then stamped in the upper end. Using the Paper Trimmer I then cut it just below the sentiment. By placing it in the bottom corner, it seems a perfect shape and fit. The final touch was a scattering of the Classic Matte Dots in black. The third one is sort of hiding. It is in the center of the blue plaque on the post box.
Thank you for stopping by today! Please let me know if you have any questions.
Online exclusives are here to stay! Click on the photo and be taken directly to them in my online store. If you place an order, please use my Host Code listed just below.
HOST CODE
My May Host Code is K326G6VQ. Please use this code for orders under $150.00. I will have a small gift for those with orders over $50.00 in addition to the Perk Rewards Program. You can read all of the information at the top of the page in the Menu Bar under SHOP / Perks.
Thank you for stopping by today. I hope you enjoyed today’s project and will come back. I do read and reply to all of the comments individually. They mean a lot to me. Please reach out if you have a question.
Today’s card is a sweet Friendship or Valentine card. The Country Bouquet Bundle is an awesome one. I love the colors of the Designer Series paper. It is a happy paper for sure.
Paper
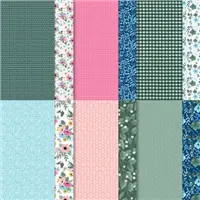
This beautiful DSP is the Country Floral Designer Series Paper. The colors and designs are somewhat Country, as the name suggests. But they are wonderful together and have a different sort of mix. I love the unexpected bicycle print on the larger piece I used. The vertical strip of Balmy Blue DSP is from the same pack of papers. And of course, all of my other color choices came from the bicycle print.
Stamps
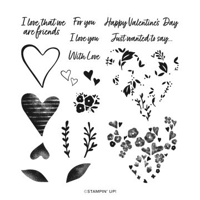
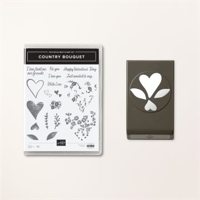
I do have to say that the Country Bouquet Punch is out of stock until April. However, you can still purchase the stamp set. The sentiment and stamps are wonderful and since it is a punch containing the two hearts, you could quite easily cut them out. I stamped and then cut these two hearts. The left and right ones are from the set. As is the sentiment.
Punches
As I said, the Country Bouquet Punch is not in stock, but there are other heart punches. For the center heart with the sentiment, I used the Heart Punch Pack. This is the smaller of the two hearts. I believe it fits perfectly here between the two curvy hearts.
Finishes
To complete the card, I chose the Sweet Sorbet as the background for the bicycle print. That is the color I used to stamp the two hearts also. And since there are hearts in the strip of Balmy Blue DSP, I added one more. The Heart Pearls are a wonderful embellishment to have on hand. They fit in here perfectly.
Thank you for stopping by today !!!
Additional FREE Sale-A-Bration Items for February…..
Sale-A-Bration and Join Promotion
Not only is SAB all about Free Products, but Stampin’ Up! has really upped the rewards if you choose to join my team.
The regular Starter Kit, I call it the Ultimate Bundle, is 125.00 in product for 99.00. You get to choose all of the products yourself. For these two months of SAB, there are three options for you to choose and the rewards are amazing!
Option 1: The exclusive Boho Blue Mini Machine ($63 ) + your choice of $175 of Stampin’ Up! products for only $129 .
Option 2: The original white Mini Machine ($63 ) + your choice of $175 of Stampin’ Up! products for only $129 .
Option 3: Your choice of $175 of Stampin’ Up! products for only $99 .
Options 1 and 2 offer you 50.00 more in product and the Mini Machine for only 30.00 above the regular price.
Option 3 offers you $50 more product than the standard Starter Kit offer for the regular price!
These are the best deals I have seen. If you are interested, please reach out to me and let’s chat about it.
HOST CODE
My February Host Code is FCF2FJVJ. Please use this code for orders under $150.00. I will have a small gift for those with orders over $50.00 in addition to the Perk Rewards Program. You can read all of the information at the top of the page in the Menu Bar under SHOP / Perks.
Thank you for stopping by today. I hope you enjoyed today’s project and will come back. I do read and reply to all of the comments individually. They mean a lot to me. Please reach out if you have a question.
Today’s card is a mix of current and upcoming products. I love how Stampin’ Up! products work well together regardless of old or new.
Paper and Colors
I knew which stamp set I wanted for this card, but needed some direction with the color and flow. Turning to my DSP is always my next step. The colors and patterns are wonderful. Yesterday I shared with you the Fitting Florets Designer Series Paper. (You can see that card HERE!) And today I have gone back to the Fitting Florets for yet another piece of that gorgeous paper.
This one is very bright and happy. And it led me to this finished product. The Night of Navy and Balmy Blue are a perfect match. It is the unexpected Polished Pink that is the surprise and the star!
Stamps
Beginning with the Polished Pink and hearts was a fairly certain thing. The stamps used are from the upcoming Country Bouquet stamp set and punch Bundle. Did you notice Punch Bundle? They are my favorite type of Bundles because they are less expensive and so quick and easy. The two hearts are on one stamp but punch with one punch due to the layout. That is an extra bonus. Personally I also love the distressed, or I suppose Country, look of the hearts. A bit of a softer look.
Punches
I went a bit heavy with punches for this card. The background of the focal layer is the Decorative Circle Punch. Then the leaves and flowers are from the Boughs Punch. And last but not least is the sentiment layer of the Label Me Fancy Punch. But as I mentioned before, they are so easy to look at your punch stash and decide what works best.
Hopefully this card works for you! I love the mix of the dark and bright colors. So to finish it off, I went with a few of the 2021-2023 In Color Opals in Polished Pink. They are scattered on the boughs and a larger one on the sentiment layer. And to finish the sentiment layer I chose one of the 2022-2024 items. It is the Twine in those In Colors. This one is Starry Sky, but against the mix of Night of Navy and Balmy Blue, it works perfectly.
HOST CODE
My December Host Code is Y7T7EMTC. Please use this code for orders under $150.00. I will have a small gift for those with orders over $50.00 in addition to the Perk Rewards Program. You can read all of the information at the top of the page in the Menu Bar under SHOP / Perks.
Thank you for stopping by today. I hope you enjoyed today’s project and will come back. I do read and reply to all of the comments individually. They mean a lot to me. Please reach out if you have a question.
The content in this blog is the sole responsibility of Jackie Beers as an Independent Stampin' Up! Demonstrator. The use of and content of classes, services or products offered is not endorsed by Stampin' Up!