A dear friend and former co-worker had a milestone birthday yesterday. He is a happy 80 years of age! So I had to make him a special birthday card. I did not add the numbers, but did use the colors for his favorite team.
Colors
The colors for the card are Red and Black. I began with a piece of Thick Basic White cardstock with a top fold. That is my preference because it is so easy to display with that fold. The DSP is from the Pattern Party Designer Series Paper. This is a FABULOUS pack of paper that is a Host Rewards only purchase. There are 48 sheets of DSP in this pack. And what a variety!!!
I added a layer of Basic Black between the Thick White and the DSP. Otherwise the DSP would just blend in with the White. The red bow ties, and red strips with the Happy Birthday compliment the black of the DSP very well. Of course I had to add some of the Black Dots to tie everything together.
Stamps
I used my first choice for this manly card. It is the Biggest Wish stamp set for the Happy Birthday. I stamped in Memento Tuxedo Black and then embossed it with Clear Embossing Powder. It simply makes the sentiment shine!
The bow ties are stamped using Real Red Ink and then die cut using the Suit & Tie Dies. There are actually two different bow ties, but I opted to use the larger one.
This was really a pretty quick card to create. The hardest part was figuring the layout with the sentiment strips. I hope you enjoyed today’s card.
The picture below shows the Designer Series Papers that are included in the Sale. There are 9 to choose from!!
HOST CODE
My July Host Code is 2GKGF4Q7. Please use this code for orders under $150.00. I will have a small gift for those with orders over $50.00 in addition to the Perk Rewards Program. You can read all of the information at the top of the page in the Menu Bar under SHOP / Perks.
Thank you for stopping by today. I hope you enjoyed today’s project and will come back. I do read and reply to all of the comments individually. They mean a lot to me. Please reach out if you have a question.
The card I have to share with you today is one of my favorites. It is a gift card holder. I love gift cards more and more I as I get older. I never know what gift to give someone. So I make quite a few cards to enclose gift cards in.
Layout
This card is the one I mentioned on Tuesday’s post. You can see that post here to compare cards. This card led me to make the card from Tuesday. The only differences are the horizontal vs vertical and that this holds a gift card.
Here is a photo of the section opened
I have not added an inside sentiment. I tend to wait until I know who is going to receive the card. The difference between the two cards is the length of this folded piece. This one is 4 X 11, scored at 3, 6, & 9. The 9 fold is folded onto itself and adhered along the sides to hold the gift card.
Paper and Stamps
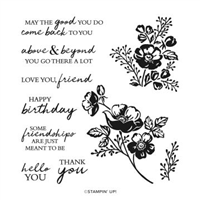
The gorgeous paper that is showing on the base layer and the gift card section is from the Beauty of The Earth Designer Series Paper. And it is one of the DSP Sale packs for 15% off!!!! The stamp set is the Lovely You stamp set. I thought the leaf stamp matched the blue image in the DSP.
The image is stamped using Misty Moonlight Ink and is stamped off before stamping on the cardstock. I did three or four stampings to make the image I wanted. The Just Because is also in the stamp set. Sometimes we do not need a special occasion to think of those we care about and send them a little something!
Finishing
Even though this card is a bit simple, it still requites a bit of a final touch. For me it was deciding how to keep the folded section secure. I debated on a belly band, but finally decided on adding some ribbon. I wanted the blue and the Misty Moonlight ribbon has retired. The little idea bulb popped on though with regard to Stampin’ Blends.
I used the White Crinkle Seam Binding Ribbon and my Silicone Mat. By simply dragging the Light Misty Moonlight Stampin’ Blend across the ribbon, it colored very quickly. The ink spreads a bit. So the coloring , even for a longer length like this one, is very quick. And it dries almost immediately. Plus there is the added bonus that the coloring takes away the static cling that this ribbon tends to have. Win/ Win/ Win!!!
Measurements
Base card is 5 1/2 X 4 1/4
White layer is 5 1/4 X 3
DSP layer is 5 1/8 X 3 7/8
Folded Old Olive is 4 X 11, scored at 3, 6, 9
Small DSP is 3 7/8 X 1 7/8
Front Misty Moonlight is 2 3/4 X 3 3/4
Front White is 2 1/2 X 3 1/2
Inside White is 2 3/4 X 3 3/4
Ribbon is cut to 19″
The picture below shows the Designer Series Papers that are included in the Sale. There are 9 to choose from!!
HOST CODE
My July Host Code is 2GKGF4Q7. Please use this code for orders under $150.00. I will have a small gift for those with orders over $50.00 in addition to the Perk Rewards Program. You can read all of the information at the top of the page in the Menu Bar under SHOP / Perks.
Thank you for stopping by today. I hope you enjoyed today’s project and will come back. I do read and reply to all of the comments individually. They mean a lot to me. Please reach out if you have a question.
Welcome to the Stampin’ Pretty Pals’ Blog Hop! This month, the theme is “Wonderful Cards/Projects from the Garden” where our design team showcase projects from things found in a garden, such as flowers, vegetables, fruits, or even a garden scene. We really hope that you enjoy and will be inspired by them! As you hop from blog to blog, don’t forget to leave comments because we love hearing from you. Once you finish here, you will find the lineup at the end of my post to help you “hop” along from Pal to Pal.
I have to say that I LOVE flowers, but somewhere along the way I lost my green thumb! That being said, I think it makes me appreciate and love the Stampin’ Up! beautiful Designer Series Paper even more. Of course, the paper is the star of the card I have to share with you. And I have added a bit of a Fun Fold for good measure.
I am calling this card a Standing Double Easel Card. Instead of making the front easel section on a quarter piece of cardstock, I added it to the front of a regular size top folded card. This gives a much easier way to personalize and write a note to the recipient without trying to add that to the fun fold sections.
Paper
Since this is a garden theme, I chose my favorite of the flower papers currently available. The Hand-Penned Designer Series Paper is such a pretty “hand drawn” looking paper. The colors from the DSP created the additional colors I chose. The Cinnamon Cider is a bit unexpected at first, but them is very appropriate with the garden thinking.
Folded Card View
Folded, the card fits easily into a regular A2 envelope. The front folded section is Basic White and DSP, so not very much thickness is added.
Stamps
The Hand-Penned Petals stamp set matches the DSP extremely well. So much so that after I colored the stamped images with Stampin’ Blends, it almost blended in to the DSP! There are two different large images included in the stamp set. I stamped one of each image on the two focal layers using Memento Tuxedo Black Ink and then colored them similar to the flowers of the DSP.
The only sentiment showing is on the front of the inside section of the easel. A simple Thanks is all that was needed. It is stamped using the Cinnamon Cider Ink.
Finishing
To complete the card, I added one of the upcoming Mini Catalog Brushed Metallic Dots to the large front flower. These dots are fabulous!! When adhering the front stamped image, I found it best to lay the card flat and press the folds flat. The front stamped layer is the same size as the inside stamped layer. I lined up the front image directly over top of the inside one and then added adhesive to the bottom section only.
Measurements
The base card of Cinnamon Cider is a top fold cut to 4 1/4 X 11
The Basic White layer is cut to 4 X 9 3/4 and scored at 2 1/4 & 4 1/2
The large DSP piece is cut to 3 3/4 X 5
The two small DSP pieces are cut to 3 3/4 X 2, there is one on the front and one on the inside of the fold
The Mint Macaroon layer is cut to 2 1/2 X 4 1/4
The two Basic White stamped pieces are cut to 2 1/4 X 4
More inspiration awaits, so use the lineup below to visit the rest of the Design Team, because the Pals are excited to show you what they’ve created! Then, please mark your calendars for our next blog hop on August 11th. Our theme will be “My Happiest Season” when our Design Team creates a project showcase projects inspired by their favorite season of the year. Until then, have fun in your craft space.
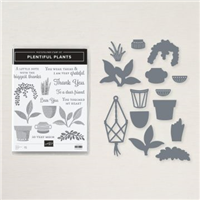
Have there been stamp sets that you first see and have absolutely no interest in? I have those from time to time. LOL!! They are very few that strike me that way. The Plentiful Plants Bundle, and Suite even, first struck me that way. Of course I have since seen many beautiful projects and cards from that bundle and had to have it. So I am sharing a card using some of the unexpected pieces of the DSP, as well as a Fun Fold.
Due to the Fun Fold, I had to photograph this card differently. Please forgive my finger.
Paper
You all know that for me, the first step after choosing a stamp set, is choosing the paper. And sometimes the paper is my first choice and then I find a stamp set that pairs with it. The paper first was the beginning of this card.
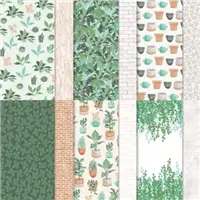
I saw this gorgeous piece of the Bloom Where You’re Planted Designer Series Paper, and knew I had to make it the star of a card. Next was me noticing the flower pots and plants on other sheets in the pack. And then remembering that the dies in the bundle would cut out those pots and plants! Oh My!!!
Fun Fold
I have seen a few cards similar to this fold of late, and new I wanted to try it. (There is already a different version with a twist that is finished! But for another day.) Here is the open card.
I apologize that he photo does not do it justice. Because of the folded out size, it did not work well inside my light box.
The base of the card is Evening Evergreen cut to a quarter sheet size of 5 1/2 X 4 1/4. The Basic White layer is 5 1/4 X 4, with the DSP layer being 5 1/8 X 3 7/8. This has become my current favorite layering sizes. The folded section of Soft Succulent is cut 4 X 9 3/4 and is scored on the long side at 3 1/4 & 6 1/2. (Be sure to burnish these folds well for this section to lay as flat as possible.) For the white layers in the sections, I cut those 3 1/8 X 3 7/8.
Finishing
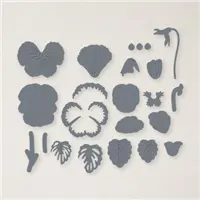
The DSP strip on the center fold was a scrap that I cut to 3 3/4 tall. All of the plants and pots are die cut using the Perfect Plants Dies that are part of the Bundle. There is one exception. The center section cactus is fussy cut. Sadly there is not a die to fit it.
All of the plants / pots are glued down with the exception of the front terracotta pot. For the front of the card I decided to raise that one using Stampin’ Dimensionals. The inside and front sentiments are from the Plentiful Plants stamp set. They are stamped using Cinnamon Cider Ink. I originally stamped the front sentiment and used that ink to coordinate with the terracotta pot. Then it only seemed reasonable to use the same ink for the inside one.
Once again I have showcased one of the Designer Series Paper Packs that is included in the Designer Series Paper Sale. 15% off of the original price is a good deal for this gorgeous paper. I hope you will take advantage of it! The picture below shows all of the papers that are included in the sale. Please use my Host code which is shown just below that papers.
The picture below shows the Designer Series Papers that are included in the Sale. There are 9 to choose from!!
HOST CODE
My July Host Code is 2GKGF4Q7. Please use this code for orders under $150.00. I will have a small gift for those with orders over $50.00 in addition to the Perk Rewards Program. You can read all of the information at the top of the page in the Menu Bar under SHOP / Perks.
Thank you for stopping by today. I hope you enjoyed today’s project and will come back. I do read and reply to all of the comments individually. They mean a lot to me. Please reach out if you have a question.
I have paired some more neutral type stamp sets to make today’s card. It could be a masculine card with the colors I chose, or it could be just more a “nature” type card. Either way, I hope you like it.
Colors
Are you shocked that I do not have DSP in the card? I sort of was. It is the second in a row without DSP. That is probably a record. So instead of getting colors from the designer paper, I got them from the image.
The pod was what I used to decide the colors. Sadly I cannot name what type of pod this is. But I know it is supposed to be brown. Because of my favorite width for my layers, you cannot really see the Mossy Meadow sticking out from behind the Very Vanilla.
I carried the colors from the cardstock to the Ink colors I used. The leaves are Mossy Meadow, the Pod Soft Suede and then a softer color for the written backgroundj. It is Sahara Sand that is stamped off before putting to the paper.
Stamps
The stamp sets are both of similar, nature theme. They are the Enjoy The Moment for the pods and sentiment. For the leaves and background script stamps I went to Very Versailles. This is a go to stamp set for background images when I want stamped backgrounds or collage type cards.
All of the images are sort of distressed looking. Even the sentiment. It is from the Enjoy The Moment stamp set also. I used Memento Tuxedo Black Ink for it to help it stand out a bit more than the other images. As a finishing touch I relied on my favorite ribbon, the Linen Thread. It is always a go to for a touch of rustic, natural look.
The picture below shows the Designer Series Papers that are included in the Sale. There are 9 to choose from!!
HOST CODE
My July Host Code is 2GKGF4Q7. Please use this code for orders under $150.00. I will have a small gift for those with orders over $50.00 in addition to the Perk Rewards Program. You can read all of the information at the top of the page in the Menu Bar under SHOP / Perks.
Thank you for stopping by today. I hope you enjoyed today’s project and will come back. I do read and reply to all of the comments individually. They mean a lot to me. Please reach out if you have a question.
I really like Bundles, and Stampin’ Up! outdoes theirselves constantly with some of the best. My favorite bundle type is the Punch Bundles. Punches are just so quick and easy to use. I like quick cards for the most part and punches aid me in achieving the quick part. For today’s card, I joined Embossing, (is this sounding familiar from the last couple of days?) with a punch bundle. I hope you like this one.
Stamps
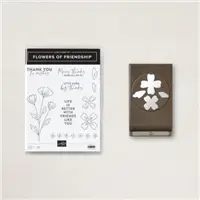
My original idea for this card was actually more simple than the end result. From the beginning however, the focus was the flower from the Flowers of Friendship Bundle. A fellow demonstrator shared the idea of using the stamped and punched image being cut into layered petals for the largest flower. I love the idea and that was my first plans.
I stamped the image onto Basic White using Basic Gray Ink. The Basic Gray is not quite as bold as the Memento Tuxedo Black. The flowers and leaves were colored using Just Jade and Fresh Freesia Stampin’ Blends. For the larger flower, the image is stamped onto Fresh Freesia cardstock using Fresh Freesia Ink. It is punched using the Flowers and Leaves Punch in the bundle, cut into petals and layered over the flower.
Layout
Once I finished the flower layer, the plan was to simply layer it over a piece of Fresh Freesia cardstock. That just looked too plain. I flipped through the embossing folders and found the Ornate Floral 3D Embossing Folder. You can’t have too many flowers! After embossing the cardstock, it is layered on a piece of Thick Basic White cardstock, and the floral layer adhered on top.
Finishing
For the finishing touches, I added the fun sentiment from Happiest of Birthdays. When I placed it on the card the first time, I thought it looked like a flower pot with the flowers sticking out. To tie in something to match the green of the leaves, I added a piece of the Evening Evergreen Open Weave Ribbon. Just a small strip of ribbon really adds a punch. It is adhered and then the sentiment added using Stampin’ Dimensionals. The last thing added was one of the Pastel Pearls at the base of the main flower.
The card is actually still a quick card to make even if not quite as simple as I originally planned.
The picture below shows the Designer Series Papers that are included in the Sale. There are 9 to choose from!!
HOST CODE
My July Host Code is 2GKGF4Q7. Please use this code for orders under $150.00. I will have a small gift for those with orders over $50.00 in addition to the Perk Rewards Program. You can read all of the information at the top of the page in the Menu Bar under SHOP / Perks.
Thank you for stopping by today. I hope you enjoyed today’s project and will come back. I do read and reply to all of the comments individually. They mean a lot to me. Please reach out if you have a question.
You all know how much I love the beautiful Stampin’ Up! Designer Series Paper. Today I have gone a bit overboard in the use of it. LOL!! I even added in an embossed layer of the Gold Foil Sheets. The outcome is well worth all the shine and DSP.
Gold
I have added a variety of “Gold” to today’s card. As I commented in yesterday’s post, I have been neglecting the Embossing Folders. So the star of this show is the Gold Foil Sheet embossed using the Painted Texture 3D Embossing Folder. Oh My, does it show up wonderfully with the gold! I really hated to cover up parts of it.
To carry on the Gold theme, I went with two sheets from the Expressions In Ink Designer Series Paper. This paper is all a work of art! I like using smaller pieces of it in that it makes me think it will last longer. The final gold layer is another small piece of the Gold Foil sheet cut using the Layering Circles Dies.
Shaded Spruce
To break up all of the gold, I pulled Shaded Spruce from the marble looking piece of DSP. It could have been the softer shade of green, but I wanted something that was strong enough to highlight the gold. I still used it somewhat sparingly. By using it as the background layers, it is like the man’s black tuxedo to better show the lady’s sparkling evening gown. (I read that somewhere, I do not wear evening gowns!)
The last touch of greens are on the sentiment layer. Since I went with the Gold background for the sentiment, I stamped the Best Wishes using the Shaded Spruce Ink. Although I have not used Soft Succulent in the card, the softer color for the bow is the correct choice. Plus the texture of that Open Weave Ribbon is a great contrast to the gold.
Measurements
card base of Shaded Spruce is cut 4 1/4 X 11, folded in half at 5 1/2
layer of Basic White is cut 4 X 5 1/4
Gold Foil embossed layer is cut 3 7/8 X 5 1/8
Shaded Spruce long layer is cut 1 5/8 X 4 5/8
Striped DSP is cut 1 1/2 X 4 1/2
Shaded Spruce wider layer is cut 2 5/8 X 3 5/8
Veined DSP is cut 2 1/2 X 3 1/2
The Expressions In Ink DSP is not included in the current 15 % off sale. However, when I checked it is back in stock and available to order. If you place your order through my online store, please use the host code further down, or on the right side of the page depending on your computer.
The picture below shows the Designer Series Papers that are included in the Sale. There are 9 to choose from!!
HOST CODE
My July Host Code is 2GKGF4Q7. Please use this code for orders under $150.00. I will have a small gift for those with orders over $50.00 in addition to the Perk Rewards Program. You can read all of the information at the top of the page in the Menu Bar under SHOP / Perks.
Thank you for stopping by today. I hope you enjoyed today’s project and will come back. I do read and reply to all of the comments individually. They mean a lot to me. Please reach out if you have a question.
I have realized that in my card making of late that I have been neglecting my Embossing Folders. I decided to go back to what used to be my favorite tool in card making and get back to my roots. In doing this, I found some fun new ones from the current Annual Catalog.
The card I made is a very clean looking card with minimal parts when you first glance at it. Actually there are several layers and different products. However all are simply used. There is zero difficulty in making this card!
Layers
There are a few layers in the layout of this card. It begins with the Calypso Coral card base. I paired it with a reverse side of one of the sheets of DSP from the Pansy Petals Designer Series paper. I cut the polka dot piece of DSP into two strips of 5/8 X 5 3/8. They were each layered at the top and the bottom , watching the margins on the ends and either top or bottom of the card. I also cut a second strip of 5/8 X 4 that I cut in half. Those are used as the flags on the focal layer.
The center embossed layer is made using the new Hello Embossing Folder. The folder comes in a pair with a Thanks folder as well. It is one of the narrow ones, so the Pale Papaya cardstock is 3 1/8 X 5 3/8. This piece was layered slightly over the DSP strips at the top and bottom. I would rather have the little extra coverage from the strips than not quite enough.
I love this folder! It says Hello in a variety of different languages. I placed my focal point to the left side so the English “Hello” is showing in the center. Here is a close up of the embossed image.
Finishing
For the focal point I tried to keep it simple as well. I wanted the embossed layer to not be too overshadowed. To do this I chose the sentiment from Free As A Bird that is another “Hello”. I feel certain my recipient will get the message intended by the card! LOL!!!
The Pansy is cut from a piece of the Pansy Petals Designer Series Paper. I love when the Dies not only cut what is stamped but also matches the images in the DSP. I chose the Pansy that is the same colors as my card choices. The plain White circle was chosen to highlight the single flower. Layering Circles were used to cut the circle.
With the flower added to the stamped circle, it was just a couple of steps to finishing the card. By using the Banner Pick A Punch flag end to cut the two pieces of the DSP I had left, it made a perfect little addition and tied the card together. For the finishing touch I added a trio of Champagne Rhinestones. One is in the center of the flower, one in the upper corner of the circle and the third is the “O” in Hello.
Measurements
card base of Calypso Coral is 5 1/2 X 8 1/2
Pale Papaya embossed layer is 3 1/8 X 5 3/8
DSP strips are 2 @ 5/8 X 5 3/8
DSP flags are 5/8 X 4, then cut in half to 2 @ 5/8 X 2
The Pansy Petals Designer Series Paper is one of the packs that is included in the DSP Sale !!! All of the information is just below.
The picture below shows the Designer Series Papers that are included in the Sale. There are 9 to choose from!!
HOST CODE
My July Host Code is 2GKGF4Q7. Please use this code for orders under $150.00. I will have a small gift for those with orders over $50.00 in addition to the Perk Rewards Program. You can read all of the information at the top of the page in the Menu Bar under SHOP / Perks.
Thank you for stopping by today. I hope you enjoyed today’s project and will come back. I do read and reply to all of the comments individually. They mean a lot to me. Please reach out if you have a question.
I have a fun card to share with you today. The front is a bit of an envelope look to it. Just a different cut of the front, but it adds quite a bit of interest. I hope you like it.
Stamp Set
I love this new stamp set in the Annual Catalog. It is called Shaded Summer. There are a couple of similar flowers and some great sentiments with really pretty fonts. It is a Red Rubber stamp set. So I used Stampin’ Write Markers and colored the stamp itself to get the two colors on the image. I used Granny Apple Green and Flirty Flamingo to color the stamp. After stamping the image, I then added Blushing Bride to color in the openings of the flowers and Soft Sea Foam to fill in the leaves. Note: I do not have the Markers listed in the supply list since they can only be purchased in Color Families or the entire bundle. I will say that they are worth the price to have them on hand.
I made this card over the weekend and was not thinking that I have my Pre-order arriving today. As a demonstrator, we get to order from the upcoming Mini Catalog early, and in this case, earn the Free Sale-A-Bration items as well. There are matching Dies for this stamp set in the SAB Catalog!! I cannot wait. After using this set, I love it. You will definitely see it more once I get the matching dies!! I fussy cut the flowers with my Paper Snips, and it was pretty quick as I only cut around the image. But the dies would have been so much better.
Paper and Cutting
I wanted a bit of a different fold for this card but could not come up with what I wanted. As I was looking at dies for the layers, I saw the Basic Borders Dies. I knew I could make a fun trimmed front using the dies. I used the Stitched Wide V shape die to cut the point. I cut the base card first by placing the point of the V 1/2″ from the bottom of the card. I then cut the Flirty Flamingo and DSP pieces the appropriate sizes. I slid the DSP down and had it flush on top of the Flirty Flamingo layer and cut through both pieces at the same time. I was very pleased that it worked out as I envisioned it.
The DSP is the Pattern Party Designer Series paper. It is the Host Rewards pack of paper. Oh My!!! It is an awesome deal to use Host Rewards for. There are 48 sheets in the pack. I thought this soft flower pattern worked well with my stamped image.
I paired the card colors with the stamped image of Soft Sea Foam and Flirty Flamingo. I also added a Rectangle Stitched layer for the stamped flower and sentiment. The sentiment was stamped and then cut using the Label Me Fancy Punch. Of course I had to add some bling by placing a couple of Rhinestones on the flowers and sentiment.
Inside
Just to be a little different, I used the cut off pieces from the front flap and added them to the inside of the card.
I should have trimmed the bottom edge of the DSP piece a bit to show the border underneath. I will remember that next time.
The picture below shows the Designer Series Papers that are included in the Sale. There are 9 to choose from!!
HOST CODE
My July Host Code is 2GKGF4Q7. Please use this code for orders under $150.00. I will have a small gift for those with orders over $50.00 in addition to the Perk Rewards Program. You can read all of the information at the top of the page in the Menu Bar under SHOP / Perks.
Thank you for stopping by today. I hope you enjoyed today’s project and will come back. I do read and reply to all of the comments individually. They mean a lot to me. Please reach out if you have a question.
I am sharing another card using the Hand-Penned products. I love the delicacy of these gorgeous stamps and papers. They truly look like someone sat down with Pen and Paper and drew the designs, then colored them using watercolors. A card is pretty much finished as soon as you add the paper and stamps, they are that pretty on their own.
Hand-Penned
The Hand-Penned Suite of products includes the stamp set, Hand-Penned Petals, the matching dies , Penned Flowers Dies, the DSP, Hand-Penned Designer Series Paper, and finally the Genial Gems. All of these products are wonderful.
I used the stamps and DSP for today’s card. The layout is actually a very simple one. The base card is a basic 8 1/2 X 5 1/2 folded in half. I used a strip of the DSP cut to 1 X 5 1/2 and placed that along the cut edge on the front of the card. The layer beneath the stamped image is a second piece of the DSP. It is cut 2 1/2 X 2 3/4. The stamped Basic White is cut to 2 1/8 X 2 3/8.
Colors and Finishes
The base card I chose is darker than the colors in the DSP. There is a Misty Moonlight in the paper, but I went a tad darker with Night of Navy. The darker color helps the Highland Heather of the front layer stand out a bit more. The flower is stamped using Fresh Freesia and Soft Succulent.
To finish the card, I stamped the Thanks using Memento Tuxedo Black Ink. I felt it needed to be darker to pop. One of the final additions is a bow. The Soft Succulent Open Weave Ribbon was the choice I made. It makes an easy bow, and ties the stamped layer to the DSP layer along the edge of the card. For the touch of bling, I added a trio of Pearls to a couple of the Freesia flowers. I have to have some bling!!
DSP Sale
The information for the Designer Series Paper sale is just below. The Hand-Penned used today is included in the sale! Woohoo!!!
The picture below shows the Designer Series Papers that are included in the Sale. There are 9 to choose from!!
HOST CODE
My July Host Code is 2GKGF4Q7. Please use this code for orders under $150.00. I will have a small gift for those with orders over $50.00 in addition to the Perk Rewards Program. You can read all of the information at the top of the page in the Menu Bar under SHOP / Perks.
Thank you for stopping by today. I hope you enjoyed today’s project and will come back. I do read and reply to all of the comments individually. They mean a lot to me. Please reach out if you have a question.
The content in this blog is the sole responsibility of Jackie Beers as an Independent Stampin' Up! Demonstrator. The use of and content of classes, services or products offered is not endorsed by Stampin' Up!