The card for today is to honor a dear friend’s sweet kitty. Any sympathy card is difficult to make. I hope I was able to honor the sweet girl with a simple card.
Stamps
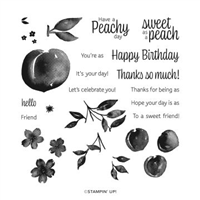
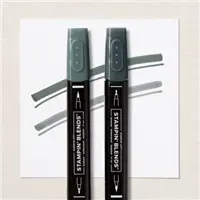
The precious kitty is from the Pampered Pets stamp set. I stamped her with Basic Gray ink and then colored with Smoky Slate Stampin’ Blends. The kitty is fussy cut, which was quite easy as it has pretty simple lines.
The sentiment is from the set as well. Actually the sentiment also says “Sorry For Your Loss” . I wanted a bit smaller wording and also to focus on the “Heart” part of the wording. To achieve this, I inked the part of the sentiment I wanted by using the Basic Black Stampin’ Write Marker. This is the only marker that can be purchased individually. And it is a must have for me! Included in the stamp set are these adorable little hearts. I added them as a compliment for the sentiment.
Paper
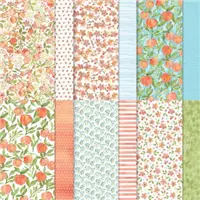
This pretty paper is from the You’re A Peach stamp set. It creates a soft background for the kitty to sit on. The DSP piece is 4 X 3 and cut at an angle. I placed one edge on the trimmer track and the other on the 3/4″ mark. The same was done for both top and bottom.
The base card is Thick Basic White. For a bit of dimension, I added the kitty layer to a piece of Basic White that is cut 4 X 5 1/4. This is then added to the base card with Stampin’ Dimensionals.
Fabulous Stampin’ Up! Join Promotion
Join my team by purchasing the Starter Kit for $75.00 and receive $125.00 of products totally of your choosing! That is a fabulous deal at a $24.00 discount off of the regular Starter Kit price. This is always the Ultimate Bundle of products, and now it is even better! You can simply click on the picture below and Join.
HOST CODE
My November Host Code is M4GF9KZ7. Please use this code for orders under $150.00. I will have a small gift for those with orders over $50.00 in addition to the Perk Rewards Program. You can read all of the information at the top of the page in the Menu Bar under SHOP / Perks.
Thank you for stopping by today. I hope you enjoyed today’s project and will come back. I do read and reply to all of the comments individually. They mean a lot to me. Please reach out if you have a question.
This sale is a great one and at a perfect time. I believe that gifts of Stampin’ Up! products would be perfect for our crafting friends. Best of all, the sale items are great for Card Making, Scrapbooking, and Home Design projects. Of course, gifts for ourselves are the best kind !!!
The sale is on items in the Annual Catalog only and includes:
10% off on Cardstock
15% off on individual Ink Pads. It does not include the ink pad bundles and third party ink pads
20% off on Dies.
There is a way to benefit even more from this Sale!
To get more bang for your buck, combine the sale with the join promotion. Please do not discount this offer immediately! Hear me out.
The Join Promotion is to purchase the Starter Kit for $75.00 and choose $125.00 worth of product of your choice. You are saving $50.00 right there. If in your choices for the Starter Kit, you choose any of the Sale Items, they will have the Sale discount applied. So you will be saving even more money! And in addition to the added savings, their is no Shipping & Handling charge on the starter kit.
Also, there is no requirement to ever make another order. Most Stampin’ Up! Demonstrators are Hobby Demonstrators. That means that they do not hold classes, they just enjoy the discount on the products they love! After receiving your Starter Kit, if you do place a demonstrator order, you will receive a $20% discount on the entire order.
And if you choose not to meet the $300.00 quarterly minimum to stay active, you will still be an active demonstrator until the end of April 2022. So you will get to enjoy the discount on the upcoming January – June Mini Catalog as well as the pre-order for that catalog. You will also receive the Januaray-June and the Sale-A-Bration Catalogs before anyone else.
I would love to have you on my team! If you have any questions or concerns, I would love to talk with you any time. There is a Contact Me in the menu bar at the top of the page. And if you are ready to join now, simply click on the Join picture below. Or there is a join in the menu bar as well.
HOST CODE
My November Host Code is M4GF9KZ7. Please use this code for orders under $150.00. I will have a small gift for those with orders over $50.00 in addition to the Perk Rewards Program. You can read all of the information at the top of the page in the Menu Bar under SHOP / Perks.
Thank you for stopping by today. I hope you enjoyed today’s project and will come back. I do read and reply to all of the comments individually. They mean a lot to me. Please reach out if you have a question.
The card I have to share today is using the same piece of scrap DSP as yesterday. That is where the similarities end however. I hope you enjoy this one as well.
Paper
The beginning of this card is the same piece of scrap DSP as yesterday’s card. Both were the same size. This is the opposite side from the green used on yesterday’s version. I also made this card a portrait alignment. Paired with the floral of the You’re A Peach Designer Series Paper is this other piece from that pack which is a polka dot on variegated Calypso Coral.
I used the scrap of floral DSP the same from yesterday and cut it on the diagonal. To pull the pretty blue from the flowers, I added a layer of Balmy Blue on the bae card of Calypso Coral. By placing the card in portrait mode, the angles of DSP did not totally cover the sides. I decided to let the top not be covered and added the strip of Flirty Flamingo Gold Metallic Ribbon. The colors compliment each other perfectly.
Stamps and Finishes
The only stamp set I used is the Sweet As A Peach stamp set. I love the “sweet” sentiments. To keep from adding more layers, I stamped the sentiment on Basic White and used the Tailored Tag Punch to cut it out. (Yesterday’s card used the Tailored Made Tags Dies)
I went a bit out of the norm in changing the shape of the punched image. It just did not quite fit the area or the look I wanted. I have recently seen using the top point of the punch to create banner tips, and it really works well. With that in mind, I put each end back into the top of the punch and created these fun flags for each side of the sentiment. A happy trial! The last touch is one of the gold dots from Genial Gems.
Fabulous Stampin’ Up! Join Promotion
Join my team by purchasing the Starter Kit for $75.00 and receive $125.00 of products totally of your choosing! That is a fabulous deal at a $24.00 discount off of the regular Starter Kit price. This is always the Ultimate Bundle of products, and now it is even better! You can simply click on the picture below and Join.
HOST CODE
My November Host Code is M4GF9KZ7. Please use this code for orders under $150.00. I will have a small gift for those with orders over $50.00 in addition to the Perk Rewards Program. You can read all of the information at the top of the page in the Menu Bar under SHOP / Perks.
Thank you for stopping by today. I hope you enjoyed today’s project and will come back. I do read and reply to all of the comments individually. They mean a lot to me. Please reach out if you have a question.
Today’s card is another one made from leftover pieces from my desk. I love picking up a piece of Designer paper and seeing where it leads.
Paper
Since I began the card with a scrap of the You’re A Peach Designer Series Paper, I thought I would start there. The piece of scrap, and there were two of these, measured 3 1/2 X 2 3/4. I cut it on the diagonal to make these two unequal triangles. ( I do not know the proper triangle name!) They were adhered to the ends of the White cardstock and then the overhanging edges trimmed off.
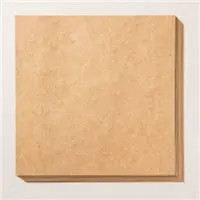
To coordinate with my DSP inspiration pattern, I went with an earthy layer. The Kraft paper from the Mini Catalog is what I choice. It is a stiffer piece but layers very well. So it became the separation layer as well as the star of the cad with the Tailor Made Tag.
Stamps and Finishes
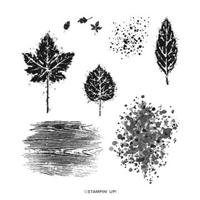
These beautiful leaves are from the Gorgeous Leaves stamp set. I wanted bright colors to pair with the green of the DSP piece. The ones I chose are Merry Merlot and Bumblee. They are both stamped randomly between the DSP sections. For an addition to the tag, I added just the Bumblee smaller leaf. But also used the Merry Merlot for the sentiment.
The sentiment is from the Artistically Inked stamped set. If fit perfectly on a 3/4″ piece of White and imitates the White area on the card layers. For finishing touches I added a few of the Genial Gems scattered around, along with a Bumblebee ribbon on the tag. The Bumblebee Ribbon is a retired item from the last Annual Catalog. I apologize about that since it is not currently orderable.
Please check back tomorrow for another version of this card. Remember that I said there were two pieces of the scrap DSP found!!
Fabulous Stampin’ Up! Join Promotion
Join my team by purchasing the Starter Kit for $75.00 and receive $125.00 of products totally of your choosing! That is a fabulous deal at a $24.00 discount off of the regular Starter Kit price. This is always the Ultimate Bundle of products, and now it is even better! You can simply click on the picture below and Join.
HOST CODE
My November Host Code is M4GF9KZ7. Please use this code for orders under $150.00. I will have a small gift for those with orders over $50.00 in addition to the Perk Rewards Program. You can read all of the information at the top of the page in the Menu Bar under SHOP / Perks.
Thank you for stopping by today. I hope you enjoyed today’s project and will come back. I do read and reply to all of the comments individually. They mean a lot to me. Please reach out if you have a question.
Welcome to the Stampin’ Pretty Pals’ Blog Hop! This month, the theme is “Home for the Holidays”. We really hope that you enjoy and are inspired by them! As you hop from blog to blog, don’t forget to leave comments because we love hearing from you. You will find the lineup at the end of my post to help you “hop” along from Pal to Pal.
I chose a New to me fun fold Bay Window card for today’s hop. It fits perfectly in keeping with the Home for Holidays theme. Please forgive the length of the post. I wanted you to see all of the views.
Stamps and Dies
I used the Tidings & Trimmings Bundle to create the stockings, star, and sentiment. The matching Dies were used to cut the stockings and star. Did you notice the personalization on the stockings? My kitties are honored to share their stockings with you.
The Merry Christmas is from the Word Wishes Die set. These are a wonderful group of sentiments. Make note if you case this card, and use a similar sentiment, only adhere it to the center panel. It needs to hang over the other panels when open.
Papers and Color
The Tidings of Christmas Designer Series Paper is a favorite and the pattern on the front of the card is the #1! So that paper is what defined my color choices for the rest of the card. The inside DSP is a complimentary piece from the same pack.
The Soft Succulent layer of the right side sentiment as well as the stockings also come from the DSP. To tie in the inside paper, I added the “berries” to the stocking patterns with Cherry Cobbler Stampin’ Blends. The pearls on the side sentiment are also colored with the Cherry Cobbler Stampin’ Blend to match.
Other Views
The inside sentiment layer could be made larger. I chose to have it a bit smaller so it did not show when the card was in display mode.
This is the flat view. As you can see it does fold flat for mailing without damaging the Merry Christmas. And you can see my non professional personalization of the stockings. 🙂
Directions and Measurements
I discovered this Fun Fold from fellow Stampin’ Up! Demonstrator Lisa Cursio.
Card base of Cherry Cobbler is cut 4 1/4 X 11 and scored at 3/8, 1 7/8, 3 5/8 5 1/8 & 5 1/2
The front DSP is cut in portrait mode at 1 3/8 X 4 1/8 (x2 for the 2 outside pieces) and 1 5/8 X 4 1/8 for the center
The right side greeting layers are Soft Succulent cut to 1 5/8 X 1 5/8 and Basic White cut to 1 1/2 X 1 1/2.
The inside DSP is 5 X 4 1/8 (5 is width)
The inside sentiment layer is 2 1/4 X 3 1/4
Fold and burnish the score lines. Add Tear & Tape between the last two score lines and adhere. This makes the hinge on the left side of the card. When adding your right side sentiment ,align it even with the right edge of the inside DSP. Place dimensionals only the right side of the sentiment. This allows the Bay Window to slip under the unattached left side to stay open. I hope you give this fund fold a try!
Thank You!!
More inspiration awaits, so use the lineup below to visit the rest of the Design Team. The Pals are excited to show you what they’ve created! Then, please mark your calendars for our next blog hop on December 8th. Our theme will be “My Favorite Things” with our design team showcasing some of their favorite products from any catalog they choose.
Thank you for stopping by today. I hope you enjoyed today’s project and will come back. I do read and reply to all of the comments individually. They mean a lot to me. Please reach out if you have a question.
I have another quick and easy card where a single Stamp set and the Designer Paper are all you need. Well, this one has another item or two added in!
Stamps
I began this card with the Hand Penned Petals stamp set in mind as the star of the card. That changed a little bit, but I still used the stamp set as a focal point. The flower is stamped directly on the DSP using Memento Tuxedo Black Ink. For some people, I know that stamping on the DSP seems a bit odd. Personally, I love it.
The sentiment is also from the Hand Penned Petals. It is stamped and then layered using the Layering Circles and the smallest of the plain and scalloped circles. The only bling is a larger pearl on the stamped flower image.
Paper
These beautiful papers are both from the Hand Penned Designer Series Paper. I love the softness of these two. Actually the strip is the opposite side of the peach polka dot. Using it in place of a piece of ribbon or cardstock seemed a sort of daring thing to do. LOL!!
The layers are Garden Green, to pull the green from the floral strip and Basic White. I tend to use a White layer as a way to break up the DSP and the base color. It works especially well if the two are mostly of the same color.
Fabulous Stampin’ Up! Join Promotion
Join my team by purchasing the Starter Kit for $75.00 and receive $125.00 of products totally of your choosing! That is a fabulous deal at a $24.00 discount off of the regular Starter Kit price. This is always the Ultimate Bundle of products, and now it is even better! You can simply click on the picture below and Join.
HOST CODE
My November Host Code is M4GF9KZ7. Please use this code for orders under $150.00. I will have a small gift for those with orders over $50.00 in addition to the Perk Rewards Program. You can read all of the information at the top of the page in the Menu Bar under SHOP / Perks.
Thank you for stopping by today. I hope you enjoyed today’s project and will come back. I do read and reply to all of the comments individually. They mean a lot to me. Please reach out if you have a question.
My project for today is a quick Birthday card using the beautiful Expressions In Ink DSP along with the equally wonderful Artistically Inked stamp set. It is a quick and gorgeous birthday card.
Paper
My saying simply Paper is like saying Oh Well. This Expressions In Ink Designer Series Paper is one of Stampin’ Up!’s best ever. The gorgeous colors with the fine touch of Gold is exquisite! So my apologies for making it sound plain. Obviously the DSP is the star of this show by far. What is not to love about it?
Saying that, I went a bit of a different direction with the base color. Generally I would pick the pink or peach, but instead wanted to use one of the greens. I settled on Shaded Spruce. This is such a vibrant green that it really works wonderfully with the paper. To continue the green, I used the Shaded Spruce Ink to stamp the sentiment on a plain piece of White paper. Leaving just the white breaks up the printed DSP more than layering it would have.
Stamps and Finishes
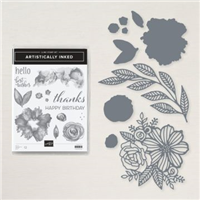
This group of products is actually a Suite of products. It is the Expressions In Ink Suite. The stamps and dies are a Bundle that you can purchase without the entire suite. It is aptly named Artistically Inked Bundle. I did not use much of the Bundle however. The sentiment is from the stamp set, and the dies creating the flowers at the end of the sentiment are from the die set. That was from a scrap I had to trim for the paper size and decided to use it.
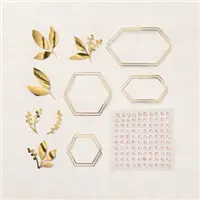
For the finishing touches, I added a few of the Gold Metallic Pearls to the flowers and the sentiment banner. And for the first time, I used the Expressions In Ink Ephemera Pack. It is a little hard to see in the photo. The gold leaves behind the left side of the sentiment layer are from the pack. I placed them above and below the sentiment for some added bling! The only part of the Suite that I did not use is the ribbon. Maybe next time it will be included.
Fabulous Stampin’ Up! Join Promotion
Join my team by purchasing the Starter Kit for $75.00 and receive $125.00 of products totally of your choosing! That is a fabulous deal at a $24.00 discount off of the regular Starter Kit price. This is always the Ultimate Bundle of products, and now it is even better! You can simply click on the picture below and Join.
HOST CODE
My November Host Code is M4GF9KZ7. Please use this code for orders under $150.00. I will have a small gift for those with orders over $50.00 in addition to the Perk Rewards Program. You can read all of the information at the top of the page in the Menu Bar under SHOP / Perks.
Thank you for stopping by today. I hope you enjoyed today’s project and will come back. I do read and reply to all of the comments individually. They mean a lot to me. Please reach out if you have a question.
Today’s project is an ornament card using leftover bits and pieces to make a great project with wonderful colors. My projects for this month are going to be a happy mix of holidays and any time cards. Let’s begin with a Christmas card.
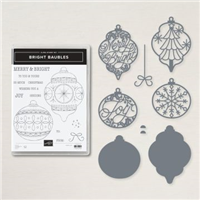
Bright Baubles Bundle
This ornament from the Delicate Baubles Die set is a leftover from an earlier project. The Glimmer Paper on the Red Foil ornament is from Sale-A-Bration, that shows that it is from earlier. However, you could easily substitute any of the Metallic Specialty Papers that you have on hand or are still available.
For the sentiment, I chose to go with the softness of the Soft Succulent Ink on Basic White cardstock. This sentiment is included in the Bright Baubles stamp set, but is an all on one line setting. I chose to cut it apart and layer a bit haphazardly for a different look.
Paper and Finishes
The base of today’s card is Cherry Cobbler with a narrow border of Soft Succulent behind the gorgeous DSP. My favorite DSP of the Annual Catalog is the Tidings of Christmas Designer Series Paper. It is a 6X6 paper stack and has the addition of Misty Moonlight in it. I love that unexpected color and the freshness it brings. I will add that the layer of DSP behind the top piece is actually two smaller strips. As I said earlier, this was leftover parts! By cutting those and the top piece to the same height, it doesn’t show that it’s two pieces.
The final touch of this card is the Evening Evergreen Open Weave Ribbon. With the bling and shine on the ornament, I didn’t need any additional of my normal blings.
Fabulous Stampin’ Up! Join Promotion
Join my team by purchasing the Starter Kit for $75.00 and receive $125.00 of products totally of your choosing! That is a fabulous deal at a $24.00 discount off of the regular Starter Kit price. This is always the Ultimate Bundle of products, and now it is even better! I would really love to have you on my team and to share my love of Stampin’ Up! with you. For many years I was a Hobby Demonstrator, just to get the discount, and do not regret one minute of that. Now I have a community of Stamping Friends that you could be a part of. You can simply click on the picture below and Join.
HOST CODE
My November Host Code is M4GF9KZ7. Please use this code for orders under $150.00. I will have a small gift for those with orders over $50.00 in addition to the Perk Rewards Program. You can read all of the information at the top of the page in the Menu Bar under SHOP / Perks.
Thank you for stopping by today. I hope you enjoyed today’s project and will come back. I do read and reply to all of the comments individually. They mean a lot to me. Please reach out if you have a question.
Beginning today through November 30th, Stampin’ Up! has an awesome Join Promotion. The everyday price of the Starter Kit is an awesome deal at $99.00 for $125.00 worth of Stampin’ Up! products.
However, for this month, the deal is even sweeter! The price of the Starter Kit is dropped to only $75.00for the same great $125.00 of products.
When you purchase the Starter Kit, there is no requirement to ever make another purchase. I would love to have you join my team and give Stampin’ Up! a try.
In the event you do decide to make a purchase after the Starter Kit, you will receive a 20% discount on the products. Also, by joining now you will see the upcoming January Mini Catalog early as well as being able to purchase items from it during the pre-order period. A Win/Win situation!
I would love to talk with you about this awesome offer. Or you can click HERE to be taken to my Join page.
HOST CODE
My November Host Code is M4GF9KZ7. Please use this code for orders under $150.00. I will have a small gift for those with orders over $50.00 in addition to the Perk Rewards Program. You can read all of the information at the top of the page in the Menu Bar under SHOP / Perks.
Thank you for stopping by today. I hope you enjoyed today’s project and will come back. I do read and reply to all of the comments individually. They mean a lot to me. Please reach out if you have a question.
Expressing our Gratitude to someone is always a good thing to do. This time of year makes me especially aware of that. Today’s project is a perfect way to show someone they are appreciated.
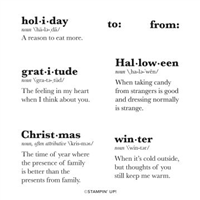
Stamp Set
This stamp set is aptly named Well Defined. There are various holidays and similar sentiments that are one word and their definition. These definitions make a wonderful clean and sweet card that is made quickly. The Gratitude was chosen as a nod to Thanksgiving. It is stamped using Cinnamon Cider Ink. As I have stated before, this ink looks a bit metallic when paired with embossed or metallic paper.
Paper
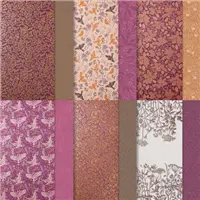
To pair the Cinnamon Cider with this beautiful paper was a given. This is the Blackberry Beauty Designer Series paper. It has been difficult for Stampin’ Up! to keep in stock for that very reason. But I looked and it is in stock now! This paper is paired with Cinnamon Cider cardstock and a layer of Very Vanilla.
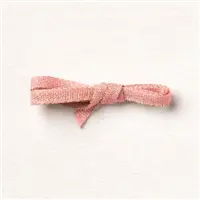
There was a piece of the DSP previously cut. So I just needed a tiny adjustment. That piece I cut off was only 1/4″. Of course I couldn’t bring myself to throw it away. As I was looking for a way to finish the card, I saw that little strip. A bow is born! All it took was a few folds, snips, and several glue dots. This little bow should be called a glue dot bow! I love the little different look to the card.
HOST CODE
My November Host Code is M4GF9KZ7. Please use this code for orders under $150.00. I will have a small gift for those with orders over $50.00 in addition to the Perk Rewards Program. You can read all of the information at the top of the page in the Menu Bar under SHOP / Perks.
Thank you for stopping by today. I hope you enjoyed today’s project and will come back. I do read and reply to all of the comments individually. They mean a lot to me. Please reach out if you have a question.
The content in this blog is the sole responsibility of Jackie Beers as an Independent Stampin' Up! Demonstrator. The use of and content of classes, services or products offered is not endorsed by Stampin' Up!