Today’s project is a gift card holder. The Fun Fold inside is a way to make any card a Gift Card holder. What a fun idea!!
Stamps
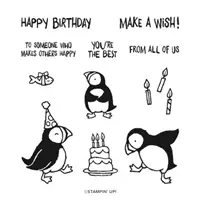
The fun stamp set with the name of Party Puffins is exactly what the name implies. They are really party animals. And I love them!! At first glance I thought they may be more for younger recipients. But the more I play with them, I now know they are perfect for anyone. And they bring a Smile to my face!
All of the stamps I used are from the one stamp set. Here is the inside of the card.
Inside Fun Fold
I cased the inside fold from Dawn Griffith. It is really simple to do and makes such a Wow for your card. The “fold” is a piece of 4 1/4 X 11. (It looks much smaller because the card itself is a regular 5 1/2 X 8 1/2 folded in half) Fold and score the White piece at 5 1/2. Then fold each end back on itself and score. This gives you the accordion fold. You want the mountain to be in the center. For the gift card slot, mark 2″ up from the bottom of the right end and then cut from the mark to the score line.
Finishing Card
Adhere the folded piece to the inside by having it in the accordion fold, apply adhesive to the left end piece. Place it evenly spaced , top to bottom, and with a narrow border on the end of the inside front of the card. Lay it down and then close the back of the card over the folded piece. Open the card and apply glue to the angle cut end, but only the bottom and the short side. Do the same alignment and close the front of the card over it to adhere.
The inside panels are 2 1/4 X 3 1/2 (3) and 2 X 3 1/4 (3). Be sure to adhere the panels prior to adding the accordion fold to the inside of the card. It is Much Easier to do the panels first. Ask me how I know this 🙂 LOL!!
Thank you for visiting today! If you have any questions about today’s card or any products, please reach out to me. I would love to assist you.
HOST CODE
My November Host Code is M4GF9KZ7. Please use this code for orders under $150.00. I will have a small gift for those with orders over $50.00 in addition to the Perk Rewards Program. You can read all of the information at the top of the page in the Menu Bar under SHOP / Perks.
Thank you for stopping by today. I hope you enjoyed today’s project and will come back. I do read and reply to all of the comments individually. They mean a lot to me. Please reach out if you have a question.
One of my favorite cards to make are Thank You type cards. Thanksgiving allows me an entire month of sharing my gratitude. Today’s card is one I cased from fellow demonstrator Patty Bennett. It requires 3/4 of a full sheet of cardstock, and is so worth it!!
Patty Bennett has a detailed video on how to make this card. So I am not going to attempt to explain the process. I will say that it is pretty easy to do. There are just quite a few layers.
Front Section
Above is the front of my version. Next is the second layer.
Second Layer
Now you see the second section. I believe you can see how the “window” on the front opens away and leaves the layers and stamped images on this second section.
Third Section
This is the fully opened card. The front flap is open to the left, and the blue second section is on the opposite side of the lower section where you would sign the card. As you have seen, there are three sections, but four decorated panels. I think of it as another version of one of the little accordion mini scrapbooks.
I hope you enjoyed seeing this Fun Fold. As I said, Patty has a video detailing how to make this card. My Supply List is at the bottom of the post. If I can assist you please do not hesitate to reach out. And if you do not currently have a demonstrator, I would love to invite you in to my stamping family.
HOST CODE
My November Host Code is M4GF9KZ7. Please use this code for orders under $150.00. I will have a small gift for those with orders over $50.00 in addition to the Perk Rewards Program. You can read all of the information at the top of the page in the Menu Bar under SHOP / Perks.
Thank you for stopping by today. I hope you enjoyed today’s project and will come back. I do read and reply to all of the comments individually. They mean a lot to me. Please reach out if you have a question.
The project I have for today is a Halloween version of the Envelope Fold card, with an added pocket, that was made a couple of weeks ago. I hope you enjoy this version.
The Fold
Let me first say that this card could just as easily be made in the same method as my original Envelope Fold card. You can see that post HERE. In the previous version, I cut off the corners of the front flap to create the point. For this version, I left the corners, scored from the mark to the point, and folded them to the front. Using washi tape, or any tape, the folded pieces are secured together which creates the pocket. After making the pocket, the rest of the steps to creating the card are the same as the original version.
Here is a look into the pocket.
Stamps and Paper
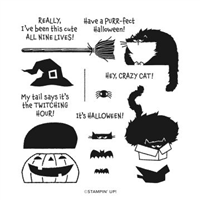
I am sure you recognize the Clever Cat stamp set since I use it fairly often. LOL!!! All of the Halloween stamps in the set are used to create this card. There are not matching dies, so I fussy cut all of the pieces. Not something I would do in the making of multiple cards, but I do not mind for a single card. Plus I love this one! The fat cat is perched on the edge of the pocket, with little kitties playing peekaboo around the sentiment. I allowed the pumpkin to slip partially into the pocket where the broom is sticking out from also.
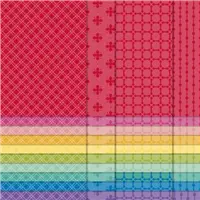
The paper is the Cute Halloween Designer Series paper. I totally adore this multi-colored dots paper! It has such great colors combined in it. The Highland Heather was my choice, but mixed with Pumpkin Pie. These are my favorite Halloween colors.
Here is a view of the inside of the card.
I could not resist the fat cat in the box. And this sentiment is just a hoot!!!
Directions
Click on this photo for a PDF instructions for the card. This instruction sheet was made rather quickly, so please ignore errors. And if you have questions, please do not hesitate to contact me. I want you to love this Fun Fold as much as I do!!
HOST CODE
My October Host Code is HSUBS7GX. Please use this code for orders under $150.00. I will have a small gift for those with orders over $50.00 in addition to the Perk Rewards Program. You can read all of the information at the top of the page in the Menu Bar under SHOP / Perks.
Thank you for stopping by today. I hope you enjoyed today’s project and will come back. I do read and reply to all of the comments individually. They mean a lot to me. Please reach out if you have a question.
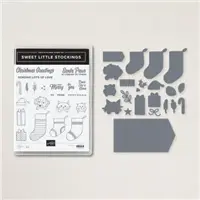
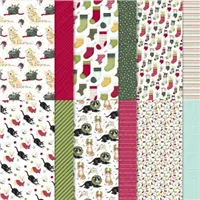
Today’s project is a Fun Fold using the Sweet Stockings Bundle and Designer Series Paper. You cannot go wrong with these adorable dogs and cats.
The Fun Fold
I was given this fold in a card swap with my Stamping Club in a card exchange. The card I received had a belly band. I love Fun Folds of all varieties. However, I rarely use a belly band. So I tried different versions of how to keep the card closed and finally arrived at this one.
Here is a view of the card partially open:
You can see how the sentiment layer tucks behind the gift package on each side. And here is a view of the inside and all of the folds.
There are only three score lines, but it seems like more when you unfold it. I love the different angles and the added benefit that it stands up for display very well. Instead of highlighting the products, they will all be in the Supply List at the bottom, I am going to give you the measurements.
Measurements
My version is made using a piece of Pool Party cardstock cut to 4 1/4 X 11.
It is scored at 1 1/4, 5 1/2, & 9 1/4.
Please look at the last picture for the directions of the folds.
There are three different sizes of the DSP. I is cut as follows: 1 Strip cut 1 X 4, 1 Strip cut 1 1/2 X 4, 2 pieces cut 3 1/2 X 4. The strips are placed on the two end sections. The left one is the narrower. The DSP larger pieces are on the front of the closed card and on the inside right.
The inside sentiment section White piece is cut 4 X 4.
If you have any questions, please do not hesitate to reach out to me. This one is a bit outside of the box and I have not had a chance to make a video.
HOST CODE
My October Host Code is HSUBS7GX. Please use this code for orders under $150.00. I will have a small gift for those with orders over $50.00 in addition to the Perk Rewards Program. You can read all of the information at the top of the page in the Menu Bar under SHOP / Perks.
Thank you for stopping by today. I hope you enjoyed today’s project and will come back. I do read and reply to all of the comments individually. They mean a lot to me. Please reach out if you have a question.
The project I have to share today is a quick birthday card starring the Artistically Inked stamps and Designer Series Paper. You cannot go wrong with these two products.
Paper
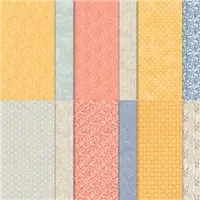
The paper, or rather the Designer Series Paper, is the star of this card. Expressions In Ink DSP has been very popular since it debuted in June. The sheets I chose for this project have not been used quite as much as the ones with the gold veining. I wanted a softer look for this card and these two pieces of paper deliver there. Of course the base card of Pale Papaya with a layer of Pear Pizzaz, came directly from this beautiful DSP.
I also added a strip from a second sheet of the DSP and made the green, veined banner. Never throw away scraps of DSP! And I could not stop there so I added the smaller gold striped piece. I love how all of these sheets coordinate beautifully.
Stamp Sets
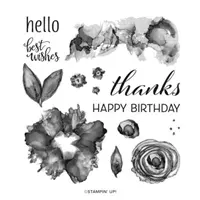
To follow up on the Expressions paper, I used the matching Artistically Inked stamp set for the sweet flower in the focal layer. The same colors were used to stamp the flower and leaves as the card base and layer. I searched for a small and pretty font for the Happy Birthday. It was found in the Timeless Tulip stamp set. This sentiment fits perfectly in the Layering Circles flower.
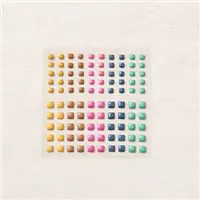
For a finishing touch, I added some of the 2021-2023 In Color Jewels. There are three of them scattered around the sentiment and the smaller DSP pieces. I do love having some bling on my cards.
HOST CODE
My October Host Code is HSUBS7GX. Please use this code for orders under $150.00. I will have a small gift for those with orders over $50.00 in addition to the Perk Rewards Program. You can read all of the information at the top of the page in the Menu Bar under SHOP / Perks.
Thank you for stopping by today. I hope you enjoyed today’s project and will come back. I do read and reply to all of the comments individually. They mean a lot to me. Please reach out if you have a question.
Today’s project is a Fun, quick and easy card starring the Little Delights Stamp set. It is a Smile card for sure.
Stamps
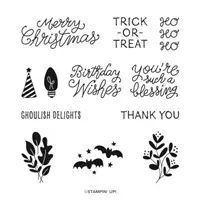
All of the stamps I used on this card are from the one stamp set. As I mentioned, it is the Little Delights stamp set. It has become a Go To stamp set for quick and easy cards. The seasonal images and sentiments are so fun! I went with the Ho Ho Ho and Christmas lights. The lights do not have a string connecting them. I added the cord using my Basic Black Stampin’ Write Marker. It is the one Marker that can be purchased individually.
Colors and Finishes
To be a bit different, I went with out of the norm colors. The Poppy Parade is a version of red and I paired it with Misty Moonlight. These are great together. To finish off the card, I added some Metallic Pearls at the base of each light bulb. Another metallic touch is a bow made from the Metallic Mesh Ribbon. To be quite wide, this ribbon is a dream to work with! The final touch was to add Wink of Stella to each of the light bulbs.
HOST CODE
My October Host Code is HSUBS7GX. Please use this code for orders under $150.00. I will have a small gift for those with orders over $50.00 in addition to the Perk Rewards Program. You can read all of the information at the top of the page in the Menu Bar under SHOP / Perks.
Thank you for stopping by today. I hope you enjoyed today’s project and will come back. I do read and reply to all of the comments individually. They mean a lot to me. Please reach out if you have a question.
The card for today is one of the Slim or Skinny cards made with a touch of Whimsey and Snowflakes. It includes the Whimsical Trees Bundle along with the Wonderful Snowflakes. An early touch of Christmas.
Stamps and Dies
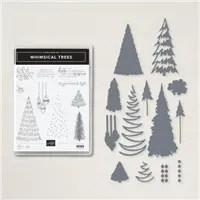
This sweet card is made with one of my favorite Bundles in the Mini Catalog. The Whimsical Trees Bundle is fabulous. The tree with the lovely metallic garland is so pretty and actually simple to do. They are both die cut using the matching dies of the bundle. For the garland, I did use the Adhesive Sheets to simplify applying it to the tree.
Colors
Above I mentioned my favorite Bundle, is the Whimsical Trees, when actually it is a favorite Suite of products. The Designer Series Paper was my color inspiration for this card, even though I did not use the DSP. The Blushing Bride and Misty Moonlight are so pretty together. And I had to use a green for the tree. I went with Soft Succulent there.
Finishing Touches
One of the main pieces of this card is the Wonderful Snowflake. These are iridescent snowflakes that come in a package pre cut. I love the shine it brings to the card. As a pairing to the Rose Metallic Shimmer of the garland, I added the Blushing Bride Metallic Ribbon. It is wrapped around the front layers with an extra strip simply tied in a knot. The last touch is the Champagne Rhinestone on the center of the snowflake
HOST CODE
My October Host Code is HSUBS7GX. Please use this code for orders under $150.00. I will have a small gift for those with orders over $50.00 in addition to the Perk Rewards Program. You can read all of the information at the top of the page in the Menu Bar under SHOP / Perks.
Thank you for stopping by today. I hope you enjoyed today’s project and will come back. I do read and reply to all of the comments individually. They mean a lot to me. Please reach out if you have a question.
Today’s card is another Fun Fold that is a super easy one to make. It is a change to soft Christmas Colors with a touch of Whimsey. This will definitely be one of my Christmas cards this year. I CASED it from The Paper Pixie, Julie DiMatteo.
Paper
This card is all about the paper! The gorgeous Whimsey & Wonder Designer Series Paper is such a WOW! I have now fallen in love with all of the soft colors for Christmas in place of the traditional ones. The Blushing Bride card base is pulled from the beautiful paper. And both pieces of the DSP you see are from the Whimsey & Wonder.
Stamps and Dies
All of the stamps used, with the exception of one, are included in the Whimsical Trees stamp set. I really love the sweet sentiment on the front. It is larger than most front sentiments, but it fit perfectly and is so sweet! The raised swirl is in the stamp set and has a matching die that I used to cut it out with.
This is a view of the card opened. You can still see the beautiful DSP. The same swirl image as on the front, I stamped on the inside as well. Merry Christmas is the only stamp not included in the Whimsical Trees. This one is from the Little Delights stamp set.
Directions:
As I mentioned, this is a CASE from The Paper Pixie. It is truly very easy to do, but here is a link to her video. Click Here
HOST CODE
My October Host Code is HSUBS7GX. Please use this code for orders under $150.00. I will have a small gift for those with orders over $50.00 in addition to the Perk Rewards Program. You can read all of the information at the top of the page in the Menu Bar under SHOP / Perks.
Thank you for stopping by today. I hope you enjoyed today’s project and will come back. I do read and reply to all of the comments individually. They mean a lot to me. Please reach out if you have a question.
Welcome to InKing Royalty’s October Blog Hop! During this year’s blog hops, we are having fun with our stamping favorites – our favorite themes for seasonal cards and projects. This month’s projects center around Harvest & Hope, so prepare yourself for gratitude and love in Fall-themed projects. We are excited to share our creations with you today! After you read my post, I hope you’ll hop over to the next person on the list at the base of this post.
The card I have to share today contains Pumpkins and Gratitude for this Harvest Theme. Both inspire memories of childhood, family time and fun
Paper and Colors
I have been using all of the deeper and brighter Fall colors lately. So I wanted to go with a softer look today. The Boldness of the Bumblebee cardstock pairs well with the softer green of Soft Succulent in the piece of Harvest Meadow Designer Series Paper I picked . For an even softer touch, I used Soft Sea Foam for the green of the vines. To pair with that, the Pumpkins are stamped with Smoky Slate and then colored using Pale Papaya Stampin’ Blends. The piece needed another spot of brightness to match the Bumblebee. So I colored the flower bloom from the vine with Daffodil Delight and added a 2021-2023 In Color Jewel.
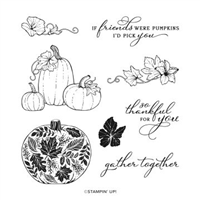
Stamps
The stamps I used are all from the Pretty Pumpkins set. Being able to make a card from just one set is something I love! The gorgeous font from the Gather Together looks beautiful with the shine of the Bumblebee Ink. I stamped the three pumpkin image twice. Once on the main piece and another on a scrap of White cardstock. They are all colored the same, but I fussy cut the end ones from the extra stamped piece. For a bit of fun I added them to the corners of the focal layer.
Thank you for stopping by today. I hope you’ll hop along to the next stop on the blog hop, Lynn Kolcun at Avery’s Owlery. There’s lots of inspiration to be found in this group – and you don’t want to miss it!
Thank you for hopping along with us. If you get stuck during the Blog Hop, please use this line-up as a guide:
My October Host Code is HSUBS7GX. Please use this code for orders under $150.00. I will have a small gift for those with orders over $50.00 in addition to the Perk Rewards Program. You can read all of the information at the top of the page in the Menu Bar under SHOP / Perks.
Thank you for stopping by today. I hope you enjoyed today’s project and will come back. I do read and reply to all of the comments individually. They mean a lot to me. Please reach out if you have a question.
Click on this photo to see the complete list. You can also click on the SHOP button at the top of my post to go directly to my Online Store.
HOST CODE
My October Host Code is HSUBS7GX. Please use this code for orders under $150.00. I will have a small gift for those with orders over $50.00 in addition to the Perk Rewards Program. You can read all of the information at the top of the page in the Menu Bar under SHOP / Perks.
Thank you for stopping by today. I hope you enjoyed today’s project and will come back. I do read and reply to all of the comments individually. They mean a lot to me. Please reach out if you have a question.
The content in this blog is the sole responsibility of Jackie Beers as an Independent Stampin' Up! Demonstrator. The use of and content of classes, services or products offered is not endorsed by Stampin' Up!