Happy Thanksgiving to all of you. Hoping you are having a wonderful day. Especially for those of you having to work on this holiday. That was me for over 30 years, I know how tough it can be. I am grateful for your staying with me on my stamping journey.
Today’s card is one that expresses gratitude and could be used for any occasion that requires it. We all have the need for these type cards.
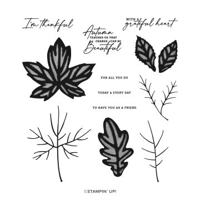
STAMPS
There are a mix of Autumn products used today. The sentiment is from the Autumn Leaves stamp set. This is a stamp set ,with matching dies, that carried over. I was thrilled that it did. The leaves are gorgeous and it has great sentiments.
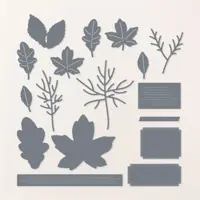
DIES and EMBOSSING
To create the fun focal layer I used a mix of Dies from the Autumn Leaves Die set. The sentiment and the two leaves are from that Die set. There are additional leaves, as well as some detail dies and another sentiment frame.
The background of this card has a special feature. Sadly it does not show very well. I used the Changing Leaves Embossing Folder to emboss the DSP. This is the first time I have ever embossed DSP. I have stamped on it , and Die cut it, but never embossed. Woohoo! A new adventure! And to add some additional detail, I used a Blending Brush and Shaded Spruce Ink to go over the embossed leaves to help them stand out. I did not go very dark, just a light color. That may be why it doesn’t show as well in the photo. Sorry about that.
PAPERS
The star paper is this gorgeous background layer. This is from the Splendid Autumn Designer Series Paper. It is one of the reverse sides of the watercolor sheets. I used a layer of Blackberry Bliss to help pull out the darker splotches. To add green to the purple colors I went with a bright, but dark, shade. I chose Shaded Spruce. I love it and Blackberry Bliss together. I will keep this in mind.
EXTRAS
The Die cut pieces are wonderful “extras”. Additionally I have used the Woven Gold Leaves. These are a great standout for any card where leaves work. And there must be more. To add my bling, I opted for the Purple Shimmer Dots. I chose the darkest of the shades. They are scattered around the card.
HOST CODE
My DECEMBER Host Code is SAQE7VYU. Please use this code for orders under $150.00. I will have a small gift for those with orders over $50.00 in addition to the Perk Rewards Program. You can read all of the information at the top of the page in the Menu Bar under SHOP / Perks.
Thank you for stopping by today. I hope you enjoyed today’s project and will come back. I do read and reply to all of the comments individually. They mean a lot to me. Please reach out if you have a question.
Smile and Keep On Stamping,
Jackie
New Scrapbooking Catalog
The newest addition to Stampin’ Up! is an Online catalog of Scrapbooking products. You can see the catalog by clicking the photo below and save it to your computer.
Online Exclusives
New Online Exclusives have dropped. There are Halloween, Fall, Christmas, and many that are great year round. Of course the new Designer Series Papers and Embellishments are fabulous as well!
You can go directly to these in my Online Store by clicking HERE
Before I get to today’s project, I wanted to remind you that the Kit Sale is going away soon. It is over on Halloween! So if you have one, or more, that you have been considering now is the time. You cannot bet the 30% off.
I have a a sweet Winter card to share today. It is not necessarily a Christmas card as it is more of a Caring card. I thought the set was adorable when I first saw it. And I am just now getting around to inking it up. It is a fun one for sure.
Stamp Set
This sweet snowman and bunny scene is a single stamp from the Snowman Hugs stamp set. I think it is a perfect one for friends and even as a thank you during this coming Winter months. And even better is the perfect sentiment included in the set as well. There are a couple of snowmen along with a few sentiments that are funny and sweet. I hope you will take a look at it in the Mini Catalog.
The image is stamped using Memento Tuxedo Black Ink and then colored using a variety of Stampin’ Blends. All f them are listed in the Supply List at the bottom of the post. The colors are all pulled from the paper. I may have taken some liberties with my snowman’s vest. I used Poppy Parade for the trim and bow tie and then both of the Shaded Spruce for the vest. The vest has plaid markings. The overall is the Light Shaded Spruce with the striping being the dark Shaded Spruce.
Papers
This fun paper seemed a perfect match for the snowman. It is from the Snowy Scenes Designer Series Paper. This is a great pack that I almost overlooked. It has snowy scenes like this on one side and then fun plaid, snowflakes, and candy canes on the other sides. There is something for any Winter card. I use the Candy Cane piece on another card for later in the week.
The card base and layer were also from the DSP. I pulled the very light Pool Party as the card base. I love this color and use it as a highlight fairly often. Then to help the DSP pop, I added a layer of Poppy Parade. Once I began putting everything together I felt like I needed to ground the snowman. So a thin strip of the Poppy Parade did the trick.
Extras
To give the sentiment a little extra, I used the Everyday Details Dies. These Dies have large holes punched around the pieces. But the smallest circle is this one I used. It has smaller stitching and works great here. To finish the scene I needed some bling. I could not decide on what would work the best and decided on some color. But there is not really a Poppy Parade bling. I fixed that however. All I had to do was color a few pearls with the Poppy Parade Stampin’ Blends. Easy Peasy!!!
Thank you for stopping by today!!
Kit Sale
October Starter Kit promotion…..
New Scrapbooking Catalog
The newest addition to Stampin’ Up! is an Online catalog of Scrapbooking products. You can see the catalog by clicking the photo below and save it to your computer.
Online Exclusives
New Online Exclusives have dropped. There are Halloween, Fall, Christmas, and many that are great year round. Of course the new Designer Series Papers and Embellishments are fabulous as well!
You can go directly to these in my Online Store by clicking HERE
HOST CODE
My OCTOBER Host Code is 2C9JH3D9. Please use this code for orders under $150.00. I will have a small gift for those with orders over $50.00 in addition to the Perk Rewards Program. You can read all of the information at the top of the page in the Menu Bar under SHOP / Perks.
Thank you for stopping by today. I hope you enjoyed today’s project and will come back. I do read and reply to all of the comments individually. They mean a lot to me. Please reach out if you have a question.
I have a two for one for you today. Generally it is just as easy to make two cards as one when we are creating. These cards were definitely easily made at the same time. They have a simple technique playing a large role in the creation.
Background and Colors
To begin with the background is not my normal starting point. However with these cards I kind of have to begin there. And you will learn my reason as we go along. I was looking to make a Fall card. Even though it is 90 degrees right now!! Where is my Fall weather!!! That being said, I still wanted a Fall card. I chose the colors based on that.
The colors chosen are Cherry Cobbler, Pumpkin Pie, and Crushed Curry. My idea was a simple “beginner” type “technique” card. To do this fun center technique I used Clear Block H. First I opened the Cherry Cobbler Ink and used the block to touch the ink pad about a third of the way across. Next I turned the block and opened the Pumpkin Pie ink. This time there was no way to get the ink only into the center of the block. Yes, I could have taped part of it off. But I went the simpler route. I inked the rest of the block by touching it to the crushed curry with the Cherry Cobbler hanging off the side. Then I used a damp paper towel to remove the last third. Finally I turned the block and inked that last section with Crushed Curry. (I did make sure it was dry from having wiped off the ink.)
To stamp on the Basic White card stock was only a matter of giving the inked block a little breath of life. In other words I huffed on it. Breath of life sounds so much better. LOL! After stamping the first time I thought there might be enough ink to stamp again. So I gave it more life saving breaths and stamped on the second piece. And there we have two backgrounds.
Stamps
These bright leaves are from the Caring Leaves stamp set. It is in the back of the Mini Catalog and is what I consider a sleeper set. I thought it was cute when I first saw it. But did not really think much after that. Then I saw other’s creations using it and had to look again. Now I am in love with this set.
The outline for the leaves are not totally closed. This gives them a very artistic look. And the filler stamps have the definition to them that leaves shading in places. I used the same inks for the fillers as I did the background strip. But I stamped with Memento Tuxedo Black for the outlines. I am happy with how it turned out. This sweet sentiment is also from the stamp set. It is stamped using Cherry Cobbler Ink.
Finishes
To keep these cards pretty simple I went with all the same colors for the layers as well. One has Cherry Cobbler base with a Crushed Curry layer and the other is the opposite. To give a touch of some bling, I turned to the Regal Foiled Adhesive Dots. These are so pretty with the gold flecks. I used the darker reddish ones. There are a trio scattered around each card.
Thank you for stopping by today!!
New Scrapbooking Catalog
The newest addition to Stampin’ Up! is an Online catalog of Scrapbooking products. You can see the catalog by clicking the photo below and save it to your computer.
Online Exclusives
New Online Exclusives have dropped. There are Halloween, Fall, Christmas, and many that are great year round. Of course the new Designer Series Papers and Embellishments are fabulous as well!
You can go directly to these in my Online Store by clicking HERE
HOST CODE
My SEPTEMBER Host Code is S9CRPBZ4. Please use this code for orders under $150.00. I will have a small gift for those with orders over $50.00 in addition to the Perk Rewards Program. You can read all of the information at the top of the page in the Menu Bar under SHOP / Perks.
Thank you for stopping by today. I hope you enjoyed today’s project and will come back. I do read and reply to all of the comments individually. They mean a lot to me. Please reach out if you have a question.
Happy Memorial Day!! And in honor of those who this day is for, I have a simple Gratitude card. My city holds a Memorial Day Parade every year. And my card sort of reflects the Hometown feel of that.
Stamps
There is a real mix of stamp sets for this card. My first idea was for a flag. The only thing I could find was the Sending Love stamp set and the post mark wavy lines. I got creative and made a flag from that. I added the stars square and cut out just a section of the lines. My stars are dabs of White Craft Ink dotted on the blue with the tip of the smallest scoring ball from the Take Your Pick tool. It is not perfect, but I thought it was pretty good.
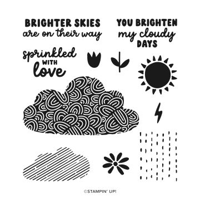
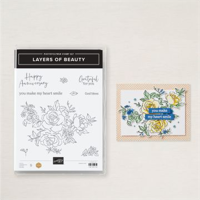
Then it was figuring out what to place the flag on. With the Sending Love set out, I thought why not a mailbox. And so the card was born. The mailbox is from the same set. I added flowers, sun, and clouds from the Bright Skies stamp set. And the Grateful is from the Layers of Beauty set. I masked of the “for you” which is underneath grateful, inked, removed the tape, and stamped only the one word. Not sure about you, but I always hold my breath for that stamping, afraid more than what I want will stamp!
Colors
The colors used are the traditional Red, White, and Blue. But with the added green grass and yellow sun. Real Red and Night of Navy are beautiful traditional colors and help this card to pop. And you know I love to color, so the red and blue mailbox was an easy choice for me.
Thank you for stopping in today! I hope you can have an enjoyable family and friends gathering.
May Join Promotion
New demonstrators who join during the month of May will receive the following products in their Starter Kit at no additional cost:
2024–2026 In Color Classic Stampin’ Pad Bundle
2024–2026 In Color 8-1/2″ x 11″ (21.6 x 27.9 cm) Cardstock
2024–2026 In Color 6″ x 6″ (15.2 x 15.2 cm) Designer Series Paper
2024–2026 In Color Stampin’ Write Markers
HOST CODE
My MAY Host Code is 96AT2UNW. Please use this code for orders under $150.00. I will have a small gift for those with orders over $50.00 in addition to the Perk Rewards Program. You can read all of the information at the top of the page in the Menu Bar under SHOP / Perks.
Thank you for stopping by today. I hope you enjoyed today’s project and will come back. I do read and reply to all of the comments individually. They mean a lot to me. Please reach out if you have a question.
A sweet appreciation card is what I have to share today. It stars a few Sale-A-Bration items that add definition and fun to the card.
Stamp Bundle
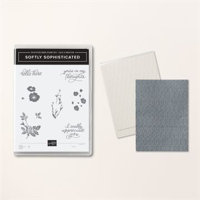
The sweet background for this card is made with DSP, that I will get to in a minute, and the gorgeous Embossing Folder that is part of the Softly Sophisticated Bundle. This is a Sale-A-Bration Bundle. You can see the fun design the embossing folder leaves. It works great with the variegated color in the DSP.
The stamps from this bundle are what created the flowers in the focal center. The greenery is one stamp and the flowers another. To create this scene I stamped twice. Actually I die cut the shape prior to stamping. This made it easier to fill the area than to try to gauge how much space I had.
Focal Layers
There are two focal points on this card and they actually work well together. The first is the floral area. The Softly Sophisticated flowers are die cut using the second largest of the Thoughtful Expressions Dies from the Mini Catalog. These are a bundle in the Mini Catalog. I love both of the layering shapes in this die set. They are both unique shapes and multiples of each.
The second focal point is the tag. This tag is from the Designer Tags Dies. It is a die set in the Annual Catalog. The sentiment is part of the Softly Sophisticated stamp set also.
Papers
The papers on this card are minimal. I used Basic White Thick card stock for the card base as I wanted the focal layers to pop. And the fun variegated blue is from the Flight & Airy Designer Series Paper, a Sale-A-Bration paper. It is one of the reverse sides of the birds.
Finishes
The focal layers are raised with Stampin’ Dimensionals and layered over each other. I used the White Baker’s Twine colored with a Boho Blue Stampin’ Write Marker to make the little bow. This needed a small bow and coloring Bakers Twine is an easy way to do that. The final touch is a scattering of Iridescent Pearls.
Thank you for stopping in today!!
HOST CODE
My FEBRUARY Host Code is PR4KTFTS. Please use this code for orders under $150.00. I will have a small gift for those with orders over $50.00 in addition to the Perk Rewards Program. You can read all of the information at the top of the page in the Menu Bar under SHOP / Perks.
Thank you for stopping by today. I hope you enjoyed today’s project and will come back. I do read and reply to all of the comments individually. They mean a lot to me. Please reach out if you have a question.
The card I am sharing today is similar to one I did previously. It showcases the gorgeous All About Autumn Designer Series paper and Autumn Leaves stamp set.
Papers
The paper is by far the star of this card. It has been so popular and continues to be. The expected return date is October 9, so keep a check if you are interested. This layout is one I have done several times before. It is a regular side fold card with 1″ cut off of the right front opening. I love how this allows more of the gorgeous paper to show.
The front and strip are both part of the All About Autumn Designer Series Paper. But did you notice the leaves? They also are cut from the DSP. They really pop with the definition in the die cut. And to add some more of the bling from the paper, I used Gold Foil as the background for the sentiment.
Stamps and Dies
The Bundle used is the Autumn Leaves Bundle. I know SU has had some beautiful leaves bundles previously. But these have to be my favorite. And as I mentioned above, the detail in the die cut is awesome. As is the details in the label dies. There are three of those included in the dies. I used the smaller one and simply cut the Basic White to fit inside of it.
The sentiment is from the stamp set. It is definitely a favorite. I am Thankful for so many things, really everything, in my life and this allows me to share that with others. And to add just a touch more bling, I added a single gold from the Adhesive Backed Sparkle Gems.
Thank you for stopping by today!!
Online exclusives are here to stay! Click on the photo and be taken directly to them in my online store. If you place an order, please use my Host Code listed just below.
HOST CODE
My OCTOBER Host Code is NYVXHUMX. Please use this code for orders under $150.00. I will have a small gift for those with orders over $50.00 in addition to the Perk Rewards Program. You can read all of the information at the top of the page in the Menu Bar under SHOP / Perks.
Thank you for stopping by today. I hope you enjoyed today’s project and will come back. I do read and reply to all of the comments individually. They mean a lot to me. Please reach out if you have a question.
The content in this blog is the sole responsibility of Jackie Beers as an Independent Stampin' Up! Demonstrator. The use of and content of classes, services or products offered is not endorsed by Stampin' Up!