I have matched the Citrus Blooms set with the fun Sale-A-Bration Fruit Salad DSP. They are perfect pairing for a sweet card.
Speaking of SAB, have you seen the new February additions? Oh My!!! There are several from Current catalogs in the list. Just remember that there are different product numbers on the SAB sheet for these products. If you use the catalog number they will show up as a price and not Free. Here is the flyer.
Now here is the focus of today’s post.
STAMPS& DIES
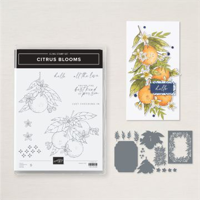
The Citrus Blooms stamp set from the Annual Catalog seemed a great pairing to go with these fun papers. Plus I just love the fruit images. And I love to color. This orange is colored with Stampin’ Blends to look somewhat like an orange.
Those little stars, I believe they are supposed to be little flowers, are from the matching Die set. I think they make a great addition of color and texture for the card. And the sentiment is from the set as well. I think it is an especially nice sentiment for a friend or as a Thank You.
PAPERS
These two different DSP pieces are from the Fruit Salad Designer Series Paper pack from Sale-A-Bration. The color are what made me look for a piece of fruit to pair with them. That and the Fruit Salad name of course! I paired Lemon Lime Twist for the card base with Basic White between the DSP layers. The addition of the Daffodil Delight stars ties everything together easily.
EXTRAS
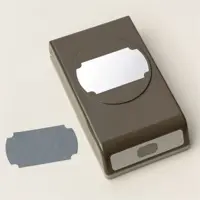
There are actually a few Extras today. First is the punch for the sentiment. This is the Labeled With Love Punch. It is a great size and I really like the touches on the ends for a little more detail. The stars probably count as some extra. But I still had to add some bling. So there are a scattering of Gold Textured Adhesive Dots to add some shine.
MEASUREMENTS
To give you info on the layers, I have the measurements for you. The card base is 4 1/4 X 11, folded at 5 1/2. The first White layer is 4 X 5 1/4. And the yellow DSP is 3 7/8 X 5 1/8. The second White is 3 1/4 X 4 1/2 with the green at 3 1/8 X 4 3/8. You all know how much I love layers!!
HOST CODE
My January Host Code is KSG3THS3. Orders of $50.00 or more will receive an appreciation gift from me. I appreciate you choosing me as your demonstrator!
Thank you for stopping by today. I hope you enjoyed today’s project and will come back. I do read and reply to all of the comments individually. They mean a lot to me. Please reach out if you have a question.
Smile and Keep On Stamping,
Jackie
New Scrapbooking Catalog
The newest addition to Stampin’ Up! is an Online catalog of Scrapbooking products. You can see the catalog by clicking the photo below and save it to your computer.
Online Exclusives
New Online Exclusives have dropped. There are Halloween, Fall, Christmas, and many that are great year round. Of course the new Designer Series Papers and Embellishments are fabulous as well!
You can go directly to these in my Online Store by clicking HERE
I love making little treat holders to hand out to the nice people I encounter regularly. The ones I have to share today have been around for some time. Actually I had a lady message me asking exactly how it went together. So after playing with it to help her, I decided I should make some to hand out. It is a Double Treat Holder. I have used it for Ghirardelli Chocolates and Tea Bags. This one has gorgeous DSP to make it extra special.
I have the directions at the bottom of the post. They are pretty simple to score and fold.
STAMPS & DIES
This sweet stamp is is from the Mixed Labels Bundle. And the adorable Die cut shape is made using one of the matching Dies. I love the stitching with detail around the edge. Plus the new shape is wonderful. On The opposite side of the treat holder I added a little note card. The sentiment from it is from the fabulous So Sincere stamp set. It is definitely one that is a keeper for some great sentiments.
The the opposite side of the treat holder is the exact same size as the front. You could add a second treat there in place of a note. Here is a view of that side.
PAPERS
This gorgeous paper is the Marbled Elegance Designer Series Paper. It is back in stock now so Woohoo!! The gold marbling is on one side with red, cherry cobbler, pretty in pink, white, and gold. The stamping was done on good ol’ Basic White. So a simple supply project as well.
EXTRAS
The Cherry Cobbler and Gold ribbon used to hold the sides together is from Holiday Catalog that just went out. It is still available but with low inventory. For the bling I used the Gold Textured Adhesive Dots. There are three different sizes and I used the middle size to add a touch of gold to the main sentiment.
DIRECTIONS
The treat holder uses a 6X6 piece of DSP. Use your Simply Scored Scoring Tool. I have drawn a line down the center of mine from the 6″ mark using a Black Sharpie. This makes the steps for this project much easier. So….place the DSP on the scoring tool with a point at the 6″ mark and the other lines up in the 6″ line. You have a diamond shape. Score at 4 1/2 and 7 1/2. Make a turn in either direction and score at 5 1/4, 6, and 6 3/4.
Fold and burnish on all of the score lines. Decide which paper you want to be on the outside front folds, like where my sentiment is. Now fold the two side score folds towards the center. They overlap a bit and that is perfect. Then fold the three center scores with the center one making a mountain. Fold the other two so they meet to make the shape. There is no adhesive needed! Here is a view of the side so you can see those center score lines as they need to fold. Let me know if you have any problems.
HOST CODE
My January Host Code is KSG3THS3. Orders of $50.00 or more will receive an appreciation gift from me. I appreciate you choosing me as your demonstrator!
Thank you for stopping by today. I hope you enjoyed today’s project and will come back. I do read and reply to all of the comments individually. They mean a lot to me. Please reach out if you have a question.
Smile and Keep On Stamping,
Jackie
New Scrapbooking Catalog
The newest addition to Stampin’ Up! is an Online catalog of Scrapbooking products. You can see the catalog by clicking the photo below and save it to your computer.
Online Exclusives
New Online Exclusives have dropped. There are Halloween, Fall, Christmas, and many that are great year round. Of course the new Designer Series Papers and Embellishments are fabulous as well!
You can go directly to these in my Online Store by clicking HERE
Today I have a quick card using two complimentary Pear products. That is not something I would normally think of as a having a starring role. However they work wonderfully together.
STAMPS
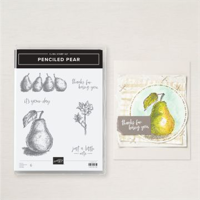
The Penciled Pear is focal layer of the card. I have always liked it for a plain card with a pop. It is sort of a subtle stamp. And it has great sentiments included in the set. For this card I used the Direct To Rubber Technique using Stampin’ Write Markers. Granny Apple Green is the body, Old Olive is the leaf and the shadow, and Early Espresso is the stem. The set does not include matching Dies. So I fussy cut the pear to layer here.
The sentiment is one that I mentioned is included in the stamp set. I believe it is such a sweet way of saying Thank You. Having these type cards ready to go when someone is extra special, or for a friend, is always nice.
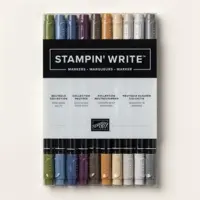
The Stampin’ Write Markers used in the Direct To Rubber Technique only are available in a color family pack. Now is the perfect time to get two packs of these. The current Sale-A-Bration Starter Kit Special includes 2 packs of Stampin’ Write Markers as a Bonus!!! Additionally you receive a special Stamp Set plus the regular $125.00 in products of your choice for $99.00. And did I mention that shipping is FREE!!! If you are interested please reach out to me.
PAPERS
This fun Pear paper is actually from the Sale-A-Bration DSP named Fruit Salad Designer Series Paper. The pack has almost any fruit you can think of included. I was surprised when I saw the pears and immediately thought of the Penciled Pear to “PAIR” with it! LOL!!!
To add a bit more to the sentiment and focal layer, I fussy cut a pear from the edge of the strip I had cut away from the sheet. It tucks perfectly under the Penciled Pear. And to help the pears stand out I layerd them on an Early Espresso circle.
EXTRAS
The circle behind the pears is the first of the extras. This was made using the 2 3/8″ Circle Punch. I love circle punches for quick focal layers. To add some texture, I used two different products. Beneath the circle I added a twisted bow using the Natural Tones Linen Thread from the last Mini Catalog. And of course some bling. This bling is not super shiny. It is the Earthtone Shimmer Gems which are in a few different colors. I used a trio of the green to highlight the green pears.
HOST CODE
My January Host Code is KSG3THS3. Orders of $50.00 or more will receive an appreciation gift from me. I appreciate you choosing me as your demonstrator!
Thank you for stopping by today. I hope you enjoyed today’s project and will come back. I do read and reply to all of the comments individually. They mean a lot to me. Please reach out if you have a question.
Smile and Keep On Stamping,
Jackie
New Scrapbooking Catalog
The newest addition to Stampin’ Up! is an Online catalog of Scrapbooking products. You can see the catalog by clicking the photo below and save it to your computer.
Online Exclusives
New Online Exclusives have dropped. There are Halloween, Fall, Christmas, and many that are great year round. Of course the new Designer Series Papers and Embellishments are fabulous as well!
You can go directly to these in my Online Store by clicking HERE
The card I have to share today is a mix of new OnLine , Sale-A-Bration, and Mini Catalog products. This octagon shape is the star.
STAMPS & DIES
This focal octagon shape is from the Memorable Blooms Bundle in the Mini Catalog. There is another smaller Octagon that fits inside this one. That Die has a floral design included. For this card all I needed was the plain shape. For the inside of the shape I used one of the Elements of Text stamps that is a new Online Exclusive set. This is the long, skinny text stamp. There is a larger, more square, one also. It is stamped as the background using Smoky Slate Ink.
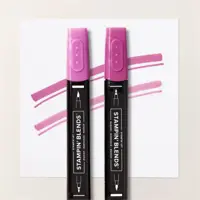
The pretty floral stamp in the focal layer is from the Memorable Blooms Bundle as well. It is stamped using Tuxedo Memento Black Ink and then colored using Stampin’ Blends. My colors for the entire card are Berry Burst and Lost Lagoon. That is what I used to color the floral. And the simple, yet bold, sentiment is from the stamp set as well.
PAPERS
To create the background of this card was as simple as choosing this sheet of paper from the Beautiful Bokeh Designer Series Paper. This sheet is what inspired the card colors. And the strip of the sentiment is the reverse side of this splattered sheet. I wanted to use it but was afraid the ink would not show very well on the Berry Burst darker color. However with the boldness of the stamp it worked just fine. I love stamping on DSP!
The card base is Berry Burst with layers of Lost Lagoon. The little strip beneath the sentiment layer was all it needed to give it some grounding.
EXTRAS
To have some additional of the berry color, I turned to one of the Free items from Sale-A-Bration. These are the Purple Sequins. Products are Free with a qualifying order. These sequins are a couple of different shades of pink. They fit perfectly with my card today.
HOST CODE
My January Host Code is KSG3THS3. Orders of $50.00 or more will receive an appreciation gift from me. I appreciate you choosing me as your demonstrator!
Thank you for stopping by today. I hope you enjoyed today’s project and will come back. I do read and reply to all of the comments individually. They mean a lot to me. Please reach out if you have a question.
Smile and Keep On Stamping,
Jackie
New Scrapbooking Catalog
The newest addition to Stampin’ Up! is an Online catalog of Scrapbooking products. You can see the catalog by clicking the photo below and save it to your computer.
Online Exclusives
New Online Exclusives have dropped. There are Halloween, Fall, Christmas, and many that are great year round. Of course the new Designer Series Papers and Embellishments are fabulous as well!
You can go directly to these in my Online Store by clicking HERE
I love opening the boxes of new products! Seeing items in person is so much better than in the catalog. Along those lines is the star of today’s card. Two little die cuts and the card is practically finished! This is a fun and versatile type card.
STAMPS and DIES
The stamp for this card is great. But it is not really the star of the card. The cut outs in the two corners are what makes this simple card so cute. And it was so simple to do! The cut outs are from two separate Dies from the Spring Corners Die set. (There is also a fabulous matching stamp set.)
The Dies are perfect to place in corners as you can see. I simply chose my Basic White layer and added the two dies where I wanted them. One run through the cutting machine and here we are! I have seen cards where folks have cut the large flower several times in different colors and then pieced the cut out pieces into this outline. Those are really pretty, but I opted for quick and easy on this one.
The sentiment is from a separate stamp set. It is from another new set the Memorable Blooms. It is a bundle in the Mini Catalog. One of my favorite things is a mixing of fonts. And this one really stands out.
PAPERS
To create the background of my flower I wanted daisy colors. In looking through my DSP, I found this piece from the Fruit Salad Designer Series Paper. It is a Sale-A-Bration DSP, which means you can get it free with a qualifying order amount. Actually I used two sheets of the same pattern. The layer behind the die cut areas is the opposite side of the layer piece.
The layer piece looks like the inside of an orange slice when you see the full sheet. And to compliment the yellow of the DSP, I went with Crushed Curry for the card base. When trying to decide how to place my sentiment I noticed a scrap of the DSP on the table. So I fussy cut the sentiment and layered it on the scrap. Then I fussy cut the DSP scrap to match. It was very quick and I do not mind fussy cutting at all. Especially on this which had some straight cuts.
EXTRAS
The bling for the card was chosen to match the yellow again. These are sweet little color dots and not really shiny bling. But that is okay with me. I like matching my colors sometimes. These are named Party Dots! How cute is that. There is a variety of colors in the package.
HOST CODE
My January Host Code is KSG3THS3. Orders of $50.00 or more will receive an appreciation gift from me. I appreciate you choosing me as your demonstrator!
Thank you for stopping by today. I hope you enjoyed today’s project and will come back. I do read and reply to all of the comments individually. They mean a lot to me. Please reach out if you have a question.
Smile and Keep On Stamping,
Jackie
New Scrapbooking Catalog
The newest addition to Stampin’ Up! is an Online catalog of Scrapbooking products. You can see the catalog by clicking the photo below and save it to your computer.
Online Exclusives
New Online Exclusives have dropped. There are Halloween, Fall, Christmas, and many that are great year round. Of course the new Designer Series Papers and Embellishments are fabulous as well!
You can go directly to these in my Online Store by clicking HERE
My card today is for one of the sweetest people I know. She does so much for everyone and I am honored to call her a friend. As a special Thank You, I made this card and hope you are as happy with it as I am.
STAMPS
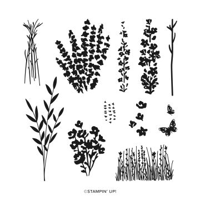
This sentiment is so perfect for the intended recipient. It is a bit different than normal, but fits the bill perfectly. The fun font is awesome as well. I love a different font. This one is from the Penciled Pear stamp set. That set is a hidden gem in the Annual Catalog. The inside sentiment is from the Wonderful Thoughts stamp set. There is also a matching flower from the Painted Lavender stamp set inside. Here is a view of the open card. It is a Double Z fold.
PAPERS
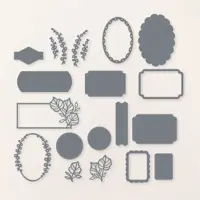
The card base ,or bases, since there are two Z folds are Pretty Peacock cardstock. And all of the DSP is from the Perennial Lavender Designer Series Paper. I normally do not put DSP on the inside of the Z base. However I saw one recently that had done so, and it really added to the card. So I saw this tone on tone floral in the paper pack and said Why Not! Additionally the surround for the front sentiment is also included in the DSP pack. I believe it is the opposite side of this main floral pattern.
EXTRAS
There is only one extra for this card. And that is very surprising even to me! It is the Die used for the sentiment on the front of the card. This Die is from the Unbounded Love Die set. It is one Die, but it cuts the outside and inside both. So it was simple to cut the DSP and then the White with the sentiment separately. Then I simply put them back together again. Plus I now have a White outside and plaid inside leftover for another card. Two for the price of one!
MEASUREMENTS
The Pretty Peacock card base is 11 X 4 1/4 and scored at 2 3/4 and 5 1/2. The inner card is also Pretty Peacock and is 10 1/2 X 3 1/4, and is scored at 4 1/2 and 7 1/2. There are different DSP on each of the layers. For the card base the DSP measures 2 pieces @ 2 1/2 X 4, these are the front and center. And the inside back is 5 1/4 X 4. For the smaller card, the DSP is 4 1/4 X 3 for the front. The middle section is 2 3/4 X 3. The back White layer that is stamped on is 2 3/4 X 3 also.
HOST CODE
My DECEMBER Host Code is SAQE7VYU. Please use this code for orders under $150.00. I will have a small gift for those with orders over $50.00 in addition to the Perk Rewards Program. You can read all of the information at the top of the page in the Menu Bar under SHOP / Perks.
Thank you for stopping by today. I hope you enjoyed today’s project and will come back. I do read and reply to all of the comments individually. They mean a lot to me. Please reach out if you have a question.
Smile and Keep On Stamping,
Jackie
New Scrapbooking Catalog
The newest addition to Stampin’ Up! is an Online catalog of Scrapbooking products. You can see the catalog by clicking the photo below and save it to your computer.
Online Exclusives
New Online Exclusives have dropped. There are Halloween, Fall, Christmas, and many that are great year round. Of course the new Designer Series Papers and Embellishments are fabulous as well!
You can go directly to these in my Online Store by clicking HERE
The content in this blog is the sole responsibility of Jackie Beers as an Independent Stampin' Up! Demonstrator. The use of and content of classes, services or products offered is not endorsed by Stampin' Up!