I see 4 X 4 cards quite often and think to myself that I should try that, and of course I never do! Well today I did it!! And then I do the imaginary eye roll and ask “why did I wait so long to do this”? Duh….. Of course the 4 X 4 cards can be every bit as elaborate as a regular A2 card or just a simple note. I went with the simple.
Country Livin’ 141925, $15.00
My plan was for a cute little card that could be used for a variety of reasons. And as most of my cards are, it was very quickly put together. The stamp sets are Country Livin’ and Endless Birthday Wishes.
The base of the card is done in Soft Suede card stock = 8 X 4 and folded in half
The next layer is Sahara Sand card stock = 3 3/4 X 3 3/4
The top layer is Very Vanilla card stock = 3 1/2 X 3 1/2
The boots are stamped in Early Espresso Ink and colored with a Blender Pen and the Ink pads .
The boots are colored with Sahara Sand ink, the darker areas are Crumb Cake Ink and the sole and straps are Soft Suede ink
The Yippee is stamped in Early Espresso
The shading around the boots is Soft Sky ink and a blender pen. This idea comes from Susan Itell.
The ends of the top layer are torn and sponged with Soft Suede
The “lasso” is Linen Thread looped around and secured with a Glue Dot.
And that is the building of my card. I hope you enjoyed it. I love reading your comments and very much appreciate them. If you have any questions, please contact me.
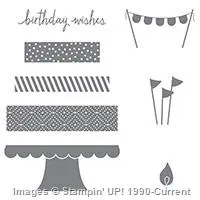
Today’s card is from the retiring list and is such a sweet stamp set. It is the Birthday Wishes set. It is a cake builder, candle builder bunch of fun stamps. The set is very versatile and just FUN!! Here is the card:
Birthday Wishes, 138646, $21.00
This is just a HAPPY , Happy Birthday card! Or for me, it is a SMILE card. Who would not smile when they opened the envelope to reveal this card?
The stamp set is photopolymer, so it is very easy to just “eyeball” the layers to line then up. I know some of you are Red Rubber Fans. And I have to admit that I was leary of the photopolymer initially. But it is times like this that have helped to convert me. Also I love being able to see through the stamp for ease of placement of my sentiments.
Almost all of the items on today’s card are on the Retiring List. Please don’t forget to check it if there is something you have been waiting on. They will not last very long. You can click the link below to get to the list.
I think many customers, and myself included, tend to forget about the Host Exclusive stamp sets. Because you can use your reward dollars on anything in the catalog, these sets get lost. I try to remember to remind my customers that these sets are a great Bang for Your Buck! They are discount priced and can only be purchased by the Host. So please give these stamp sets another look before the current Annual Catalog ends. With the new Annual Catalog there will be New Host Rewards sets available.
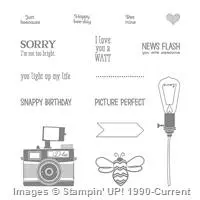
Today’s card was made with the Host exclusive set Pun Intended. This set is so cute and works especially well with our Note Cards and Envelopes (p.176) for just a quick card.
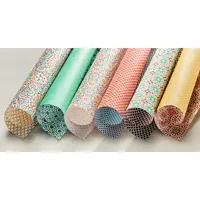
Today I used this cutie pie set and paired it with the Moroccan DSP.
Pun Intended, 141804, $9.50
It may look wacky, but I intentionally did not center the camera circle in the other one. In my mind at least, it looks like a lens. HaHa, or I’m looking at it oddly!
Anyway, I used Moroccan DSP with Mint Macaron and Very Vanilla card stock. The Mint Macaron circle is embossed with Petal Burst Embossing Folder to add some depth.
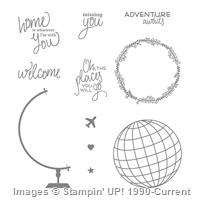
I absolutely love to travel! And I bought this stamp set to use with that in mind. I have to confess that this is the first time I have actually used it. Don’t you just hate that? Now that I have inked it up, I am in love. Talking about quick and easy!! Wow. A few stamps and you have a really cute card. And the stamp set is: “Places You’ll Go”.
Places You’ll Go
You really cannot tell from the picture, but the globe is layered. It gives the front just a little more definition. I wanted this to be a sweet card and I do like it. Isn’t it nice to have a card that uses only one stamp set. Sometimes it is difficult to do that!
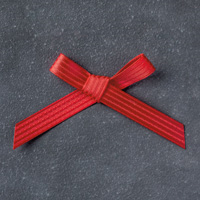
The base is Crumb Cake card stock cut to 4 1/2 X 11, scored at 5 1/2 and then the front folded under. This made for a great way to add ribbon and it not be wrapped on the inside of the card. I cut the ribbon, taped the two ends down on the back side of the crumb cake, and then took a short piece and just tied a not around the ribbon across the top. Easy Peasy!!
The Real Red layer is 3/4 X 4 3/8, and the Very Vanilla layer is 3 5/8 X 4 1/4. I like the smaller amount of red showing as opposed to the normal 1/4″ difference in layers. Remember that you will need a smaller than normal layer of Very Vanilla for the inside of the card. You do not want to see it around the edges of the red from the front. I used 3 1/2 X 4 for the inside.
The content in this blog is the sole responsibility of Jackie Beers as an Independent Stampin' Up! Demonstrator. The use of and content of classes, services or products offered is not endorsed by Stampin' Up!