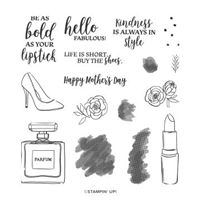
Anyone that knows me well at all is familiar with my love of purses and shoes. My shoes are more on the comfortable side (Birkenstocks and Hoka tennis shoes). When I saw the sentiment in the Dress To Impress stamp set regarding buy the shoes, I was sold! The humor along with a favorite thing was just perfect.
Does this sentiment speak to you like it did me? I am a firm believer in life is short and to enjoy the things you love. Those high heels would not be going home with me, but I can still admire the look of them. One thing I do love is the Best Dressed Suite of products.
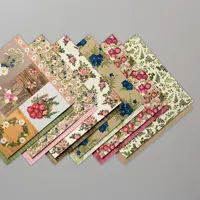
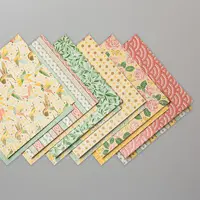
The Best Dressed 6X6 Designer Series Paper is as beautiful as all of Stampin’ Up!’s DSP. One side is purses, shoes, perfume, and the other side is like this striped pattern. I tend to go with the “opposite” sides of the DSP. I pulled my color combination directly from the DSP. It is one of my favorite ways to plan a card.
The thought of “Buy the shoes” made me think of a gift card for someone to purchase their choice of shoes. So I went with my go to gift card holder. Here is a view of the inside.
Oops on me for the Book gift card. A tip I always give when making a gift card holder is to place the card as you are securing that layer. It allows the extra space you need for a card so it is not a tight fit when you do add one. I forgot to take this one out. I promise that when the card is delivered it will have the appropriate card inside! 🙂
There are several gift card holders in my Gallery at the top of the page. You can search for them and see different versions of this style. It is very easy to do and holds a gift card perfectly.
Thank you so much for visiting today. I love to read your comments and answer any questions you may have.
Remember that it is Sale-A-Bration time!! I would love to send you a catalog if you do not have a demonstrator.
I would also love to talk with you about the Ultimate Shopping Experience , the Starter Kit! There is NO OBLIGATIONS to do anything beyond ordering the kit. You pay $99.00 + tax and receive $125.00 of your choice of products + any stamp set from any active catalog (the most expensive one is the Well Said set with a $45.00 price + the Mini Paper Cutter, a $26.50 value + the 6X6 DSP sampler pack (48 sheets of DSP) an $11.50 value + a Paper Pumpkin Kit with a value of $22.00 + FREE Shipping which is usually 10% of the order and would add another $23.00 value here. This equals over $230.00 value + business supplies added in at no cost. That is an awesome deal!! And you never have to purchase another thing. But while you are trying it out, and you have until the end of July before your trial period runs out, you are part of my Team! As well as my upline. We have Facebook groups to share our projects and assist each other. I would love to talk with you about this opportunity.
HOST CODE
My January Host Code is X3U7BR2N. Please use this code for orders under $150.00. I will have a small perk for those with orders over $50.00.
The list below is the CARRYOVER List. Items from the Holiday Catalog that will carry over to the 2020 Holiday Catalog. They will not be orderable between the two catalogs however.
Welcome to InKing Royalty’s December Blog Hop! This year’s Blog Hop themes are inspired by a single word – and this month our projects are centered around CHRISTMAS. It’s a wonderful time of year, and we are having lots of fun with our Christmas-themed projects. We are so excited to share them with you today! After you read my post, I hope you’ll hop over to the next person on the list at the base of this post.
I have once again fallen back on my favorite type of Christmas card, a Gift Card holder. As we wind down the days until Christmas, I have had a few requests for these from friends. So I assume if I and my friends need gift card holders, then you may as well. I started with my “Go To” gift card and added to that.
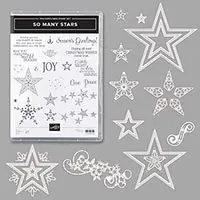
I paired Wrapped In Plaid Designer Series paper with the So Many Stars Bundle. I used three different sheets of the Wrapped In Plaid. They all coordinate which makes the matching super easy. The large star is stamped using Crushed Curry and die cut using the Stitched Stars Dies. (And the dies are carrying over to the Mini Catalog!!) The small Gold Foil Stars are leftovers from a swap I did using the swirl die from this die set. It has quite a few of the little stars that pop out and I made a dozen cards so I have a little container of them on my desk. They were just the accent I needed.
Here is the card with the flap open:
The gold stripe in the DSP made the lining up of the two sections very easy! And here is a view of the inside.
I have the complete directions for this gift card below the Hop Lineup. Please check it out and see how easy it is.
Thank you for stopping by today. I hope you’ll hop along to the next stop on the blog hop, Sheryl Sharp at Sharp Notes by Sheryl. There’s lots of inspiration to be found in this group – and you don’t want to miss it!
Thank you for hopping along with us. If you get stuck during the Blog Hop, please use this line-up as a guide:
The basic card is 4 1/4 X 11 and it is scored at 2 and 5 1/2. The 2″ is folded to the inside. I used the 1″ Circle punch to do a half circle finger hole for the gift card. Add Tear & Tape to the edges of the fold to secure. By doing it at the edges you have plenty of room for the gift card. Remember to place the gift card in the pocket as you are securing it though. That gives you a little more room. The DSP for the pocket is 4 X 1 3/4. Hint: hold this piece in position on the pocket when you are punching the finger hole.
The flap is attached beneath the right side Cherry Cobbler and DSP. The flap is 5 1/4 X 3 1/4, scored at 1/2. The 1/2 is folded and centered under the Cherry Cobbler. Then the Cherry Cobbler layer is adhered. The right side of DSP and Cherry Cobbler measure 4 X 1 3/4 and 3 3/4 X 1 1/2. The center Whisper White sentiment layer is 4 X 3 1/4.
The front left is Cherry Cobbler and DSP cut to 4 X 3 1/3 and 3 3/4 X 3. The focal point is the flap. The gold foil layer is 4 1/2 X 3 and the DSP is 4 1/4 X 2 3/4. The front sentiment is Gold foil at 2 1/4 X 1 3/4 and White at 2 X 1 5/8.
All of the supplies I used are listed below. And don’t forget the newly refreshed Clearance Rack and the End of Year Closeout sales.
The list below is the CARRYOVER List. Items from the Holiday Catalog that will carry over to the 2020 Holiday Catalog. They will not be orderable between the two catalogs however.
HOST CODE
My December Host Code is JTNY4EBH. Please use this code for orders under $150.00. I will have a small perk for those with orders over $50.00.
I made this little gift tag for a party recently. It would also be a great little gift enclosure or a RAK card. It is Quick, Easy, and Cute!
I made this one with a gift tag in mind, so I added a string of Whisper White Baker’s Twine. It is the same size as a gift card or RAK 3 X 3 card.
I broke out a carry over from the last Holiday Catalog, Dashing Deer. Remember that beautiful deer we all used last year? This little deer is in the set as well. The DSP is from Toile Tidings.
The card base is cut 6 X 3 with DSP cut 2 3/4 X 2 3/4, and the white cut to 2 1/2 X 2 1/2. I used Real Red Ink for everything. It cannot get much easier than this!
The list below is the CARRYOVER List. Items from the Holiday Catalog that will carry over to the 2020 Holiday Catalog. They will not be orderable between the two catalogs however.
HOST CODE
My December Host Code is JTNY4EBH. Please use this code for orders under $150.00. I will have a small perk for those with orders over $50.00.
Welcome to the Pals’ Blog Hop! We’re so glad you’re here because we made some great projects for our Retirement Fun Fold Party – showcasing our favorite products from the Holiday Catalog that will be leaving us forever. You may be starting the hop here or coming from a previous Pal’s blog. Either way, you’ve come to the right place. You’ll find the full line-up below to help you move, or “hop” along from Pal to Pal.
I used the Holly Jolly Christmas stamp set for my card. I love coloring and he is perfect for that. I have made a gift card card holder for this project. I love the fold that makes the gift card, as it can be done in several different directions. It is a go to for me all year round.
The modified version I made is still super simple to do. Here is another view of the inside.
Instead of it being the normal sideways, I added a piece to the back and folded it over to create a regular layered card look from the front view.
Gift cards are so important for me this time of year that I wanted to make one a little different.
Here is how I added the back piece.
To finish off the coloring, I added the Shimmery Crystal Effects to Santa’s fur. It gives just a touch of shimmer and some shine.
Measurements:
4 1/4 X 9 3/4 scored at 5 1/2 and 8 1/4
navy 3 3/4 X 5
DSP 3 1/4 X 4 1/8
Vanilla 3 X 3 7/8
Extra piece of Cherry is 4 1/4 X 3 1/4 scored at 1/2 on the 3 1/4 side
Strip of gift card is DSP 4 x 1 1/4 and vanilla 3 3/4 X 1
Thank you for stopping by today, I hope you will leave a comment with your thoughts on today’s twist to a regular gift card holder.
More inspiration awaits! Use the Blog Hop Line-up below to visit the rest of this month’s Design Team. My fellow Pals are excited to show you what they’ve created! Don’t forget to show us some love by commenting on our creations. Mark your calendars for Wednesday, January 8th, for our Time to Sale-A-Brate blog hop when our Design Team showcase projects using brand new products from the new mini catalog and Sale-A-Bration brochure. Don’t miss the fun!
Happy Monday to you! I have a really simple gift card holder to share today. I saw a sign over the weekend at a craft fair that said it was only something like 14 weekends until Christmas. Oh My!! Of course this gift card holder could be made for any occasion. The one I have made is a birthday one.
It took me a bit but I now really like this Mosaic Mood Designer Series paper. I love the texture of how it feels and looks. And here is the inside of the card.
As you can see, both the outside and the inside are really simple. The hardest part was deciding to put the ribbon just as an outside wrap that slides off. I originally was going to run it underneath the top layer. Then I thought of bow difficulties, etc. So went with it as just a band.
Directions:
Card base measures 4 X 9 3/4, scored at 3 1/4 and 6 1/2
From the top of the 6 1/2 score, cut diagonally to the bottom right edge.
Fold and burnish all of the score lines. Fold the angle to the inside and secure Only At The Bottom with Tear & Tape.
The inside layer is 3 X 3 3/4
The Front base layer is 3 X 3 3/4 and the DSP is 2 7/8 X 3 5/8
I started with a 15″ piece of Petal Pink Organdy Ribbon. Wrap it somewhat loosely around the card and tie a know. Trim ends.
Stamp the sentiment ,which is from #Elfie, and punch with the 1″ Circle Punch.
Punch the background with the 1 1/4″ Scallop Circle Punch.
Use a handheld hole punch to make a hole at the top of the circle layers and run a piece of Linen Thread through it.
Wrap the linen thread around the Petal Pink Ribbon underneath one of the ribbon ends. Pull tightly, tie a knot, and trim the knot very close.
Thank you for visiting today! I hope you will give this gift card a try. This is one that would be great to have in a variety of colors just to have on hand.
Even thought I mentioned most products in the directions, I have them listed at the bottom of the page and that will take you to my On Line store. My September Host Code is listed below. Don’t forget that the DSP sale is going on right now! WooHoo.
HOST CODE
My September Host Code is VYHZ6ZM2. Please use this code for orders under $150.00. I will have a small perk for those with orders over $50.00.
I know you have seen variations of this gift card holder. It is my “GO TO” for gift cards. It is also a fold that I do even when not including the gift card pocket. Hopefully you will like the different little twist I have added today.
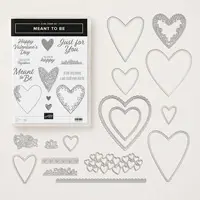
Meant To Be Bundle, 150587
I have been doing really bright cards lately, so today is no exception! But I do love this Garden Impressions DSP. Truthfully, it can go either Subtle or Bright with the colors. That is awesome!
Have you figured out the little twist I mentioned about the card? Yes, it is the little card attached to the front. You are such good guessers!! Here it is pulled out.
And here is the inside. Just in case you have never seen it before.
I have directions listed below. This may actually be my first video. I am terrified, but I will get through it. But in the meantime, you will have the directions. If you have any problems with it, please contact me.
NOTE: I used the 1/8″ Handheld Circle Punch to punch the hole the ribbon is run through on the tag. That is going to be no longer available once supplies are depleted. Apparently the manufacturer says they can no longer make it. That is a bummer! So if you do not have it I would suggest grabbing it up before it is gone.
Thank you for visiting today! The Join Promotion is still live and SAB is not even halfway over. So Happy Stamping!!
Directions:
The basic card:
Base layer is 4 1/4 X 10, scored at 5 1/2 and 8 1/4, fold and burnish
On the short section, use a circle punch and punch a half circle for a finger slot
Fold the short section into the inside of the card
Place Tear & Tape along the very edges of the short section. Place the gift card or a piece of card stock into the slot as you adhere it down to insure enough room for the card.
The top layer:
Card stock layer is 3 3/4 X 5
DSP is 3 X 5
Also, inside white piece is 3 X 5 (so that it does not show from the outside)
Front Pull Out Pocket:
Card stock is 2 3/4 X 5 1/8
score down short side and 1/2, and 2 1/4
score long side at 2 3/8
Fold and burnish score lines
Cut away the outside 1/2 scores on both sides of the longer section
Use the Trio Corner Punch and round the corner of the longer section
Use the 1/2″ circle punch to punch a finger hole in the short end
Add adhesive to the fronts of the flaps on the short section so that when you fold them in they adhere to the back longer section.
The tag is the Everyday Label Punch with the hole punched with the 1/8″ handheld punch and add ribbon of your choice.
JOIN PROMOTION:
For the Ultimate Shopping Experience is to purchase the Starter Kit. Please read through the next items and think about it. If you love paper crafting as much as I do, I believe you will want to talk with me. I hope you will consider it.
There are 2 Starter Kit choices:
You create your own kit. You get to choose ANY Stampin’ Up! products (includes bundles) However, SAB and Host stamps are excluded from the Starter Kit (but not your next order)!
You will receive a 20% discount on all future purchases through July 31, 2019. But there is no obligation to ever order anything else.
It’s a great way to Get Your Feet Wet, so to speak. Just see if you like being a demonstrator.
Hobby Demonstrators are welcome. I was one for about ten years, and really still am!
You will be the first ones to see the new catalog when it debuts in June, plus preorder from it.
There are NO OBLIGATIONS to continue or ever place another order.
The First Bonus is that you become part of my Team. I would love to have you and enjoy sharing my love for stamping and paper crafting with you.
You become a member of my Upline, Brian King, and his InKing Royalty group. There are great ideas and thoughts shared on our Facebook page.
Now for the 2 options and the Bonuses:
The first option costs $99.00 and you get the usual $125.00 worth of products (of your choice) PLUS an additional $50.00 of product for a total of $175.00 at a cost of only $99.00 to you. And did I mention FREE shipping on that order? That is another 10% off.
The second option costs $129.00. You get the same amount of products as the first choice, ($125.00 worth of your choice of products, Plus the additional $50.00 of Free Products, FREE Shipping) and the AWESOME new Craft & Carry Tote which is valued at $50.00. Basically you are paying an added $30.00 for the Craft & Carry Tote.
(I had the option to purchase, and of course I did. It is well worth the $50.00 and is a Fabulous deal for $30.00)
Here is the Tote. It is a great size, has dividers that can be moved for whatever products you are carrying each use. There are two outside pockets that are large enough to hold punches, and much more. There is a zipper outside pocket. It has regular straps as well as a shoulder strap. It has the Stampin’ Up! logo. It is made of a great heavy weight canvas. And it is so Pretty!!
The content in this blog is the sole responsibility of Jackie Beers as an Independent Stampin' Up! Demonstrator. The use of and content of classes, services or products offered is not endorsed by Stampin' Up!