I saw a card made to look like a barn door for the donkey. I wanted a simpler version though. So I played with it and come up with a Fun Fold that would work for any type card. I used stamps and paper that make it so if you have it already in your mind…..then it might be a barn door!! LOL!!
I just adore this little guy, or gal. The facial expressions that Stampin’ Up! gives to the animal stamps are always so cute. As I said at the top of the post, I was looking for a simple barn door. I went to the In Good Taste Designer Series Paper for a wood piece.
I did not want this card to be very neutral looking or simply masculine. To that end, I chose Poppy Parade as the bright piece for this project. To pull out the gray in the wood, I added a layer of Smoky Slate Card Stock. It is one of my go to colors. It pairs so well with anything else.
Here is a look at the open card. And ignore the unfinished inside. I have not decided on the proper sentiment so have not added the white layer to write and stamp on.
I have the measurements and directions to share with you. I will definitely be making more cards using this fold.
Measurements and instructions:
Base layer is Poppy Parade cut 4 1/4 X 5 1/2
Door flap is Poppy Parade cut 2 3/4 X 5 1/2, scored at 1 1/4 on the 5 1/2 side
Fold on score line and adhere the 1 1/4 section to the left, bottom of the Base
Smoky Slate is cut to 4 1/8 X 5 1/8 and adhered over the base and the small section of the door
Cut another Smoky Slate layer at 4 1/8 X 2 5/8 to adhere to the front of the door flap
DSP is cut to 4 X 5 1/8, then cut it in half at 2 5/8 on the 5 1/8 side. The taller section adheres to the upper part of the card. The shorter section adheres to the door flap.
The inside lower, behind the door flap, is Whisper White cut to 2 1/2 X 4 (I do not have that in the photo)
The front donkey layers are:
Poppy Parade is 2 3/4 X 3 3/4
Smoky Slate is 2 5/8 X 3 5/8
White is 2 1/2 X 3 1/2
Thank you for stopping by today! I hope you had a fun weekend and were able to get some crafting time in.
Now is a great time to Join My Team. Any time is a good time…..but for this current promotion, during Sale-A-Bration, you will receive a free stack of our Regals, Subtles, Neutrals, Brights, and 2020—2022 In Color Designer Series Paper along with the Starter Kit! There couldn’t be a better time to join the Stampin’ Up! family. As always, the starter kit is $99.00 and you choose product of your choice in the amount of $125.00 + the special promotion (which is the paper listed above). I would love to talk with you about this if you are interested in getting a discount for your hobby or building your own business!
HOST CODE
My JANUARY Host Code is: AYRTRJCQ Please use this code for orders under $150.00. I will have a small perk for those with orders over $50.00
I hope you have had a chance to look through the Sale-A-Bration catalog. There are several awesome products in there to choose from when you spend $50.00 or $100.00 in the Annual or Mini Catalogs. However, there is One thing you might have missed. It is the Punch Party stamp set. It is on page 17 of the SAB catalog. It is FREE with a $300.00 order or party. So what better time than to gather some friends and have a party yourself. There are ways we can do this virtually or in person.
The Punch Party stamp set would be in addition to the other $50.00 or $100.00 choices from SAB. It only for the Host that reaches the $300.00 or above sales. I am sharing one of those stamps from this wonderful set today.
The stamps in this stamp set pair with punches you may already have. I used a sentiment that would fit not only this heart punch, but the Rectangle Postage punch. The various stamps coordinates with both of those as well as the new Double Oval Punch.
I paired the heart with the new True Love Designer Series Paper. This is a totally black and white pack of paper. I have used two of the patterns on this card. These sheets are wonderful to use in black and white, but are great to color as well. I have seen some beautiful work from sponging, coloring, etc. Your imagination is free to play.
I love black and white with a touch of red. So I used a piece of the Real Red Double Stitched Satin Ribbon to cover the joining of the two pieces of DSP. Instead of a bow, I added just the little knot of ribbon. For those that say they are bow challenged, this is the way to go!
For the finishing touches, I used the second heart punch to added the scallops to the heart. I also used the Real Red Stampin’ Blend to color the flowers that are incorporated into the sentiment.
Thank you for stopping in today. I do appreciate it and love to hear from you. And I would love to talk with you about hosting a party. There are several ways to do this.
Also, now is a great time to join my Team! Any time is a great one to become a Stampin’ Up! Demonstrator. I would love for you to join my Blue Line Stars Team and find out what all the excitement is about. And there are some nice incentives from Stampin’ Up! right now.
HOST CODE
My JANUARY Host Code is: AYRTRJCQ Please use this code for orders under $150.00. I will have a small perk for those with orders over $50.00
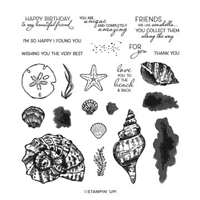
I have some new products to share today and they are a WOW!! It is the Friends Are Like Seashells Suite. Everything is just wonderful.
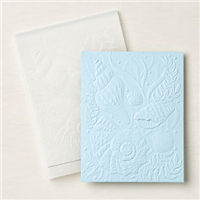
I hate to keep saying this, but the photo does not do this justice. The embossed paper is the Pearlescent Specialty Paper. It is a vanilla look with shimmer. I embossed it with the Seashells Embossing Folder, and that alone was very pretty. But I went a step further and watercolored the raised areas. I used the Water Painters and Ink Refills. The shimmer still comes through the painted areas.
The card base and layer are Soft Sea Foam and Seaside Spray. Both are beautiful, soft colors that are perfect for this suite of products. The sentiment is an immediate favorite! I decided on the set based on this sentiment. Then the more I saw of the products, the more I was sold.
I stamped the sentiment in Flirty Flamingo and punched it out using the Timeless Label Punch. I couldn’t decide where to place it. Finally I decided it needed to be grounded. So a strip of the Seaside Spray was the saving point. The finishing touch is one of the Opal Rounds next to the sentiment. (It really doesn’t show in the photo.)
Thank you for stopping by today! I really appreciate it and hope you will come back tomorrow for another project.
HOST CODE
My JANUARY Host Code is: AYRTRJCQ Please use this code for orders under $150.00. I will have a small perk for those with orders over $50.00
Hello, welcome to the Stampin’ Pretty Pals’ Blog Hop! This month our Design Team created projects featuring “Sale-A-Bration Products.” We hope you enjoy and will be inspired by them! Don’t forget to leave comments. We love hearing from you! At the end of my post, you will find the full line-up to help you “hop” along from Pal to Pal.
Sale-A-Bration is one of my favorite times of the year! I love getting FREE products for purchasing things I love! And I have a “Bundle” of things I have fallen in love with to share with you today.
I have used the Berry Blessings stamp set and the Berry Delightful Designer Series Paper. These two are a Bundle in the Sale-A-Bration Catalog. The bundle is FREE with a $100.00 purchase. My photo does not do the beauty of the DSP justice. The colors are very vibrant!
For the center stamped area, I used a separate piece of White cardstock to stamp on. The outline of the leaves is Garden Green with the inside being Granny Apple Green. The berries are outlined with Pacific Point and the inside is Balmy Blue. I also added a few extra berries using a “stamped off” Highland Heather over the Balmy Blue. I fussy cut those and added a few with dimensionals overtop of the center stamped ones and then scattered a few on the “bridge” in place of an embellishment.
The gorgeous plaid blue DSP is the flip side of the berry DSP. I decided I wanted contrast instead of all of the panels being the same. The two sentiments I have used are part of the Berry Blessings stamp set. I stamped those using Memento Tuxedo Black Ink to stand out from the bright colors of the DSP. And of course… I used the Double Oval Punch. It seems as if I have used that punch on every card I have made since it debuted!!
This fold will still fit inside an A2 envelope. Here is a photo of it flattened for inserting into an envelope.
You can see that the left side is folded and the right side is flattened out. It will do this in either direction. So depending on how you decorate, it will still flatten out. The size of the flattened version is 4 1/4 X 5 1/2, so normal size of a card.
I had a request for a Bridge Fold Card for a class I am doing soon. After figuring out what it was, I have really enjoyed making this card using that fold. My favorite thing is different Folds!
I have the measurements for you and would love to see your version of this Fun Fold.
Base of the card is cut to 8 X 4 1/4 (Tip: cut the 3″ off of the 11″ side before cutting in half for the 4 1/4. You can use this piece for the inside and the bridge piece)
Score on the 8″ side at 1 1/4, 2 1/2, 5 1/2, and 6 3/4.
The inside White layer is 2 3/4 X 4
The four sections cardstock layer is 1 1/8 X 4 1/8
The four DSP sections are 1 X 4
The base of the Bridge is 1 X 5 1/2
The cardstock layer is 7/8 X 5 3/8
The DSP layer is 3/4 X 5 1/4
Thank you for stopping by today! I hope you enjoyed my project and will give it a try.
More inspiration awaits! Use the Blog Hop Line-up below to visit the rest of this month’s Design Team. My fellow Pals are excited to show you what they’ve created! Mark your calendars for our next blog hop on February 10th when our theme will be “Birthday Bonanza” where the design team will be sharing birthday projects that celebrate our family and friends. Don’t miss the fun! Until then, please stay safe and have fun in your craft room.
I am having so much fun playing with all of the new Mini Catalog products! I especially love the more humorous sets. These are calling the “inner Child” in me. I do not mean that they are intended for children by any means. They just make you Smile and Laugh!!
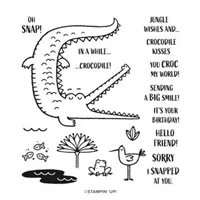
I always say that I love cards or projects that make me Smile when I see them. This one is sending a Smile! From the first time I saw this set, I knew it would come to my house. The sayings are so darn cute. I have a friend who always says “Oh Snap”! That is in the set, and is the set’s name.
I kept this card very clean and simple. I used the Forever Greenery Designer Series Paper as the jungle background for the crocodile. He is stamped in Memento Tuxedo Black and then filled in with both of the Granny Apple Green Blends.
For the sentiment, I used the Double Oval Punch. I would apologize for using this as much as I have, but I just cannot feel bad about it! This punch is awesome for so many of the sentiments that we have. It is probably my Number 1 from the Mini Catalog.
I did not use as many layers as I normally use. I only did the background and then DSP or the layer and White. My one finishing touch is a Holiday Rhinestone in the bright green beside of the sentiment.
Thank you for stopping in today. Please come back tomorrow. Tomorrow is the first Pals Blog Hop of the new year. There will be many great projects for you to hop through.
HOST CODE
My JANUARY Host Code is: AYRTRJCQ Please use this code for orders under $150.00. I will have a small perk for those with orders over $50.00
I enjoy making little 3D items to give to friends for various occasions. This year at Christmas I did a couple of more detailed projects. One is a Stand Up Calendar / Post It Note Holder. I had received one from a friend at our last in person Stampin’ Up! Event and have had it on my desk. Every time I used it, I would think that I needed to make some of those. Finally, the time was right.
Above is a photo of the closed notepad and you can see I do have the calendar. I will say that my Christmas gifts did not have the calendar, as they were delayed in arriving. (Imagine that with the crazy mail this holiday!) So those had a stamped sentiment as the focal point.
Here is the stand up and open view.
For this version of the notepad, I used the Sweet Strawberry Bundle along with the Berry Delightful Designer Series Paper. The paper is part of the Sale-A-Bration Berry Blessings Bundle. They are a great match! I do love the contrast of the two different paper pieces I used.
For an added touch to the top of the notepad part, I stamped and punched a couple of strawberries. I used Cherry Cobbler ink as the outline of the strawberry with Flirty Flamingo as the inside filler. I paired the softness of the Flamingo with Granny Apple Green to keep my cheery strawberry theme going.
I have not done a video for this because when I looked, I found a couple of them. I do have the measurements and instructions for you. It is really quite simple.
Measurements:
Base is 4 1/4 X 11, scored at 3 and 5 1/2
Card stock same as base cut to 4 1/4 X 5 1/2
DSP is 4 X 5 1/4 (need 2 of those)
Pen holder is 3 X 2, folded in half and secured together and then secured beneath the calendar
Notepad cover is 3 1/8 X 4 1/8, score on 4 1/8 side at 5/8 and 1
Calendar layers are 3 1/2 X 2 3/4 and 3 1/4 X 2 1/2 (I used Taylored Expresseions calendars, yours may be a different size)
Thank you for stopping by today. Please come back tomorrow for another new project.
HOST CODE
My JANUARY Host Code is: AYRTRJCQ Please use this code for orders under $150.00. I will have a small perk for those with orders over $50.00
The content in this blog is the sole responsibility of Jackie Beers as an Independent Stampin' Up! Demonstrator. The use of and content of classes, services or products offered is not endorsed by Stampin' Up!