Mr. Moose is in the spotlight today! By using the Spotlight Technique I am only highlighting a portion of the moose image. This is a fun technique that is an oldy but goody!
Technique
The Spotlight Technique is a simple one to accomplish. This card was made as part of the Make My Monday Challenge that I am a Design Team Member for. You can join in the fun by creating your own version and then adding your card on the challenge page. Simply click on the picture below to go to the page.
My version of the spotlight was created by using the Heart Punch, the smaller one, and punching a heart from a scrap of cardstock. Next I placed the negative, the scrap of cardstock with the heart missing, over the stamped image of Mr. Moose. After finding the perfect section to color, I used the Basic Black Stampin’ Write Marker to draw around the inside of the negative. A quick and easy method. You may use any shape you wish as long as you are not covering the majority of the image. By using the heart I thought it was a bit different and shows love for Mr. Moose.
Stamps
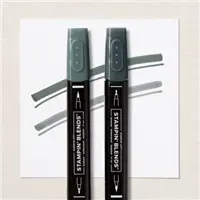
Because the stamped image of Mr. Moose is so large I did not add a sentiment. But there are cute sentiments included in the stamp set named All Bundled Up, as well as a few other cute critters. You may remember that I used the Raccoon last week. There is also a bunny and a bird. Mr. Moose is stamped using Memento Tuxedo Black Ink and then colored using Stampin’ Blends. As mentioned above the spotlight shape was drawn using a Black Stampin’ Write Marker. This is the only marker that is available individually. It is a very handy tool to have.
Paper
Leaving the paper discussion to last was very difficult for me. This paper is amazing!! It is from the Lights Aglow 6X6 Designer Series Paper. All of the sheets are gorgeous but this is my favorite. The gold simply shines and I am in love with the design on this sheet. The colors used are very similar to the Raccoon card from last week. But after seeing this piece of paper, I knew it was The One to help Mr. Moose be the star!
And to further help Mr. Moose shine, I added more gold to bring out the gold in the DSP piece. It is not just a plain Gold Foil however. This is the Gold and Rose Gold 6×6 Metallic Specialty Paper. It carried over to the current Annual Catalog from last year’s Fall Mini. And I am so happy. Both colors in this paper pack are wonderful. Before you shake your head at me for wasting some of this beautiful paper, rest assured that I took this into consideration. I cut the layer behind Mr. Moose from the center of the larger gold layer. No one but me would know, and it saves a second piece of the paper. Now you can released the shocked breath you took after seeing two layers of gold! 🙂
Mini Catalog and Sale-A-Bration
Click on either catalog photo and you will be taken to my Online Store where you can download either or both catalogs.
HOST CODE
My July Host Code is ZMG9Q7EX. Please use this code for orders under $150.00. I will have a small gift for those with orders over $50.00 in addition to the Perk Rewards Program. You can read all of the information at the top of the page in the Menu Bar under SHOP / Perks.
Thank you for stopping by today. I hope you enjoyed today’s project and will come back. I do read and reply to all of the comments individually. They mean a lot to me. Please reach out if you have a question.
Showcasing beautiful paper is an easy thing to do with Stampin’ Up!’s Designer Series paper. This card is starring the Splendid Day DSP.
This card was created during a Stampin’ Up! creative day for demonstrators. It was a fun day of creating with a presenter with not a real idea of the outcome until the card was complete. All of the cards were great and not something I would have normally thought to do. This one definitely fits that last statement.
Suite of Products
Generally I do not showcase a Suite of products. However, this Suite is amazing and I love all of the products included in the suite. It is all about the Splendid Day Suite today.
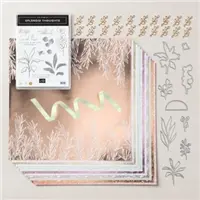
PAPER: The star(s) of this card are the little taco shaped DSP pieces. They are cut from the Splendid Day Specialty Designer Series Paper. The paper has a variety of soft colors with one side being a Foil and the other regular DSP images and designs. To show so many different papers on one card is unusual even for me! Last but not least is the card base of Petal Pink and the banner of Soft Sea Foam. Both of these colors are included in the DSP.
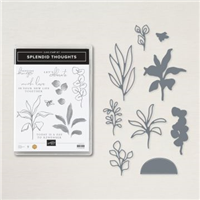
DIES: The taco looking pieces were cut using the die from the Splendid Stems Dies. This shape is a favorite of mine. I have used it on a few different cards because the shape and details are so unique. A bonus is that two of the four sentiments included in the stamp set fit on this die cut! And as you see on the card, it is a great size!
STAMPS: To mimic the pattern in the Foil DSP pieces, the large leaf outline was used as Tone on Tone on the card base. The Splendid Thoughts stamp set includes the sentiments I mentioned above plus a bee and two different stem/floral pieces. Each of those have fill stamps as well. Pairing these with the Die set, which has dies for those plus some extra leafy pieces, makes great focal layers.
Finishing Touches
The shine and taco shapes on this card are so pretty on their own. And the added finishing touches simply emphasize these. Even though the sentiment fits on the taco die, that would be a bit much. So the sentiment was stamped on a piece of Soft Sea Foam. Banner tips were cut using Paper Snips.
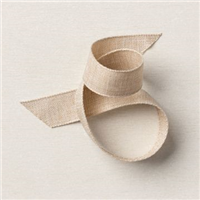
Also included in the Splendid Day Suite is the Soft Sea Foam 3/8″ Seam Binding Ribbon. If you have used Seam Binding Ribbon before then you know how wonderful and easy it is to work with. This ribbon is the same. Plus we simply wrapped the ribbon around the white layer and tied a knot. It doesn’t get any easier than that!
For the final touch there has to be a bit of bling. Although with the foil DSP pieces there is already a good bit of shine! The bling added to the sentiment is from the 2021-2023 Opal Rounds.
After seeing a bit of a different layout and use of dies, I would love for you to try a similar card and let me know what you think!!
Mini Catalog and Sale-A-Bration
Click on either catalog photo and you will be taken to my Online Store where you can download either or both catalogs.
HOST CODE
My July Host Code is ZMG9Q7EX. Please use this code for orders under $150.00. I will have a small gift for those with orders over $50.00 in addition to the Perk Rewards Program. You can read all of the information at the top of the page in the Menu Bar under SHOP / Perks.
Thank you for stopping by today. I hope you enjoyed today’s project and will come back. I do read and reply to all of the comments individually. They mean a lot to me. Please reach out if you have a question.
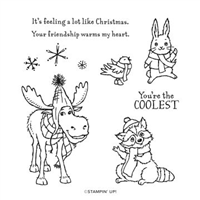
The weather is most definitely NOT saying Winter, but today’s card may “cool” you off a bit. It is such a fun set of bundled up critters.
Stamps
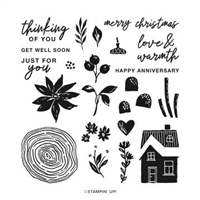
The All Bundled Up stamp set has such adorable animals, who are all “bundled” up with cute scarves and hats. It is definitely making me warm just thinking about it since the weather here in Georgia is anything but cool right now. However, we all need to begin thinking of our Christmas cards before long. And this stamp set would be great for any time of year that the weather is a bit cooler. Plus the sentiment gives a fun twist to the little raccoon’s outfit.
The raccoon is stamp stamped using Memento Tuxedo Black and then colored with Crumb Cake Stampin’ Blends. His scarf and hat are colored using Soft Succulent and Sea Foam Stampin’ Blends. For a bit of semi-bling, but not really, I added the single snow flake to the raccoon layer. There are actually three different snowflakes on that stamp and they are used on the inside of the card. The sentiment is from the stamp set and is stamped using Pool Party Ink, as is the snowflake.
Paper
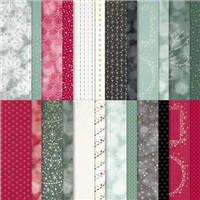
The colors used are from the piece of DSP. That paper is the Painted Christmas Designer Series paper, which is a carryover from last Fall Mini Catalog into the current one. By using the darkest color for the card base and coming forward with lighter colors gives a different look I think. And is not something I tend to even think about. Evening Evergreen is the base card with a layer of Soft Succulent. The strip of DSP is cut 5 X 1 3/4 and is adhered directly to the Soft Succulent layer. Simply leave the correct edging distance on the bottom and sides for fitting.
Embossing Etc.
To pair with the DSP layer I went with the Winter 3D Embossing Folder Duo. These two embossing folders are sized to work on the Mini Cut & Emboss Machine. This one is snowflakes and the second one is evergreen bows. Either would have worked, but I was thinking snow! The embossed layer is Basic White and is cut 5 X 2. It is layered abutting the DSP layer with the same distance on the sides and top. And even if it did not meet perfectly, the Natural Finish Ribbon covers the joining line.
To highlight the sentiment, I could not find two punches or dies to layer that fit in the area I had left. After debating I finally decided upon the Label Me Fancy Punch. The sentiment was cut using the punch and then a second piece was punched from a scrap of the Evening Evergreen. This piece was cut up the center. By layering these two pieces to each end of the sentiment, you get just enough of a frame of green. And you really do not even notice that none is showing above and below the white. For the final touch a single Festive Pearl was added on the sentiment layer.
Mini Catalog and Sale-A-Bration
Click on either catalog photo and you will be taken to my Online Store where you can download either or both catalogs.
HOST CODE
My July Host Code is ZMG9Q7EX. Please use this code for orders under $150.00. I will have a small gift for those with orders over $50.00 in addition to the Perk Rewards Program. You can read all of the information at the top of the page in the Menu Bar under SHOP / Perks.
Thank you for stopping by today. I hope you enjoyed today’s project and will come back. I do read and reply to all of the comments individually. They mean a lot to me. Please reach out if you have a question.
For today’s Pals Fun Fold Blog Hop I have a Twisted Card to share with you. Twisted is an odd name for a card but is very appropriate in this instance.
And here is the unfolded card to give you a better idea of the Twist.
Twist Fold
This type of Fun Fold has been around for a while. And I have wanted to make it, but the size was too large. All of the versions I had seen were 5 1/2 X 5 1/2 so required a special envelope. Keeping it simple and working with what we have is my preference. So I fiddled with the measurements and this one will fit inside a regular A2 envelope.
Hopefully my directions in the PDF are understandable. Although I will say the most difficult part is making sure the DSP is cut in the direction you want. It took me two tries to get that correct. And there are videos available for the larger size. The directions would be the same with the exception of the height of the card base.
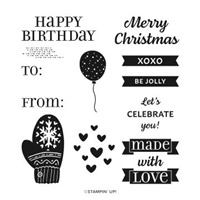
Both of the sentiments used are from the Celebrate With Tags stamp set. For the front, I stamped the sentiment and then cut it apart to fit on the circle section of the tag. It can work by either cutting straight with a paper trimmer or as I did and just winging it with paper snips! Personally I like the bit of angle to the Let’s and You.
Dies
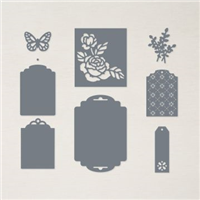
Two different die sets were used for this fun card. The one I love is the Designer Tags Dies. It includes the tag on the front of the card. The little detail at the top plus the stitched edging adds more than you would expect. And the second die is the Layering Circles Dies for the white and Hues of Happiness circles on the tag. If you happen to still have circle punches, they would work also. The white circle is exactly the width of the tag for reference.
Thank you for visiting and please follow along to the other Fun Folds in the Hop.
Mini Catalog and Sale-A-Bration
Click on either catalog photo and you will be taken to my Online Store where you can download either or both catalogs.
HOST CODE
My July Host Code is ZMG9Q7EX. Please use this code for orders under $150.00. I will have a small gift for those with orders over $50.00 in addition to the Perk Rewards Program. You can read all of the information at the top of the page in the Menu Bar under SHOP / Perks.
Thank you for stopping by today. I hope you enjoyed today’s project and will come back. I do read and reply to all of the comments individually. They mean a lot to me. Please reach out if you have a question.
Sharing the beautiful Sun Prints Designer Series Paper brings me happiness. And it can be the star of the card. That is the case for today’s quick, Fun Fold card.
Paper
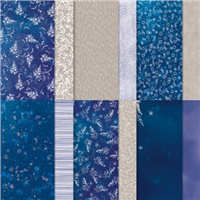
The variations in colors of the Sun Prints Designer Series paper is so pretty! And that is an understatement. The pack is variations of Blue, gray and white. This piece is particularly appealing to me and is why I chose it for this card. Sadly a Sympathy cards was needed and I wanted it to be caring and pretty at the same time.
The DSP is paired with a color I rarely use. It is the Gray Granite. This color has a brownish tone to it compared to say Smoky Slate, which has a silvery tone. And either of these would work with this DSP. But the Gray Granite is maybe a touch softer so it seems to pull out the softer shades in the paper.
Stamps
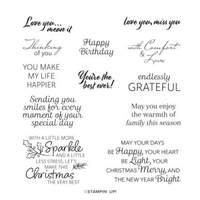
There are two wonderful stamp sets used on this card. The first is the set for the sentiments. It is an awesome stamp set named Very Best Occasions and is in the Mini Catalog. Better yet is that it is paired in a bundle with the Very Best Trio Punch. The punch was used in a card last week for decoration on the focal layer. For a quick and beautiful edge to a layer, I highly recommend the punch and these sentiments are a nice mix of different occasions.
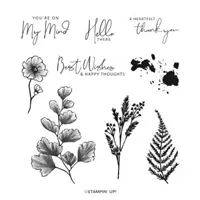
The second stamp set is the Nature’s Print stamp set. To give some beauty to the White part of the card which shows above the sentiment flap, I used one of the floral stamps. It is stamped in Gray Granite Ink and then stamped off before stamping the White layer. This gives quite a bit softer shade of color. But you still get the definition of the stamp.
Card Design
This card qualifies in my book as a Fun Fold. It is a quick and easy one to do, which is a super bonus. The card base is 5 1/2 X 8 1/2 and scored on the 8 1/2 side at 4 1/4. Then you cut off 2″ from the front flap. Save that piece because it becomes the little flap! Fold that 2 X 5 1/2 piece in half and burnish the fold. Then adhere half behind the White piece prior to adding the White inside layer.
The DSP pieces are 1 7/8 X 5 1/8 and 2 3/8 X 1 5/8. Each of these pieces is layered onto a piece of Basic White that are cut 2 X 5 1/4 and 2 1/2 X 1 3/4. The inside White layer is cut 4 X 5 1/4. As a finishing touch, the front sentiment layer, is stamped using Gray Granite Ink. The Double Oval Punch is used to cut the sentiment and the background scalloped layer. This is probably my most used punch! And this may be my card requiring the least number of supplies I have ever made!! 🙂
Here is a look at the open card.
Mini Catalog and Sale-A-Bration
Click on either catalog photo and you will be taken to my Online Store where you can download either or both catalogs.
HOST CODE
My July Host Code is ZMG9Q7EX. Please use this code for orders under $150.00. I will have a small gift for those with orders over $50.00 in addition to the Perk Rewards Program. You can read all of the information at the top of the page in the Menu Bar under SHOP / Perks.
Thank you for stopping by today. I hope you enjoyed today’s project and will come back. I do read and reply to all of the comments individually. They mean a lot to me. Please reach out if you have a question.
The card I am sharing today may have you wishing for Fall and cooler weather. Showcased are the Leaf Embossing Folder and Leaf Labels.
Leaf Labels
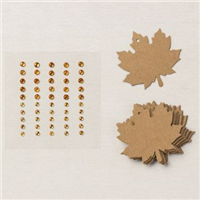
Nothing could be simpler than using these Leaf Labels as a focal layer on a card. These beauties come already cut, and even have a tag hole in place to use them as a tag. The hole is at the top point ,where I have strategically placed an Amber Gem. Speaking of the Amber Gems, they are included with the Leaf Labels! It is a two for one pairing. All I had to do was stamp the sentiment on the leaf and it was ready to go.
Designer Series Paper
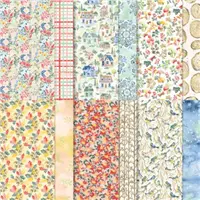
This beautiful and bright piece of DSP is from the Sale-A-Bration paper named Rings of Love Designer Series Paper. It is FREE with a $50.00 order. By using just a strip, it goes a really long way in creating some beautiful cards for Fall. And all of the colors are bright ones. That is my choice for most card colors. Plus the bright plays perfectly to the Kraft paper of the Leaf Label.
Background and Embossing
The background of this card was created from the DSP of course. All of the colors were pulled from that little strip, as was the decision on the Embossing Folder. Crushed Curry was used to show off the beautiful leaves of the Leaf Fall 3D Embossing Folder. They blow softly across the card. Actually it is a large space folder so you can move your cardstock around a little to place the leaves in the best location. To compliment all of the layers, I went with Parakeet Party as the card base. The brightness offsets the Kraft leaf and ties in to the DSP colors.
Mini Catalog and Sale-A-Bration
Click on either catalog photo and you will be taken to my Online Store where you can download either or both catalogs.
HOST CODE
My July Host Code is ZMG9Q7EX. Please use this code for orders under $150.00. I will have a small gift for those with orders over $50.00 in addition to the Perk Rewards Program. You can read all of the information at the top of the page in the Menu Bar under SHOP / Perks.
Thank you for stopping by today. I hope you enjoyed today’s project and will come back. I do read and reply to all of the comments individually. They mean a lot to me. Please reach out if you have a question.
The content in this blog is the sole responsibility of Jackie Beers as an Independent Stampin' Up! Demonstrator. The use of and content of classes, services or products offered is not endorsed by Stampin' Up!