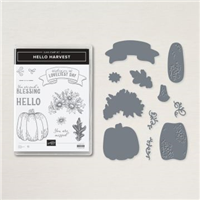
My project today showcases one of the new Fall stamp sets. It is the Hello Harvest Bundle and is perfect for anything Fall!
Stamp Set and Dies
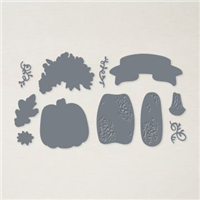
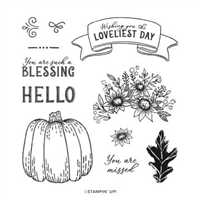
This card has a few different things of interest. But since the star of the show is the stamp and die bundle, we will will start there. This is the Hello Harvest Bundle. It contains the Hello Harvest Stamp set and the Rustic Pumpkin Die set. Both are great alone or together. My favorite of them are the ones used on today’s card. They are the pumpkin with the sunflowers on top. It is as if we were using the pumpkin as a vase.
Both the pumpkin and the sunflowers were stamped using Early Espresso Ink and then colored with Stampin’ Blends. The Pumpkin didn’t really require any coloring. And the extra single leaf is included in both the stamp set and the die set. Adding the single leaf was to pull more of the Poppy Parade color into the layers.
DSP and Fold
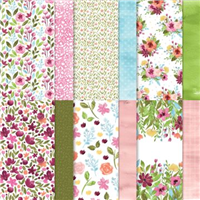
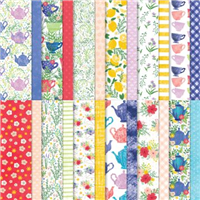
The DSP of this card is a perfect match to the stamps. Between the colors and the images you could not find a better pairing. And the best part of this paper is that it is FREE! Yes, it is one of the Sale-A-Bration choices. The Rings of Love Designer Series Paper not only coordinates wit the Rings of Love stamp set in the Mini Catalog, but is also one of the SAB items. With a $50.00 order you can choose this as a Free gift.
The fold I have used looks similar to a Book Fold, but opens fully. The DSP piece is simply added behind the 1″ front flap. It allows for you to see the reverse side of the DSP when the card is opened. And to get more pieces from a 12 X 12 piece of DSP it is cut 4 X 5 1/2. That is only 1/2″ less than normal but gets you two additional pieces from a 12X12 sheet. The addition of the ribbon covers the inside of the card where the DSP and card flap meet. This allows for a “cleaner” finish.
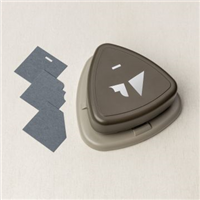
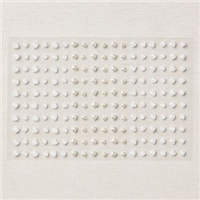
Punch
Were you wondering what I used to create the pretty details on the Pumpkin background layer? It is really pretty and quite different from any corner makers we have. Best of all is that this came from a punch! It is the new Very Best Trio Punch. The punch was all that I used, but it comes as a Bundle with the Very Best Occasions Stamp set. The set is only sentiments and has a variety. We all love punches and great sentiments, or at least I do. So this is a must have from the Mini Catalog in my opinion.
Mini Catalog and Sale-A-Bration
Click on either catalog photo and you will be taken to my Online Store where you can download either or both catalogs.
HOST CODE
My July Host Code is ZMG9Q7EX. Please use this code for orders under $150.00. I will have a small gift for those with orders over $50.00 in addition to the Perk Rewards Program. You can read all of the information at the top of the page in the Menu Bar under SHOP / Perks.
Thank you for stopping by today. I hope you enjoyed today’s project and will come back. I do read and reply to all of the comments individually. They mean a lot to me. Please reach out if you have a question.
Welcome to InKing Royalty’s July Blog Hop! We’ve made projects that celebrate the fun of summer and are excited to share them with you today. We are a diverse group, so I know you’ll see a great variety of summer projects. After you read my post, I hope you’ll hop over to the next person on the list at the base of this post.
My first though of Summer Fun is outside where I usually ending up sweaty or dirty. Hopefully you will get a smile from my card even if you do not play in the dirt.
Watercolor Background
This is National Watercolor Month so I wanted to pay a bit of tribute to that with my card. Plus it gives a different look to the ink colors and my cute piggy. Using the Stampin’ Up! Fluid 100 Watercolor Paper, along with the Water Painters, I added Ink from Old Olive , Balmy Blue, and Pool Party Ink pads. By squeezing the pad while closed it pushes a bit of ink into the lid of the ink pad. Since I was not going for perfection (and it’s a good thing!) my watercoloring worked.
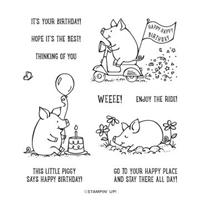
Stamp Set
One of my favorite stamp sets in the Annual Catalog is the This Birthday Piggy. Those pigs are so adorable! To go along with our Summer Fun theme, I decided that playing in the dirt with flowers is definitely a summer fun activity. This little piggy seems to be having a wonderful time doing that. To keep the Memento Ink from smearing with the water, I heat set the watercolor and then waited a few minutes afterwards before stamping the scene. Ms. Piggy and her surroundings are colored using Stampin’ Blends.
Paper
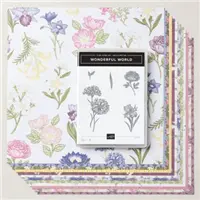
This DSP may be unfamiliar to you. It is part of a Free with a $100.00 order Sale-a-bration set. The name is Wonderful World Stamp Set and Wonderful World 12×12 Designer Series paper. They both feature beautiful floral images. Since I wanted the flowers with Ms. Piggy to pop, I went with Melon Mambo. This paper is the only one I found to have Melon Mambo included in it. So a win for me with a Free pack of paper.
Finishes
For the finishing touches to my Summer Fun, I added both items in a similar shade to Melon Mambo. The first is the beautiful Sweet Sorbet In Color 1/8″ Metallic Ribbon. It is wrapped around the layer twice. And there is a double loop bow to complete that part. The second finish is the pinkish Opal in the upper corner. That is from the 2021-2023 Opal Dots. Even Ms. Piggy needs a bit of bling!
Thank you for stopping by today. I hope you’ll hop along to the next stop on the blog hop, Sheryl Abernathy at Elegant Sentiments. There’s lots of inspiration to be found in this group – and you don’t want to miss it!
Thank you for hopping along with us. If you get stuck during the Blog Hop, please use this line-up as a guide:
Click on either catalog photo and you will be taken to my Online Store where you can download either or both catalogs.
HOST CODE
My July Host Code is ZMG9Q7EX. Please use this code for orders under $150.00. I will have a small gift for those with orders over $50.00 in addition to the Perk Rewards Program. You can read all of the information at the top of the page in the Menu Bar under SHOP / Perks.
Thank you for stopping by today. I hope you enjoyed today’s project and will come back. I do read and reply to all of the comments individually. They mean a lot to me. Please reach out if you have a question.
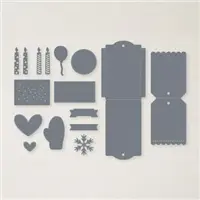
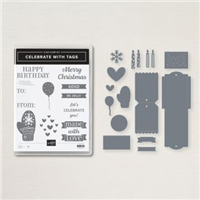
The product I am showcasing today contained a wonderful surprise. It is the Celebration Tags Dies and a gift card will actually fit inside of it. How exciting is this?
Dies
Since the tag / envelope on the front of the card is the star of this show, I am beginning with the tag. There are two foldable tags included in the Celebrations Tag Dies, along with several other pieces. This card includes the larger of the envelope / tags plus the balloon. It also includes the layer the sentiment is stamped on. With this versatility I believe this is a must have die set.
The best part of this card, besides being cute, was the discovery that a gift card will fit in the tag. After gluing the tag / envelope together, I had the idea to try a gift card. Having not seen anyone demonstrate that one would fit, I had my doubts. But surprisingly, and with great excitement, I discovered it fits perfectly!
Here is a view of the card being pulled out of the tag.
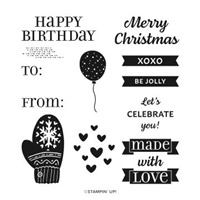
Stamp set / Bundle
Since I have been going on about the die set, I should tell you that it Bundles with the Celebration With Tags stamp set. The stamp set includes the Happy Birthday as well as some other great sentiments. Even though the dies are my favorite part, the stamps are very good and fit the layers. That is always a good thing.
Paper
The paper choices were dictated by my needing a female birthday card. And with a different sentiment, these colors and papers would be great for a baby shower. Backing up to the DSP, you know that it was my first choice, as that is how I generally begin. So the pink and blue from the Awash In Beauty Designer Series Paper is what prompted the Balmy Blue and Blushing Bride cardstocks. The balloon is die cut from the same piece of DSP. It is showing the reverse side. And has a Heart Pearl as an embellishment.
Gift Card Pull
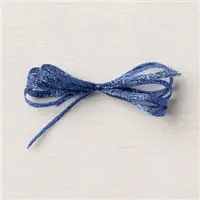
Having the tag containing the gift card on the front of the card required an easy means of retrieving the gift card.. This “Pull” idea came from The Paper Pixie on a gift bag she did recently. Since the tag already has the holes on both the front and the back layers, all I had to do was thread the ribbon through them. The ribbon is 12″ of the Old Olive Ribbon that is part of the Sahara Sand and Old Olive Ribbon Combo in the Annual catalog.
Feed the ribbon through one side and all the way through the other side. Pull through to the back with about 3″ of ribbon. While holding on to that piece, place the gift card in the opening and push down. This will take the length of the ribbon from the front down into the tag with the gift card. When the gift card is fully inside the tag, you should have about the same amount of ribbon left on the front and the back. You can tie with Bakers Twine, as I did, leave as is, or use your own idea. Then simply trim the ribbon ends to the same length.
Mini Catalog and Sale-A-Bration
Click on either catalog photo and you will be taken to my Online Store where you can download either or both catalogs.
HOST CODE
My July Host Code is ZMG9Q7EX. Please use this code for orders under $150.00. I will have a small gift for those with orders over $50.00 in addition to the Perk Rewards Program. You can read all of the information at the top of the page in the Menu Bar under SHOP / Perks.
Thank you for stopping by today. I hope you enjoyed today’s project and will come back. I do read and reply to all of the comments individually. They mean a lot to me. Please reach out if you have a question.
Today’s card is a challenge to create with an Outdoor Sport. That topic is not one that I have a lot of call to use stamps from that direction anymore. However, Let’s Set Sail came to the rescue. Sailing is definitely an outdoor sport.
This card and the challenge is for the Make My Monday Challenge. You can add your cards to the challenge as well. Click on the link and you will be taken to the site.
Stamps
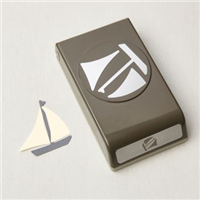
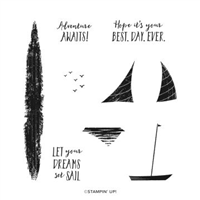
The Let’s Set Sail stamp set is a fun one that is easy to create quick and easy cards with. The best part is that it is a Punch Bundle. The sailboat was made using the matching Sailboat Builder Punch. There are stamp pieces included in the set which match the punch, but I opted to simply punch them from different cardstock.
For the banner at the top of the card I did use a stamp from the set. The wording is great for a variety of meanings. To help it stand out a bit, I went with a different look for the sentiment. So there is no layering. Instead I went with making the sentiment into a banner. It only required leaving a little extra space on the bottom beneath the sentiment. Then simply cut a little way up in the center and then angle cut from each side. To finish this off, I added a staple for something different.
Paper and Ink
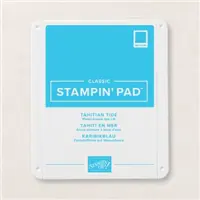
In designing the card the paper was the next step after the stamp set. After looking through all of the current DSP, I landed on the 2022-2024 In Color 6X6 papers. By using a couple of different pieces from those new In Colors they all tied together wonderfully. The base of the card is Starry Sky which fits with sailing. And to match the water I went with the polka dot look piece of Tahitian Tide. To give a faux texture look to the sails I chose the striped pieces of Starry Sky and Sweet Sorbet. The background layer of the sailboat is a flowery piece of the Sweet Sorbet also. Sadly the sailboat itself is simply Crumb Cake.
There really is not a lot of stamping on this card as I mentioned earlier. But the water is stamped using Tahitian Tide Ink. The pad is very juicy and as it dried the bubbles gave a bit of texture to the water. It is not something I would want on most occasions but here it works perfectly. The only other ink is the Basic Gray that is used for the seagulls flying in the distance, as well as the sentiment itself. This addition of , not quite black, is a little softer look than black itself would leave.
Measurements
The card base of Starry Sky cardstock is cut to 4 1/4 X 11 and scored at 5 1/2. For me at least DSP requires a layer between it and the card base. So the White layer is 4 X 5 1/4 with the DSP layer being 3 3/4 X 5. The stamped layer is 2 1/2 X 3 with the background layer being 2 3/4 X 3 1/4.
Mini Catalog and Sale-A-Bration
Click on either catalog photo and you will be taken to my Online Store where you can download either or both catalogs.
HOST CODE
My July Host Code is ZMG9Q7EX. Please use this code for orders under $150.00. I will have a small gift for those with orders over $50.00 in addition to the Perk Rewards Program. You can read all of the information at the top of the page in the Menu Bar under SHOP / Perks.
Thank you for stopping by today. I hope you enjoyed today’s project and will come back. I do read and reply to all of the comments individually. They mean a lot to me. Please reach out if you have a question.
Pretty Designer Series Paper can be difficult to cut. A Fun Fold card with a different front view requiring less cutting is the solution.
Paper
As you can see from the photo, this card is all about the paper! The Awash In Beauty Designer Series Paper is gorgeous. This pattern used is my favorite. Bold colors and flowers will always be my favorite and this fits the bill. Because this piece of the DSP is so pretty I did not want to cut it. (Have you ever had that though?) So the next best thing was to use as much of the sheet as I could. And I should say that this started as a leftover 6X6 piece from my paper shares.
What you see on the front is a 4 X 5 1/4 piece that I then cut 1 1/4 off of the right side. This card began as a Fun Fold, and you will see that when I share the open view. (Hopefully that helps to explain your confusion after my comment on cutting off a section.) The piece that was cut is adhered to the right side of the 4 X 5 1/4 inside layer. And here is the inside view.
Fun Fold
After seeing the open view I hope it makes my explanation of the front layer a bit clearer. The idea was for it to appear as a solid piece of the pretty DSP when closed. And then you see the Fun part when you open it. This fold is not a new one, but the way the DSP is adhered is not one I have seen previously. As I mentioned earlier, it came to me as a way to share more of the pretty paper.
To get this Fold, cut the base of Merry Merlot to 8 1/2 X 5 1/2, then score on the 8 1/2 side at 2 1/8 and 4 1/4. Basically it is a regular fold, the 4 1/4, and you then fold the front flap back on itself. To have the DSP layers meet properly, I layered the left side of DSP first. By aligning the top, bottom, and left side equally it was fairly easy. Next add the DSP strip to the right side of the White inside layer. Add your adhesive to the White layer and carefully slide it into the card while bring the top over. By using Multipurpose Liquid Glue I had a little wiggle room. I was able to match up the two pieces of DSP and make sure they were properly aligned.
Stamps and Dies
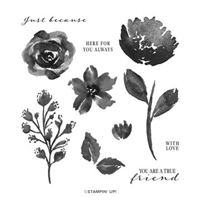
There is not a sentiment on the inside of the card as I sometimes leave them until needed. Especially for an outside sentiment as this one with the Just Because. But it could not be blank inside, even with the gorgeous DSP. So I added a flower from the set. This was created using the Balmy Blue and Mossy Meadow Stampin’ Write Markers. These are not available individually, but are available as a Color Family. And in my opinion they are a must have for adding more than one color to a Red Rubber stamp.
For the front sentiment I needed a layer, or layers, that would not take over from the DSP. These layers used were found in the Potted Succulent Dies. It was a great surprise that the sentiment fit perfectly in that slim die piece. And the fun shapes with stitching were just an added bonus. To finish off the card there had to be bling! Sometimes it is difficult for me to just use one bling. This was definitely one of those times with the flowers needing some love as well as the sentiment. So three Rhinestones were spread among the two flowers and the sentiment for equal bling.
Mini Catalog and Sale-A-Bration
Click on either catalog photo and you will be taken to my Online Store where you can download either or both catalogs.
HOST CODE
My July Host Code is ZMG9Q7EX. Please use this code for orders under $150.00. I will have a small gift for those with orders over $50.00 in addition to the Perk Rewards Program. You can read all of the information at the top of the page in the Menu Bar under SHOP / Perks.
Thank you for stopping by today. I hope you enjoyed today’s project and will come back. I do read and reply to all of the comments individually. They mean a lot to me. Please reach out if you have a question.
This month, the theme is Create Your Own Background. We really hope that you will be inspired by all the amazing creations the Pals are sharing with you! As you hop from blog to blog, we would love for you to leave a comment. You will find the lineup at the end of my post to help you “hop” along from Pal to Pal.
This month’s theme of creating your own background was a bit of a challenge. Trying to think of something not commonly seen was my idea. It took a while but I finally came up with an idea that I hope you will like.
Background
With the theme being the background, let’s start there. My idea was to create a bright and fun background using the 2022-2024 In Color Metallic Woven Ribbons. These are individual ribbons in each of the five colors. By adding adhesive to a piece of cardstock it was fairly easy to wrap the ribbon around it. Of course the back of this piece is a hot mess! But I was happy with the finished product and I love the metallic shine it gives to the card. As an aside, I will say that a wider ribbon would probably be easier to work with if you decide to give this technique a try. And I hope you will try it.
Papers and Colors
With the shine of the background, I wanted a bright rest of the card as well. Going with the Tahitian Tide cardstock for the base layer was my choice. It is the brightest of all of the In Colors. To partner with the bright Tahitian Tide, but still be one of the In Colors, it took a few minutes to decide on the background layer. But the Orchid Oasis was the one that seemed to match. This piece is a “back side” of a piece of the Tea Boutique 6 X 6 Designer Series paper. And of course I had to add the White layer between the base and layer. For some reason I find it difficult to put the DSP directly on the base. One of my many quirks!!
Stamps
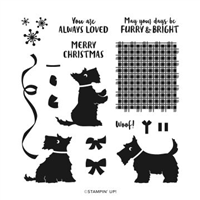
After the Theme and the brightness it created, the stamp set seemed to take a backseat on this card. That is really not true but it is simply the last item I chose in making the card. Finally the Christmas Scottie was chosen to be the star. There are a couple of images of the scottie to choose from. For the layout I had going on, the standing up little guy was the one that fit the best.
But that was not the hardest part of the stamp choosing. The sentiment choice was the hardest. After stamping and punching out a sentiment, it was discarded and I decided on the barking. Since I have never had a dog that did not love to hear themselves talk, I thought it was a perfect choice! Each In Color is stamped and then trimmed using my Paper Snips. Spreading them the height of the layer was making sure that the little guy’s words were loud and clear! 🙂 And the finished touch is a bit of bling on this collar. A single rhinestone was all that was needed.
More inspiration awaits, so use the lineup below to visit the rest of the Design Team. The Pals are excited to show you what they’ve created! Then, please mark your calendars for our next blog hop on August 10th. Our theme will be Seasons’ Greetings, where we will showcase projects inspired by our favorite seasonal time of the year.
My July Host Code is ZMG9Q7EX. Please use this code for orders under $150.00. I will have a small gift for those with orders over $50.00 in addition to the Perk Rewards Program. You can read all of the information at the top of the page in the Menu Bar under SHOP / Perks.
Thank you for stopping by today. I hope you enjoyed today’s project and will come back. I do read and reply to all of the comments individually. They mean a lot to me. Please reach out if you have a question.
The content in this blog is the sole responsibility of Jackie Beers as an Independent Stampin' Up! Demonstrator. The use of and content of classes, services or products offered is not endorsed by Stampin' Up!