I am late getting started today. But I have good news to share. The All About Autumn Designer Series Paper is back in stock. If you have been waiting on this beautiful paper then grab it now!
Today’s card is another Thank You. I have been needing quite a lot of these lately. This one pairs Autumn Leaves with Inked Botanicals DSP for a softer Fall look. I love this pair, and had to use it with a Fun Fold as well. The measurements for the Fun Fold are at the bottom of the post.
Papers
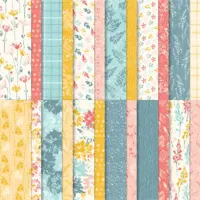
This paper, and colors, is not what you would first think to pair with Autumn Leaves. But I believe it works with a totally different look. The star of this card is the gorgeous Inked Botanicals Designer Series paper. These colors are still wonderful Fall colors, they are just a bit brighter than what you would first think of.
To keep with the rustic look, I began with a card base of Crumb Cake card stock. Then added a layer of Very Vanilla, as it is the color in this DSP. Next came choosing a the DSP pieces. I finally went with a variety! And I think it is a good mix. It is not normal that I use three pieces of a DSP on one card. But these were all partial pieces left over ,so why not!! You can see the third piece from the open view of the card.
Stamps and Dies
The leaves from the Autumn Leaves set are still a favorite. I love the inside details. Not only do you get shading with the leaf stamp, but you can add the veining and stem with a second stamp. This is actually the first time I have used the veining. And now I am sad that I never used it before! It really adds to the leaves. The leaves are stamped in Calypso Coral and Wild Wheat, with the veins done in Pecan Pie.
The shape for the sentiment is from the matching Die set Autumn Leaves. I have used this shape several times and really love the stitching, but most of all the little ticket corner look of the corners. The Pecan Pie Ink was used for the sentiment but was stamped on Lost Lagoon card stock. The front sentiment is from the Autumn Leaves set, but the inside sentiment is from the Inked & Tiled stamp set. This is another great set for a variety of occasions.
Finishes
The finishes were kept pretty simple for me. With all of the DSP and the fun fold, it did not require much. Of course I had to add a touch of bling though. There is one of the Faceted Gems Trio. And some loops of Bakers Twine was the last touch to complete it.
Fun Fold
The card begins with a piece of Crumb Cake card stock that is 8 1/2 X 5 1/2, score at 4 1/4 and then cut off 1 1/2 from the front. Then use the 1 1/2 cut off piece and cut it down to 3″ long. Score it in the center and attach half to the inside of the back of the card so the fold is flush with the edge.
The inside Very Vanilla is cut to 4 X 5 1/4 and covers the adhered part of the flap. For the front of the flap use a piece of DSP that is cut to 1 1/4 X 1 1/4. I used the same paper as the front fold. For the front fold I added a piece of Very Vanilla that is 2 1/2 X 5 1/4. Then the DSP is 2 1/4 X 5 to layer over it. The strip of DSP on the inside right is 1 1/8 X 5.
The front focal section is Crumb Cake cut to 3 X 3. It is adhered to the flap so that it is centered on the front of the card. I just adhered it to the front of that flap as I was going to add DSP to cover. (You can add the Crumb Cake behind and let your focal layer cover the flap.) The back side of the focal layer DSP is 2 3/4 X 2 3/4. And the Vanilla for the stamped front is 2 3/4 X 2 3/4.
Starter Kit promotion: We are in the last week of this awesome deal!!!
Reminder of the Join Promotion!!! I would love to have you join my team. There is no pressure to ever place another order. Although you do get a discount being a demonstrator!! Plus we have so much fun sharing our ideas and just enjoying ourselves while stamping. Please reach out if you have any questions. I would love to talk with you. 🙂
Online exclusives are here to stay! Click on the photo and be taken directly to them in my online store. If you place an order, please use my Host Code listed just below.
HOST CODE
My OCTOBER Host Code is NYVXHUMX. Please use this code for orders under $150.00. I will have a small gift for those with orders over $50.00 in addition to the Perk Rewards Program. You can read all of the information at the top of the page in the Menu Bar under SHOP / Perks.
Thank you for stopping by today. I hope you enjoyed today’s project and will come back. I do read and reply to all of the comments individually. They mean a lot to me. Please reach out if you have a question.
The card today is a Thank You but with a lot of whimsey mixed in. It features the Zany Zoo Bundle and the Zoo Crew DSP. I could not miss with these fun products.
Stamp Bundle
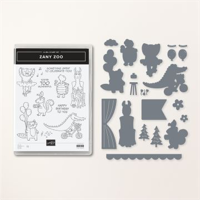
The Zany Zoo Bundle is a great mix of adorable animals doing a bit of everything. I chose to use the alligator on a bicycle. It is in thought for my husband on his knee scooter. (Note the cast on one of the alligator’s legs!) The image and sentiment are both from the stamp set and are stamped using Memento Tuxedo Black Ink. Then the alligator is colored with a variety of Stampin’ Blends.
The matching Dies in this bundle are great as well. They not only cut out all of the animal stamp images, but have quite a few scene extras as well as this fun banner. I used the banner, but then decided it needed a backing. So I used the banner as the template and cut the background around it.
Papers
The paper was Not chosen first! I know that is a shock as that is how I usually begin. Actually the Azure Afternoon was chosen first. My husband’s knee scooter is blue and he has a blue cast. So that was of course the choice. Then to tie in the alligator, I went with a Lemon Lime Twist layer.
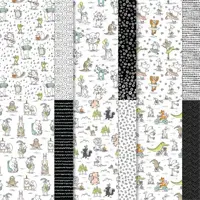
The DSP is the Zoo Crew Designer Series Paper. These two black and white pieces are the reverse sides of the colorful animal prints. By the way, did you know the Dies will cut quite a few of the animal prints as well? As I have said many times, this is such a fun set to use. It definitely makes me Smile!! The final touch was to add a 2022-2024 In Color Pearl in Tahitian Tide on the sentiment to continue the blue theme.
Thank you for stopping by today!! I hope you have a great weekend.
Online exclusives are here to stay! Click on the photo and be taken directly to them in my online store. If you place an order, please use my Host Code listed just below.
HOST CODE
My OCTOBER Host Code is NYVXHUMX. Please use this code for orders under $150.00. I will have a small gift for those with orders over $50.00 in addition to the Perk Rewards Program. You can read all of the information at the top of the page in the Menu Bar under SHOP / Perks.
Thank you for stopping by today. I hope you enjoyed today’s project and will come back. I do read and reply to all of the comments individually. They mean a lot to me. Please reach out if you have a question.
The card I have to share today could be for any time of year. It is a sweet wreath with a gorgeous background. The star of the card is between the wreath and the beautiful paper.
Stamps and Dies, and Punch
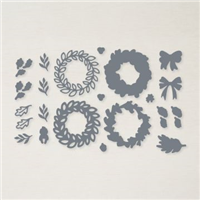
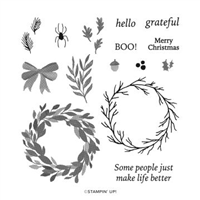
This fun wreath is super easy to create! I used the Cottage Wreaths Stamp set to stamp the wreath in Crushed Curry Ink. Next I stamped some of the extra bows with Old Olive Ink. After die cutting the pieces, I cut apart the greenery to space it behind the wreath. Both of the stamped images are the distinctive stamping where it shows texture along with lighter and darker areas. I think this adds so much to the image.
The gorgeous and detailed bow is also from the Country Wreath Die Set. The details are perfect when doing the bow from card stock. There is also a solid die if you are cutting a stamped bow. The last of the stamping is the simple sentiment. Personally I love words on a wreath. This was created with the Best Label Punch. The words are from the stamp set. And it tucks easily behind the bottom inner part of the wreath.
Papers
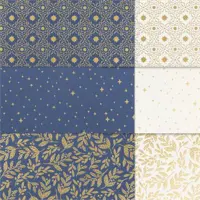
This gorgeous paper could also be the star of the card. It is from the Shining Brightly Designer Series Paper. And it is even prettier in person! I wanted the DSP to really pop, so kept a semi monochromatic color scheme. The card base of Night of Navy is perfect for the DSP. To tie in the greenery of the wreath, I added a thin layer of Old Olive card stock. And the Crushed Curry wreath mimics, somewhat, the gold in the DSP. I love the combination personally and hope you do as well.
Finishes
There are two things that help the look of the card. The first is the layout. I went with smaller layers to show more of the Night of Navy card base. That larger area frames the beautiful DSP and wreath like art on a wall. And the usual final touch is bliing! For this one I added one of the Adhesive Backed Sparkle Gems to the center of the bow on the wreath. With the gold in the DSP it really did not need much.
I appreciate you stopping by today!!!
Online exclusives are here to stay! Click on the photo and be taken directly to them in my online store. If you place an order, please use my Host Code listed just below.
HOST CODE
My OCTOBER Host Code is NYVXHUMX. Please use this code for orders under $150.00. I will have a small gift for those with orders over $50.00 in addition to the Perk Rewards Program. You can read all of the information at the top of the page in the Menu Bar under SHOP / Perks.
Thank you for stopping by today. I hope you enjoyed today’s project and will come back. I do read and reply to all of the comments individually. They mean a lot to me. Please reach out if you have a question.
The card I am sharing today is similar to one I did previously. It showcases the gorgeous All About Autumn Designer Series paper and Autumn Leaves stamp set.
Papers
The paper is by far the star of this card. It has been so popular and continues to be. The expected return date is October 9, so keep a check if you are interested. This layout is one I have done several times before. It is a regular side fold card with 1″ cut off of the right front opening. I love how this allows more of the gorgeous paper to show.
The front and strip are both part of the All About Autumn Designer Series Paper. But did you notice the leaves? They also are cut from the DSP. They really pop with the definition in the die cut. And to add some more of the bling from the paper, I used Gold Foil as the background for the sentiment.
Stamps and Dies
The Bundle used is the Autumn Leaves Bundle. I know SU has had some beautiful leaves bundles previously. But these have to be my favorite. And as I mentioned above, the detail in the die cut is awesome. As is the details in the label dies. There are three of those included in the dies. I used the smaller one and simply cut the Basic White to fit inside of it.
The sentiment is from the stamp set. It is definitely a favorite. I am Thankful for so many things, really everything, in my life and this allows me to share that with others. And to add just a touch more bling, I added a single gold from the Adhesive Backed Sparkle Gems.
Thank you for stopping by today!!
Online exclusives are here to stay! Click on the photo and be taken directly to them in my online store. If you place an order, please use my Host Code listed just below.
HOST CODE
My OCTOBER Host Code is NYVXHUMX. Please use this code for orders under $150.00. I will have a small gift for those with orders over $50.00 in addition to the Perk Rewards Program. You can read all of the information at the top of the page in the Menu Bar under SHOP / Perks.
Thank you for stopping by today. I hope you enjoyed today’s project and will come back. I do read and reply to all of the comments individually. They mean a lot to me. Please reach out if you have a question.
The card I have to share today is a really simple birthday card. It stars the Curved Occasions stamp set. This is one that comes with the arched punch as a bundle.
Stamps
The card I made is a very simple and somewhat plain one. I love quick and easy cards and this is one that is simple, may be considered plain, but is pretty. And that is my main goal, a pretty card. The Curved Occasions Stamp set is a mix of single images that are perfect as stand alone focal layers. This card could be a birthday, wedding shower, or any special occasion that requires cake! I stamped the cake with Memento Tuxedo Black and colored the leaves and flowers with Stampin’ Blends. I also added a touch of the Sea Foam Green on the cake to not have it totally white.
Papers
The colors of the card came from the DSP choice of course. That is pretty much my norm. This one is from the Bright & Beautiful Designer Series Paper. It is a mix of Bubble Bath and Fresh Freesia. A perfect combination for a sweet birthday. To further carry those colors I used Fresh Freesia as the card base and then a layer of Bubble Bath behind the cake layer. The finishing touch is a scattering of Iridescent Pearls that I colored with both the Fresh Freesia and Bubble Bath Stampin’ Blends.
Thanks for stopping by today!!
Online exclusives are here to stay! Click on the photo and be taken directly to them in my online store. If you place an order, please use my Host Code listed just below.
HOST CODE
My September Host Code is 7BSV39GV. Please use this code for orders under $150.00. I will have a small gift for those with orders over $50.00 in addition to the Perk Rewards Program. You can read all of the information at the top of the page in the Menu Bar under SHOP / Perks.
Thank you for stopping by today. I hope you enjoyed today’s project and will come back. I do read and reply to all of the comments individually. They mean a lot to me. Please reach out if you have a question.
The card I have to share today is a quick and easy one. It stars the beautiful Countryside Inn Designer Series Paper. And is great for your leftover pieces.
Papers
The star of this card is the DSP strips. As I said above, they are from the Countryside Inn Designer Series Paper. Each one is cut 1 X 4. These are the sort of strips that I tend to have leftover. What a great way to use those leftover, but so cute, little strips of paper.
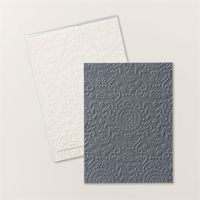
The strips are adhered to a Basic White panel that is embossed using the Countryside Blossoms Embossing Folder. This adds some great texture to the background. With a thin layer of Misty Moonlight between the Thick Basic White card base and the embossed layer is all the extra color I chose to use.
Stamps and Punch
The sentiment layer is from the Circle Sayings Bundle. And it is a Punch Bundle. There are a variety of sentiments and images that fit inside the 2 3/8″ Circle Punch. I really love Circle Punches!!! The flowers at the top and sentiment are from the stamp set. The little flowers on the bottom are from the Lasting Joy stamp set. How perfect is that! I also used a sentiment from that set on the inside. With a scattering of the Boho Blue pieces from Adhesive Backed Solid Gems as flower centers the card is complete. So a quick card as well as one starring leftover paper strips!
Thank you for stopping in today!!
Online exclusives are here to stay! Click on the photo and be taken directly to them in my online store. If you place an order, please use my Host Code listed just below.
HOST CODE
My September Host Code is 7BSV39GV. Please use this code for orders under $150.00. I will have a small gift for those with orders over $50.00 in addition to the Perk Rewards Program. You can read all of the information at the top of the page in the Menu Bar under SHOP / Perks.
Thank you for stopping by today. I hope you enjoyed today’s project and will come back. I do read and reply to all of the comments individually. They mean a lot to me. Please reach out if you have a question.
The content in this blog is the sole responsibility of Jackie Beers as an Independent Stampin' Up! Demonstrator. The use of and content of classes, services or products offered is not endorsed by Stampin' Up!