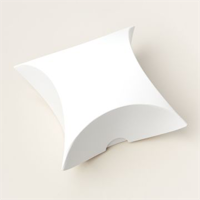
My project for today is a gift box. And it is one of the easiest you will make. This box stars the Square Pillow Boxes available in the Mini Catalog. I paired it with the Adoring Hearts Bundle from yesterday’s card.
Box
The Square Pillow Boxes could not be simpler to use. They are pre-scored, and come with the adhesive already on them. The boxes are made from thick paper like some of the other gift card boxes. All of the boxes are white, and can be colored with Blending Brushes and ink. And you can still stamp on them as you can see I did. Although my ribbon hides part of it.
Stamp Bundle
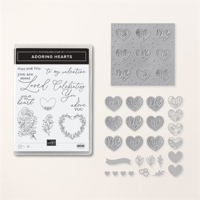
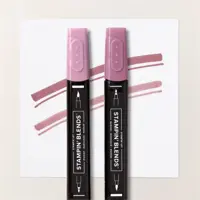
The stamp bundle I used is the one from yesterday’s card. It is the Adoring Hearts Bundle. I mentioned yesterday that there are other than hearts in the set. This lovely rose image is one of those. It is stamped with Memento Tuxedo Black Ink and then colored with Stampin’ Blends. I will say that I had to use the darker of the blends to show any color. But I love how simple this is.
The die I used is the same from yesterday’s sentiment, and is the same sentiment. For this however I cut part of the die cut banner and some of the wording off. I wanted it to fit on that upper corner and did not like the look of it hanging over. Now it fits perfectly!
Finishes
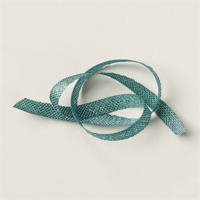
The beautiful ribbon, even though it is covering the image, is from the Mini Catalog as well. It is the Pretty Peacock and Gold Ribbon. It is really gorgeous ribbon. The gold gives it a “special” look. But it is very easy to tie a bow. And the final touch is bling of course. I added the same Brushed Brass Butterflies to this as the card. One was all that was needed.
Thank you for stopping by today!
HOST CODE
My FEBRUARY Host Code is PR4KTFTS. Please use this code for orders under $150.00. I will have a small gift for those with orders over $50.00 in addition to the Perk Rewards Program. You can read all of the information at the top of the page in the Menu Bar under SHOP / Perks.
Thank you for stopping by today. I hope you enjoyed today’s project and will come back. I do read and reply to all of the comments individually. They mean a lot to me. Please reach out if you have a question.
Today’s card is from me simply playing with products. The new Adoring Hearts Hybrid Folder is amazing! And paired with Sale-A-Bration DSP it is even better.
Bundle
The Adoring Hearts Bundle is actually three parts. And it is amazing!!! The hearts you see on the card are from the Hybrid Embossing Folder and Dies used together. I think it is really amazing how these work. It is so cool that the die simply lays into it’s slot in the folder. Sort of getting a two for one. There are six heart shapes included in the one die. And there are 6 heart shapes in the embossing folder. The images make two each of three different designs on the hearts. I have only used two of the hearts on my card. But you can see the great detail.
Stamps
The stamp set is one that can be used for any “loving” card. There are hearts, flowers, and some sweet sentiments. The sentiment I chose to use is from the stamp set. And actually the shape is another die from the die set. I chose to emboss the sentiment using Gold Embossing Powder to match the gold of the DSP.
Papers
The soft Bubble Bath of the hearts matches great with the Moody Mauve in my opinion. The Moody Mauve keeps it from being overly sweet. I used the same Moody Mauve for the strip, which is offset just a bit, to ground the hearts and sentiment. And the Gold Foil behind the DSP is just more bling! It really helps the DSP gold to pop.
The DSP is from Sale-A-Bration. It is the Most Adored Designer Series Paper. I have seen several of those pieces that are gold and white being colored. So I thought I would give it a try. The almost Bubble Bath coloring I have is actually by using Blending Brushes and Moody Mauve Ink. I was surprised at the softness of the color it produced. After I had finished blending, I took a tissue and wiped over the DSP. This helps to get any extra ink off of the gold sections. We want the gold to shine!
Finishes
The final touch was to add just a bit more bling. I debated over several different gold embellishments. But ended with one of the softest bling we have, the Brushed Brass Butterflies. I love these little guys. And they are generally Just Enough!!
Measurements
The Moody Mauve card base is 4 1/4 X 11, scored and folded at 5 1/2. The Gold Foil layer is cut to 3 5/8 X 4 7/8 and the DSP is 3 1/2 X 4 3/4. For the strip of Moody Mauve, it is cut to 1 X 4 3/4.
Thank you for stopping by today!!
HOST CODE
My FEBRUARY Host Code is PR4KTFTS. Please use this code for orders under $150.00. I will have a small gift for those with orders over $50.00 in addition to the Perk Rewards Program. You can read all of the information at the top of the page in the Menu Bar under SHOP / Perks.
Thank you for stopping by today. I hope you enjoyed today’s project and will come back. I do read and reply to all of the comments individually. They mean a lot to me. Please reach out if you have a question.
The card I have to share with you today is starring the two favorites of mine from the Mini Catalog. The Perennial Postage Dies and the Perennial Lavender paper.
Dies
The first dies are from the Perennial Postage Bundle. These “postage stamp” edged dies are fabulous. Having a large and then smaller ones is perfect for layering and overall theme. I used the smaller rectangle layers. The largest of those is for the Gorgeous Grape and purple DSP pieces. And the third larger is for the sentiment.
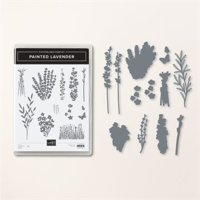
The second die set is from the Painted Lavender Bundle. I used the greenery from those dies. These two small sprigs are actually one die. Since I needed smaller pieces to tuck behind the sentiment, I simple cut that one piece in half. then it is a perfect size and fit.
Stamps
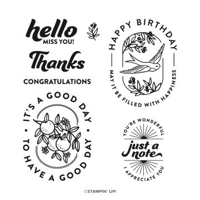
The stamps used are also from the two bundles. The front sentiment is from the Perennial Postage Bundle. I love this sentiment. It is such a sweet one, and at the same time could be used to accompany a variety of inside sentiments. Flexibility is key in sentiments. I love mixing and matching.
The second stamp set is the Painted Lavender. I did not add a sentiment on the inside. As I said above, this card would work for a variety of occasions. So I added some stamping and left the sentiment blank until needed. These stamps are from the Painted Lavender set as well. Next is a view of the inside. I love the little butterflies!
Papers
The star of the card, besides the Postage Dies, is the gorgeous Perennial Lavender Designer Series Paper. First off, I love purple. But these pages mix it with earth tones for a very calming look. I would never have thought to pair it with the Crumb Cake and that is probably my favorite thing about this paper! And the softer purple piece that is Postage cut is beautiful as well. The designers outdid themselves on this paper.
The card base is Pretty Peacock, which is the color from some of the leaves. And yes, I generally add a layer of solid between the base and the DSP. But for this card it really did not need it. I did pull the beautiful Gorgeous Grape for one of the postage layers. It really helps the more purple of the DSP piece to pop.
Finishes
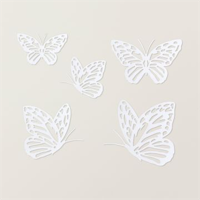
There is always room for embellishments on my cards. But first I added a large embellishment. The delicate butterfly is an embellishment that comes in a large package of different sizes and positions. Several cards I have seen show them colored with Blending Brushes and that is a wonderful look. But because of my White sentiment, I opted to leave this one white. And the second embellishment is bling! The Purple Shimmer Dots come in a large package of three different shades of purple and two different sizes. I used three of them. There is one on the butterfly, one on the sentiment, and one on the large DSP towards the bottom.
Thank you for stopping by today!!!
Online exclusives are here to stay! Click on the photo and be taken directly to them in my online store. If you place an order, please use my Host Code listed just below.
HOST CODE
My JANUARY Host Code is BQEMX92K. Please use this code for orders under $150.00. I will have a small gift for those with orders over $50.00 in addition to the Perk Rewards Program. You can read all of the information at the top of the page in the Menu Bar under SHOP / Perks.
Thank you for stopping by today. I hope you enjoyed today’s project and will come back. I do read and reply to all of the comments individually. They mean a lot to me. Please reach out if you have a question.
The card today is another using the Bee My Valentine Bundle. This time around is a little different regarding paper usage.
Papers
The Be Mine Designer Series Paper is the same paper as on the previous Bee Valentine. You can see that card HERE if you missed it earlier in the week. The special addition to this card is the sweet jar of Love. It was fussy cut from a piece of the DSP. There are jars with “honey”, “hug”, and the heart. I opted for the heart to match the Sweet Sorbet in the center DSP piece. The wonderful patterns in this pack of paper is perfect for any Spring cards, but especially to pair with this fun bee.
The card base is Daffodil Delight and is paired with the Basic White layer. That has the honeycomb stamp with Daffodil Delight Ink to create the background. The honeycomb pairs perfectly with the bee and the jar of Love.
Bundle
The only stamps used are from the Bee My Valentine set. The fun sentiment makes me think of a Southern type statement! You cannot help but smile. I believe this would make a great Thank You card for someone as well. And of course the bee with the Bee Builder Punch is perfect for creating your own bee. He can be going in any direction and with a variety of facial expressions. Plus you get the bonus of the two hearts. The wings and antenna are made with two sizes of hearts. I can see myself using these hearts on all kinds of projects!
Finishes
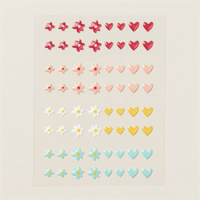
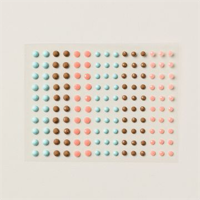
The sentiment layer is simply a strip of Basic White across the card. So I had to add some fun to that. Raising the bee and the little jar created some depth, but we must have bling! The Adhesive Backed Hearts & Flowers embellishments fill that need perfectly. And they have a kind of retro look to them. There are one on each end of the sentiment and then the yellow heart in the upper left corner. It sort of blends in with the honeycomb.
Measurements
The card base of Daffodil Delight is 4 1/4 X 11, folded at 5 1/2. The Basic White layer is 3 7/8 X 5 1/8. And the DSP is 2 1/2 X 3 1/4. For the sentiment it is a strip of Basic White cut to 3 1/2 X 3/4. I used scraps for the bee and wings. Since these are on one punch. I suggest stamping and punching the bee, then stamp and punch each of the others.
Thank you for stopping in today! I hope you have a great crafting weekend.
Online exclusives are here to stay! Click on the photo and be taken directly to them in my online store. If you place an order, please use my Host Code listed just below.
HOST CODE
My JANUARY Host Code is BQEMX92K. Please use this code for orders under $150.00. I will have a small gift for those with orders over $50.00 in addition to the Perk Rewards Program. You can read all of the information at the top of the page in the Menu Bar under SHOP / Perks.
Thank you for stopping by today. I hope you enjoyed today’s project and will come back. I do read and reply to all of the comments individually. They mean a lot to me. Please reach out if you have a question.
The card today is a stepped up version of yesterday’s card. Saying that, there is not a lot of difference, but it looks like more was added. The Filled With Happiness set is so much easy to work with.
Stamp
This card is still a quick card to make and uses only the one stamp from the Filled With Happiness stamp set. I chose the “Good Day” message for this card. This sentiment reminds me of one of the first episodes of Fixer Upper when they made a sign that said this, or something similar. I love it though. And in my book these are oranges in the stamp. I suppose they could be another fruit.
The image is stamped with Memento Tuxedo Black ink and then stamped again on scrap to get the center. I colored with Stampin’ Blends. There was creative license used with the Pool Party blooms. LOL!! But I believe that is fine.
Punch
The punch is the same as yesterday with the Modern Oval Punch. It is out of stock, but will be returning. The oval is then added to the large area with Stampin’ Dimensionals. I had a question yesterday regarding lining up the center back to the large image. Everyone has their own methods, but I add the dimensionals, then keep my point finger from each hand underneath to keep it from attaching before I am ready. Then I can use my thumb to press down a bit on the bottom once I have everything lined up. That allows for a little wiggle room and I go from bottom to top in positioning. I hope that helps some of you.
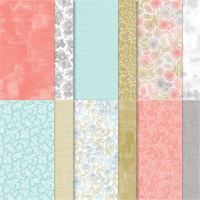
Sale-A-Bration Items and Paper
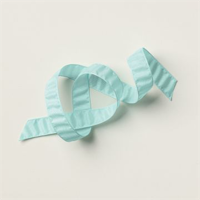
The rest of the card, other than card stock, is Sale-A- Bration products. Woohoo!! I love Free and Sale-A-Bration is offering some really nice items. The card base is Pool Party. When using two pieces of DSP, I like to use a layer of card stock to help align the two evenly. So I added a layer of Basic White. Then I have two pieces of the Pool Party DSP from the SAB Softly Stippled Designer Series Paper. Both of the pieces are Pool Party as well. Next I added the Pool Party Crinkle Ribbon from SAB. I simply wrapped it around the intersection of the two pieces of DSP and secured on the back of the White layer. And the finishing touch are the Opague faceted Gems. These are also from SAB. I added two Pool Party and one of the orange to tie in to my oranges in the stamp.
Measurements
The card base is 4 1/4 X 11, folded at 5 1/2. The layer of Basic White is 4 X 5 1/4. For the DSP, it is 3 3/4 X 2 for the floral piece and 3 3/4 X 3 for the textured piece. My stamped layer is 2 1/2 X 3 1/4 with a scrap that is 2 1/4 wide for the punched layer.
Thank you for stopping by today!!!
Online exclusives are here to stay! Click on the photo and be taken directly to them in my online store. If you place an order, please use my Host Code listed just below.
HOST CODE
My JANUARY Host Code is BQEMX92K. Please use this code for orders under $150.00. I will have a small gift for those with orders over $50.00 in addition to the Perk Rewards Program. You can read all of the information at the top of the page in the Menu Bar under SHOP / Perks.
Thank you for stopping by today. I hope you enjoyed today’s project and will come back. I do read and reply to all of the comments individually. They mean a lot to me. Please reach out if you have a question.
The Bee My Valentine Bundle is a fun one and is quite different from simply hearts. I love the versatility this gives. And with it being a Punch Bundle, it goes to the top of my list.
Stamps
This is a Bundle, but I wanted to focus on the stamps first. The sweetest bee is so happy looking. And it takes several stamps to make him so happy. That is also one of the things I love about this set. The bee body consists of the black stripes and then the oval Daffodil Delight over top. Next you have wings, antenna, and facial features. There are a couple of different facial stamps. That is great for different looks. Plus you can position the bee side view or straight up with wings on each side. Additionally there are different sayings, background stamps, etc. This is a year round stamp set!
Punch
The Bee Builder Punch is part of the Bundle. And it also offers variations. Or I should say other options. The bee body is one portion of the punch. And the wings are a separate Heart that can be a heart as well as punch out the wings. Plus the antenna is another heart that is smaller, as you can see from the bee I built. So you get a punch with two different sized hearts to use for any project. I especially love that!!
Papers
The Bee Mine Designer Series Paper obviously matches the stamp bundle. But it has pretty pages that will work anytime of the year. I used two of the pieces for my layers behind the bee. The Sweet Sorbet flower piece makes me excited for Spring. And the yellow plaid is an anytime paper as well. But they both go along perfectly with my Bee and honey design. The Daffodil Delight card base and the layer, which is stamped with the honeycomb in Daffodil Delight, add a little more dimension to the card.
Finishes
The sweet sentiment is included in the stamp set. I kept it simple by having just a strip of Basic White card stock. But I did embellish it with some soft bling. The flowers and hearts in pink and sorbet are from the Adhesive Backed Hearts & Flowers embellishments. I love these because they are so cute, but they are also flat. That is good for mailing to not have bumps in the envelope. And I have used them on other cards as well. They are sort of retro and are simply cute!
Thanks for stopping by today!!
Online exclusives are here to stay! Click on the photo and be taken directly to them in my online store. If you place an order, please use my Host Code listed just below.
HOST CODE
My JANUARY Host Code is BQEMX92K. Please use this code for orders under $150.00. I will have a small gift for those with orders over $50.00 in addition to the Perk Rewards Program. You can read all of the information at the top of the page in the Menu Bar under SHOP / Perks.
Thank you for stopping by today. I hope you enjoyed today’s project and will come back. I do read and reply to all of the comments individually. They mean a lot to me. Please reach out if you have a question.
The content in this blog is the sole responsibility of Jackie Beers as an Independent Stampin' Up! Demonstrator. The use of and content of classes, services or products offered is not endorsed by Stampin' Up!