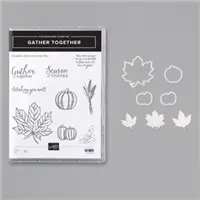
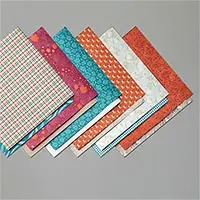
Sunday was the Fall card swap I do with my Stamp Club. I made tags for the little baskets everyone places the cards into. My favorite suite of products for Fall, and maybe in the Holiday Catalog, is the Gather Together products. Of course that is what I used to make the name tags.
I am not very good at the infinity shots that some take of a group of cards and other products they have mass produced. But I think you can see how cute these are.
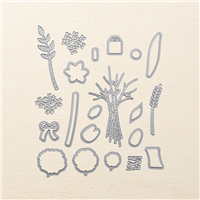
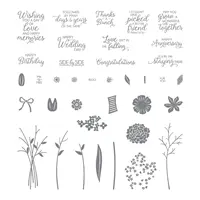
I really adore the leaves from the Gathering Leaves Dies, part of the Gather Together Bundle. They are perfectly sized, but best of all they emboss and cut at the same time. Whoever invented dies that do that are some of my favorite people!! I cut the three different sizes in different colors. I used Merry Merlot, Crumb Cake and Pear Pizzaz for the leaves.
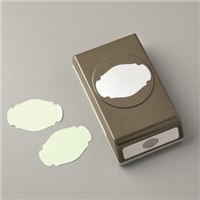
The sentiment is from the Gather Together stamp set and is stamped in Pretty Peacock. I chose all of the colors from that wonderful plaid designer series paper. The shape of the sentiment is from the Story Label Punch. I also used the Delightful Tag Topper Punch for the top of the tag, but then I covered it up with the leaves.
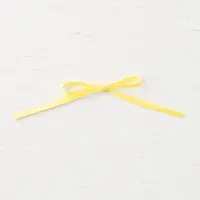
The names were printed off the computer and then layered on Pretty Peacock card stock. The finishing touch was the piece of Burlap Ribbon with a Linen Thread tiny bow.
The tag itself is 2 X 5, and the DSP is 1 7/8 X 4 7/8. The name layer depended on the size of the name. 🙂 I see these as being re-made for a Thanksgiving party as place tags or for food names. The thought is to just turn the placement of the decorations. Make them 4 X 5 folded in half to 2 X 5 and sitting on the table with the decorations in top left corner or across the top. I will post a picture of that once I get them made. This is in my brain right now!
Before I go, have you seen the extra post I did yesterday about the upcoming Flash Sale? Here are the flyers with the stamp sets that will be included in the sale. 15% off is a pretty good deal in my book!
HOST CODE
My October Host Code is BD2FGFTK. Please use this code for orders under $150.00. I will have a small perk for those with orders over $50.00.
UPDATES:
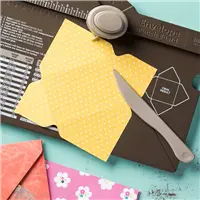
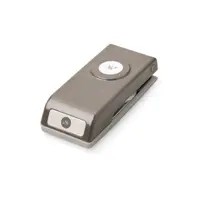
The new Stampin’ Up! Paper Trimmer has been revealed!! It is available for order by Demonstrators on October 1. Here is a picture of it. I will be giving you my opinion after the beginning of the month. I cannot wait and I hope you will be just as excited! There is not a date yet as to when it will be available for customer orders. However, you can place it on a Starter Kit!! Hint, Hint !!
CHRISTMASTIME IS HERE SUITE BUNDLE: This can be ordered as a Suite Bundle with everything pictured, or individually to get just the pieces you want. The products will be available on November 1 for customers to order.
Since today is Friday the 13th I should have made a Halloween project to share. Poor planning on my part unfortunately. I have been playing with the new Christmas sets instead.
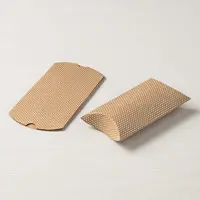
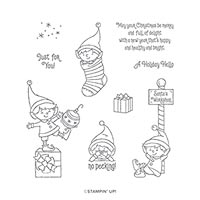
I adore this little Elf!! He, or she, is so cute and has really useful sentiments included in the stamp set. I started to make this as a gift tag. I had a pillow box on my desk for a different project and realized that it was sized to fit perfectly on this Kraft Pillow Box. What a great find on my part. And a super easy way to wrap a small gift or just a Random Act of Kindness type treat.
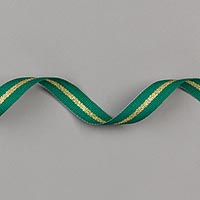
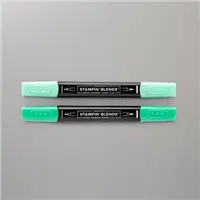
I stamped and colored the image with Memento Tuxedo Black Ink and the Stampin’ Blends. It is layered on a piece of the Wrapped In Plaid 6X6 DSP. I wrapped the Shaded Spruce Striped Ribbon as a little bow around the center for some texture.
To adhere the tag to the box, I added two pieces of the Foam Adhesive Strips down the center. These strips are great when you need to cover a bit more space. You could also use the outside “frame” from your Stampin’ Dimensionals as well. Now all that is left is to fill the box with fun treats!!
Thank you for stopping by today. Please come back on Monday and I will have a variety of different projects to share next week.
HOST CODE
My September Host Code is VYHZ6ZM2. Please use this code for orders under $150.00. I will have a small perk for those with orders over $50.00.
I skipped the Royal Challenge yesterday due to the Pals Blog Hop. If you did not go through the Hop, I hope you will do so. There are some great projects. Today the Royal Challenge is “Not A Card”. I love 3D projects, but am not good and creating my own. For the one today I cheated a bit. Not Really!! I created a table centerpiece using the new, and super cute, Mini Shipping Boxes that are in the catalog. I hope you will like it.
I got the idea from the Pop Up Box cards. I created this using the same idea of the cross pieces as used on the pop up box card, and then adhering my flowers to those. It isn’t super good from top view, but you can see the method I used.
I did not add filler to the bottom of the box so that you could see my construction. If this were my table decoration, I would put some green tissue paper in the bottom to help blend the cross pieces that hold the flowers.
I used both of the Daisy punches and punched in Daffodil Delight and the Perennial Essence Vellum. The stems and leaves are punched using dies from the Bouquet Bunch Dies. The tag is from that die set as well. The sentiment on the tag is from Beautiful Bouquet stamp set. All of my adhering besides the green strips in the box are done with glue dots. Glue Dots are my heroes!!
MEASUREMENTS:
For the cross pieces inside the box, the box is 4″ wide. I cut three strips 5 X 3/4 and scored each end at 1/2″. I then folded on the score lines and used Tear & Tape to adhere those to the box inside. Then all of the flowers stems are adhered to those pieces with glue dots.
Thank you for stopping by today. I hope you liked seeing something a bit different today. All of the supplies are listed at the bottom of the post.
HOST CODE
My July Host Code is ZGQ6YRAU. Please use this code for orders under $150.00. I will have a small perk for those with orders over $50.00.
UPDATES:
For every $50.00 of product you spend during July, you will receive a coupon code worth $5.00 to use in August. There are no limits to the number of coupons you can receive!
Joining Stampin’ Up! and my TEAM is always a good idea. Now there are some good incentives to do it during July and August. For the price of the Starter Kit, which is the ULTIMATE BUNDLE!!!!, you receive an additional $30.00 of products, plus a $10 coupon.
The Starter Kit is $99.00. For that amount, you normally receive $125.00 in product. During July and August, you will receive $155.00 in product. This includes FREE SHIPPING, and an additional $10.00 Coupon to be used the following month. There are NO requirements to ever place another order. However, if you do decide to use your discount and place other orders, you will receive a 20% discount on every order.
If you are thinking about joining, even the first hint of a thought, I would love to talk with you about it. Please reach out to me and I will tell you all the reasons I Love Stampin’ Up!
One of the tools that is retiring soon is the much loved Envelope Punch Board. I must say that I cannot remember the last time I used it for an envelope vs making a box or treat holder. So that said, I will miss this versatile tool. To say goodbye I have made another little box with it.
I do not know who created this version. I had it on my desk for some time. I’m sure my friend and fellow demonstrator Julie DiMatteo has a version. I will have the simple directions listed below.
So here is the cute little box. It just happens to hold a Ghirardelli Chocolate!
Envelope Punch Board, 133774
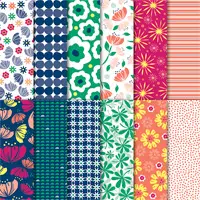
This paper is the Garden Impressions 6X6 Designer Series Paper Stack. It is perfect anytime but especially for spring. And depending on the size of the box you are making it may be a perfect size. I used a 4 1/4 X 4 1/4 piece, plus used one of the cutoff pieces for the bellyband.
Here is the inside view:
These are very quick to make. The most time is just deciding on which beautiful paper you want to use! I have the measurements and simple directions below.
I am giving you a sneak peek of a new stamp set as well. It is the Celebrate With Cake. It will be available in the upcoming annual catalog. It is one of the several that Stampin’ Up! has designed for a stamper with the #simplestamping in mind. I LOVE it!!!
Directions:
4 1/4 X 4 1/4 card stock or DSP
Start at the 1 3/4 mark on the Envelope Punch Board, punch and score
Slide down to the 2 1/4 mark, punch and score.
Now just rotate to all sides and punch and score by lining up the score lines
Fold and burnish on all the score lines
Cut away the four small corner squares
Decide which is the top.
Round the edges of the top and bottom sections using the Envelope Punch Board Corner Rounder feature.
Lay your piece of chocolate inside and dry fit the sides and bottom sections.
Add glue or adhesive of choice to the two side pieces where the bottom piece will cover it.
Cut a 5 1/4 X 3/4 strip for the bellyband
Dry fit the bellyband by using your fingers to crease it as you fold it around.
Adhere the two ends together and cover the seam with your decoration
Thank you for stopping in today. I have included all of the products used at the bottom of the post. If you have any questions about products or my directions, please do not hesitate to contact me.
The Clearance Rack has been UPDATED again!!!
Click on the Last Chance icon to go to my Online store. This will give you up to date what is left on the retiring lists. And if you would like to place an order, I have a Host Code just below the icon.
If you place an order with me, please use the April Host Code of 3KNKXJFH. If your order is $75.00 (of product) or more, I will send you a small gift. If it is over $150.00 (of product) I will send you a small gift, but DO NOT use the code. 150.00 is the minimum host rewards so you get the host rewards.
I would forget my brain if it wasn’t attached! I forgot to take a photo of my treat box that I used as table favors and give aways at OnStage last week. I used the directions from my fellow Demonstrator and 3D Queen Julie DiMatteo to make them. They are so quick to do that I needed some for another occasions and will share that one with you today. I have a link to Julie’s post and video. The only difference is that I shortened the flap and tucked it inside as opposed to the longer flap and magnet closure that Julie used. They are both after the pictures.
A Good Day 145873
I don’t know if you can see the little finger groove to help in opening.
This is a better shot of the finger groove and the tucked in flap.
And here is the good stuff on the inside! The ones from OnStage held a Snack size Hershey bar, but I used all of those. So these each had two Ghirardelli Minis.
Here is the post from Julie on the treat holder. Click HERE . The only difference is that the size is 4 X 4 1/2 for mine instead of her 4 X 5. Do all the measurements just as Julie does. The right side of the 4 1/2 will have two score marks 1/2 apart and not a longer as hers does. I simply rounded that end and used the 1/2″ circle punch to make a finger groove. Both are super easy to make.
Thank you for visiting today. I hope you enjoyed the little box. please come back tomorrow for the monthly InKing Royalty Blog Hop! You will see several really nice projects. And as always, my supply list is at the bottom of the post.
Reminder: I have used this sweet stamp set, A Good Day, twice this week. It is a favorite Go To set for little tags. It is on the retiring list. So don’t let it get away from you!
Click on the Last Chance icon to go to my Online store. This will give you up to date what is left on the retiring lists. And if you would like to place an order, I have a Host Code just below the icon.
If you place an order with me, please use the April Host Code of 3KNKXJFH. If your order is $75.00 (of product) or more, I will send you a small gift. If it is over $150.00 (of product) I will send you a small gift, but DO NOT use the code. 150.00 is the minimum host rewards so you get the host rewards.
I know Saint Patrick’s Day was yesterday! I could not show this little treat ahead of time because it was a treat for my Stamp Club ladies and we meet on Sunday. Even though it isn’t much , I wanted them to see it in person first.
This is a super quick and easy treat holder and could easily be made to match any occasion.
Itty Bitty Greetings, 146667
It really needed green wrapped candy, but I like using the DSP to cover regular candy that you may already have on hand. I swiped these from my husband’s candy stash! Ssshhhh!!!
The designer series paper is the Happiness Blooms and the green enamel dot is also from the Happiness Blooms Suite of products. The Scallop Tag Topper Punch, the Scallop Circle punch, and the circle punches are all my “Go To” punches for adding just a bit of extra to a card. I would not know what to do without these workhorse punches. I highly recommend having them in your supplies.
The holder itself is 1 1/2 X 6. I punched each end with the Scallop Tag Topper Punch. I then scored at 3 5/8, 4, , 5 1/8. Using the Bone Folder, I burnished each fold. Then I folded the 5 1/8 score in the opposite direction and burnished again. I placed the DSP piece on the front of the short section, and wrapped the candy bar with the same DSP. The front piece measures 1 3/8 X 1, and the candy wrap is 3 X 2 1/2. I used two glue dots to hold the candy in place, then folded the bottom section up over it. I threaded the Whisper White 1/8″ ribbon behind the holder and up through the front hole. Then I just tied a regular bow. Other than adding the sentiment, that is it. Easy as can be.
Thank you for stopping by today. I will have a regular card project for you tomorrow. All of the supplies I used today are listed at the bottom of the page.
JOIN PROMOTION:
The Ultimate Shopping Experience is to purchase the Starter Kit. Please read through the next items and think about it. If you love paper crafting as much as I do, I believe you will want to talk with me. I hope you will consider it.
There are 2 Starter Kit choices:
You create your own kit. You get to choose ANY Stampin’ Up! products (includes bundles) However, SAB and Host stamps are excluded from the Starter Kit (but not your next order)!
You will receive a 20% discount on all future purchases through July 31, 2019. But there is no obligation to ever order anything else.
It’s a great way to Get Your Feet Wet, so to speak. Just see if you like being a demonstrator.
Hobby Demonstrators are welcome. I was one for about ten years, and really still am!
You will be the first ones to see the new catalog when it debuts in June, plus preorder from it.
There are NO OBLIGATIONS to continue or ever place another order.
The First Bonus is that you become part of my Team. I would love to have you and enjoy sharing my love for stamping and paper crafting with you.
You become a member of my Upline, Brian King, and his InKing Royalty group. There are great ideas and thoughts shared on our Facebook page.
Now for the 2 options and the Bonuses:
The first option costs $99.00 and you get the usual $125.00 worth of products (of your choice) PLUS an additional $50.00 of product for a total of $175.00 at a cost of only $99.00 to you. And did I mention FREE shipping on that order? That is another 10% off.
The second option costs $129.00. You get the same amount of products as the first choice, ($125.00 worth of your choice of products, Plus the additional $50.00 of Free Products, FREE Shipping) and the AWESOME new Craft & Carry Tote which is valued at $50.00. Basically you are paying an added $30.00 for the Craft & Carry Tote.
(I had the option to purchase, and of course I did. It is well worth the $50.00 and is a Fabulous deal for $30.00)
Here is the Tote. It is a great size, has dividers that can be moved for whatever products you are carrying each use. There are two outside pockets that are large enough to hold punches, and much more. There is a zipper outside pocket. It has regular straps as well as a shoulder strap. It has the Stampin’ Up! logo. It is made of a great heavy weight canvas. And it is so Pretty!!
The content in this blog is the sole responsibility of Jackie Beers as an Independent Stampin' Up! Demonstrator. The use of and content of classes, services or products offered is not endorsed by Stampin' Up!