Welcome to InKing Royalty’s November Blog Hop! November is a time of gratitude and thanksgiving, and we’ve made projects that say “thanks!” to special people in our lives. We are excited to share our creations and hope you love them! After you read my post, I hope you’ll hop over to the next person on the list at the base of this post.
My card for today says Thanks very clearly! However the flowers may not seem appropriate for November. Since the weather here in Georgia cannot seem to decide on a season, I am going along and using flowers for my Thanks.
Dies
This card is more about what Die sets than Stamp sets. So I am going to begin here with Dies. The background scalloped layer is cut using the Scalloped Contours Dies. I used the second largest one. Those scallops draw your eye in and show off more of the DSP behind it.
The sentiment is from the Amazing Thanks Dies. What better way to say Thanks than in large double layer script form! And since that is such a pretty and great statement piece on the card, I simply tucked in some flowers behind it.
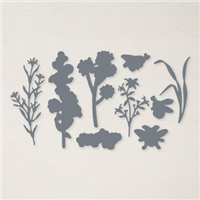
The two flowers and bee , plus the added greenery, are cut using the Honeybee Blooms Dies. White showing around the die cuts sort of blend into the card because of the white swirls in the green DSP. And it is mimicked somewhat, but in reverse, with the Thanks.
Paper
Even though the flowers may not say November, my colors were chosen more to fit the time of year. Both of the sheets of DSP are from the Rustic Harvest Designer Series Paper. I particularly love the swirls in the Mossy Meadow layer, but the Crushed Curry tone on tone piece is a stand out!
Stamps
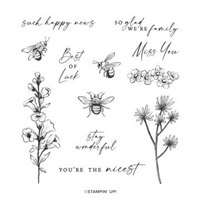
Last but not least is the Honeybee Home stamp set. The two flower stems and the bee are included in the set. They are stamped with Smoky Slate Ink and then colored using Stampin’ Blends. Having these items a bit less vibrant softens the card and allows the Thanks to pop a little more. And to finish the card I added a trio of Pearls scattered around the flowers.
Thank you for stopping by today. I hope you’ll hop along to the next stop on the blog hop,Jan Dufour at Stamp Me Silly. There’s lots of inspiration to be found in this group – and you don’t want to miss it!
Thank you for hopping along with us. If you get stuck during the Blog Hop, please use this line-up as a guide:
The die sets and stamp set I used on today’s card are included in the sale. Purchasing the Honeybee Home Bundle separately is a 30% discount. The bundle price is 10% discount. So this is an awesome time to get those bundles you have on your wish list! You can see all of the discounted products at the bottom of the post in the Supply List.
Click on the photo for the complete pdf of all products included in the sale along with the discounted amount.
Birthday Organizer Kit
DETAILS
Kit includes one 8″ x 10″ (20.3 x 25.4 cm) monthly planner with space to record birthdays each month as well as a pocket sleeve to hold birthday cards.
Includes 12 full-size birthday cards, 6 of 2 designs, and 12 coordinating envelopes.
Includes Glue Dots, Stampin’ Dimensionals, Adhesive-Backed Embellishments, and Tear & Tape Adhesive
Includes die-cut florals and pieces ready for you to use—no prep work required!
Includes sticker sentiments and die-cut labels in Dutch, English, French, and German
My November Host Code is XUE6MDFV. Please use this code for orders under $150.00. I will have a small gift for those with orders over $50.00 in addition to the Perk Rewards Program. You can read all of the information at the top of the page in the Menu Bar under SHOP / Perks.
Thank you for stopping by today. I hope you enjoyed today’s project and will come back. I do read and reply to all of the comments individually. They mean a lot to me. Please reach out if you have a question.
The Seasonal Sale begins today and runs through the 18th!!!!
I mentioned yesterday that I had attended a Stampin’ Up! Event over the weekend. So today I am sharing the card I made for a swap in our group. This is a layout I have used previously and received a lot of love for. Hopefully this one is as well received. The sweet layout and fold is the star of the show.
Paper and Stamps
Even though I said the layout is the star of this card, the stamp set and paper are pretty great as well. This piece of DSP is from the Boughs of Holly Designer Series Paper. I pulled all of my colors from this particular sheet from the paper pack. It is a mix of greens, white, and Poppy Parade. The pop of Poppy Parade is the subtle dots. But the greens are swirled around. I chose to use Shaded Spruce and Old Olive from the choices.
This beautiful tree is a mix of both of those greens. All of the stamps used, with the exception of the sentiment, are from the Trimming The Tree stamp set. The tree is a two step stamp and I used the Shaded Spruce for the outside and the Old Olive for the inside. The star is stamped with Crushed Curry Ink and has a single Basic Pearl in the center for some bling.
The sentiment is from the Peaceful Deer stamp set. I just love the simplicity of it, as well as the mix of fonts. Mixed fonts are one of the things I look for in sentiments. There was not a lot of room for adding a sentiment. So I simply made a banner by stamping on the strip of White and then using paper snips to flag each end. Those flags do not need to be perfect either!
Views
Here is a look at the first inside layer of the card. This may jog your memory for when I used this layout previously. On this inside image, I reversed the colors of the tree and the background layer.
I know it is hard to imagine, but this tree is the inside tree stamp of the tree on the front of the card! It is supposed to be for adding depth and detail to the larger tree. Personally I thought it was a cute tree on it’s own. So I added the garland included in the set to give it more of a real tree look. The garland is stamped using Crushed Curry and the finishing touch on this tree is a bow of Poppy Parade. It is in the set as well. And now the rest of the card…….
And there is that detail tree again! I just stamped it a bit lower and in the corner but left bare here.
Layout
After seeing all of the views I hope you remembered my card using this same layout. If not, you can click HERE to see it. It looks totally different I believe. The only differences in the measuremnts between these two cards is the two tree layers. These are based on the size of the images. I try to insure the inside image and layers are a bit smaller than the front ones. That makes hiding the inside one behind the front quite a bit easier. Since that is the only difference in the measurements, I have added the PDF I made for the Cottage Rose version here for you. CLICK HERE for the pdf.
Sale
In case you did not copy the list from yesterday’s post, you can get it here by clicking on the photo. You will get the complete pdf of all products on the Sale list.
Birthday Organizer Kit
DETAILS
Kit includes one 8″ x 10″ (20.3 x 25.4 cm) monthly planner with space to record birthdays each month as well as a pocket sleeve to hold birthday cards.
Includes 12 full-size birthday cards, 6 of 2 designs, and 12 coordinating envelopes.
Includes Glue Dots, Stampin’ Dimensionals, Adhesive-Backed Embellishments, and Tear & Tape Adhesive
Includes die-cut florals and pieces ready for you to use—no prep work required!
Includes sticker sentiments and die-cut labels in Dutch, English, French, and German
My November Host Code is XUE6MDFV. Please use this code for orders under $150.00. I will have a small gift for those with orders over $50.00 in addition to the Perk Rewards Program. You can read all of the information at the top of the page in the Menu Bar under SHOP / Perks.
Thank you for stopping by today. I hope you enjoyed today’s project and will come back. I do read and reply to all of the comments individually. They mean a lot to me. Please reach out if you have a question.
I attended our first Stampin’ Up! in person event in 3 Years this weekend. It was so much fun and inspiring. The best was seeing friends and new products. There are a couple of things I have to share with you today.
First
Since the Seasonal Sale is coming tomorrow, it is the biggest of the Great News! From the Annual Catalog there are wonderful discounts on most products. Click on the picture and you will get a complete PDF of all the sale items and sale prices. And please, if you do not have a $150.00 order, use my host code: XUE6MDFV. I use these rewards as gifts for my customers.
Make your list now and be ready tomorrow morning!!!
Second
We were able to play with a New Kit that is available soon. It is great for both your Traveler and Male friends. Here is a peak at that.
Also, there is an amazing Christmas Tag Kit. Here is the peak at that .
Both of these, along with all the other kits, are on the website under Kits! You can get there by clicking Shop on the menu bar at the top of the page.
Third
Last, but certainly not least, is that we were all given the January – June Mini Catalog. AND the Sale-A-Bration Catalog! Whoot, Whoot !!!! I cannot share much with you right now. But I can show you the covers of the catalogs. And I know there are a couple of my customers that are going to be thrilled with the color!
Can you tell by the top corner that I have been flipping through it? Maybe a time or FIFTY!!! This is one of my favorite in a while. The sets are amazing!
And the Sale-A-Bration catalog face shows some exerts as well. Of course there is amazing paper!
Thank you to all of my customers for keeping me in business! Which allows me to attend these amazing events!
Birthday Organizer Kit
DETAILS
Kit includes one 8″ x 10″ (20.3 x 25.4 cm) monthly planner with space to record birthdays each month as well as a pocket sleeve to hold birthday cards.
Includes 12 full-size birthday cards, 6 of 2 designs, and 12 coordinating envelopes.
Includes Glue Dots, Stampin’ Dimensionals, Adhesive-Backed Embellishments, and Tear & Tape Adhesive
Includes die-cut florals and pieces ready for you to use—no prep work required!
Includes sticker sentiments and die-cut labels in Dutch, English, French, and German
My November Host Code is XUE6MDFV. Please use this code for orders under $150.00. I will have a small gift for those with orders over $50.00 in addition to the Perk Rewards Program. You can read all of the information at the top of the page in the Menu Bar under SHOP / Perks.
Thank you for stopping by today. I hope you enjoyed today’s project and will come back. I do read and reply to all of the comments individually. They mean a lot to me. Please reach out if you have a question.
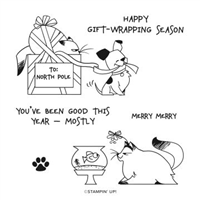
Cats and dogs are two of my main loves. Actually most animals make me smile and want to hug them. So the North Pole Mischief stamp set was an immediate hit with me. I have shared a couple of cards using the images of the cat. Today I have used the mischievous pup as well.
Stamp
I can imagine this cat sitting on top of the gift! That is an ingrained cat habit to sit in or on a box. At least it is at my house! And then all it takes is a little pup to come along and play with the ribbon. Or it could have been another cat doing the ribbon playing. But the cat is sitting there planning revenge as the pup is happily playing! LOL!!!
The adorable image is stamped using Memento Tuxedo Black Ink and then colored with Stampin’ Blends. I chose the colors from the paper of course. The debate was wether or not to color the dog and cat or leave as is. I think the black sections made when stamping were sufficient for their colors. Of course that took a bit of thinking on!
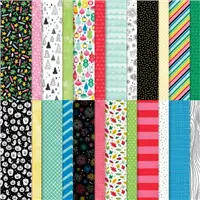
Paper and Embellishments
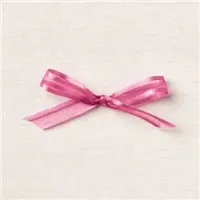
The gorgeous ornament paper is from the celebrate Everything Designer Series Paper. It is a Host reward and well worth the price! And as is the norm, all of my colors came from that piece of paper. I chose to go with a Thick Basic White card base because of all the white in the DSP piece. But layered a bright Granny Apple Green to pop the colors. I actually thought ahead about how I was going to finish the card. When the “package” look was decided, I went with the Polished Pink Open Weave Ribbon. And that made the ribbon choice in the stamped image so the two coordinate. With the busy DSP and the fun image, I decided that no other bling was needed. That is another rare occasion!
Birthday Organizer Kit
DETAILS
Kit includes one 8″ x 10″ (20.3 x 25.4 cm) monthly planner with space to record birthdays each month as well as a pocket sleeve to hold birthday cards.
Includes 12 full-size birthday cards, 6 of 2 designs, and 12 coordinating envelopes.
Includes Glue Dots, Stampin’ Dimensionals, Adhesive-Backed Embellishments, and Tear & Tape Adhesive
Includes die-cut florals and pieces ready for you to use—no prep work required!
Includes sticker sentiments and die-cut labels in Dutch, English, French, and German
My November Host Code is XUE6MDFV. Please use this code for orders under $150.00. I will have a small gift for those with orders over $50.00 in addition to the Perk Rewards Program. You can read all of the information at the top of the page in the Menu Bar under SHOP / Perks.
Thank you for stopping by today. I hope you enjoyed today’s project and will come back. I do read and reply to all of the comments individually. They mean a lot to me. Please reach out if you have a question.
It is the time of year for Gift Card holders. They are a favorite of mine to make and share. Today’s card showcases the Poinsettia paper.
And here is the inside view:
Paper
The Boughs of Holly Designer is where I found the beautiful Poinsettias. The two pieces you see when the card is closed I wanted to be the same. They could easily be two different coordinating papers. And for the gift card pocket I opted for a different Poinsettia piece. There are a variety of greens in the paper, but I opted to go with Mossy Meadow as the card base. And I know you are shocked, but I did not add a layer between the DSP and the card base. That is something I almost always do. Since this card, including the gift card, is fairly thick, I did not want to add anymore layers to that.
Stamps
I used two different stamp sets on this card. The two sentiments are from the Christmas To Remember stamp set. And the greenery are from the Christmas Season stamp set. To get the focal layer greenery I simply stamped around the edges and left room in the center for the sentiment. The colors used are ones from the DSP. That made the choices rather easy! For the inside layer I only added a sentiment. That piece is rather small and did not want to take up any more of the writing room.
Measurements:
The card base is cut to 4 1/14 X 11 and scored at 2 1/2 and 5 1/2. Fold and burnish the score lines. The DSP pieces are two at 2 1/4 X 4. These are the gift card pocket and the far right pieces. The front left DSP is 2 3/4 X 4. Adhere all of the DSP pieces and then use a circle punch or die to create the finger notch on the gift card pocket. Then adhere it with Tear & Tape placed very close to the edge on each side. It also helps to place your gift card inside when closing. That insures that the fit is not too tight when you place it afterwards.
The front sentiment layer is a Mossy Meadow cut to 3 X 4 1/4 and a White cut to 2 3/4 X 4. And the final is the inside White at 2 3/4 X 4. I hope you will give this one a try!
Birthday Organizer Kit
DETAILS
Kit includes one 8″ x 10″ (20.3 x 25.4 cm) monthly planner with space to record birthdays each month as well as a pocket sleeve to hold birthday cards.
Includes 12 full-size birthday cards, 6 of 2 designs, and 12 coordinating envelopes.
Includes Glue Dots, Stampin’ Dimensionals, Adhesive-Backed Embellishments, and Tear & Tape Adhesive
Includes die-cut florals and pieces ready for you to use—no prep work required!
Includes sticker sentiments and die-cut labels in Dutch, English, French, and German
My November Host Code is XUE6MDFV. Please use this code for orders under $150.00. I will have a small gift for those with orders over $50.00 in addition to the Perk Rewards Program. You can read all of the information at the top of the page in the Menu Bar under SHOP / Perks.
Thank you for stopping by today. I hope you enjoyed today’s project and will come back. I do read and reply to all of the comments individually. They mean a lot to me. Please reach out if you have a question.
This month, the theme is Home for the Holidays, so the design team created a project for the holiday of their choice. We really hope that you will be inspired by all the amazing creations the Pals are sharing with you! As you hop from blog to blog, we would love for you to leave a comment. You will find the lineup at the end of my post to help you “hop” along from Pal to Pal..
The theme, Home for the Holidays, says Christmas to me. My card showcases the beautiful Lights Aglow DSP and Peaceful Deer stamp set.
Papers
These two pieces of the Lights Aglow Designer Series Paper just seemed perfect for an old-fashioned Christmas theme. Red and Green are the traditional colors and these are that with a touch of bling! And when I added the Gold from the Gold & Rose Gold Specialty Paper, the texture in it really helps the papers pop! For a little different look, I added the card base in Soft Succulent. It is not in the DSP but was what I had chosen for some of the tree colors.
For the focal layer I wanted something more than plain white. So I die cut the piece with the largest square in the Stylish Shapes Dies. The stitching around the edges, plus the gold background paper, seemed to be just right. And the little banner was the finishing touch. I love that sentiment and by flagging the ends it helps it to stand out a bit from the focal layer.
Stamps
The sweet sentiment, and the other stamps used, are all from the Peaceful Deer stamp set. These trees are all included in the stamp set as well. By placing the largest one center stage, and in Soft Succulent Ink, it seems to pop. The other trees are stamped with Evening Evergreen and appear to be in the distance.
Here is a view of the open card.
A second sentiment from the set was used on the inside panel, as well as the smaller of the trees.
More inspiration awaits, so use the lineup below to visit the rest of the Design Team. The Pals are excited to show you what they’ve created! Then, please mark your calendars for our next blog hop on December 14th. Our theme will be Last Minute Gift/Card Ideas.
My November Host Code is XUE6MDFV. Please use this code for orders under $150.00. I will have a small gift for those with orders over $50.00 in addition to the Perk Rewards Program. You can read all of the information at the top of the page in the Menu Bar under SHOP / Perks.
Thank you for stopping by today. I hope you enjoyed today’s project and will come back. I do read and reply to all of the comments individually. They mean a lot to me. Please reach out if you have a question.
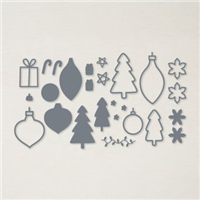
Today’s card is a quick one using the In Color Glimmer Paper paired with the Spruced Up Dies. Counting the Ink and Ribbon this is a four part card. It may be a record for me!
Papers
Starting with the paper may seem a bit odd as there does not appear to be a lot of paper! But that is the point. This is a quick card with Thick Basic White, some Glimmer Paper, and a regular Basic White. And that is all it took! The die cut piece is cut to 3 X 5. The three strips of Glimmer Paper are each cut 4 1/4 X 3/4. I believe this technique would work just as well with Designer Series paper scraps, or Washi Tape. I just am in love with this Glimmer Paper.
Focal Layer
The Focal Layer is the 3 X 5 Basic White piece. I stamped the sentiment, from the Brightest Glow Stamp Set, first and positioned it at the bottom of the card. It is stamped in Parakeet Party Ink. Next was the placement of the ornament die. This is from the Spruced Up Die set. There are a couple of sizes of ornaments and two trees. Any of these dies would work with this technique.
The ornament die was positioned between the top of the layer and the sentiment. After die cutting I added Stampin’ Dimensionals to the back and with the backings still attached, put it on the card. This allowed me to find the perfect location for the Glimmer Paper strips. Once those were in place I adhered the focal layer over them. All that was left was tying a bow using the Parakeet Party Metallic Ribbon.
I hope you will give this technique a try!
Birthday Organizer Kit
DETAILS
Kit includes one 8″ x 10″ (20.3 x 25.4 cm) monthly planner with space to record birthdays each month as well as a pocket sleeve to hold birthday cards.
Includes 12 full-size birthday cards, 6 of 2 designs, and 12 coordinating envelopes.
Includes Glue Dots, Stampin’ Dimensionals, Adhesive-Backed Embellishments, and Tear & Tape Adhesive
Includes die-cut florals and pieces ready for you to use—no prep work required!
Includes sticker sentiments and die-cut labels in Dutch, English, French, and German
My November Host Code is XUE6MDFV. Please use this code for orders under $150.00. I will have a small gift for those with orders over $50.00 in addition to the Perk Rewards Program. You can read all of the information at the top of the page in the Menu Bar under SHOP / Perks.
Thank you for stopping by today. I hope you enjoyed today’s project and will come back. I do read and reply to all of the comments individually. They mean a lot to me. Please reach out if you have a question.
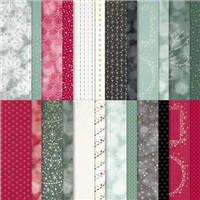
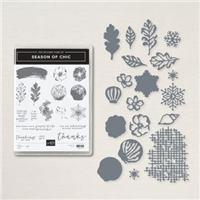
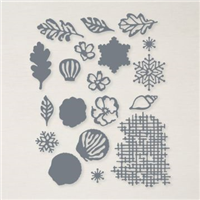
Today’s project is a Fun Fold for a Thank You challenge. I used a few different sheets of the beautiful Texture Chic Designer Series paper to create this one.
And here are the open views:
As mentioned at the top, this card was made for the Make My Monday Blog Challenge. This challenge was simply a Thank You card. You can see inspiring cards from the other designers, as well as join the challenge yourself. Simply click on the link to be taken to the challenge.
Paper
I believe the fabulous DSP is the star of this card. It is from the Texture Chic Designer Series Paper. My favorite is not only the images, but the colors. And in saying that, the color I used for the card base is not actually in the papers. But it matches perfectly with the darker shades and pairs with the Petal Pink. The card base is Soft Suede with the layers of Pool Party.
I have directions further down. But to complete the Paper topic, I used a piece of scrap to die cut the leaves which surround the sentiment on the front. The color variations were so pretty, and with Fall leaves as an inspiration, I decided to give it a try. They look great in my opinion. And to finish the inside of the card, I used a scrap to add a little bit of the Petal Pink to the bottom of the inside White piece.
Stamps and Dies
This is an all Chic card. The stamp set used was the Season of Chic with the matching Chic Dies. They are a bundle, and actually there is a Suite of the Texture Chic that contains the DSP, Stamp Bundle, and Distressed Gold Specialty DSP. I used everything except the gold paper.
As I mentioned earlier, the leaves are die cut from the DSP. There are several leaf dies and I loved the openness of them. The stamped Thanks is included in the set, as is the inside sentiment. Sadly there is not a die for the Thanks. So I took my paper snips and sort of outline cut around the stamped word. And to give more color and depth, it is layered on a scrap of Pool Party and I then did the same cut around that. It is not perfect by any means, but I love the look!
Directions
The card base of Soft Suede is cut to 5 1/2 X 8 1/2 and scored at 4 1/4. Cut from the top of the score line diagonally down to the bottom right of the front panel. For the small card, cut a piece of Pool Party to 3 X 8 and score and fold at 4. To make the diagonal pieces, cut a piece of Pool Party to 4 X 5 1/4. Next cut it diagonally from top left to bottom right. These are for both sides of the angle front on the card. Then cut a piece of DSP to 3 7/8 X 5 1/8. Cut it diagonally as well. Since this pattern is not directional, both pieces fit the front and inside of the flap.
To finish the inside of the card, cut a piece of Pool Party to 4 X 5 1/4 and adhere to the inside of the card. Also cut a complimentary piece of DSP to 2 3/4 X 3 3/4 for the front of the small card. A piece of Basic White cut the same size fits the inside of that card. Adhere the small card by having it closed and placing it with even borders all around. I finished mine with a strip of the Petal Pink DSP across the bottom of the White that was 2 3/4 X 1/2.
Birthday Organizer Kit
DETAILS
Kit includes one 8″ x 10″ (20.3 x 25.4 cm) monthly planner with space to record birthdays each month as well as a pocket sleeve to hold birthday cards.
Includes 12 full-size birthday cards, 6 of 2 designs, and 12 coordinating envelopes.
Includes Glue Dots, Stampin’ Dimensionals, Adhesive-Backed Embellishments, and Tear & Tape Adhesive
Includes die-cut florals and pieces ready for you to use—no prep work required!
Includes sticker sentiments and die-cut labels in Dutch, English, French, and German
My November Host Code is XUE6MDFV. Please use this code for orders under $150.00. I will have a small gift for those with orders over $50.00 in addition to the Perk Rewards Program. You can read all of the information at the top of the page in the Menu Bar under SHOP / Perks.
Thank you for stopping by today. I hope you enjoyed today’s project and will come back. I do read and reply to all of the comments individually. They mean a lot to me. Please reach out if you have a question.
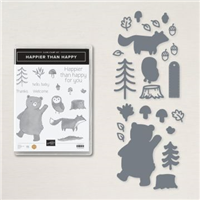
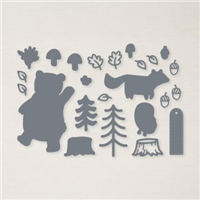
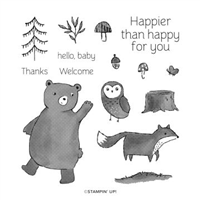
I have gone back to the Annual Catalog for some fun and non-holiday cards. Today’s is from the Happier Than Happy Bundle. It is a happy Thank you card!
Bundle
My original thought when starting this card was for a Happy card. This cute bear definitely gives off the Happy and Smile vibe I was looking for. And the fact he is part of a bundle with dies is a huge bonus. This is the Happier Than Happy Bundle that includes the Happy Forest Dies. I will say that my first opinions of this suite of products was that it was for children. But after seeing the pieces and playing with them, I totally changed that opinion. They make great SMILE cards!
The bear was stamped with Soft Suede ink and then die cut. He is raised using Stampin’ Dimensionals to give some depth to the card and make it look more like he walking in front of those cute flowers. And the sentiment frame is adorable! I have begun making a list of cute frames like this one to use with different sentiments. Sometimes I forget to look further than what I am currently working with and that is sad. So to finish this card I added the tag and sort of “attached” it to the bears hand with one of the Rustic Metallic Dots.
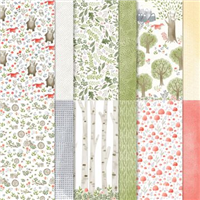
Paper
This paper is so pretty and saved me from having to decide on a stamped background. The little woodsy scene is perfect as is. And to compliment the color of the flowers, I went with a second sheet from the Happy Forest Friends Designer Series paper. I love the colors and the small hearts.
I hope you have an awesome weekend!
Birthday Organizer Kit
DETAILS
Kit includes one 8″ x 10″ (20.3 x 25.4 cm) monthly planner with space to record birthdays each month as well as a pocket sleeve to hold birthday cards.
Includes 12 full-size birthday cards, 6 of 2 designs, and 12 coordinating envelopes.
Includes Glue Dots, Stampin’ Dimensionals, Adhesive-Backed Embellishments, and Tear & Tape Adhesive
Includes die-cut florals and pieces ready for you to use—no prep work required!
Includes sticker sentiments and die-cut labels in Dutch, English, French, and German
My November Host Code is XUE6MDFV. Please use this code for orders under $150.00. I will have a small gift for those with orders over $50.00 in addition to the Perk Rewards Program. You can read all of the information at the top of the page in the Menu Bar under SHOP / Perks.
Thank you for stopping by today. I hope you enjoyed today’s project and will come back. I do read and reply to all of the comments individually. They mean a lot to me. Please reach out if you have a question.
Quick cards are what I seem to be focused on lately. Today’s is a fun and quick one using the Forever Friendship stamp set. I love these simple images and matching sentiments.
Stamp set
Previously I have made cards using almost all of the images and matching sentiments from this Forever Friendship stamp set. These are a perfect size for Note Cards or full size ones. And I personally love the whimsy of the sayings. Plus you have a One Stamp Card, which I always love. For this card I kept everything very simple. Even though I love layers and fun folds sometimes I just need to make a quick and easy card. This one began with the strip of DSP.
Paper
After some marathon stamping and prepping for a class, I decided I needed to make some work space before I could do anymore. And that is where this card was born. I found the strip of DSP. It is from the Texture Chic Designer Series Paper. The colors are all ones that I love so I began looking for a set to make a quick card. And the rest is history so to speak! In keeping with the quick and easy theme, I simply cut the DSP strip to the height of the card and adhered it.
Finishing
Trying to decide what was the appropriate finish was maybe the hardest thing about this card creation. I finally decided just a bow would be fine. When I saw the Petal Pink Soft Ribbon I knew it was the answer. I do not care for a ribbon to be seen on the inside of a card, as this one is in being wrapped all the way around the card base. But with it being the same color as the cardstock that concern was not a concern at all! It simply blends in to the cardstock. Yay!!
Birthday Organizer Kit
DETAILS
Kit includes one 8″ x 10″ (20.3 x 25.4 cm) monthly planner with space to record birthdays each month as well as a pocket sleeve to hold birthday cards.
Includes 12 full-size birthday cards, 6 of 2 designs, and 12 coordinating envelopes.
Includes Glue Dots, Stampin’ Dimensionals, Adhesive-Backed Embellishments, and Tear & Tape Adhesive
Includes die-cut florals and pieces ready for you to use—no prep work required!
Includes sticker sentiments and die-cut labels in Dutch, English, French, and German
My November Host Code is XUE6MDFV. Please use this code for orders under $150.00. I will have a small gift for those with orders over $50.00 in addition to the Perk Rewards Program. You can read all of the information at the top of the page in the Menu Bar under SHOP / Perks.
Thank you for stopping by today. I hope you enjoyed today’s project and will come back. I do read and reply to all of the comments individually. They mean a lot to me. Please reach out if you have a question.
The content in this blog is the sole responsibility of Jackie Beers as an Independent Stampin' Up! Demonstrator. The use of and content of classes, services or products offered is not endorsed by Stampin' Up!