A sweet appreciation card is what I have to share today. It stars a few Sale-A-Bration items that add definition and fun to the card.
Stamp Bundle
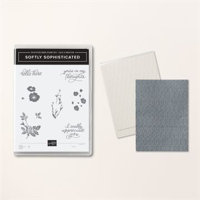
The sweet background for this card is made with DSP, that I will get to in a minute, and the gorgeous Embossing Folder that is part of the Softly Sophisticated Bundle. This is a Sale-A-Bration Bundle. You can see the fun design the embossing folder leaves. It works great with the variegated color in the DSP.
The stamps from this bundle are what created the flowers in the focal center. The greenery is one stamp and the flowers another. To create this scene I stamped twice. Actually I die cut the shape prior to stamping. This made it easier to fill the area than to try to gauge how much space I had.
Focal Layers
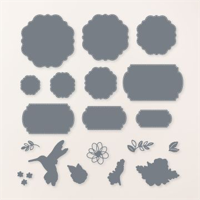
There are two focal points on this card and they actually work well together. The first is the floral area. The Softly Sophisticated flowers are die cut using the second largest of the Thoughtful Expressions Dies from the Mini Catalog. These are a bundle in the Mini Catalog. I love both of the layering shapes in this die set. They are both unique shapes and multiples of each.
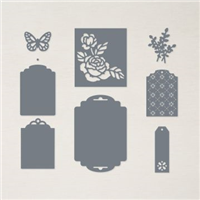
The second focal point is the tag. This tag is from the Designer Tags Dies. It is a die set in the Annual Catalog. The sentiment is part of the Softly Sophisticated stamp set also.
Papers
The papers on this card are minimal. I used Basic White Thick card stock for the card base as I wanted the focal layers to pop. And the fun variegated blue is from the Flight & Airy Designer Series Paper, a Sale-A-Bration paper. It is one of the reverse sides of the birds.
Finishes
The focal layers are raised with Stampin’ Dimensionals and layered over each other. I used the White Baker’s Twine colored with a Boho Blue Stampin’ Write Marker to make the little bow. This needed a small bow and coloring Bakers Twine is an easy way to do that. The final touch is a scattering of Iridescent Pearls.
Thank you for stopping in today!!
HOST CODE
My FEBRUARY Host Code is PR4KTFTS. Please use this code for orders under $150.00. I will have a small gift for those with orders over $50.00 in addition to the Perk Rewards Program. You can read all of the information at the top of the page in the Menu Bar under SHOP / Perks.
Thank you for stopping by today. I hope you enjoyed today’s project and will come back. I do read and reply to all of the comments individually. They mean a lot to me. Please reach out if you have a question.
The card today is another using the Bee My Valentine Bundle. This time around is a little different regarding paper usage.
Papers
The Be Mine Designer Series Paper is the same paper as on the previous Bee Valentine. You can see that card HERE if you missed it earlier in the week. The special addition to this card is the sweet jar of Love. It was fussy cut from a piece of the DSP. There are jars with “honey”, “hug”, and the heart. I opted for the heart to match the Sweet Sorbet in the center DSP piece. The wonderful patterns in this pack of paper is perfect for any Spring cards, but especially to pair with this fun bee.
The card base is Daffodil Delight and is paired with the Basic White layer. That has the honeycomb stamp with Daffodil Delight Ink to create the background. The honeycomb pairs perfectly with the bee and the jar of Love.
Bundle
The only stamps used are from the Bee My Valentine set. The fun sentiment makes me think of a Southern type statement! You cannot help but smile. I believe this would make a great Thank You card for someone as well. And of course the bee with the Bee Builder Punch is perfect for creating your own bee. He can be going in any direction and with a variety of facial expressions. Plus you get the bonus of the two hearts. The wings and antenna are made with two sizes of hearts. I can see myself using these hearts on all kinds of projects!
Finishes
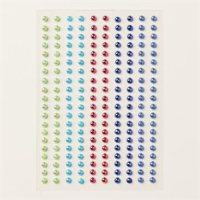
The sentiment layer is simply a strip of Basic White across the card. So I had to add some fun to that. Raising the bee and the little jar created some depth, but we must have bling! The Adhesive Backed Hearts & Flowers embellishments fill that need perfectly. And they have a kind of retro look to them. There are one on each end of the sentiment and then the yellow heart in the upper left corner. It sort of blends in with the honeycomb.
Measurements
The card base of Daffodil Delight is 4 1/4 X 11, folded at 5 1/2. The Basic White layer is 3 7/8 X 5 1/8. And the DSP is 2 1/2 X 3 1/4. For the sentiment it is a strip of Basic White cut to 3 1/2 X 3/4. I used scraps for the bee and wings. Since these are on one punch. I suggest stamping and punching the bee, then stamp and punch each of the others.
Thank you for stopping in today! I hope you have a great crafting weekend.
Online exclusives are here to stay! Click on the photo and be taken directly to them in my online store. If you place an order, please use my Host Code listed just below.
HOST CODE
My JANUARY Host Code is BQEMX92K. Please use this code for orders under $150.00. I will have a small gift for those with orders over $50.00 in addition to the Perk Rewards Program. You can read all of the information at the top of the page in the Menu Bar under SHOP / Perks.
Thank you for stopping by today. I hope you enjoyed today’s project and will come back. I do read and reply to all of the comments individually. They mean a lot to me. Please reach out if you have a question.
Today’s projects are a group of Thank You cards I made for a friend. Not only did my husband manage to fall and break his ankle, but a good friend broke her arm. And yes the threes did strike. Another friend broke several bones in his hand. Hopefully that took care of all breakage for the near future!!! That being said, I made a set of Thank You cards for my friend to use.
Papers
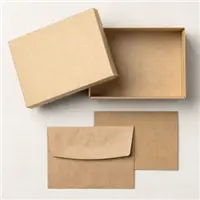
These cards all begin with the Basic White Note Cards. The note cards are such a great deal and are available in Whisper White, Very Vanilla and Kraft. The Kraft are Online Exclusives. These all come in a package of 20 cards and envelopes for the low price of $8.00.
My cards are using the Basic White note cards. And each has a strip of Fresh As A Daisy Designer Series Paper. There are four different DSP patterns used. The strips coordinate with the color of the stamped flower. Or rather, I coordinated the stamping to the DSP!
Stamps and Ink
The pretty flower is from the Inked & Tiled stamp set. I really love this flower as it is large enough to stand alone, as I have used it. The leaves on each flower are direct to rubber colored using the Shaded Spruce Marker. For the flowers there are different colors to match the DSP. But all are done with the direct to rubber technique and using the Stampin’ Write Markers. All of the colors are listed in the Supply List at the bottom of the page.
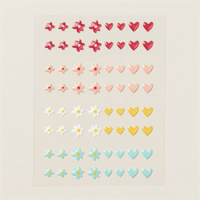
The sentiment is stamped using Pebbled Path Ink and is the same on each card. I left the inside blank since they are smaller note cards. But did finish with a bit of bling to each. I used the 2023-2024 In Color Dots.
View of Each Card
These are each of the different cards where you can see the different bloom colors used.
Starter Kit promotion is ending on October 31. Don’t let it pass you by!
Reminder of the Join Promotion!!! I would love to have you join my team. There is no pressure to ever place another order. Although you do get a discount being a demonstrator!! Plus we have so much fun sharing our ideas and just enjoying ourselves while stamping. Please reach out if you have any questions. I would love to talk with you. 🙂
Online exclusives are here to stay! Click on the photo and be taken directly to them in my online store. If you place an order, please use my Host Code listed just below.
HOST CODE
My OCTOBER Host Code is NYVXHUMX. Please use this code for orders under $150.00. I will have a small gift for those with orders over $50.00 in addition to the Perk Rewards Program. You can read all of the information at the top of the page in the Menu Bar under SHOP / Perks.
Thank you for stopping by today. I hope you enjoyed today’s project and will come back. I do read and reply to all of the comments individually. They mean a lot to me. Please reach out if you have a question.
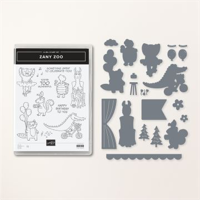
The card today is a Thank You but with a lot of whimsey mixed in. It features the Zany Zoo Bundle and the Zoo Crew DSP. I could not miss with these fun products.
Stamp Bundle
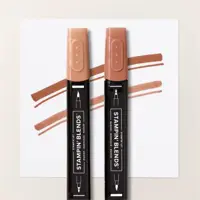
The Zany Zoo Bundle is a great mix of adorable animals doing a bit of everything. I chose to use the alligator on a bicycle. It is in thought for my husband on his knee scooter. (Note the cast on one of the alligator’s legs!) The image and sentiment are both from the stamp set and are stamped using Memento Tuxedo Black Ink. Then the alligator is colored with a variety of Stampin’ Blends.
The matching Dies in this bundle are great as well. They not only cut out all of the animal stamp images, but have quite a few scene extras as well as this fun banner. I used the banner, but then decided it needed a backing. So I used the banner as the template and cut the background around it.
Papers
The paper was Not chosen first! I know that is a shock as that is how I usually begin. Actually the Azure Afternoon was chosen first. My husband’s knee scooter is blue and he has a blue cast. So that was of course the choice. Then to tie in the alligator, I went with a Lemon Lime Twist layer.
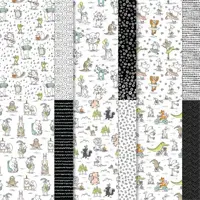
The DSP is the Zoo Crew Designer Series Paper. These two black and white pieces are the reverse sides of the colorful animal prints. By the way, did you know the Dies will cut quite a few of the animal prints as well? As I have said many times, this is such a fun set to use. It definitely makes me Smile!! The final touch was to add a 2022-2024 In Color Pearl in Tahitian Tide on the sentiment to continue the blue theme.
Thank you for stopping by today!! I hope you have a great weekend.
Online exclusives are here to stay! Click on the photo and be taken directly to them in my online store. If you place an order, please use my Host Code listed just below.
HOST CODE
My OCTOBER Host Code is NYVXHUMX. Please use this code for orders under $150.00. I will have a small gift for those with orders over $50.00 in addition to the Perk Rewards Program. You can read all of the information at the top of the page in the Menu Bar under SHOP / Perks.
Thank you for stopping by today. I hope you enjoyed today’s project and will come back. I do read and reply to all of the comments individually. They mean a lot to me. Please reach out if you have a question.
The Trucking Along Bundle is back in stock and waiting for many awesome cards to be made with it! I have used it today, along with some other layering products for a cute Thank You card. We can never have enough of these around.
Stamps
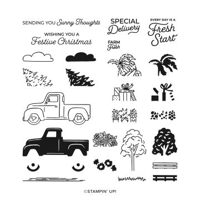
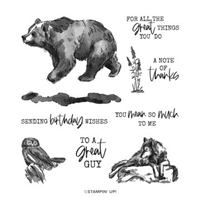
This card seems to have more individual products than I have used in quite a long time. But the star of the show is the Trucking Along little truck. I do love this truck! It is so versatile, not only in adding the Punch with it, but everything else that is in the stamp set. And please don’t laugh at me, or with me, but I did not use the punch! I stamped the truck and the sunflowers in the bed and was so happy how I perfectly placed the flowers. Then I realized when I punched the truck the flowers would be gone! DUH!!!! So out came the paper snips and it was an easy fussy cutting instead of punching.
The sentiment is not from the Trucking Along. Everything else is however. The sentiment is from the Wildlife Wonder stamp set. I just loved the mixed fonts of this one. The sentiment is stamped with Memento Tuxedo Black Ink and the truck is stamped with Pretty Peacock. The color of the truck is a stamped off Pretty Peacock also. The splotchy color goes well with the “old farm truck” look I wanted.
Papers
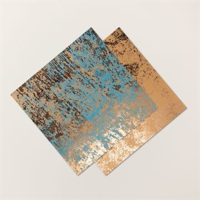
The card was intended to be pretty simple. That did not last long at all though! But I did begin with a Thick Very Vanilla card stock for the base and then a thin layer of Pretty Peacock. The DSP at the bottom was another piece that just seemed to have the patina of the “old farm truck” and fit the sunflowers as well as the Pretty Peacock color. It is from the Oxidized Copper Specialty Designer Series Paper. The largest circle is also Pretty Peacock card stock for a bold backdrop of the truck.
Extra Products
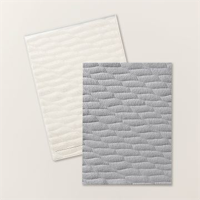
There are several “extras” on this card. First is the background of Very Vanilla that has been embossed using the Twisted Rope Embossing Folder. It may be a little difficult to see in the photo. But this is a very detailed embossing folder. The next are the circles. These are cut using the Deckled Circles Dies. There are a lot of dies in this Die set. The ones I used are the 2nd and 7th going up from smallest.
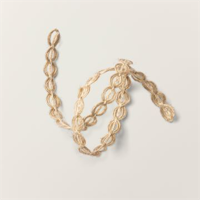
The other products are more finishing touches to the card. First is the Natural Wavy Trim across the bottom of the DSP layer. With all of the various extras raised with Stampin’ Dimensionals, I wanted something to sort of ground that piece of DSP. The wavy trim fit perfectly. And to finish the card I went for more masculine bling! I used the Brushed Metallic Dots in a copper color. There are a couple of different metallic colors in this collection of dots.
Thank you very much for stopping by today!!!
Online exclusives are here to stay! Click on the photo and be taken directly to them in my online store. If you place an order, please use my Host Code listed just below.
HOST CODE
My October Host Code is NYVXHUMX. Please use this code for orders under $150.00. I will have a small gift for those with orders over $50.00 in addition to the Perk Rewards Program. You can read all of the information at the top of the page in the Menu Bar under SHOP / Perks.
Thank you for stopping by today. I hope you enjoyed today’s project and will come back. I do read and reply to all of the comments individually. They mean a lot to me. Please reach out if you have a question.
I should still be on my trip to Norway! So these posts are done ahead of time. And I am sharing another of the quick Notecards I made as Thank You for the staff.
Papers
Today’s card is a return to the Kraft Notecards and Envelopes for the card base. This one has the added benefit of the gorgeous DSP from the Fresh As A Daisy Designer Series Paper. The sheet used here is a full one that looks like this. You could make quite a few cards from one single sheet.
Stamp and Punch
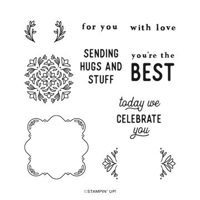
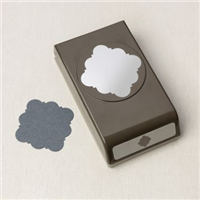
The sweet sentiment is from the Handmade Hugs stamp set. This set coordinates with the Handmade Tag Punch. The outline image is stamped using Azure Afternoon Ink. And the sentiment is stamped using Berry Burst Ink. Both are included in the stamp set. And I love the shape and size of the Handmade Tag Punch! It fits quite a lot of the larger size sentiments that most punches do not. I do not know if y’all have noticed that none of these notecards have added Bling! I left that off for ease of packing and travel. But it was so hard to not add some bling!!!
Thank you for stopping in today!!
Start Redeeming your Bonus Days Coupons!!!
August 1 – 31 is the redemption period for your Coupon Codes. Now is the time to order something you have been waiting on and treat yourself!
Online exclusives are here to stay! Click on the photo and be taken directly to them in my online store. If you place an order, please use my Host Code listed just below.
HOST CODE
My August Host Code is D6EB6CX7. Please use this code for orders under $150.00. I will have a small gift for those with orders over $50.00 in addition to the Perk Rewards Program. You can read all of the information at the top of the page in the Menu Bar under SHOP / Perks.
Thank you for stopping by today. I hope you enjoyed today’s project and will come back. I do read and reply to all of the comments individually. They mean a lot to me. Please reach out if you have a question.
The content in this blog is the sole responsibility of Jackie Beers as an Independent Stampin' Up! Demonstrator. The use of and content of classes, services or products offered is not endorsed by Stampin' Up!