My card for today is what I call a Pam Card. My up – upline, Pam Morris, makes gorgeous cards that are perfect and simple layers. This is one little stamp and some beautiful DSP. I hope Pam is proud. 🙂
STAMPS
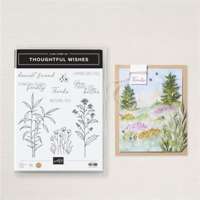
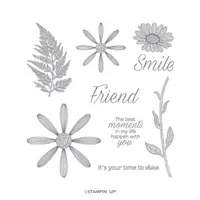
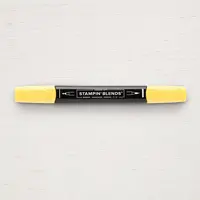
This sweet little flower stamp is from the Thoughtful Wishes stamp set. I love the simple look of them. The image is inked with Memento Tuxedo Black Ink and then colored with stampin’ Blends. I used colors from the DSP for this. They are Daffodil Delight and Old Olive Stampin’ Blends. It is a soft look for the soft DSP.
PAPERS
The wonderful background of this card is a sheet of the Beautiful Bokeh Designer Series Paper. For me these sheets look like photography backgrounds Even though I am definitely a Brights person, this soft sheet really makes me smile. It is so calm looking.
I used a Thick Basic White for the card base to keep the “clean” look. Then I pulled Balmy Blue from the DSP for the thin layer behind the DSP as well as the stamped layer. I think any of the Subtles Color Family would have worked for this.
EXTRAS
There is a single Extra on today’s card. I just had to add a touch of bling. This one is new and will be available in the new Annual Catalog in May. I received them at the Onstage Event a few weeks ago. This is a 2025-2027 In Color Flat Pearl. There are all of the new In Colors in this package. The one I used is the new soft blue called Cloud Cover. That is such an appropriate name!
HOST CODE
My FEBRUARY HOST CODE is S2EYAW9N. Orders of $50.00 or more will receive an appreciation gift from me. I appreciate you choosing me as your demonstrator!
Thank you for stopping by today. I hope you enjoyed today’s project and will come back. I do read and reply to all of the comments individually. They mean a lot to me. Please reach out if you have a question.
Smile and Keep On Stamping,
Jackie
New Scrapbooking Catalog
The newest addition to Stampin’ Up! is an Online catalog of Scrapbooking products. You can see the catalog by clicking the photo below and save it to your computer.
Online Exclusives
New Online Exclusives have dropped. There are Halloween, Fall, Christmas, and many that are great year round. Of course the new Designer Series Papers and Embellishments are fabulous as well!
You can go directly to these in my Online Store by clicking HERE
First thing today I have a reminder about Sale-A-Bration! This is the last few days to get these items at no cost! And there are a few of the second release products that are active in catalogs right now. What a bonus! So don’t miss out. And reach out to me if you have any questions.
Today I am sharing the Spring Corners Bundle and pairing it with a beautiful DSP from SAB. This is one of the fabulous products from this last release of Online Products. They are fun and exciting stamp sets with matching Dies. Plus more are coming in March. The bright Sale-A-Bration DSP pairs perfectly with this fun stamp set.
STAMPS& DIES
The Spring Corners Bundle has a couple of corner sentiments in addition to images that pair with those sentiments. For the front of the I had to use one of the corner sentiments. I think that is such a refreshing idea. And then the group of balloons reinforces the “amazing day” idea.
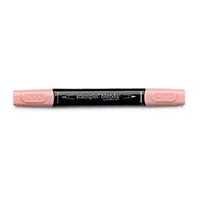
These stampings are done with Memento Tuxedo Black Ink . Then the balloons are colored using Stampin’ Blends. Those colors are pulled form the DSP. This gave me all kinds of color options. So I chose Melon Mambo, Peach Pie, and Shy Shamrock for the balloon colors. These balloons are also stamped on the inside of the card along with a Happy Birthday. For the front the balloons are Die cut with a matching Die. I added Stampin’ Dimensionals under the balloons for depth, but left the bottom free. That allows the bow to sit a little bit flatter.
PAPERS
This unusual mix of cardstock colors are both pulled from the floral piece of DSP. I have been on a Blueberry Bushel kick of late and continued that here. It is just a bright and happy blue. Then to soften things for the DSP pieces, I went with Peach Pie for the layer. It acts as the leading in the stain glass pieced top layer.
The DSP is from the Bloom Impressions Designer Series Paper from Sale-A-Bration. I love these flowers. They are a mix of Brights but with almost all of the color families represented. This makes it so simple to create a variety of cards using different card bases.
The top layer is created with a piece of Peach Pie measuring 4 X 5 1/4. The DSP is all 1″ widths. The top left is 1 X 1, the floral piece is 1 X 4, and the bottom one is 2 3/4 X 1. (Always be careful with your cutting if using directional paper! ) Then the Basic White section is 2 3/4 X 4 to stamp the sentiment.
EXTRAS
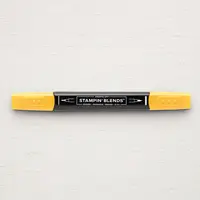
There are two Extras, bling and sweet ribbon. The ribbon is the new Daffodil Delight Satin Ribbon. I love this narrow ribbon. It is a breeze to tie a bow with. And then of course bling. Today I chose to use Rhinestones. A sparkle is always needed for a celebration.
Here is the inside view of the card.
HOST CODE
My FEBRUARY HOST CODE is S2EYAW9N. Orders of $50.00 or more will receive an appreciation gift from me. I appreciate you choosing me as your demonstrator!
Thank you for stopping by today. I hope you enjoyed today’s project and will come back. I do read and reply to all of the comments individually. They mean a lot to me. Please reach out if you have a question.
Smile and Keep On Stamping,
Jackie
New Scrapbooking Catalog
The newest addition to Stampin’ Up! is an Online catalog of Scrapbooking products. You can see the catalog by clicking the photo below and save it to your computer.
Online Exclusives
New Online Exclusives have dropped. There are Halloween, Fall, Christmas, and many that are great year round. Of course the new Designer Series Papers and Embellishments are fabulous as well!
You can go directly to these in my Online Store by clicking HERE
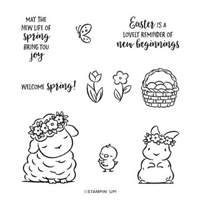
Today’s card is similar to one I did previously using the Springtime Joy stamp set. This is such a sweet set that I have actually used it several times on cards not posted. So today you get to see a second one with this set.
I love this adorable little lamb! I kept all of the colors very soft. The base card is Thick White cardstock and the stamping is done on a White cardstock piece cut 4 X 5 1/4 that is layered using Dimensionals. I like the white on white look plus the depth it gives.
The lamb is stamped on a circle that I used Blending Brushes and a mask. It is the 2″ circle from Layering Circles Dies. The ink is Mint Macaron and kept pretty light. The lamb is just highlighted with Smoky Slate Stampin’ Blends. I did use Just Jade and Flirty Flamingo Stampin’ Blends for the little flowers. The butterfly is colored using the same blends and then fussy cut with my Paper Snips. It has a Mini Stampin’ Dimensional to give it a little elevation.
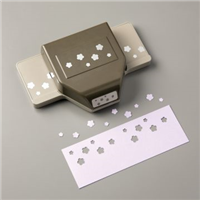
The sentiment is a strip of Soft Sea Foam cardstock cut 3/4 X 4. The little flower added is from the Confetti Flowers Punch. I punched just a small strip, enough to get two flowers, and layered them together. This flower and one on the lamb have an added Pearl for a highlight.
This card was a fun one to make and could be cased using any number of stamp sets. If you didn’t want to using the Blending Brushes, you could simply cut a circle and stamp on it.
I appreciate you coming by today. Please come back tomorrow for another new project.
HOST CODE
My March Host Code is: B6JC9CHE Please use this code for orders under $150.00. I will have a small perk for those with orders over $50.00
The days are getting warmer and longer, and I LOVE it!!! Today I have a card that shows my enthusiasm for the warmer Spring weather.
One of the old time sayings has something about “coming in like a lamb”. I cannot remember if it is Spring though. When I saw this stamp set, Springtime Joy, I immediately thought of Spring and Easter. Regardless, I think this little lamb is adorable! I kept the lamb image very simple. I stamped using Smoky Slate Ink on Basic White cardstock. I colored the flower headband with Petal Pink and Mint Macaron Stampin’ Blends.
The paper is from the Peony Garden Designer Series Paper. I love the softness and the flecks of color in the larger piece. I layered the DSP onto a piece of Smoky Slate cardstock. The base of the card is Thick Basic White. The ribbon wrapped around the card is Petal Pink Organdy Striped Ribbon from the Annual Catalog. Sometimes I get carried away with the newer catalogs and don’t use the other items.
To join all of the colors together I cut two banner pieces and cut one end of each using the Banner Pick A Punch. To finish, I decided not to layer the lamb circle. I simply added a few Stampin’ Dimensionals and let it overlap the banners a bit. I did add some Basic Pearls to the flowers on the lamb. I know it is a norm to only use an odd number of embellishments, but there were four flowers, so I added four pearls.
Thank you for stopping in today. I have the measurements just below. Please stop by on Monday for another new project.
Measurements:
Card base of Thick Basic White is cut 4 1/4 X 11, scored at 5 1/2
Smoky Slate cardstock cut to 4 X 5 1/4
Peony Garden DSP cut to 1 X 5 1/8 and 2 7/8 X 5 1/8
Smoky Slate banner cut to 1 X 3 3/4, before punched banner
Basic White stamped banner cut to 1/2 X 3 1/2, before punched banner
HOST CODE
My March Host Code is: B6JC9CHE Please use this code for orders under $150.00. I will have a small perk for those with orders over $50.00
I want to share some sunshine here and make you all relax and hopefully Smile! So the next couple of posts are going to be along those lines. Today I have a daisy, which is simple flower that always makes me smile.
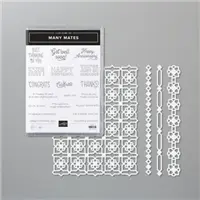
I have a mix of bundles for this card. The Daisy Lane stamp set debuted in a previous catalog as a bundle with the Medium Daisy Punch. Although they are no longer a bundle, they are both in the current catalog. The other is the Many Mates Bundle. It is the sentiment and the background for the daisies. The sentiments for this set are varied and a mix of fonts. The mixed fonts are always a favorite of mine.
I also used the Lovely Label Punch for the sentiment. I adore the two different shapes for the ends of the punch. In case you missed it. I did a tip in one of last weeks posts that shares how to get the equal distance on each end of your sentiment. Click HERE to go to that post. The tip is in the middle of the post.
For the daisies, I punched four daisies to make the two flowers. I fussy cut the small daisy and the fern. The fern was an experiment. I stamped it on Whisper White card stock, and to say it didn’t look good was mild. The white actually shined, in a bad way!! So I used my Light Shaded Spruce Stampin’ Blend and went over the entire leaf. I was happy with that. I was trying not to use another set of dies to get some greenery.
Thank you so much for stopping by today. I hope you will return tomorrow for another Smile project.
Now is a great time to join my Blue Line Stars Team. During June purchasing the Starter Kit, which is a fabulous deal any time, is an even better Bang For Your Buck. The regular cost of the Starter Kit is $99.00 and you receive $125.00 in products of your choice. For this month, you get to add one of the Bundles listed in the flyer below. It can be a Stamp/Punch Bundle, or a Stamp/Die Bundle. The most expensive one is a value of $60.25. And did I mention that shipping is FREE as well. If you have any questions, please do not hesitate to contact me.
HOST CODE
My June Host Code is WYRUJVGW. Please use this code for orders under $150.00. I will have a small perk for those with orders over $50.00
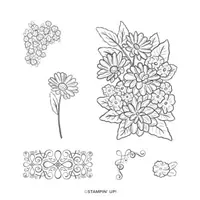
I have a little Spring Bouquet to share today. I used the Ornate Style stamp set. It is a new set to the next Annual Catalog, but it has been available for about a month now as a sneak peek. I shared one card earlier in the week with a single daisy from the set. Today I have the full bouquet for you.
I went a little on the wacky side with my layers for this card. I couldn’t decide on the colors of my normal layers and had all three of these colors on my desk playing with them. I layered all three to see which two I preferred and decided I liked them all. So to keep the bouquet the size it is, I had to go with a wacky layer look. And I am okay with that. This is not the first time that I have used this angled look.
For the definition on the layers, I used the leaf from Parcels & Petals stamp set. I stamped the leaf on all of the layers using Versamark Ink so that it is a lighter shade of the colors. The ribbon is the Daffodil Delight RuchedRibbon from the Mini Catalog.
The sentiments is from the Itty Bitty Greetings stamp set. It is stamped in Granny Apple Green ink to match the card base and it is die cut using the Stitched So Sweetly Dies. I love the different sizes and shapes of these dies. And I am thrilled that they carried over!!
Now for the bouquet!! I love this mix of flowers. I stamped the image using Gray Granite Ink. I like the light gray because it doesn’t show as much of an outline. I colored everything using a variety of Stampin’ Blends. All of the colors are listed in the supply list at the bottom of the post.
Thank you for stopping in today. I hope you have a nice weekend and check back in next week. I appreciate you visiting my projects.
By Clicking on the Giveback picture, you will be taken to the page to order this awesome digital download.
Below are links to the two Retiring or Last Chance Lists. Keep in mind, a Bundle may retire, but the stamp set and dies or punch can still carry over. So look for the individual item. Also, all of the Stampin’ Blends are not retiring. It is only that in the new catalog, they will be sold in the combo pack only. The only ones retiring are the 2018-2020 In Color ones.
You may also click on the Shop Now on my Menu bar and be taken to my online store. There you can see all of the Retiring / Last Chance items as well as all other products.
Annual Catalog Retiring List. Click on the pdf to get the full list.
Mini Catalog Retiring List:
HOST CODE
My MAY Host Code is QNAG7RRZ. Please use this code for orders under $150.00. I will have a small perk for those with orders over $50.00.
The content in this blog is the sole responsibility of Jackie Beers as an Independent Stampin' Up! Demonstrator. The use of and content of classes, services or products offered is not endorsed by Stampin' Up!