I have realized that in my card making of late that I have been neglecting my Embossing Folders. I decided to go back to what used to be my favorite tool in card making and get back to my roots. In doing this, I found some fun new ones from the current Annual Catalog.
The card I made is a very clean looking card with minimal parts when you first glance at it. Actually there are several layers and different products. However all are simply used. There is zero difficulty in making this card!
Layers
There are a few layers in the layout of this card. It begins with the Calypso Coral card base. I paired it with a reverse side of one of the sheets of DSP from the Pansy Petals Designer Series paper. I cut the polka dot piece of DSP into two strips of 5/8 X 5 3/8. They were each layered at the top and the bottom , watching the margins on the ends and either top or bottom of the card. I also cut a second strip of 5/8 X 4 that I cut in half. Those are used as the flags on the focal layer.
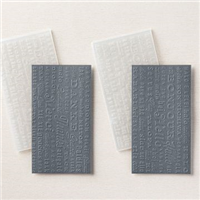
The center embossed layer is made using the new Hello Embossing Folder. The folder comes in a pair with a Thanks folder as well. It is one of the narrow ones, so the Pale Papaya cardstock is 3 1/8 X 5 3/8. This piece was layered slightly over the DSP strips at the top and bottom. I would rather have the little extra coverage from the strips than not quite enough.
I love this folder! It says Hello in a variety of different languages. I placed my focal point to the left side so the English “Hello” is showing in the center. Here is a close up of the embossed image.
Finishing
For the focal point I tried to keep it simple as well. I wanted the embossed layer to not be too overshadowed. To do this I chose the sentiment from Free As A Bird that is another “Hello”. I feel certain my recipient will get the message intended by the card! LOL!!!
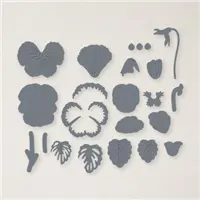
The Pansy is cut from a piece of the Pansy Petals Designer Series Paper. I love when the Dies not only cut what is stamped but also matches the images in the DSP. I chose the Pansy that is the same colors as my card choices. The plain White circle was chosen to highlight the single flower. Layering Circles were used to cut the circle.
With the flower added to the stamped circle, it was just a couple of steps to finishing the card. By using the Banner Pick A Punch flag end to cut the two pieces of the DSP I had left, it made a perfect little addition and tied the card together. For the finishing touch I added a trio of Champagne Rhinestones. One is in the center of the flower, one in the upper corner of the circle and the third is the “O” in Hello.
Measurements
card base of Calypso Coral is 5 1/2 X 8 1/2
Pale Papaya embossed layer is 3 1/8 X 5 3/8
DSP strips are 2 @ 5/8 X 5 3/8
DSP flags are 5/8 X 4, then cut in half to 2 @ 5/8 X 2
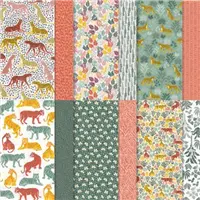
The Pansy Petals Designer Series Paper is one of the packs that is included in the DSP Sale !!! All of the information is just below.
The picture below shows the Designer Series Papers that are included in the Sale. There are 9 to choose from!!
HOST CODE
My July Host Code is 2GKGF4Q7. Please use this code for orders under $150.00. I will have a small gift for those with orders over $50.00 in addition to the Perk Rewards Program. You can read all of the information at the top of the page in the Menu Bar under SHOP / Perks.
Thank you for stopping by today. I hope you enjoyed today’s project and will come back. I do read and reply to all of the comments individually. They mean a lot to me. Please reach out if you have a question.
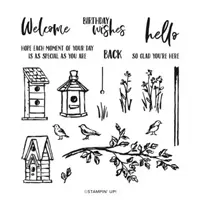
With Summer in full swing it seems, I decided to do a garden type card using the Garden Birdhouse stamp set. It is paired with the In The Wild Designer Series paper. That sounds appropriate I believe!
Layout
I chose to do a 4 X 4 card with this adorable little birdhouse. The size of the focal layer fits perfectly on the 4 X 4 size. The InThe Wild Designer Series paper is also a good fit and not just the theme. The size of the leaves are not too large for the birdhouse.
The base of the card is one color that it seems has not been shared in quite a while. It is the Merry Merlot. Of course I chose it from the colors in the DSP, but as soon as I placed the two pieces together, I knew it was the right one.
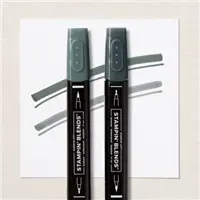
For the focal layer I went with the Crushed Curry to highlight it. It is also used as the joining layer between the Merry Merlot and the DSP. As I said earlier, the birdhouse is from the Garden Birdhouse stamp set. I loved the size of the stamps in this set and thought they would be great for smaller cards. The birdhouse is stamped using Cajun Cruze Ink and then colored with Crumb Cake, Cinnamon Cider, and Evening Evergreen Stampin’ Blends.
Finishing Touches
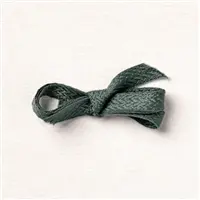
To complete this garden card, I added the Evening Evergreen Open Weave Ribbon off to one side. There was enough room to also add a small bow. I thought I would need to just add the little ribbon knot and was happy for the unexpected space.
To finish the focal layer I stamped the sentiment in Memento Tuxedo Black Ink. The sentiment is also from the Garden Birdhouse stamp set. I “hung” the birdhouse from a 2021-2023 In Color Jewel that matches the greens of the DSP.
Measurements
base card is Merry Merlot cut 4 X 8
Layer is Crushed Curry cut 3 3/4 X 3 3/4
DSP is cut 3 5/8 X 3 5/8
Focal layer is Crushed Curry cut 1 3/4 X 3
Focal White is cut 1 1/2 X 2 3/4
Don’t forget about the Mini Catalog Last Chance Sale. And if you have questions, please reach out to me. I would love to assist you. Also, remember my Rewards Program and my Host Code. They are listed further down and on the right column of the post.
January – June Mini Catalog Last Chance Sale
Click on the image below to get the 4 page pdf of the sale. A reminder, in some cases a Bundle is cheaper to purchase the stamp set and dies individually. Some dies are discounted up to 50% off.
If you order through me, and it is as easy as clicking on the Shop Now button on the Menu Bar, I have a Rewards Program. For every $50.00 in product you purchase, you earn a Blue Star. When you have gathered 10 Blue Stars, you get a $50.00 shopping on me. Plus every time you spend $50.00 I will add a small gift for you. Please use my Host Code listed below.
HOST CODE
My June Host Code is HCX2WT2A Please use this code for orders under $150.00. I will have a small perk for those with orders over $50.00
Thank you for stopping by today. I hope you enjoyed today’s project and will come back. I do read and reply to all of the comments individually. They mean a lot to me. Please reach out if you have a question.
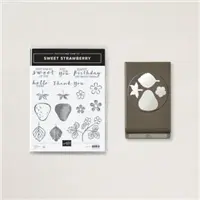
On Friday I shared one of the Treat Boxes I had decorated with the Sweet Strawberry Bundle. Today I have the matching card to show. I intentionally made it quite similar to the layer on the top of the treat box.
Even though the layout of the focal layer is quite similar to the box, it is stepped up somewhat. I added a layer of Granny Apple Green cardstock. I do not know whether this would be considered embossed or die cut? I used the Stitched With Whimsey Dies to add the stitching around the center layer. It does not cut out the piece, it only adds the stitching. I used the second largest die for this project.
The background DSP that is sticking out from behind the center layer is from the Berry Delightful Designer Series Paper from the Sale-A-Bration Bundle Berry Blessings. As I said on Friday’s post, I really LOVE this pack of paper. It is one of the best ever.
For the stamped images, I started with the background zigzag stamp from the Hearts & Kisses stamp set. I stamped it using So Saffron Ink for a very light color. The leaves and flowers are stamped with Granny Apple Green Ink, and stamped off first. I wanted this a little lighter as well. I did not color these so the So Saffron would show through.
The strawberries and caps are stamped and punched using the Strawberry Builder Punch, which is part of the Sweet Strawberry Bundle. I stamped the berries with a black outline because I like the look of the black seeds. I have stamped them before using Cherry Cobbler as the outline and Real Red as the center. The bottom two berries are glued down and the top one is raised using a Stampin’ Dimensional. On the treat box, I made a 3D strawberry. I did not think that would work very well to go in an envelope or mail.
For the final touch, I stamped the greeting using Memento Tuxedo Black Ink. I love my Bling!! So I added three of the Champagne Rhinestone Jewels to give it some shine.
Thank you for stopping by today. I hope you have enjoyed these last two posts and seeing how well a card layout can work for a treat box as well. I have all of the measurements and supplies below.
Measurements:
Card base of Real Red is 5 1/2 X 8 1/2 scored at 4 1/4 and folded
Granny Apple Green layer is 5 1/4 X 4
DSP layer is 2 3/4 X 4
White layer is 2 1/2 X 3 3/4
HOST CODE
My February Host Code is: MRYR7XY2 Please use this code for orders under $150.00. I will have a small perk for those with orders over $50.00
I have been focusing on holiday cards lately and now find I need quite a few birthday cards. So I have a really cute one for you today. It contains a fun stamp set and gorgeous DSP!
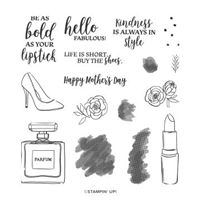
I really like all of the Green in the Forever Greenery Designer Series Paper. (And YES, it is one of the papers that are included in the 15% OFF Sale. I have all of them listed below!) The different greens were the basis of the card. I paired Pretty Peacock with Just Jade for the main colors.
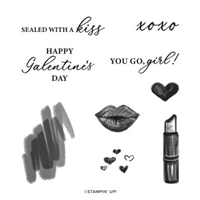
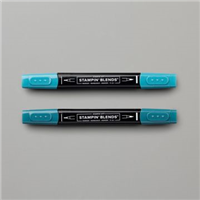
All of the stamps I used are from the Dressed To Impress stamp set. For the perfume bottle, I stamped it using Just Jade Ink. I then added the squiggly to the bottle in Pretty Peacock Ink. To finish it off, I colored the remaining parts of the bottle with the Dark Pool Party Stampin’ Blend. As I said, I LOVE how all of the greens work together! I also stamped it again on some scrap paper and fussy cut the perfume label. It is raised with a dimensional for a bit of definition. I added a few Rhinestones for some Bling! A girl definitely needs bling!
Today’s Measurements are:
4 1/4 X 11 card base
4 X 5 1/4 for white layer
Jade is 3 1/4 X 4 3/4
DSP is 3 X 4 1/2
Perfume base layer is 2 1/8 X 2 5/8
Perfume white layer is 1 7/8 X 1 3/8
sentiment base layer is 1 1/4 X 3 1/4
sentiment white layer is 1 X 3
Thank you so much for stopping by today! I hope you like today’s project and will return tomorrow for another new card idea.
HOST CODE
My October Host Code is SXDVJZF3 Please use this code for orders under $150.00. I will have a small perk for those with orders over $50.00
I am sure you looked at the title a couple of times wondering what I was saying. Even I looked at it and thought it was Angels instead of Angles. LOL!! I just purchased the Stitched Triangles dies and was just playing with them to see what I came up with. This is the card I completed.
I mixed several products together for this card. The background is the Forever Greenery Designer Series Paper. It of course is what determined most of my color choices.
To pair with the DSP, I used the Forever Fern Bundle. These stamps are so gorgeous that I cannot stop using them. The images are so crisp and clear. I stamped and die cut the one piece using Pretty Peacock Ink. I then just die cut the other pieces from both Pretty Peacock and Pear Pizzaz. These dies have a bit of definition to them as well.
The triangles are all cut from Whisper White. As I said, I was just playing around in the beginning. After laying them down into this final pattern, I decided I liked the contrast of the White. Especially since it shows on the stamped and die cut greenery. To me, the triangles pair well with the pattern in the DSP.
As the finishing touch, I colored the Whisper White Crinkle Seam Binding ribbon with the Pretty Peacock Stampin’ Blend. It colors easily and very quickly. The ribbon soaks it up fast. And best of all, it dries almost immediately! The last touch is one of the 2019-2021 In Color Faceted Dots in Pretty Peacock. I will confess tht I thought they carried over. Sadly, they did not. Even more sadly, they were on the Clearance Rack refresh. But I just checked and they are already gone. There are quite a lot of great deals there still.
Thank you for stopping by today. Be sure and read the new Starter Kit Special below. It is another awesome deal for you to get a taste of Stampin’ Up! a bit closer and get a discount for your Wish List!!! And before I go….a final note that You Can Add the New Stampin’ Cut & Emboss Machine to your Starter Kit! So you would be getting it , for under $99.00 !!
Additional Products: In addition to the regular starter kit (for $99.00, new recruits choose $125 -worth of products) new recruit will also receive enough cardstock pieces to make 16 cards, a pack of Rhinestone Basic Jewels, the So Much Love stamp set, and the Queen Anne’s Lace stamp set—all for their first event.
Granny Apple Green card pack contents
8-1/2″ x 5-1/2″ (21.6 x 14 cm) Granny Apple Green Cardstock
3″x 4″ (7.6 x 10.2 cm) Bermuda Bay Cardstock
3″x 4″ (7.6 x 10.2 cm) Coastal Cabana Cardstock
3/4″x 4″ (1.9 x 10.2 cm) Daffodil Delight Cardstock
5-3/4″ x 4-3/8″ (14.6 x 11.1 cm) Whisper White Envelope
Coastal Cabana card pack contents
2-1/4″ x 3-1/2″ (5.7 x 8.9 cm) Whisper White Cardstock
2-3/4″ x 4″ (7 x 10.2 cm) Daffodil Delight Cardstock
3″ x 4″ (7.6 x 10.2 cm) Bermuda Bay Cardstock
8-1/2 x 5-1/2″ (21.6 x 14 cm) Coastal Cabana Cardstock
5-3/4″ x 4-3/8″ (14.6 x 11.1 cm) Whisper White Envelope
HOST CODE
My September Host Code is GJUKJDFB Please use this code for orders under $150.00. I will have a small perk for those with orders over $50.00
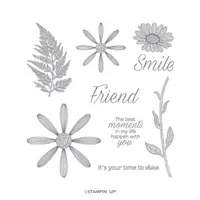
I want to share some sunshine here and make you all relax and hopefully Smile! So the next couple of posts are going to be along those lines. Today I have a daisy, which is simple flower that always makes me smile.
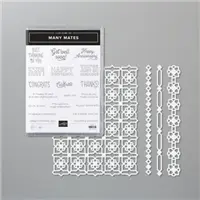
I have a mix of bundles for this card. The Daisy Lane stamp set debuted in a previous catalog as a bundle with the Medium Daisy Punch. Although they are no longer a bundle, they are both in the current catalog. The other is the Many Mates Bundle. It is the sentiment and the background for the daisies. The sentiments for this set are varied and a mix of fonts. The mixed fonts are always a favorite of mine.
I also used the Lovely Label Punch for the sentiment. I adore the two different shapes for the ends of the punch. In case you missed it. I did a tip in one of last weeks posts that shares how to get the equal distance on each end of your sentiment. Click HERE to go to that post. The tip is in the middle of the post.
For the daisies, I punched four daisies to make the two flowers. I fussy cut the small daisy and the fern. The fern was an experiment. I stamped it on Whisper White card stock, and to say it didn’t look good was mild. The white actually shined, in a bad way!! So I used my Light Shaded Spruce Stampin’ Blend and went over the entire leaf. I was happy with that. I was trying not to use another set of dies to get some greenery.
Thank you so much for stopping by today. I hope you will return tomorrow for another Smile project.
Now is a great time to join my Blue Line Stars Team. During June purchasing the Starter Kit, which is a fabulous deal any time, is an even better Bang For Your Buck. The regular cost of the Starter Kit is $99.00 and you receive $125.00 in products of your choice. For this month, you get to add one of the Bundles listed in the flyer below. It can be a Stamp/Punch Bundle, or a Stamp/Die Bundle. The most expensive one is a value of $60.25. And did I mention that shipping is FREE as well. If you have any questions, please do not hesitate to contact me.
HOST CODE
My June Host Code is WYRUJVGW. Please use this code for orders under $150.00. I will have a small perk for those with orders over $50.00
The content in this blog is the sole responsibility of Jackie Beers as an Independent Stampin' Up! Demonstrator. The use of and content of classes, services or products offered is not endorsed by Stampin' Up!