The card I am sharing today is a bright and cheery one. I cased a card I received from one of my downline for the layout. Thank You and shoutout to Deirdre Reilly.
I used the beautiful Pretty Perennial stamp set and pulled the colors from the DSP. The DSP is the Flower & Field Designer Series Paper is that is a FREE one from the Sale-A-Bration Catalog. I have more about that at the bottom of the post.
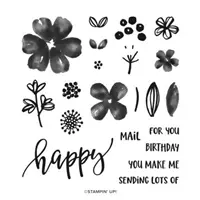
I love all of the flowers and leaves in this set which allows you to make your own flowers in whatever color you choose. As I said, I pulled colors from the DSP, and went on the bright side of the colors.
Probably my favorite part of this stamp set though is the “Happy”! I love that cursive writing. Plus it has a few different words that pair with the happy included in the set. I chose to use the “birthday”.
This is a great layout to use up scraps of DSP that if you are like me, you have plenty!! The base of the card is 4 1/4 X 5, and then the white layer is cut to 4 X 10 1/2 and folded in half. The DSP layer i used is 4 X 1 3/4 with a 4 X 1/2 strip for the birthday. However, you could make the DSP strip any size that fits your leftover pieces.
I made a second card using the same colors and layout. The main difference is that I did a black base card. Here is a look at that one.
I hope you have had a chance to look at the offerings in the Sale-A-Bration catalog. The choices are really pretty and the best part is that they are FREE with a qualifying purchase. I always recommend for people to save their end of year purchases until January – February so they get an added bonus. For every $50.00 of merchandise you purchase, you get to choose one of the SAB items at no charge. There are also $100.00 options. And with a $100.00 order, you can choose 2 of the $50.00 options or 1 of the $100.00 options. WooHoo!!
Thank you for stopping by today! I hope you will give this easy layout a try and use up some of your scraps of DSP. I hope you have a great rest of your day.
HOST CODE
My JANUARY Host Code is: AYRTRJCQ Please use this code for orders under $150.00. I will have a small perk for those with orders over $50.00
I saw a card made to look like a barn door for the donkey. I wanted a simpler version though. So I played with it and come up with a Fun Fold that would work for any type card. I used stamps and paper that make it so if you have it already in your mind…..then it might be a barn door!! LOL!!
I just adore this little guy, or gal. The facial expressions that Stampin’ Up! gives to the animal stamps are always so cute. As I said at the top of the post, I was looking for a simple barn door. I went to the In Good Taste Designer Series Paper for a wood piece.
I did not want this card to be very neutral looking or simply masculine. To that end, I chose Poppy Parade as the bright piece for this project. To pull out the gray in the wood, I added a layer of Smoky Slate Card Stock. It is one of my go to colors. It pairs so well with anything else.
Here is a look at the open card. And ignore the unfinished inside. I have not decided on the proper sentiment so have not added the white layer to write and stamp on.
I have the measurements and directions to share with you. I will definitely be making more cards using this fold.
Measurements and instructions:
Base layer is Poppy Parade cut 4 1/4 X 5 1/2
Door flap is Poppy Parade cut 2 3/4 X 5 1/2, scored at 1 1/4 on the 5 1/2 side
Fold on score line and adhere the 1 1/4 section to the left, bottom of the Base
Smoky Slate is cut to 4 1/8 X 5 1/8 and adhered over the base and the small section of the door
Cut another Smoky Slate layer at 4 1/8 X 2 5/8 to adhere to the front of the door flap
DSP is cut to 4 X 5 1/8, then cut it in half at 2 5/8 on the 5 1/8 side. The taller section adheres to the upper part of the card. The shorter section adheres to the door flap.
The inside lower, behind the door flap, is Whisper White cut to 2 1/2 X 4 (I do not have that in the photo)
The front donkey layers are:
Poppy Parade is 2 3/4 X 3 3/4
Smoky Slate is 2 5/8 X 3 5/8
White is 2 1/2 X 3 1/2
Thank you for stopping by today! I hope you had a fun weekend and were able to get some crafting time in.
Now is a great time to Join My Team. Any time is a good time…..but for this current promotion, during Sale-A-Bration, you will receive a free stack of our Regals, Subtles, Neutrals, Brights, and 2020—2022 In Color Designer Series Paper along with the Starter Kit! There couldn’t be a better time to join the Stampin’ Up! family. As always, the starter kit is $99.00 and you choose product of your choice in the amount of $125.00 + the special promotion (which is the paper listed above). I would love to talk with you about this if you are interested in getting a discount for your hobby or building your own business!
HOST CODE
My JANUARY Host Code is: AYRTRJCQ Please use this code for orders under $150.00. I will have a small perk for those with orders over $50.00
Yesterday I mentioned there were two upcoming berry / strawberry stamp sets coming. Today I am sharing the second of the two. This one is in the Upcoming Mini Catalog.
You may recognize the same background Designer Series paper from yesterday’s card. I do love this paper and the bright colors. It is the Sale-A-Bration DSP Berry Delightful.
My Mom loved anything strawberry! So when I saw this stamp set, Sweet Strawberry, in the upcoming Mini Catalog I knew I had to have it. The stamps and sentiments are wonderful. I especially like the matching punch. I believe I failed to mention that!
The punch has the little flower, strawberry, strawberry cap and a leaf. I used it for the strawberry and the cap. The background sprig is a stamp in the set.
I stamped the strawberry, which is a two step stamp, with Cherry Cobbler as the outline and the little seeds. I then filled it in with Real Red. The cap is stamped onto Granny Apple Green cardstock with Shaded Spruce Ink. For the bunch stamp, I stamped using Memento Tuxedo Black and then colored it using Stampin’ Blends.
The sentiment is part of the stamp set as well. I do love a complete stamp set that makes a one set card. I had room after adhering the three strawberries to add the sentiment in that upper right space. I finished the card with some bling. Rhinestones are the centers of the two flowers and also dot the “i” of the Birthday.
I have all of the supplies listed at the bottom of the page. However, the stamp set and DSP are not available as of yet, so I do not have the images for them.
Thank you very much for stopping by today. Please return tomorrow for another new card.
HOST CODE
My December Host Code is: 4QDB2ZYE Please use this code for orders under $150.00. I will have a small perk for those with orders over $50.00
I shared this card yesterday as an addition to the Blog Hop New Year’s Card. I do love how this one turned out, so I wanted to give you all of the fun details. I will not have the stamp and punch in the supplies though. They are not available to customers yet. So they are not in my file for supplies. Sorry!!
This card was for Brian King, my Stampin’ Up! upline. Yesterday was his birthday.
I almost did not get purchase the Handsomely Suited Bundle. Now I am so happy that I did. I had so much fun making this card. It is not overly bright, but it still makes me Smile!
There are two long tie images in the stamp set. I used them alternately to create the background. I started with a piece of DSP from the Peony Garden Designer Series Paper pack. Who would have thought??? I was originally looking for the gray paper in that pack. But when I saw this piece, I knew it would work and my card took a different turn.
To pull out the Terracotta Tile flecks in the paper, I stamped the ties in that color of ink. I then went looking for other DSP with that color in it. I have a lot of scraps of DSP, and that was perfect for this card. I found two pieces in the Play With Pattern 6X6 DSP pack. The polka dot paper that is behind the sentiment is one. And the bow ties are from the other piece. I thought the white background of the bow ties would brighten up the card.
The sentiment is from the stamp set. I love when you can make a full card from one stamp set! I don’t always do that, but love the possibilities. The background for the sentiment is another upcoming product, the Double Oval Punch. It is a Must Have!!!! I added the Smoky Slate layer to the back of the two ovals to tie in the base of the card and break up all of the Terracotta Tile. I used the Layering Ovals Dies and it matched perfectly with the punched ovals. WooHoo!!
This was a fun card to make and the layout is a very versatile one. I will be using this one again. Thank you for stopping by today. Please come back tomorrow for another new project!
HOST CODE
My December Host Code is: 4QDB2ZYE Please use this code for orders under $150.00. I will have a small perk for those with orders over $50.00
I love making cards with different folds. I believe it adds a bit of an extra to a simple card. So I have a birthday card with a fund fold to share today.
I am giving you a sneak peek of a few products from the upcoming January – June Mini Catalog with this card. It is another Wonderful Catalog!! As a Demonstrator, I was allowed to do my pre-order this morning. These products were part of our OnLine Conference order. Great perks for being a Demonstrtor!!!
The gorgeous DSP is named Fine Arts Designer Series Paper. The bold colors are what grabbed my attention immediately. The stamps and Dies are the Art Gallery Bundle. I used a technique that Shelli and Sara demonstrated at our OnLine event. They die cut different colors of the die I used and then pieced them together. I stamped the first one and die cut the Pretty Peacock. I left the Pretty Peacock in it’s entirety and cut up the one I stamped. It was easy to glue the flowers onto the solid piece.
Do you love the die of the Happy Birthday? That was one of the pieces that drew me to the set! There are two different sizes of that die.
This is a view of the inside, which gives you another view of the fold as well.
Here are the measurements for this Fun Fold.
Card base of Pretty Peacock cut 5 3/4 X 5 1/2, score at 1 1/2 on the 5 3/4 side.
First layers are Poppy Parade and are 4 1/8 X 5 3/8 and 1 3/8 X 5 3/8
DSP layers are 4 X 5 1/4 and 1 1/4 X 5 1/4
Focal Poppy Parade layer is 3 1/4 X 3 1/4
Whisper White Focal layer is 3 1/8 X 3 1/8
Inside layer is 3 X 3
Thank you for stopping in today! Please come back tomorrow for another new project.
HOST CODE
My December Host Code is 4QDB2ZYE Please use this code for orders under $150.00. I will have a small perk for those with orders over $50.00
I hope you have already taken advantage of the 24 Hour Extravaganza Sale! If you have not shopped yet, you can do so by clicking the button on my menu that is SHOP!!!!!
The card I have to share with you today includes items that are in the Annual Catalog and part of the sale.
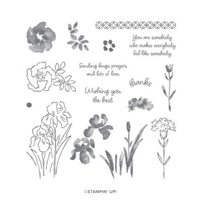
Actually, everything on this card is from the Annual Catalog! The stamp set is the Inspiring Iris set. It is such a great set for a lot of the cards I make. It gives you the ability to have a tall and narrow focal point. The flowers are all wonderful and can be Two Step stamped or Outline stamped and colored as I have done today.
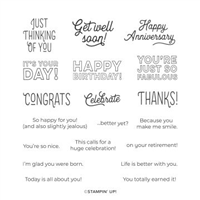
The sentiment is from the Itty Bitty Birtday stamp set. I could not get by without all of the “Itty Bitty” stamp sets. There are three different ones.
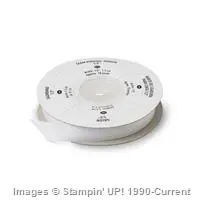
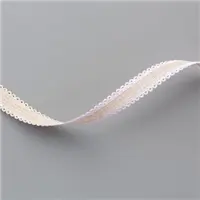
The base of the card is Purple Posy card stock and it is paired with a purple from the Play With Pattern Designer Series Paper. The flower layer is adhered with Stampin’ Dimensionals placed only on the left side. Prior to adding the front DSP layer, I wrapped the Purple Posy Scalloped Linen Ribbon around the layer. I made the bow separately and added it with glue dots. The finishing touch is a few Pearls on the flowers.
Here is a view of the inside:
I added a regular size piece of Whisper White card stock to the inside, and added a matching strip of the DSP. Actually, the front DSP is cut to full size, and then divided for the front section and the inside. This way the pattern matches.
Measurements:
Base card is Purple Posy cut 4 1/4 X 9 1/4, scored at 3 3/4
Inside Whisper White is 4 X 5 1/4
DSP is 5 3/4 x 3 3/4, cut to 3 1/4 X 3 3/4 and 1 1/2 X 3 3/4. The larger is the front and smaller is the right side of the inside.
Flower layers are 2 3/4 X 3 5/8 of Highland Heather and 2 3/8 X 3 1/4 of Whisper White
Thank you for stopping by today. As I said above, all of the items I used on this card are included in the sale if you have not placed your order yet. And if your order is under $150.00, I would appreciate you using my host code. It is above the supply list further down, or if you are on a tablet or computer it is also on the right hand side of the post.
HOST CODE
My November Host Code is: 7C63XEUQ Please use this code for orders under $150.00. I will have a small perk for those with orders over $50.00
The content in this blog is the sole responsibility of Jackie Beers as an Independent Stampin' Up! Demonstrator. The use of and content of classes, services or products offered is not endorsed by Stampin' Up!