Today’s project is a gift card holder. The Fun Fold inside is a way to make any card a Gift Card holder. What a fun idea!!
Stamps
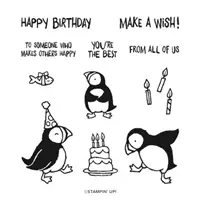
The fun stamp set with the name of Party Puffins is exactly what the name implies. They are really party animals. And I love them!! At first glance I thought they may be more for younger recipients. But the more I play with them, I now know they are perfect for anyone. And they bring a Smile to my face!
All of the stamps I used are from the one stamp set. Here is the inside of the card.
Inside Fun Fold
I cased the inside fold from Dawn Griffith. It is really simple to do and makes such a Wow for your card. The “fold” is a piece of 4 1/4 X 11. (It looks much smaller because the card itself is a regular 5 1/2 X 8 1/2 folded in half) Fold and score the White piece at 5 1/2. Then fold each end back on itself and score. This gives you the accordion fold. You want the mountain to be in the center. For the gift card slot, mark 2″ up from the bottom of the right end and then cut from the mark to the score line.
Finishing Card
Adhere the folded piece to the inside by having it in the accordion fold, apply adhesive to the left end piece. Place it evenly spaced , top to bottom, and with a narrow border on the end of the inside front of the card. Lay it down and then close the back of the card over the folded piece. Open the card and apply glue to the angle cut end, but only the bottom and the short side. Do the same alignment and close the front of the card over it to adhere.
The inside panels are 2 1/4 X 3 1/2 (3) and 2 X 3 1/4 (3). Be sure to adhere the panels prior to adding the accordion fold to the inside of the card. It is Much Easier to do the panels first. Ask me how I know this 🙂 LOL!!
Thank you for visiting today! If you have any questions about today’s card or any products, please reach out to me. I would love to assist you.
HOST CODE
My November Host Code is M4GF9KZ7. Please use this code for orders under $150.00. I will have a small gift for those with orders over $50.00 in addition to the Perk Rewards Program. You can read all of the information at the top of the page in the Menu Bar under SHOP / Perks.
Thank you for stopping by today. I hope you enjoyed today’s project and will come back. I do read and reply to all of the comments individually. They mean a lot to me. Please reach out if you have a question.
The project I have to share today is a quick birthday card starring the Artistically Inked stamps and Designer Series Paper. You cannot go wrong with these two products.
Paper
The paper, or rather the Designer Series Paper, is the star of this card. Expressions In Ink DSP has been very popular since it debuted in June. The sheets I chose for this project have not been used quite as much as the ones with the gold veining. I wanted a softer look for this card and these two pieces of paper deliver there. Of course the base card of Pale Papaya with a layer of Pear Pizzaz, came directly from this beautiful DSP.
I also added a strip from a second sheet of the DSP and made the green, veined banner. Never throw away scraps of DSP! And I could not stop there so I added the smaller gold striped piece. I love how all of these sheets coordinate beautifully.
Stamp Sets
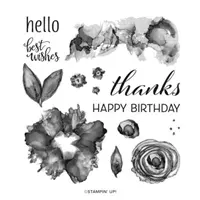
To follow up on the Expressions paper, I used the matching Artistically Inked stamp set for the sweet flower in the focal layer. The same colors were used to stamp the flower and leaves as the card base and layer. I searched for a small and pretty font for the Happy Birthday. It was found in the Timeless Tulip stamp set. This sentiment fits perfectly in the Layering Circles flower.
For a finishing touch, I added some of the 2021-2023 In Color Jewels. There are three of them scattered around the sentiment and the smaller DSP pieces. I do love having some bling on my cards.
HOST CODE
My October Host Code is HSUBS7GX. Please use this code for orders under $150.00. I will have a small gift for those with orders over $50.00 in addition to the Perk Rewards Program. You can read all of the information at the top of the page in the Menu Bar under SHOP / Perks.
Thank you for stopping by today. I hope you enjoyed today’s project and will come back. I do read and reply to all of the comments individually. They mean a lot to me. Please reach out if you have a question.
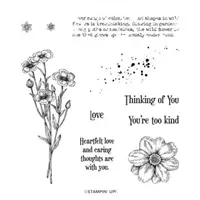
Flowers are always a good basis for a birthday card since generally something is blooming year round. I have chosen the Quiet Meadow stamp set for an easy birthday card to share with you today.
Paper
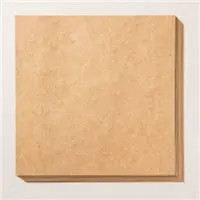
I am beginning in reverse order today since I mentioned the stamp set in the introduction. The Kraft Paper, which is in the Mini Catalog, is one I have not stamped on previous to this card. It is a bit thicker than our regular paper. However, it is wonderful to stamp on. And it does not overly absorb the ink to give a smeared or watery look. I have definitely waited too long to use this paper!!
Colors
I wanted bolder colors to pair with the Kraft paper instead of more subdued or masculine ones. You cannot get much bolder than Rich Razzleberry! And then I added Basic Black as the layer. This really helped the colors to separate. The background stamping is done with Sahara Sand for a more subtle look. Of course I had to use Memento Tuxedo Black for the flowers for them to stand out. And they are colored with Highland Heather Stampin’ Blends. I tested on scrap and the Rich Razzleberry became way too dark on the Kraft paper. So make note of this.
Stamps
All of the stamps I used, with the exception of the sentiment are from the Quiet Meadow stamp set. I love the background stamps for a softer collage look. And for me to not use a Designer Series Paper is amazing! I simply made my own paper. The sentiment is a simple one and it took me a few minutes to find one. It needed to fit the Double Oval Punch. I found it in the Peaceful Moments stamp set.
Finishing Touches
To finish this card I went with Linen Thread. That is a regular Go To for me. It is great to work with. I wrapped it around the card three times and then tied a three strand bow. As I said above, the sentiment is finished by using the Double Oval Punch. And the final touch is a single of the Elegant Gems placed next to the Happy Birthday.
HOST CODE
My October Host Code is HSUBS7GX. Please use this code for orders under $150.00. I will have a small gift for those with orders over $50.00 in addition to the Perk Rewards Program. You can read all of the information at the top of the page in the Menu Bar under SHOP / Perks.
Thank you for stopping by today. I hope you enjoyed today’s project and will come back. I do read and reply to all of the comments individually. They mean a lot to me. Please reach out if you have a question.
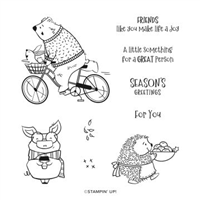
I made today’s card for a friend’s birthday card. The whimsical nature of the animals are just so darn cute! All of the animals in this Joyful LIfe stamp set are adorable. And there are great sentiments as well.
Stamps
I mentioned at the top of the page that this image is from the Joyful Life stamp set. This set is so much fun! Where else would you find a bear riding a bicycle with a bunny in the basket? The look of the blowing leaves is just an added bonus.
And the sentiments in this set fit each image as well. If this sentiment looks familiar to you, I used it on the card I shared with you Monday. You can see that card HERE. The sentiment almost has a more holiday feel to it on Monday’s card. An excellent sentiment and so wonderful that it can be used for a variety of reasons!
Paper and Color
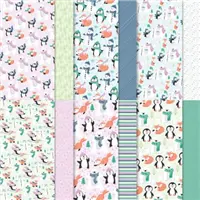
The DSP used here is from Sale-A-Bration and from the Penguin Playmates Designer Series Paper. This is my favorite sheet from that pack. I love all of the colors. My friend’s favorite color is purple. So this paper fit perfectly and allowed me to add it again in the bear’s sweater.
The finishing touch is more of the purple. I used the Highland Heather Grosgrain Ribbon. This ribbon is so pretty. There is a bit of a silver like sparkle to it. For the finishing touch, I punched the sentiment using the Double Oval Punch. This is the larger of the two ovals on the one punch. Of course it had to have a tiny bit of bling. The rhinestone is a 2021-2023 In Color Jewel. So it is the Freesia Rhinestone!
The 2nd Sale-A-Bration Is Almost Over……
Time runs out tonight for you to choose any of the SAB items you have on your list.
Join My Team Promotion During Sale-A-Bration!!
HOST CODE
My September Host Code is NWZNBFH2. Please use this code for orders under $150.00. I will have a small gift for those with orders over $50.00 in addition to the Perk Rewards Program. You can read all of the information at the top of the page in the Menu Bar under SHOP / Perks.
Thank you for stopping by today. I hope you enjoyed today’s project and will come back. I do read and reply to all of the comments individually. They mean a lot to me. Please reach out if you have a question.
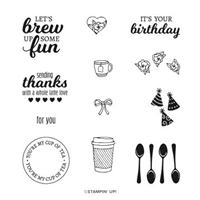
Today is the birthday of a friend. She pretty much only drinks coffee, so I felt the need to break out the Brew Some Fun stamp set for her card.
Stamps
I gave away the stamp set in the beginning of the post. It is the Brew Some Fun set. It has tea and coffee in both images and sentiments. I went with a pair of coffee cups sort of toasting each other. The party hats are included in the set as well. For the sentiment I went with the normal birthday on the front. But the inside says “Let’s Brew Some Fun”.
Paper and Fun
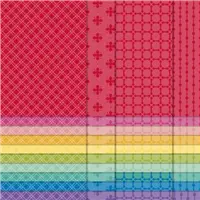
The strip of DSP on the right hand side is from the fun Sale-A-Bration paper Penguin Playmates Designer Series Paper. This paper is going to be missed after these last few days of SAB. It has great colors and a little of everything in images so it is very versatile. These stripes are some of my favorite. They are placed horizontal so that you could see all of th different colors.
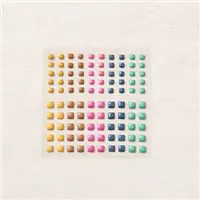
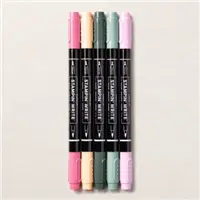
Of course the card base and layer colors were pulled from the DSP. The card base is Misty Moonlight and Fresh Freesia is the layer. I went with the brighter Magenta Madness on the cups, as well as around the sentiment. A few days ago I shared how I pull the Marker around the edge of a shape to give that outline. Instead of another layer, I used that technique on the sentiment layer. (Markers, with the exception of the Basic Black, can only be purchased in the Color Family. But these are all In Colors, so not as much of an expense!) The finishing touch is a 2020-2022 In Color Gem in Magenta Madness.
The 2nd Sale-A-Bration Is Winding Down
The Penguin Playmates Designer Series Paper is still available. It is a great choice from the SAB options. Not only is is beautiful DSP, but it pairs wiht the Penguin stamp set and punch in the Mini Catalog. There are only 6 days left to take advantage of this promotion.
Join My Team Promotion During Sale-A-Bration!!
HOST CODE
My September Host Code is NWZNBFH2. Please use this code for orders under $150.00. I will have a small gift for those with orders over $50.00 in addition to the Perk Rewards Program. You can read all of the information at the top of the page in the Menu Bar under SHOP / Perks.
Thank you for stopping by today. I hope you enjoyed today’s project and will come back. I do read and reply to all of the comments individually. They mean a lot to me. Please reach out if you have a question.
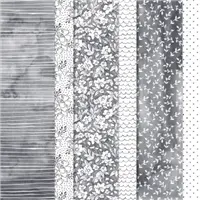
Sale-A-Bration is winding down for the 2021 year. It ends on September 30th! There are still some great products available and one of them is the Beautifully Penned Designer Series Paper. It is a black and white paper that offers great potential. My card for today is made showcasing a piece of this paper. Actually the card is all about the paper!
Paper
The Beautifully Penned Designer Series Paper has different Black and White patterns on all of the sheets. However this is one of my favorites. It allows me to color one or all of the flowers. I opted to color them all. I used the Fresh Freesia Stampin’ Blends along with the Just Jade Stampin’ Blends for the flowers and leaves.
My layers to pair with the gorgeous paper are Just Jade as the base card and a layer of Basic Black. This is my version of a fairly clean looking card. For me, clean means not a lot of layers on the front. So I succeeded with my definition here.
Stamps and Punches
The sentiment for this card is from the Pansy Patch stamp set. I needed a fairly small, but pretty, Happy Birthday. This one fit the bill perfectly. It is punched using the Label Me Fancy Punch. In addition to the unique shape of this punch, it also has a small ribbon hole as well as the slide I used. And I do have to say this is the first time I have used the slide. I love it!! It was very quick and easy to do in terms of lining it up.
Finishing Touches
With the addition of the slide from the punch, it allowed a different way of attaching the sentiment layer. I used the Fresh Freesia Open Weave Ribbon. This ribbon is so easy to work with, and is so soft and pretty. For the final touch it was pretty much a given that it needed a rhinestone.
The 2nd Sale-A-Bration Is Here!!
Join My Team Promotion During Sale-A-Bration!!
HOST CODE
My September Host Code is NWZNBFH2. Please use this code for orders under $150.00. I will have a small gift for those with orders over $50.00 in addition to the Perk Rewards Program. You can read all of the information at the top of the page in the Menu Bar under SHOP / Perks.
Thank you for stopping by today. I hope you enjoyed today’s project and will come back. I do read and reply to all of the comments individually. They mean a lot to me. Please reach out if you have a question.
The content in this blog is the sole responsibility of Jackie Beers as an Independent Stampin' Up! Demonstrator. The use of and content of classes, services or products offered is not endorsed by Stampin' Up!