Today’s card is a Winter card instead of a Christmas one. The weather has turned colder even here in the South. It is now sweater weather and the paper used reminds me of a sweater pattern. Additionally this card is for the Make My Monday Challenge and that is for a Winter card.
Everyone is welcome to join in on the Make My Monday Challenges. Simply click on the icon and you will see all of the design team cards. And you can add your own version of the current challenge.
Paper
My idea for the Winter card came from the piece of DSP. It is from the Storybook Gnomes Designer Series Paper. This pattern is a sweater pattern to me. This soft blue is different than all of the Christmas cards I have been making. But also is the color of cold ! This lead to an almost monochromatic card.
Stamps
After deciding on paper I went looking for a stamp to match. I immediately thought of the All Bundled Up stamp set where the sweet critters are all wearing scarves. By using the sweet little cardinal, it allows a lot more of the DSP to shine. The cardinal is stamped and colored with Stampin’ Blends. And to add some additional stamping, I added the snowflakes as well as a bit of “snow” on the ground. A few squiggles of Balmy Blue Stampin’ Blend is all it took.
Finishes
To complete my warm sweater card, I added one of the Wonderful Snowflakes to the mix. The iridescent shine is perfect. And just a few of the Fine Sparkle Gems scattered around completed the card. Even though I put more than an odd number of them. I can never get that correct 🙂
Clearance Rack Refresh and Last Chance Products……..
HOST CODE
My December Host Code is Y7T7EMTC. Please use this code for orders under $150.00. I will have a small gift for those with orders over $50.00 in addition to the Perk Rewards Program. You can read all of the information at the top of the page in the Menu Bar under SHOP / Perks.
Thank you for stopping by today. I hope you enjoyed today’s project and will come back. I do read and reply to all of the comments individually. They mean a lot to me. Please reach out if you have a question.
I hope you have taken advantage of the Clearance Rack Refresh as well as the Last Chance Sale for the Mini Catalog. There are some amazing deals in both places.
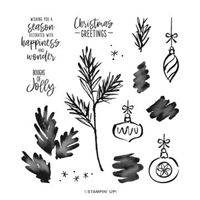
My project today is a package of Gift Tags, or Random Act of Kindness cards, using one of the Retiring products. It is the Decorated With Happiness set. This is a wonderful Bundle, and one that is less expensive purchased separately with the sale pricing.
Stamps
All of the stamps used on this project are from the Decorated With Happiness set. There are matching dies as I mentioned at the top of the post. However, I wanted to keep this as flat as possible. The bough is stamped and then the shadow stamped added. As is the two ornaments. For the sentiment I used the Layering Circles Dies and then turned it into the look of an ornament. To do that I drew a straight line for the hanger using the Sweet Sorbet Stampin’ Write Marker. And to finish that look I tied a bow using the In Color Baker’s Twine in Sweet Sorbet and White.
Cards
The 3 X 3 cards are made the same way as the front of the gift holder. Here is a view of one of those. They do not have the added layers of the sentiment though. I made a few with different ornaments but all done the same way. They each received a Festive Pearl in the center of the ornament for a touch of bling.
Directions for Card Holder
The front stamped layer is 4 X 3 3/4 to begin with. After doing the stamping I cut 1 1/8 off the top to fit over the flap. When adhering this layer, place the bottom section first and allow equal measures on the bottom and sides. Do this with the holder closed and the bottom section you are adhering will be flush against the bottom of the flap. Then add the top piece with it being flush with the bottom of the flap and equal on sides and top.
Here is an open view of the card holder.
This is a very simple card holder. It is another oldy but goody that I found when looking for something! That seems to happen fairly often. The holder begins with a piece of Garden Green card stock cut to 4 1/4 X 11. It is then scored at 1 1/4, 5 1/4, 6 1/4, and 7 1/4. Fold and burnish the score lines to create the mountain in the center .
For a closure, I used clear velcro dots. They were added after the front layer is adhered. You may have your own method for adding these. But I add the one under the flap first. I can place it towards the bottom of the flap and then with the second half attached simply close the flap on to the closed box. This ensures perfect placement.
I included 4 cards and envelopes and there is plenty of room.
HOST CODE
My December Host Code is Y7T7EMTC. Please use this code for orders under $150.00. I will have a small gift for those with orders over $50.00 in addition to the Perk Rewards Program. You can read all of the information at the top of the page in the Menu Bar under SHOP / Perks.
Thank you for stopping by today. I hope you enjoyed today’s project and will come back. I do read and reply to all of the comments individually. They mean a lot to me. Please reach out if you have a question.
The Last Chance and Carry Over Lists are below. There are some awesome deals on the Last Chance List with up to 60% off. So be sure and check prices for a Bundle. It may be quite a bit less to purchase the stamps and dies separately than as a bundle. Get the most bang for your buck! And please use my Host code, Y7T7EMTC if your order is less than 150.00! Reminder that these products are while supplies last!
HOST CODE
My December Host Code is Y7T7EMTC. Please use this code for orders under $150.00. I will have a small gift for those with orders over $50.00 in addition to the Perk Rewards Program. You can read all of the information at the top of the page in the Menu Bar under SHOP / Perks.
Thank you for stopping by today. I hope you enjoyed today’s project and will come back. I do read and reply to all of the comments individually. They mean a lot to me. Please reach out if you have a question.
I wanted to drop back into your mailbox to share the Last Chance List and the Carryover List for the current Mini Catalog. The sale goes LIVE on December 1st!
The Carryover list is first. It is a single page as shown. For the Last Chance list, click on the picture and you will get a complete PDF of the multiple pages. There are some great deals with half price items even!
Please remember that with a $50.00 qualifying order you receive my Blue Star Awards. All you have to do is use the Host Code
Birthday Organizer Kit
DETAILS
Kit includes one 8″ x 10″ (20.3 x 25.4 cm) monthly planner with space to record birthdays each month as well as a pocket sleeve to hold birthday cards.
Includes 12 full-size birthday cards, 6 of 2 designs, and 12 coordinating envelopes.
Includes Glue Dots, Stampin’ Dimensionals, Adhesive-Backed Embellishments, and Tear & Tape Adhesive
Includes die-cut florals and pieces ready for you to use—no prep work required!
Includes sticker sentiments and die-cut labels in Dutch, English, French, and German
My November Host Code is XUE6MDFV. Please use this code for orders under $150.00. I will have a small gift for those with orders over $50.00 in addition to the Perk Rewards Program. You can read all of the information at the top of the page in the Menu Bar under SHOP / Perks.
Thank you for stopping by today. I hope you enjoyed today’s project and will come back. I do read and reply to all of the comments individually. They mean a lot to me. Please reach out if you have a question.
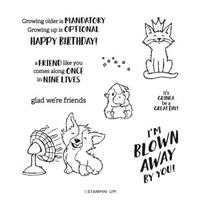
Today I have stepped away from Holidays and back to every day life. For me that means Birthday cards for friends. These are always needed and are my favorite to make. Plus this one is a quick one.
Stamp Set
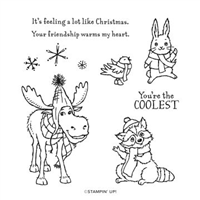
The “critter” stamps are the ones I am first drawn to. This one is the Glad We’re Friends set. I think the little animals are so cute. And since this recipient is a cat person, and we all know cats are King, this was an easy choice. Making the cat the focal point was also an easy choice because they are always the focal point. At least in their minds! So the cat is stamped and colored with Smoky Slate Stampin’ Blends. For the crown I went with Daffodil Delight Stampin’ Blends.
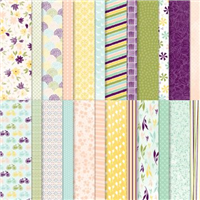
Paper
These two DSP pieces are from the Host pack Design A Daydream Designer Series paper. These are extra thick packs of DSP with several of each pattern. That makes them wonderful for creating multiples of a card. I actually chose these papers to compliment each other and they were chosen first. Then the card base color came next. And instead of black from the stripes, I substituted the gray. It was a simple and quick process.
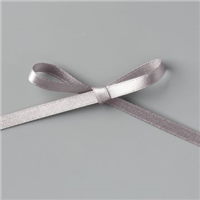
Finish
I left the front of the card pretty clean since the paper is fairly loud. And of course the cat is sitting proudly as the star. So to do a simple finish I went with a simple strip of ribbon and bow. This is the Gray Granite ribbon and is beautiful. It adds some glam to the King Cat with the shimmer it has.
Birthday Organizer Kit
DETAILS
Kit includes one 8″ x 10″ (20.3 x 25.4 cm) monthly planner with space to record birthdays each month as well as a pocket sleeve to hold birthday cards.
Includes 12 full-size birthday cards, 6 of 2 designs, and 12 coordinating envelopes.
Includes Glue Dots, Stampin’ Dimensionals, Adhesive-Backed Embellishments, and Tear & Tape Adhesive
Includes die-cut florals and pieces ready for you to use—no prep work required!
Includes sticker sentiments and die-cut labels in Dutch, English, French, and German
My November Host Code is XUE6MDFV. Please use this code for orders under $150.00. I will have a small gift for those with orders over $50.00 in addition to the Perk Rewards Program. You can read all of the information at the top of the page in the Menu Bar under SHOP / Perks.
Thank you for stopping by today. I hope you enjoyed today’s project and will come back. I do read and reply to all of the comments individually. They mean a lot to me. Please reach out if you have a question.
I have a fun and simple card for you today. It stars the Trees For Sale stamp set. The set is a sleeper in the Mini Catalog. However, I think it is such a Fun Set!
Background
The background is not the star of the show, but I have to begin there. You may recognize that shape around the trees. It is made using the negative from yesterday’s card. I used that scalloped Layering Circles negative with Pool Party Ink and a Blending Brush to create it. The trees were stamped while the negative was still in place to allow one to be only partially in the picture. Hopefully you will now look at your die cut negatives with added interest!
Stamps
This stamp set is named Trees For Sale, and that is the scene I created. The trees are stamped using Old Olive Ink. Then the detail stamp is added using Garden Green Ink. It may be a bit on the contrast side, but I like the bolder look.
To finish I added the garland of lights at the top. Tree lots have Christmas lights around their space for cheer and light. Since the set is Photopolymer, I was able to bend the strand of lights to fit. It was not quite long enough to reach side to side. For an added touch, I added different colors of Festive Pearls as the “light bulbs”. To finish that scene, I stamped the Trees For Sale sign and then fussy cut it. It is placed partially outside of the circle and raised to stand out even more.
Birthday Organizer Kit
DETAILS
Kit includes one 8″ x 10″ (20.3 x 25.4 cm) monthly planner with space to record birthdays each month as well as a pocket sleeve to hold birthday cards.
Includes 12 full-size birthday cards, 6 of 2 designs, and 12 coordinating envelopes.
Includes Glue Dots, Stampin’ Dimensionals, Adhesive-Backed Embellishments, and Tear & Tape Adhesive
Includes die-cut florals and pieces ready for you to use—no prep work required!
Includes sticker sentiments and die-cut labels in Dutch, English, French, and German
My November Host Code is XUE6MDFV. Please use this code for orders under $150.00. I will have a small gift for those with orders over $50.00 in addition to the Perk Rewards Program. You can read all of the information at the top of the page in the Menu Bar under SHOP / Perks.
Thank you for stopping by today. I hope you enjoyed today’s project and will come back. I do read and reply to all of the comments individually. They mean a lot to me. Please reach out if you have a question.
The content in this blog is the sole responsibility of Jackie Beers as an Independent Stampin' Up! Demonstrator. The use of and content of classes, services or products offered is not endorsed by Stampin' Up!