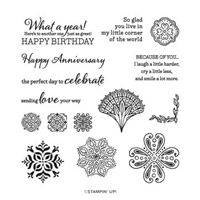
Graceful Tiles is one of the HIdden Gems from the Annual Catalog. And now it is retiring. When I first saw it I loved the look but wasn’t sure how to use it. Today’s project is a Fun way to use the fan looking stamp. And all of the retiring products are still available!!
Stamps
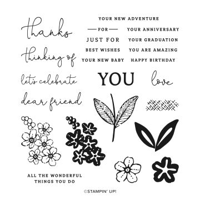
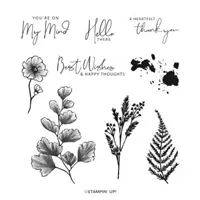
The lovely Graceful Tiles stamp set is a wonderful mix of images and some really nice sentiments. The sentiments have a mix of fonts, which is something I always love. I have only one of the images here. It is the beautiful fan looking one. On a scrap of paper I was playing around to see what I could build. And I discovered this flower looking one.
To create this look, I stamped the fan shape once. Next I turned and stamped it again directly across from the first with the pointed end just barely overlapping. Then I did one on each side the same way. And I love the final look. It has one of those kaleidoscope looks to it. I am dating myself with those tubes we would look through and turn the end to see all of the shapes. LOL!!!
The sentiment is one of those mixed font ones that I mentioned. This is a great one for many occasions. And since the image is pretty neutral as well, they pair perfectly together.
Papers
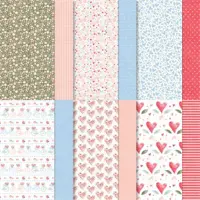
The papers used were the starting point of the card regarding color. I have always loved the Textured Chic Designer Series Paper. And am really sad for it to retire. But I know it has to happen. This dotted piece with a muted background is one that was not really used much. So it became my starting point.
The Blushing Bride card stock and Ink are not really in the papers. It is supposed to be Petal Pink. But I liked the softer shade of Blushing Bride. And it still works with the DSP. Of course having the thin layer of Basic White between the base and DSP helps to smooth out any color differences. Plus it helps the paper pop more.
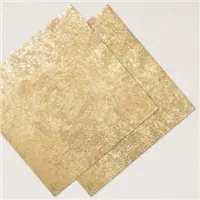
To bring out the gold dots in the DSP I wanted a touch more gold in the card. I found this with the Distressed Gold Specialty Designer Series Paper. This is a great gold to use because it is not the foil so it doesn’t get scratches or dents in it. (Note: It is the only thing used that is carrying over, besides the Basic White of course, but it is on low inventory right now.) As a final touch of gold, I added one of the Pastel Sequins, a gold one, to the center of the kaleidoscope feature.
Thank you for stopping in today!!!
RETIRING LISTS. CLICK ON THE ICON TO GET THE FULL PDF.
Online exclusives are here to stay! Click on the photo and be taken directly to them in my online store. If you place an order, please use my Host Code listed just below.
HOST CODE
My APRIL Host Code is ZE6UJ4TF. Please use this code for orders under $150.00. I will have a small gift for those with orders over $50.00 in addition to the Perk Rewards Program. You can read all of the information at the top of the page in the Menu Bar under SHOP / Perks.
Thank you for stopping by today. I hope you enjoyed today’s project and will come back. I do read and reply to all of the comments individually. They mean a lot to me. Please reach out if you have a question.
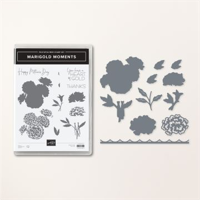
I hope you are enjoying the Last Chance Items. Some are almost gone because of the great discounts. Today’s project uses a few of them. It is the Marigold Moments Bundle, the Pretty Prints Designer Series Paper, and the Stitched Rectangles Dies.
Stamp and Die Bundle
I am writing this on Tuesday morning as the sale prices go live. So I hope these products are still available. Wanting to showcase some products that are retiring may bit me! But….if you already have the products then you have a new idea for them. Hopefully both are viable options.
The Bundle showcased here is the Marigold Moments Bundle from the Mini Catalog. I stamped the flowers, which are a two step process, using Rich Razzleberry Ink for the solid color. Then added the detailed stamp using Merry Merlot. I was pleasantly shocked and awed at how well these two colors layered with each other. If you have this set, or purchase it, try mixing unexpected colors and see what surprising and wonderful results you achieve.
The greenery was stamped using Evening Evergreen Ink and die cut. I used Stampin’ Dimensionals to raise the flowers but adhered the leaves to the background.
Extra Stamps and Dies
For the great stitched background for the flowers, I used the Stitched Rectangles Dies. They are on the retiring list also, but are discounted. The stitching shows very well on the White card stock and is a bright background for the darker flowers.
The simple one word sentiment is from the Sentimental Park stamp set. Thankfully this wonderful set is carrying over. So no worries there! It is stamped with Merry Merlot ink directly onto the White layer. These great flowers did not need anything large on the front with them.
Papers and Embellishments
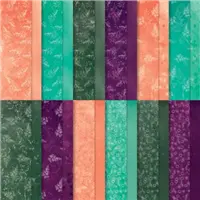
The gorgeous mix of Merry Merlot and Rich Razzleberry, with a touch of Blackberry Bliss, results in this DSP. This sheet is from the Pretty Prints Designer Series Paper. Sadly it also is retiring. All of the DSP, or almost all, retires at the end of a catalog period. This one is simply beautiful and fit these flowers perfectly. And of course the other colors came from the paper. My card base is Rich Razzleberry with the layer of White to help differentiate between the base and the DSP. That thin layer gives a little pop to the light spots in the DSP.
To complete this card I debated on a few embellishments. After looking it over, I really noticed how the white popped between the base and DSP as I mentioned above. So to play with that idea I added a single Pearl to the larger front flower. That is very minimal on embellishments for me but I like it. And I hope you do as well.
Thank you for stopping by today!!
RETIRING LISTS. CLICK ON THE ICON TO GET THE FULL PDF.
Online exclusives are here to stay! Click on the photo and be taken directly to them in my online store. If you place an order, please use my Host Code listed just below.
HOST CODE
My APRIL Host Code is ZE6UJ4TF. Please use this code for orders under $150.00. I will have a small gift for those with orders over $50.00 in addition to the Perk Rewards Program. You can read all of the information at the top of the page in the Menu Bar under SHOP / Perks.
Thank you for stopping by today. I hope you enjoyed today’s project and will come back. I do read and reply to all of the comments individually. They mean a lot to me. Please reach out if you have a question.
Before I get into today’s project, a quick reminder that the Discounted Prices on the Last Chance Lists are now in effect! Woohoo!!!!
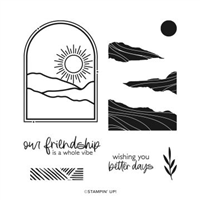
My project for today is a mix of New and Retiring products. I believe you will love the New aspect as it is a very different look. These are the Radiating Stitched Dies from the Online Exclusives.
Dies
Here is a larger view of the Radiating Stitched Dies. The radiating lines really add some definition to the layer. These are one of the Online Exclusives only available in the Online Store and not in a catalog. Sadly they have just been marked Currently Unavailable.
This leads me to a Tip for you.!! When and item in the Online Store shows Currently Unavailable, it means it will restock. If an item simply disappears from the online store, then it is gone for good. So these beauties will return! As of today it shows May 8 as the expected return date.
Stamps
One of the reasons for me making this card was to showcase the Better Days stamp set. This gorgeous layered look scene is so pretty. The window, sun, and mountain layers are all in the set. You could do cut paper or use the stamps in different colors as I did. Being photopolymer the layers are very easy to line up in the window.
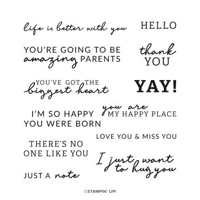
The sentiment is from the Happy Labels stamp set. This one is carrying over to the New Annual Catalog thankfully. I love the sentiments in this set. And this one fits my feelings regarding the mountains perfectly!
Colors
This card was made over the weekend and I had just returned from North Carolina Mountains. And had actually taken a photo very similar to this view. That was my inspiration for the colors. The Balmy Blue and Blushing Bride were the sky colors. I used Shaded Spruce, Old Olive, and Smoky Slate for the layers of mountains. Then to be a bit different, I used a Blender Pen with Balmy Blue, Blushing Bride, and Pool Party Inks to randomly color the sky.
Thank you for stopping by today!!!
RETIRING LISTS. CLICK ON THE ICON TO GET THE FULL PDF.
Online exclusives are here to stay! Click on the photo and be taken directly to them in my online store. If you place an order, please use my Host Code listed just below.
HOST CODE
My APRIL Host Code is ZE6UJ4TF. Please use this code for orders under $150.00. I will have a small gift for those with orders over $50.00 in addition to the Perk Rewards Program. You can read all of the information at the top of the page in the Menu Bar under SHOP / Perks.
Thank you for stopping by today. I hope you enjoyed today’s project and will come back. I do read and reply to all of the comments individually. They mean a lot to me. Please reach out if you have a question.
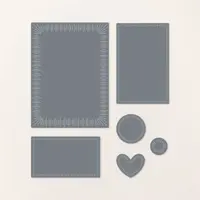
Today’s card is a fun and different use of Dies. The Basic Borders Dies makes a fun edging, and in this case center, for a card. And best of all it is really quick and easy to do.
Dies
The fun little details down the center of the card are made using the Basic Borders Dies. It is usual to see these cute Dies used on an edge or as a layer, but this is a fun and fairly new way to use them. The best part is that when these Dies cut the paper the same design is on both edges. In this case it almost looks like a tear in fabric. I could see it being used as a path also. Achieving a different look from the norm is always a good thing.
Papers
The DSP is from the Country Floral Lane Designer Series Paper. It is always sad when a catalog closes and we lose all of the beautiful paper. Of course I look forward to what new papers are coming. But this has been a package I found worked easily with so many stamp sets. Both of these pieces are from the Country Floral Lane.
To choose the card base and layer was so easy with the DSP. I went with soft colors and chose Mint Macaron for the card base and Balmy Blue for the Heart. Both they and the Ribbon of Petal Pink come from the papers.
Stamp and Punch
To emphasize the hearts in the DSP, I opted to use the larger of the Heart Punch Pack and the scalloped heart for my sentiment layer. The sweet sentiment comes from the Nature’s Print stamp set. All of the hearts seemed appropriate for the “Heartfelt” thank you!
Embellishments
The heart needed something to hold on to since the only thing on the front of the card was the paper. So I added a strip of the Petal Pink Soft Polyester Ribbon. A simple knot was all it needed as a finish. The final touch for the heart was to add one of the Heart Pearls. I love these adorable hearts. You cannot have too many of those. But I stuck with only one as a highlight.
Directions for Die Cut
To place the DSP on the front of the card I began with a piece of the blue and white DSP cut to 3 X 5 1/4. Using the Basic Borders Die I placed the die down the center and die cut. Beginning with a piece of Basic White cut 4 X 5 1/4, place the second piece of DSP, the pink one, to the center of the White. It is cut 2 1/4 X 5 1/4. Adhere it flush with the top and bottom. Next adhere the two other pieces on each side. They will be flush with left or right edge and top and bottom. I added a bit of glue towards the center but left the center edges loose for a 3D look.
RETIRING LISTS. CLICK ON THE ICON TO GET THE FULL PDF.
Online Exclusives are here to stay….. Click on the photo to be takendirectly to them in my Online Store.
HOST CODE
My APRIL Host Code is ZE6UJ4TF. Please use this code for orders under $150.00. I will have a small gift for those with orders over $50.00 in addition to the Perk Rewards Program. You can read all of the information at the top of the page in the Menu Bar under SHOP / Perks.
Thank you for stopping by today. I hope you enjoyed today’s project and will come back. I do read and reply to all of the comments individually. They mean a lot to me. Please reach out if you have a question.
Stampin’ Up! has released the retiring and last chance lists. They are both shown below. Click on each photo to get a PDF of each. There are multiple pages of each list, so click to get the full release. These items may sell out quickly. That applies especially to retiring papers and inks.
Also, if you have products on your Wish List that are carrying over, the time to purchase is now! Quite a lot of prices are increasing in the next catalog. Stampin’ Up! has held off as long as is possible. I know personally with every trip to the grocery store my bill is higher. So I totally understand what they have to do for the company.
If you do place an order, I would greatly appreciate you using my Host Code. It is at the bottom of the post, and on the right side bar if you are utilizing a computer or laptop. Thank you!!
HOST CODE
My March Host Code is ZF27VSFC. Please use this code for orders under $150.00. I will have a small gift for those with orders over $50.00 in addition to the Perk Rewards Program. You can read all of the information at the top of the page in the Menu Bar under SHOP / Perks.
Thank you for stopping by today. I hope you enjoyed today’s project and will come back. I do read and reply to all of the comments individually. They mean a lot to me. Please reach out if you have a question.
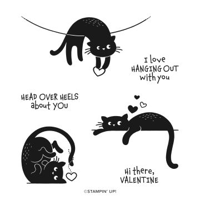
My love of cats is well known. And I purchase every cat set that Stampin’ Up! makes. However, this Love Cats is probably my favorite one yet. I know I have used it a few times, but here is one more!
Stamps
This silly cat may be my favorite from the Love Cats stamp set. He or she is so happy looking while flipped over. I have a 14 year old female cat that every afternoon, while telling us it is dinner time, chases her tail!
One of the things I love about these cats are that they are solid. So one ink and you have a great image. For this one I simply filled in the heart using Sweet Sorbet Stampin’ Blends. And that was all it took for the focal image.
Papers
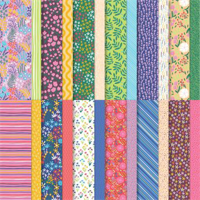
To pair with the silly cat, I wanted a fun paper. All it took was pulling out the pack of Flowers & More Designer Series Paper. This is a Host reward paper in the Mini Catalog. The colors are all fun and bright which is my favorite generally. To pair with the bright, I pulled the brightest of the colors from the paper and went with Parakeet Party for the card base. And then another fun piece of the DSP for the cat layer that would coordinate with the first. These papers make it so easy.
Fold
This is a simple, but Fun Fold. Here is a photo of the open card.
Instead of the fold being at the top as is usual, I flipped the card and have the opening at the bottom. I have done some gift card holders with this orientation. But this card is just a card only.
By clicking on the photo you will be taken to the Online Exclusives in my online store. Please use my Host code if you make a purchase. I would really appreciate it!
HOST CODE
My March Host Code is ZF27VSFC. Please use this code for orders under $150.00. I will have a small gift for those with orders over $50.00 in addition to the Perk Rewards Program. You can read all of the information at the top of the page in the Menu Bar under SHOP / Perks.
Thank you for stopping by today. I hope you enjoyed today’s project and will come back. I do read and reply to all of the comments individually. They mean a lot to me. Please reach out if you have a question.
The content in this blog is the sole responsibility of Jackie Beers as an Independent Stampin' Up! Demonstrator. The use of and content of classes, services or products offered is not endorsed by Stampin' Up!