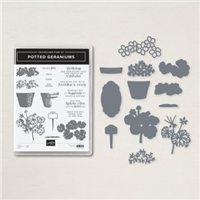
The star of today’s card is the Potted Geraniums Bundle. It is still available and definitely one I recommend.
Stamp Bundle
The Potted Geranium Bundle is an awesome mix of the flowers, pot, sentiments, and even the frame for the sentiments. And for me it is very difficult to type the word!! I have had to correct it every time I have typed it! LOL!!!
The pot is stamped using Calypso Coral as the definition stamp with Petal Pink as the bae color. Most of the stamps are two step by the way. The leaves are Old Olive and Garden Green. And the geraniums used Fresh Freesia and Highland Heather. I know the flowers do not really match the papers and the pot. But I wanted something that would POP!!! And the purple hues do just that. All of the images are die cut using the matching dies.
Papers
The paper idea came from me thinking of a terra cotta pot for the geraniums. So Calypso Coral was my choice for the base card. In looking for some DSP, I came across this textured looking piece as a back side of a Fancy Flora Designer Series Paper. And the Old Olive layer was to break up those similar colors plus add in the leaves color to the mix.
Finishes
The angle of the layers was simply done because I have not used that layout in a while. Using something different can be a good thing on occasion. The added addition of the Old Olive ribbon was again to separate the pink/corals and give more of a darker color. All of the die cut images are raised with the exception of the leaves. They are adhered flat for some depth differences. And the final touch is once again the 2021-2023 Opal Rounds that are scattered around.
Thank you for stopping by today!! I hope you have a wonderful weekend.
RETIRING LISTS. CLICK ON THE ICON TO GET THE FULL PDF.
Online exclusives are here to stay! Click on the photo and be taken directly to them in my online store. If you place an order, please use my Host Code listed just below.
HOST CODE
My APRIL Host Code is ZE6UJ4TF. Please use this code for orders under $150.00. I will have a small gift for those with orders over $50.00 in addition to the Perk Rewards Program. You can read all of the information at the top of the page in the Menu Bar under SHOP / Perks.
Thank you for stopping by today. I hope you enjoyed today’s project and will come back. I do read and reply to all of the comments individually. They mean a lot to me. Please reach out if you have a question.
The card I have to share with you today is one that reminds me of an Irish Blessing. This is the Covered In Sunshine stamp set. There is a mix of retiring, carryover, and New products.
Stamp set
Yesterday we were in Scotland with the Thistle and today we have (maybe) an Irish Blessing. I am ready to travel!!! It seems I always fall for items as they are being retired! This stamp set, the Covered In Sunshine, is retiring and I believe I have only used it one time. After making this card, I can think of so many uses for it.
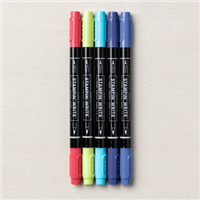
The sentiment is the star of the card. It is actually written at a slant. After reading the words, I knew I wanted the daisies from the Rain or Shine paper. And that created my colors for the card. I stamped the image using Parakeet Party Ink. Then the sun using Crushed Curry. The inside of the sun is colored using the new Lemon Lolly Stampin’ Blends.
Papers and Dies
To complete the Rain or Shine Designer Series Paper daisies, I added a fun polka dot piece of Parakeet Party. This is from the 2022-2024 In Color 6×6 Designer Series Paper. The card base of Crushed Curry was pulled from the daisies as well.
To cut the sentiment, I turned to a new Die Set. It is the Countryside Corners Dies. There are seven or eight of this shape in graduating sizes. The one I used is the 4th largest. And it fit perfectly with the angle of the writing. The sun was cut using the Layering Circles Dies, it was one of the smallest.
Embellishments
To tie in the Parakeet Party color, I added a double ribbon and bow using the 2022-2024 In Color Baker’s Twine. I love bakers twine because it is so very easy to work with. Plus it does not add much thickness to the card.
As a finishing touch I turned to 2021-2023 In Color Rounds. The Pale Papaya ones were close enough for the daisies centers. A few scattered around was just enough to say I have some bling!
Thank you for stopping by today!!!
RETIRING LISTS. CLICK ON THE ICON TO GET THE FULL PDF.
Online exclusives are here to stay! Click on the photo and be taken directly to them in my online store. If you place an order, please use my Host Code listed just below.
HOST CODE
My APRIL Host Code is ZE6UJ4TF. Please use this code for orders under $150.00. I will have a small gift for those with orders over $50.00 in addition to the Perk Rewards Program. You can read all of the information at the top of the page in the Menu Bar under SHOP / Perks.
Thank you for stopping by today. I hope you enjoyed today’s project and will come back. I do read and reply to all of the comments individually. They mean a lot to me. Please reach out if you have a question.
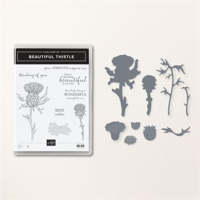
My project today stars the Beautiful Thistle Bundle. It is paired with the Fancy Floral DSP. That paper is going to be missed so much when it is gone!
Bundle
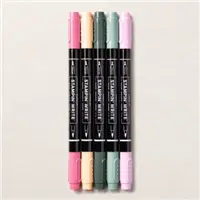
When I first saw this stamp set, Beautiful Thistle, I knew I had to have it. It reminds me of my first trip to Scotland and everything Thistle in the gift shops. Plus it is such a fun flower image. To create this stamped image I used Both Stampin’ Write Markers and Stampin’ Blends. The image is a solid piece (there are sections as well) so I colored it with Orchid Oasis, Soft Succulent and Evening Evergreen Markers. Then I filled in the areas using Orchid Oasis and Soft Succulent Stampin’ Blends after stamping.
The sentiment is included in this stamp set. To assist it in standing out against the darker colors, I opted to stamp onto Basic White with Memento Tuxedo Black Ink. That did the trick wonderfully!
Die Cut Trick
Last month, while recovering from pneumonia, I watched a lot of stamping videos! And once again I did not make note of the name and now cannot find it. But one of the videos showed a lady who had stamped and colored on White card stock but was layering onto Black card stock. She did not want the white outside area after die cutting to stand out. So she used a black Stampin’ Blend and colored around the image before she cut. I thought that was amazing because the image then seemed to pop off the black background. Well I tried it with this thistle. If you look closely, you can see that I went around this with the Orchid Oasis Stampin’ Blend. Since that was the main color of the background layer I hoped it would work. What do you think?
Papers
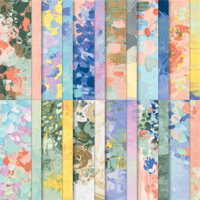
The main paper on this card, or at least the most important to me, is the DSP piece. It is once again from the Fancy Flora Designer Series Paper. I wanted a purplish color for the Thistle and thought this one would fit the bill. And it did!
There are several layers because it seemed no matter what color I put against the Soft Succulent base that it did not Pop. I had added the White between the Orchid Oasis and the DSP because they are so similar. So when I tried that between the Orchid and the base, it seemed to work as well. Plus the sentiment is on White.
Finishes
To complete this card I chose to go with the Rectangle Postage Punch. I am truly sad to see this fun punch retire! It is a great size and can actually be shortened if needed. To ground the sentiment layer, I added a ribbon and bow using the Soft Succulent Open Weave Ribbon. This ribbon is easy to work with and is thin so it does not add bulk. For the final touch I added a few of the 2021-2023 Opal Rounds. They are In Colors that are retiring. I scattered a few of the Soft Succulent ones around the card for a soft bling.
Thank you for stopping by today!!!
RETIRING LISTS. CLICK ON THE ICON TO GET THE FULL PDF.
Online exclusives are here to stay! Click on the photo and be taken directly to them in my online store. If you place an order, please use my Host Code listed just below.
HOST CODE
My APRIL Host Code is ZE6UJ4TF. Please use this code for orders under $150.00. I will have a small gift for those with orders over $50.00 in addition to the Perk Rewards Program. You can read all of the information at the top of the page in the Menu Bar under SHOP / Perks.
Thank you for stopping by today. I hope you enjoyed today’s project and will come back. I do read and reply to all of the comments individually. They mean a lot to me. Please reach out if you have a question.
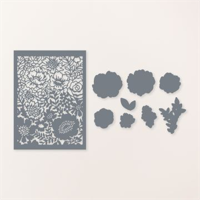
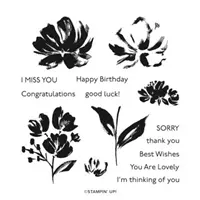
The project I have to share to do is a bit of a different look for me. This one uses the large card front size die in the Two Tone Flora Die set. The unusual part is that I don’t generally use those large dies, and that I used DSP as the paper for it.
Die
This full size die is beautiful. And as I mentioned, quite different for me. I love the look, but do not think to use these. In this instance, the DSP was what prompted it. And this Die has so much gorgeous detail that it would work with anything.
Paper
The DSP is the Fancy Flora Designer Series Paper. While I was sorting through it to pick a layer, I had the large die on my desk. Looking at the paper and then the Die was like a commercial of bumping into each other and the mix working. Since it was a floral die, I pulled color from the DSP piece to choose the other colors. The strip for the sentiment is the opposite side of this DSP piece.
Stamps and Finishes
With the Die and the paper, the stamp set was the least of the products on this card. But this simple sentiment is from the Art Gallery stamp set. To finish everything I added a scattering of the 2021-2023 Opal Dots. These are the outgoing In Colors. So I mixed some of the Evening Evergreen ones with a few of the Pale Papaya and love the result. This card uses very little in the number of products and would work with any DSP!
Thank You for visiting today!!!
RETIRING LISTS. CLICK ON THE ICON TO GET THE FULL PDF.
Online exclusives are here to stay! Click on the photo and be taken directly to them in my online store. If you place an order, please use my Host Code listed just below.
HOST CODE
My APRIL Host Code is ZE6UJ4TF. Please use this code for orders under $150.00. I will have a small gift for those with orders over $50.00 in addition to the Perk Rewards Program. You can read all of the information at the top of the page in the Menu Bar under SHOP / Perks.
Thank you for stopping by today. I hope you enjoyed today’s project and will come back. I do read and reply to all of the comments individually. They mean a lot to me. Please reach out if you have a question.
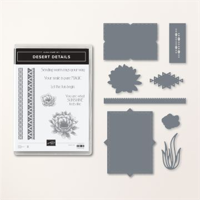
Today’s project showcases one of my favorite products from the Mini Catalog. And it is not sold out!! It is the Desert Details Bundle. This also is my design for the Make My Monday Challenge, which is “Frame It”. My frame is a bit different but I love it.
Here is the link for the Make My Monday Challenge. You can see all of the other designers’ ideas as well as enter the challenge yourself.
Details
Since the challenge was to Frame It, I am showcasing the awesome Dies with the Desert Details Bundle. The first of the front layers is the Cajun Craze card stock. But the next is one of the frames in the Desert Details Dies. I love the indented points! Additionally all of the other front pieces are cut using various of the same Die set. I especially love the design the hello is stamped on. It is such an interesting shape.
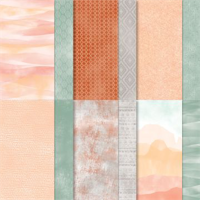
Papers
All of the papers used are from the Delicate Desert Designer Series Paper or colors from it. Calypso Coral is the card base, with DSP layers, and then Cajun Craze. The front Die cuts are Evening Evergreen and Soft Succulent, along with some DSP there as well.
Bundle
The bundle was mentioned under details. But I do love this stamp set and especially the Dies. The fun shapes are amazing. Plus I like the simpler type sentiments. And the fact the Hello fit on that small die cut shape was perfection.
Finishes
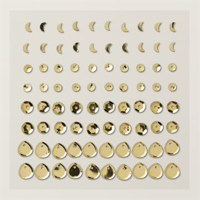
There are several added touches to this card. The front has the Linen Thread looped behind the catcus flowers. That is very soutwest looking. And I added some of the Gold Faceted Sequins to give some bling to the front.
The best part is that this card is a fun fold. It is a Double Z Fold. And is quite simple to make. Just remember that you use the folds opposite of each other. The long section on the base card has the shorter section of the layer, and vise versa. Here is a look at the card open.
From this view you can see exactly what I meant about the opposite direction of the base and layer. What you do not see is that I added a second white panel between the front and the sentiment on the back for you to write a short note.
Measurements
The Calypso Coral card base is 4 1/4 X 11 and scored at 2 3/4 and 5 1/2. The Cajun Craze layer is 3 1/2 X 10 and scored at 2 1/2 and 5. My two inside White layers are 2 1/4 X 3 1/4. Decorate how you wish.
Thank you for stopping by today!!
RETIRING LISTS. CLICK ON THE ICON TO GET THE FULL PDF.
Online exclusives are here to stay! Click on the photo and be taken directly to them in my online store. If you place an order, please use my Host Code listed just below.
HOST CODE
My APRIL Host Code is ZE6UJ4TF. Please use this code for orders under $150.00. I will have a small gift for those with orders over $50.00 in addition to the Perk Rewards Program. You can read all of the information at the top of the page in the Menu Bar under SHOP / Perks.
Thank you for stopping by today. I hope you enjoyed today’s project and will come back. I do read and reply to all of the comments individually. They mean a lot to me. Please reach out if you have a question.
My card today is made with the Easter Bunny stamp set. And I am thinking of it as an Easter Card. However I hope you will see the versatility it has for other uses. The Little Moments are wonderful moments in my book.
Stamp set
All of the images and sentiment are from the Easter Bunny stamp set. I was quite surprised how flexible this set is and am thrilled that it is carrying over to the next Annual Catalog. The simple eggs and sweet sentiment are fun next to the paper. And here is a look at the inside of the card.
Inside View
I thought this was just a precious little image! All of the images were stamped with Memento Black Ink and colored using Stampin’ Blends. The bunny was stamped using Soft Suede for a softer looking outline.
Papers
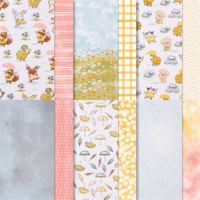
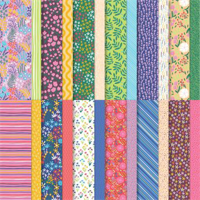
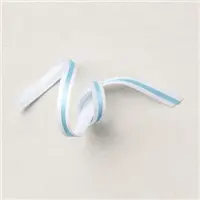
Both of the front papers are from the Flowers & More Designer Series Paper Pack. It is a Host reward in the Mini Catalog and will be going away at the end of the month with the catalog. It is an awesome pack of bright colors and designs. These touched my humor with the leaves being grass and the stripes being sky for my little scene. I pulled the balmy blue for the card base as a neutral and softer color.
Extra Elements
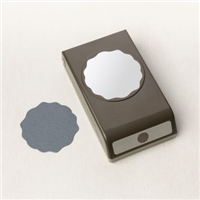
To give some extra pizzaz to the front focal layer, I used the Decorative Circle Punch. I do really love this punch as an alternative to a plain circle. Or a layer for a circle since we are getting some circles returning to the store!! Additionally, I added a strip of the Balmy Blue Double Stitch Ribbon as a joiner for the two DSP pieces. And to finish the card of course there has to be some bling! This was accomplished with a mix of the blue and pink Adhesive Backed Pastel Sequins! There are a lot of sequins in this pack and in different sizes.
Thank you for visiting today!!
RETIRING LISTS. CLICK ON THE ICON TO GET THE FULL PDF.
Online exclusives are here to stay! Click on the photo and be taken directly to them in my online store. If you place an order, please use my Host Code listed just below.
HOST CODE
My APRIL Host Code is ZE6UJ4TF. Please use this code for orders under $150.00. I will have a small gift for those with orders over $50.00 in addition to the Perk Rewards Program. You can read all of the information at the top of the page in the Menu Bar under SHOP / Perks.
Thank you for stopping by today. I hope you enjoyed today’s project and will come back. I do read and reply to all of the comments individually. They mean a lot to me. Please reach out if you have a question.
The content in this blog is the sole responsibility of Jackie Beers as an Independent Stampin' Up! Demonstrator. The use of and content of classes, services or products offered is not endorsed by Stampin' Up!