My card to share today is a CASE from fellow demonstrator, and friend, Paula Butler. When we receive a pretty card it is perfectly fine to change a bit and make it your own.
Papers
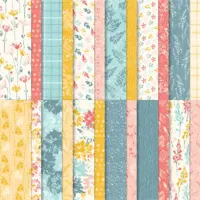
It is really difficult to say what is the most important part of this card. They are all great on their own! But I will begin with the papers. These are strips from three different sheets of the Inked Botanicals Designer Series Paper. I know that I have used this quite a bit. And I will continue to use it! There is not a bad sheet in this pack. And it is currently 15% off!! These strips are each 1 X 4.
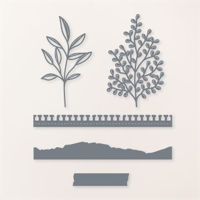
The card base is Thick Basic White card stock. I added the thin layer of Lost Lagoon as it is a color in all three of the DSP papers. The gorgeous die cut piece is from the Gorgeously Made Dies. I love that this piece has great detail and it is large enough to stand alone as I have used it. This piece is from Crushed Curry card stock.
Stamps and Other Products
This is a pretty simple card but does include a variety of products. However it could be made utilizing things that you already have. Unless you are like me and want the new things you see!!! To begin this section I will start with the embossed layer of White. The embossing folder is one I really do love! It is one of three that are in the Online Exclusives store. They do not have names other than they are Basics Embossing Folders. The detail on this one is fabulous.
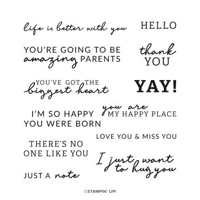
The next extra is the sentiment layer. The sentiment itself is from the Happy Labels stamp set. And it fit perfectly on the rough cut Die cut from the Gorgeously Made Dies. This is the same Die set as the floral piece. I like the jagged edges. With the fairly busy prints of the DSP, I did not need a lot of finishing touches. But again, there must be bling! So there is one small Gold Glossy Dot added next to the sentiment.
Thank you for stopping in today!!!
Designer Series Paper Sale! June 1-30
Click on the photo to see all of the available papers. If you are ready to order please click on the shop button in the menu and you will be taken to my online store! I also have a host code of 34QVEY4F that I would appreciate you using!
New Starter Kit opportunity for the month of June!
If you have a large Wish List, I would love to talk with you about the Starter Kit. It is the Ultimate Bundle!
Online exclusives are here to stay! Click on the photo and be taken directly to them in my online store. If you place an order, please use my Host Code listed just below.
HOST CODE
My June Host Code is 34QVEY4F. Please use this code for orders under $150.00. I will have a small gift for those with orders over $50.00 in addition to the Perk Rewards Program. You can read all of the information at the top of the page in the Menu Bar under SHOP / Perks.
Thank you for stopping by today. I hope you enjoyed today’s project and will come back. I do read and reply to all of the comments individually. They mean a lot to me. Please reach out if you have a question.
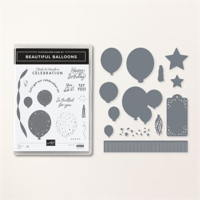
The inspiration for today’s card is from an advertisement. We get them from everywhere! But I was surprised by this one and how perfectly it works with the Beautiful Balloons Bundle.
Stamps and Dies
The Beautiful Balloons is such a fun Bundle. The dies are wonderful and add more than just the balloons. Although I did not use any of the extras here. The three balloons are stamped and die cut. For the largest one I die cut from Lost Lagoon card stock and then stamped the little stars with Lost Lagoon Ink. But the other two balloons are stamped and then die cut. They are Lemon Lolly and Parakeet Party.
The sentiment is also from the stamp set. There are a couple of different sentiments to go along with the balloons. I really like this one and that it is long. It fit the bottom of the layer perfectly to fill in white space.
Papers
The idea of this card was to focus on the balloons. And I only needed a small bit of DSP for the gift box. It could have come from anywhere, but I chose this piece from the Bright & Beautiful Designer Series Paper. This 6X6 pack is part of the Bright & Beautiful Suite of products which includes the Bundle, the DSP, and the Acetate Celebration paper.
The card base was chosen from the DSP as the brightest of the colors. It is Berry Burst. The Lost Lagoon balloon, as well as the other balloons, came from that little piece as well. I tried a couple of the colors for the thin layer between the Berry and the White, and the Lost Lagoon one that contest.
Finishes
There must be bling! And I only used one of the larger Rhinestones. Shocking! I know. But there is also extra touches with the twine. To make the balloon strings, I used the 2022-2024 In Color Bakers Twine. This was a carry over that thrilled me. I love Baker’s Twine. By adhering all of the balloons, except leaving the bottoms loose, I could lift it up and place a glue dot and the tip of the twine. The twine was allowed to twist and do it’s own thing as I pulled it down to the gift. There I added two glue dots. One to secure the three strings, and another for the bow. It was really easy to do and a great extra touch for the Balloon Celebration!
Thank you for visiting today!!!
Designer Series Paper Sale! June 1-30
Click on the photo to see all of the available papers. If you are ready to order please click on the shop button in the menu and you will be taken to my online store! I also have a host code of 34QVEY4F that I would appreciate you using!
New Starter Kit opportunity for the month of June!
If you have a large Wish List, I would love to talk with you about the Starter Kit. It is the Ultimate Bundle!
Online exclusives are here to stay! Click on the photo and be taken directly to them in my online store. If you place an order, please use my Host Code listed just below.
HOST CODE
My June Host Code is 34QVEY4F. Please use this code for orders under $150.00. I will have a small gift for those with orders over $50.00 in addition to the Perk Rewards Program. You can read all of the information at the top of the page in the Menu Bar under SHOP / Perks.
Thank you for stopping by today. I hope you enjoyed today’s project and will come back. I do read and reply to all of the comments individually. They mean a lot to me. Please reach out if you have a question.
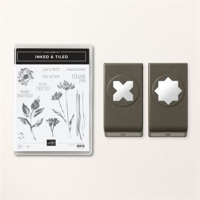
It is no secret that I love the Inked Botanicals Designer Series Paper. I have used it several times. Well, today is another of those times! And I have paired it with the Inked & Tiled Bundle.
Inked & Tiled Bundle
This bundle is a really nice one for several reasons. There are stamps that are both images and sentiments. And it is paired with punches instead of dies. Not just one punch, but two punches! I have used the more solid one on this card. The other is an “X” with pointed ends. Both are great and have multiple uses.
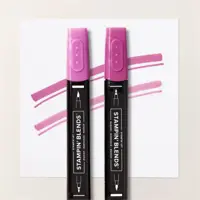
Today I used the stamped image with the old technique of Ink To Rubber. That is a red rubber stamp, sadly it does not work on photopolymer stamps, that you color the rubber with Stampin’ Write Markers. I used Pretty Peacock for the stem and leaves. And Flirty Flamingo as the flower center with Crushed Curry for the petals. The sentiment is stamped using Memento Tuxedo Black Ink. Note: Stampin’ Write Markers, with the exception of Basic Black, are only available as the entire collection or as Color Families. However they are great to have on hand.
Papers
The fun DSP pieces are both from the Inked Botanicals Designer Series Paper. I love directly stamping on to the DSP. Naturally it doesn’t work for all DSP, but in this case I love the look it gives. In this card I wanted a softer look and stamping on the DSP achieved that.
The card base is the new In Color Wild Wheat. It really makes the plaid in the front DSP stand out. And I was surprised at how well the Flirty Flamingo layer paired with it also. None of these colors seem to really go together, yet they all do work well with each other. Sometimes just going for it really works!
Finishes
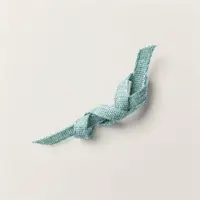
To finish the card I knew I wanted a ribbon. In putting the layers together I layed them all out on the Wild Wheat card base at the angles to make sure nothing was overhanging. After adhering each layer to the Flirty Flamingo, I wrapped a piece of the Lost Lagoon Bordered Ribbon around all three layers. The Lost Lagoon is included in the greenery DSP layer along with the Pretty Peacock. I adhered the ribbon on the back of the Flirty Flamingo and then adhered all the bundle I had made to the card base.
The sentiment was punched using the Inked & Tiled Punch and added using Stampin’ Dimensionals. The bow was added off to the side. For the bling I used the Pastel Adhesive Backed Sequins. These are in two sizes. I spread a trio of the smaller gold ones around the card.
Measurements
There is not an exact science to the layers I used. But I did stagger the sizes a little. The Flirty Flamingo layer is 3 7/8 X 5 1/8 with the green DSP layer 3 X 5. And the plaid stamped layer is 2 3/4 X 4 3/4. The differences allow for more angled placement as they get smaller.
Don’t forget the DSP sale! The Inked Botanicals DSP is included.
Thank you for stopping by today!!!
Designer Series Paper Sale! June 1-30
Click on the photo to see all of the available papers. If you are ready to order please click on the shop button in the menu and you will be taken to my online store! I also have a host code of 34QVEY4F that I would appreciate you using!
New Starter Kit opportunity for the month of June!
If you have a large Wish List, I would love to talk with you about the Starter Kit. It is the Ultimate Bundle!
Online exclusives are here to stay! Click on the photo and be taken directly to them in my online store. If you place an order, please use my Host Code listed just below.
HOST CODE
My June Host Code is 34QVEY4F. Please use this code for orders under $150.00. I will have a small gift for those with orders over $50.00 in addition to the Perk Rewards Program. You can read all of the information at the top of the page in the Menu Bar under SHOP / Perks.
Thank you for stopping by today. I hope you enjoyed today’s project and will come back. I do read and reply to all of the comments individually. They mean a lot to me. Please reach out if you have a question.
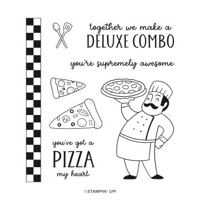
For today’s card I have cased the catalog. The Annual Catalog years ago had the additional name of Idea Book and Catalog. When I am in need of inspiration for cards that is where I look. Today I went to the Supremely Awesome stamp set.
Stamp Set
The fun Supremely Awesome stamp set is for anyone who likes Pizza. And for those of us who like the more silly cards. I have several friends that this card fits perfectly! All of the images on the card are from the one stamp set. You know how much I love those type sets!
The stamping is all done using Memento Tuxedo Black Ink. And the coloring is all Stampin’ Blends. You can always make your clothing and pizza any colors you wish. It did not bother me at all that the checkerboard strip is not darkly stamped. For me that shows a little wear and tear like an old pizza parlor would have. The sentiment is one long sentiment that I cut into pieces to “hang on the wall” . And I stamped an extra pizza for some depth. It is fussy cut and then layered over top of the other with Stampin’ Dimensionals.
Colors and Extras
There had to be some red in a pizza card. So my middle layer is Poppy Parade. It made a great pepperoni color as well. The Misty Moonlight went along with the cook’s pants. And I colored the pizza to look like a pepperoni pizza. Although the crust is a tad on the light side.
To be a little different, I placed my layers all flush at the bottom and right side of the card base. I wanted the checkerboard strip to show and this seemed the best way. Plus the sentiment “hanging on the wall” needed a place that it was not against the white so it showed at it’s best. The hangers I used are Rhinestones that are colored with the Poppy Parade Stampin’ Blend the same as the pepperoni. I hope you remember that you can color the rhinestones and pearls with your blends!
Thank you for stopping by today!!
Designer Series Paper Sale! June 1-30
Click on the photo to see all of the available papers. If you are ready to order please click on the shop button in the menu and you will be taken to my online store! I also have a host code of 34QVEY4F that I would appreciate you using!
New Starter Kit opportunity for the month of June!
If you have a large Wish List, I would love to talk with you about the Starter Kit. It is the Ultimate Bundle!
Online exclusives are here to stay! Click on the photo and be taken directly to them in my online store. If you place an order, please use my Host Code listed just below.
HOST CODE
My June Host Code is 34QVEY4F. Please use this code for orders under $150.00. I will have a small gift for those with orders over $50.00 in addition to the Perk Rewards Program. You can read all of the information at the top of the page in the Menu Bar under SHOP / Perks.
Thank you for stopping by today. I hope you enjoyed today’s project and will come back. I do read and reply to all of the comments individually. They mean a lot to me. Please reach out if you have a question.
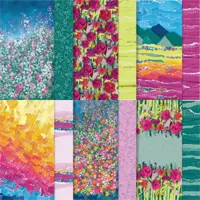
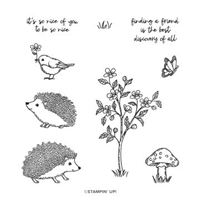
Today’s card is for the Make My Monday Challenge Blog and is celebrating Summer. In my book that means flowers, butterflies and birds to name a few. So I paired Masterfully Made Designer Series paper with the Happy Hedgehog stamp set.
You can join in the Make My Monday Challenge by clicking on the icon below. Add your own Summer card to the site. Plus check out all of the other designer’s cards.
Stamps
The papers used really shine, but I am partial to the little scene I created. This is made with the Happy Hedgehog Stamp Set. I combined the grass, bird, and butterfly to create one small scene. They are all stamped with Memento Tuxedo Black Ink and then punched with the 1 3/4″ Circle Punch and 2″ Circle Punch. Any circle dies would work as well.
Papers
The base of this card is the beautiful colors of paper. Of course the DSP is the star with those gorgeous mix of colors. It is the Masterfully Made Designer Series Paper. I pulled the other colors from it and chose an unusual mix. The card base is Orchid Oasis with a layer of Fresh Freesia. The flowers are White and Berry Burst. The Berry Burst really pops! These flowers help keep the little flap closed as well.
Layout
This is a simple but fun layout today. You know how much I love fun folds. I decided on a portrait style buckle card. This was created using the second smallest of the Countryside Corners Dies. After die cutting it I scored at 5/8″. That little flap is tucked under the inside layer.
The front layers are 2 1/2 X 5 1/4 and the DSP is 2 1/4 X 5. For the inside I used a piece of Fresh Freesia that is 4 X 5 1/4. Then added a piece of DSP that is 1 1/2 X 5 and White that is 2 1/4 X 5.
Here is an inside view:
Finishes
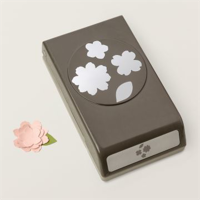
The finishes were simple as the papers and buckle are the most noticeable. I mentioned above about the flowers holding the flap closed. They are punched using the Petal Park Punch and adhered with Glue Dots. For each flower I added a pearl from the Festive Pearls. They are a carryover that are included in the Online Exclusives. I love the different colors and this is the light blue/green color. It seems to take on the color it is near. So each flower received a pearl as did the little bird scene.
Thank you for stoping in today!!!
Designer Series Paper Sale! June 1-30
Click on the photo to see all of the available papers. If you are ready to order please click on the shop button in the menu and you will be taken to my online store! I also have a host code of 34QVEY4F that I would appreciate you using!
New Starter Kit opportunity for the month of June!
If you have a large Wish List, I would love to talk with you about the Starter Kit. It is the Ultimate Bundle!
Online exclusives are here to stay! Click on the photo and be taken directly to them in my online store. If you place an order, please use my Host Code listed just below.
HOST CODE
My June Host Code is 34QVEY4F. Please use this code for orders under $150.00. I will have a small gift for those with orders over $50.00 in addition to the Perk Rewards Program. You can read all of the information at the top of the page in the Menu Bar under SHOP / Perks.
Thank you for stopping by today. I hope you enjoyed today’s project and will come back. I do read and reply to all of the comments individually. They mean a lot to me. Please reach out if you have a question.
I have another quick and pretty card for you today. This one is a case of Susan Campfield. It is simple and can be made with a variety of products. This version stars the new Bubble Bath card stock paired with Timeless Arrangements stamp set.
Layout
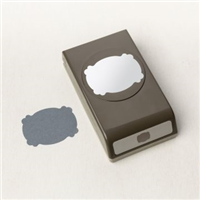
I think the layout is the highlight of this card! It is really simple and at the same time really pretty. Plus it is a little difficult to see in my photo what the layers are. The base layer is Bubble Bath that is cut to 5 1/2 X 4 1/4. A quarter sheet of card stock. Next is a layer of Basic White that is 5 1/8 X 3 7/8. Then the fun part begins. The “card” is this next layer of Bubble Bath that is 5 X 7 1/2 and folded at 3 3/4. It is so quick to put together.
Before you adhere the “card” is when you do the punching and stamping. I used the Lasting Label Punch, where Susan used a Die from the Timeless Arrangements Dies. Mine was for a class and simpler to use a punch. I went all the way in from the right side and left a 1/4″ border showing at the bottom outside of the punch itself. By pushing the paper all the way in to the punch you insure a straight punch.
The inside White layer is 4 3/4 X 3 1/2. I placed it temporarily positioned inside the folded card and then stamped through the punched area. If I were to make a mistake I could flip the white piece over or get another without messing up my card.
Stamps
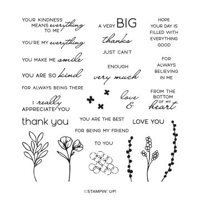
The Timeless Arrangements stamp set is all I needed for the stamped images here. The images across the bottom of the flap are tone on tone. I love how that looks. And the inside the punched area are both from the stamp set as well. Stamping the sentiment first and positioned high leaves plenty of room for the flower.
Finishes
This card is so cute that it does not really need a lot of extras. Of course there must be bling. So a trio of Iridescent Pearls fits the soft color pallet. And to compliment the pearls, I added a simple bow from the White Baker’s Twine.
Thank you for stopping by today!!!
Designer Series Paper Sale! June 1-30
Click on the photo to see all of the available papers. If you are ready to order please click on the shop button in the menu and you will be taken to my online store! I also have a host code of 34QVEY4F that I would appreciate you using!
New Starter Kit opportunity for the month of June!
If you have a large Wish List, I would love to talk with you about the Starter Kit. It is the Ultimate Bundle!
Online exclusives are here to stay! Click on the photo and be taken directly to them in my online store. If you place an order, please use my Host Code listed just below.
HOST CODE
My June Host Code is 34QVEY4F. Please use this code for orders under $150.00. I will have a small gift for those with orders over $50.00 in addition to the Perk Rewards Program. You can read all of the information at the top of the page in the Menu Bar under SHOP / Perks.
Thank you for stopping by today. I hope you enjoyed today’s project and will come back. I do read and reply to all of the comments individually. They mean a lot to me. Please reach out if you have a question.
The content in this blog is the sole responsibility of Jackie Beers as an Independent Stampin' Up! Demonstrator. The use of and content of classes, services or products offered is not endorsed by Stampin' Up!