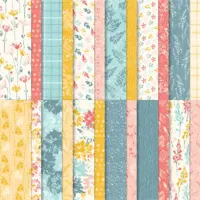
It is no secret that I love the Inked Botanicals Designer Series Paper. I have used it several times. Well, today is another of those times! And I have paired it with the Inked & Tiled Bundle.

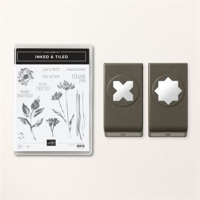
Inked & Tiled Bundle
This bundle is a really nice one for several reasons. There are stamps that are both images and sentiments. And it is paired with punches instead of dies. Not just one punch, but two punches! I have used the more solid one on this card. The other is an “X” with pointed ends. Both are great and have multiple uses.
Today I used the stamped image with the old technique of Ink To Rubber. That is a red rubber stamp, sadly it does not work on photopolymer stamps, that you color the rubber with Stampin’ Write Markers. I used Pretty Peacock for the stem and leaves. And Flirty Flamingo as the flower center with Crushed Curry for the petals. The sentiment is stamped using Memento Tuxedo Black Ink. Note: Stampin’ Write Markers, with the exception of Basic Black, are only available as the entire collection or as Color Families. However they are great to have on hand.
Papers
The fun DSP pieces are both from the Inked Botanicals Designer Series Paper. I love directly stamping on to the DSP. Naturally it doesn’t work for all DSP, but in this case I love the look it gives. In this card I wanted a softer look and stamping on the DSP achieved that.
The card base is the new In Color Wild Wheat. It really makes the plaid in the front DSP stand out. And I was surprised at how well the Flirty Flamingo layer paired with it also. None of these colors seem to really go together, yet they all do work well with each other. Sometimes just going for it really works!
Finishes
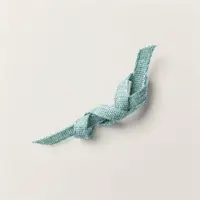
To finish the card I knew I wanted a ribbon. In putting the layers together I layed them all out on the Wild Wheat card base at the angles to make sure nothing was overhanging. After adhering each layer to the Flirty Flamingo, I wrapped a piece of the Lost Lagoon Bordered Ribbon around all three layers. The Lost Lagoon is included in the greenery DSP layer along with the Pretty Peacock. I adhered the ribbon on the back of the Flirty Flamingo and then adhered all the bundle I had made to the card base.
The sentiment was punched using the Inked & Tiled Punch and added using Stampin’ Dimensionals. The bow was added off to the side. For the bling I used the Pastel Adhesive Backed Sequins. These are in two sizes. I spread a trio of the smaller gold ones around the card.
Measurements
There is not an exact science to the layers I used. But I did stagger the sizes a little. The Flirty Flamingo layer is 3 7/8 X 5 1/8 with the green DSP layer 3 X 5. And the plaid stamped layer is 2 3/4 X 4 3/4. The differences allow for more angled placement as they get smaller.
Don’t forget the DSP sale! The Inked Botanicals DSP is included.
Thank you for stopping by today!!!
Designer Series Paper Sale! June 1-30
Click on the photo to see all of the available papers. If you are ready to order please click on the shop button in the menu and you will be taken to my online store! I also have a host code of 34QVEY4F that I would appreciate you using!

New Starter Kit opportunity for the month of June!
If you have a large Wish List, I would love to talk with you about the Starter Kit. It is the Ultimate Bundle!

Online exclusives are here to stay! Click on the photo and be taken directly to them in my online store. If you place an order, please use my Host Code listed just below.

HOST CODE
My June Host Code is 34QVEY4F. Please use this code for orders under $150.00. I will have a small gift for those with orders over $50.00 in addition to the Perk Rewards Program. You can read all of the information at the top of the page in the Menu Bar under SHOP / Perks.
Thank you for stopping by today. I hope you enjoyed today’s project and will come back. I do read and reply to all of the comments individually. They mean a lot to me. Please reach out if you have a question.
Smile and Keep On Stamping,
Jackie

SUPPLIES: