The Bee My Valentine Bundle is a fun one and is quite different from simply hearts. I love the versatility this gives. And with it being a Punch Bundle, it goes to the top of my list.
Stamps
This is a Bundle, but I wanted to focus on the stamps first. The sweetest bee is so happy looking. And it takes several stamps to make him so happy. That is also one of the things I love about this set. The bee body consists of the black stripes and then the oval Daffodil Delight over top. Next you have wings, antenna, and facial features. There are a couple of different facial stamps. That is great for different looks. Plus you can position the bee side view or straight up with wings on each side. Additionally there are different sayings, background stamps, etc. This is a year round stamp set!
Punch
The Bee Builder Punch is part of the Bundle. And it also offers variations. Or I should say other options. The bee body is one portion of the punch. And the wings are a separate Heart that can be a heart as well as punch out the wings. Plus the antenna is another heart that is smaller, as you can see from the bee I built. So you get a punch with two different sized hearts to use for any project. I especially love that!!
Papers
The Bee Mine Designer Series Paper obviously matches the stamp bundle. But it has pretty pages that will work anytime of the year. I used two of the pieces for my layers behind the bee. The Sweet Sorbet flower piece makes me excited for Spring. And the yellow plaid is an anytime paper as well. But they both go along perfectly with my Bee and honey design. The Daffodil Delight card base and the layer, which is stamped with the honeycomb in Daffodil Delight, add a little more dimension to the card.
Finishes
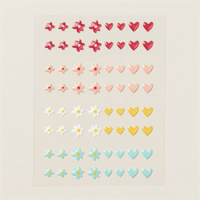
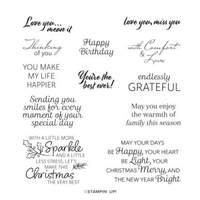
The sweet sentiment is included in the stamp set. I kept it simple by having just a strip of Basic White card stock. But I did embellish it with some soft bling. The flowers and hearts in pink and sorbet are from the Adhesive Backed Hearts & Flowers embellishments. I love these because they are so cute, but they are also flat. That is good for mailing to not have bumps in the envelope. And I have used them on other cards as well. They are sort of retro and are simply cute!
Thanks for stopping by today!!
Online exclusives are here to stay! Click on the photo and be taken directly to them in my online store. If you place an order, please use my Host Code listed just below.
HOST CODE
My JANUARY Host Code is BQEMX92K. Please use this code for orders under $150.00. I will have a small gift for those with orders over $50.00 in addition to the Perk Rewards Program. You can read all of the information at the top of the page in the Menu Bar under SHOP / Perks.
Thank you for stopping by today. I hope you enjoyed today’s project and will come back. I do read and reply to all of the comments individually. They mean a lot to me. Please reach out if you have a question.
Sometimes I find myself forgetting about the Annual Catalog with all of the new products in the Minis. After seeing several of the half round cards, I put my thinking cap on. Going to the Annual Catalog and the Die sets there, I decided on the Countryside Corners Dies. Hopefully you will be as excited for the outcome as I am.
Dies
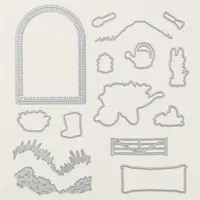
The Dies are what makes this card. And that is extra true in this case. The card base is made from the largest of the Countryside Corners Dies. You can cut a smaller piece, but I used a regular size card base. Fold the card in half, and place a long side of the die just above the fold. Do not place that edge on the card stock! If you do then you have two layers and no card base. Put this through your die cutting machine and run it back an extra time because you are cutting two layers of card stock. And like magic you have a Fun Fold card. The fold could be on the side or top but I opted for the top.
The card needs some layers as well. For the White layer and a White layer on the inside, use the next largest Die and cut two from Basic White. Then using the next size, cut one from the DSP. And you have all of your needed layers with one Die set. I liked these dies for layering before. Now I love them!!
Stamps Bundle
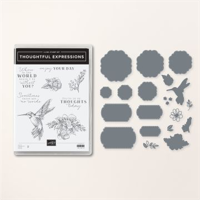
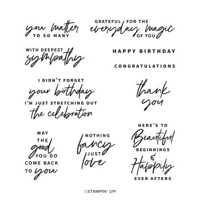
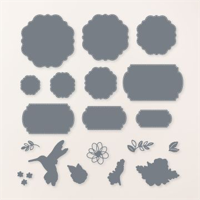
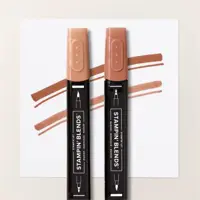
The flowers and sentiment are from the Thoughtful Expressions Bundle. This is another great Bundle in the Mini Catalog. Because I wanted to show off the gorgeous DSP, I opted for simple on the decorations. The two flower images are stamped using Basic Gray Ink and then colored with Stampin’ Blends. With the matching Dies, it was quick and easy to cut out. The extra green leaves are also a Die. Included in the Die set are some awesome Shaped Dies for layering. That was my initial reason for purchasing this set. But now I love it in it’s entirety.
The sentiment is also included in the stamp set. I think it is a great one. It is stamped using Pecan Pie to match the card base and doesn’t overwhelm the soft colors of the flowers. I flagged the end for a different edge. And the “must have bling” is one of the beautiful Purple Fine Shimmer Gems. These are in the Mini Catalog as well. They are really perfect for someone, like me, who loves purple!!!
Thank you for stopping in today! I hope you can stay warm and enjoy stamping.
Online exclusives are here to stay! Click on the photo and be taken directly to them in my online store. If you place an order, please use my Host Code listed just below.
HOST CODE
My JANUARY Host Code is BQEMX92K. Please use this code for orders under $150.00. I will have a small gift for those with orders over $50.00 in addition to the Perk Rewards Program. You can read all of the information at the top of the page in the Menu Bar under SHOP / Perks.
Thank you for stopping by today. I hope you enjoyed today’s project and will come back. I do read and reply to all of the comments individually. They mean a lot to me. Please reach out if you have a question.
The card today is the second version of my Window Card. This one stars the Perennial Lavender DSP instead of the stamp set. Although the stamp set is part of the card.
Fold
This is the same Fun Fold Window Card as yesterday’s. All of the measurements are the same. The views are a bit different though. Here are the other views.
Papers
The card is the same Lost Lagoon card base and Basic White inside card as yesterday. The difference is the gorgeous DSP that you see through the window. It is a piece of the Perennial Lavender Designer Series Paper. I love how it looks. That is definitely a nice view!
Stamps
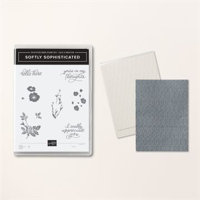
The inside stamped lavender is from the Painted Lavender stamp set. I used the Gorgeous Grape and Lost Lagoon inks to give an inside image to match the DSP. And the lovely sentiment on the front is from the Sale-A-Bration stamp set titled Softly Sophisticated. I do truly love this sentiment. It is cut using the larger of the Double Oval Punch. However, I had a bit of a brain fade when adding the sentiment. The card was completed and I was trying to decide how to add a sentiment to the front. To go along with the colors in the DSP, I opted for Very Vanilla. It did not dawn on me until after I had attached it, that the inside card is Basic White. DUH!!!
Thank you for stopping by today. I hope you have a fun weekend and can stay warm.
Online exclusives are here to stay! Click on the photo and be taken directly to them in my online store. If you place an order, please use my Host Code listed just below.
HOST CODE
My JANUARY Host Code is BQEMX92K. Please use this code for orders under $150.00. I will have a small gift for those with orders over $50.00 in addition to the Perk Rewards Program. You can read all of the information at the top of the page in the Menu Bar under SHOP / Perks.
Thank you for stopping by today. I hope you enjoyed today’s project and will come back. I do read and reply to all of the comments individually. They mean a lot to me. Please reach out if you have a question.
I have a Window Card to share with you today. The Painted Lavender set is the star of this card. And I will share a second version tomorrow with a little bit of change.
Fold
This Window card is a Fun Fold as well as having the perfect window view. Here are the openings of the card.
This fold is a regular 4 1/4 X 11 for the card base of Lost Lagoon. And the inside card is Basic White that is 8 X 5 1/4 and scored/folded at 4. You get a card within a card. And it is such an easy Fun Fold. I am sure you have a variety of large Dies that would create a unique window.
Dies
The only die used is the Window. It is from an Online Exclusive stamp set. The Bundle is the Garden Meadow Bundle and is still available. I love the variety of “extra” dies that are included in the set. Please give it a look.
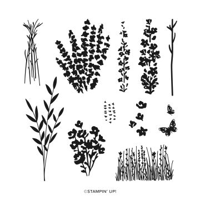
Stamps
The lovely Painted Lavender stamp set is the star of this card, besides the Window. I love Purple. It always reminds me of my Mom. This set is so pretty and simple to use. I stamped the front of the window with the lavender stamp using Highland Heather Ink. The other images are stamped with Gorgeous Grape with the pairing of Lost Lagoon.
The sweet sentiment is from the wonderful Perennial Postage stamp set. This set is amazing with fun sentiments that are sweet and more unique than a regular “thinking of you”. And I love it!! The sentiment I used is one that could be for a variety of occasions.
Finish
To complete this card it had to have some bling. The matching DSP for the Painted Lavender has butterflies on it. So I decided to give my card some butterflies as well. The Brushed Brass Butterflies are such a great embellishment. They are pretty and shiny, and best of all they are flat! So no problems are added for mailing.
Thank you for stopping in today! I have another version of this card to share for tomorrow.
Online exclusives are here to stay! Click on the photo and be taken directly to them in my online store. If you place an order, please use my Host Code listed just below.
HOST CODE
My JANUARY Host Code is BQEMX92K. Please use this code for orders under $150.00. I will have a small gift for those with orders over $50.00 in addition to the Perk Rewards Program. You can read all of the information at the top of the page in the Menu Bar under SHOP / Perks.
Thank you for stopping by today. I hope you enjoyed today’s project and will come back. I do read and reply to all of the comments individually. They mean a lot to me. Please reach out if you have a question.
Update: I have had a few requests for measurements. This is a CASE of Sue Campfield and she has a video. But I have attached a PDF of directions at the bottom of the post that you can print out.
The card I am sharing today is a fun Pop Up card using the awesome Sending Love Bundle. And it is paired with some great DSP from Sale-A-Bration.
Stamps and Dies
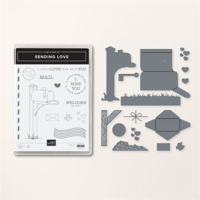
The fun mailbox is what drew me to this stamp bundle. The Sending Love Bundle has the mailbox, letter, bird, and some fun additions to go along. Plus it is a Die Bundle and there are matching dies for it all. I opted to stamp and color the mailbox on the layer. And I went with non traditional mailbox colors so it matched my paper. The addition of the envelope and bird were a add on. I am not sure if the bird is delivering or taking away. LOL!! Either way works for me.
The inside sentiment is from the Something Fancy stamp set. The inside is a Pop Up. This card is a CASE from Susan Campfield. It is pretty simple to do and she explains the mechanism very well. Here is a side view of the card. I really love this fold now that I have it figured out. Attached below is a PDF of directions that I made for this card.
The beautiful paper used on this card is from Sale-A-Bration. This means that it is free with a qualifying order. For this paper, Sunny Days Designer Series Paper, you can choose it FREE with a $50.00 order from either of the Annual or Mini Catalog. Both of the DSP used here are from this pack of paper. I love the green flowers. They are very pretty and a different color. Stampin’ Up! has such gorgeous Greens now.
The card base is Basic White card stock. And just the regular weight, not the Thick. I chose this route because of the layers and the mechanism for the pop up. And I did not add layers between the card base and the DSP. That is not the norm for me either. I did add the Basic Black layer behind the front focal layer. It gives a bit more sturdiness to that layer.
Finishes
To add to more of the unusual, my bling is different as well. Instead of shiny bling, I went with a Black Bling. It really helps the black of the flowers in the DSP to pop. And it highlights the black layer. These are from the Classic Matte Dots in the Annual Catalog. I could have colored the Iridescent Pearls with the Black Stampin’ Blends to get black pearls, but I had these.
Directions
Click on the photo below and you will get a step by step How To.
Thank you for stopping by today! I really appreciate you.
Online exclusives are here to stay! Click on the photo and be taken directly to them in my online store. If you place an order, please use my Host Code listed just below.
HOST CODE
My JANUARY Host Code is BQEMX92K. Please use this code for orders under $150.00. I will have a small gift for those with orders over $50.00 in addition to the Perk Rewards Program. You can read all of the information at the top of the page in the Menu Bar under SHOP / Perks.
Thank you for stopping by today. I hope you enjoyed today’s project and will come back. I do read and reply to all of the comments individually. They mean a lot to me. Please reach out if you have a question.
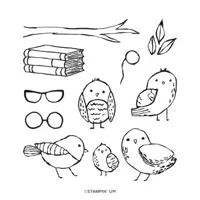
The card I am sharing today is a mixture from the different catalogs. The Birds Eye View stamp set is the star. I needed a card for my eye doctor and the “spectacles” just seemed the perfect stamp.
Stamps
The Bird’s Eye View with the glasses was the immediate thought I had for this card. I always love the animal stamps and the glasses simply put this one over the top for me. The owl, at least I hope that is what this bird is supposed to be, is stamped with Early Espresso Ink and then colored with different Stampin’ Blends.
The sentiment is from the Very Best Occasions. This is a wonderful set with a variety of sentiments we tend to need. I love the mix of fonts as well. And it is a perfect size.
Dies and Punches
The fun owl was die cut using two from the Thoughtful Expressions Die set. I love this design and the fact there are several different sizes for layer makes it a definite for me. Plus this is a more unique shape for a circle. And that is always nice. I hope you will give a second look at these dies. And the matching stamp set is great, I just did not use it today.
The sentiment is punched using my favorite punch. That is the Double Oval Punch. This is the smaller of the two ovals. I had intended to use both sizes, but the single seemed to be enough. Especially with this being a masculine card, I did not want to overwhelm with the shapes.
Papers and Finishes
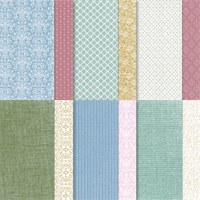
The beautiful DSP is from the Poetic Expressions Designer Series Paper. This paper has great colors and designs, like this one, that are great for any occasion. I love the mix of Boho Blue and Mossy Meadow in this piece. So I paired it with the Boho Blue card base and layer. The darker Mossy Meadow for the layer grounds the softer colors. And with a thin border, it helps the DSP to pop.
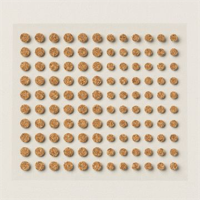
For the finish I added a strip of the Mossy Meadow to have a landing for the sentiment and the owl layers. Sometimes card stock works just as well as a ribbon. And to finish the card I added a trio of the Adhesive Backed Cork Rounds. These are so unique and the perfect touch for a variety of cards.
Thank you for visiting today!!!
Online exclusives are here to stay! Click on the photo and be taken directly to them in my online store. If you place an order, please use my Host Code listed just below.
HOST CODE
My JANUARY Host Code is BQEMX92K. Please use this code for orders under $150.00. I will have a small gift for those with orders over $50.00 in addition to the Perk Rewards Program. You can read all of the information at the top of the page in the Menu Bar under SHOP / Perks.
Thank you for stopping by today. I hope you enjoyed today’s project and will come back. I do read and reply to all of the comments individually. They mean a lot to me. Please reach out if you have a question.
The content in this blog is the sole responsibility of Jackie Beers as an Independent Stampin' Up! Demonstrator. The use of and content of classes, services or products offered is not endorsed by Stampin' Up!