Sympathy cards are always a difficult card to create for me. Part of that is that they must still be a pretty card that might make the recipient smile just a bit. A pretty floral with a “hug” attached fits that idea pretty well.
Papers
This floral pattern is one I have used previously. The Delicate Dreams Designer Series Paper is really exceptional. All of the colors are bright and with the copper accents become really stunning. And to highlight the gorgeous blue, I paired it with two of my favorite blues. The card base and embossed layer are Secret Sea and the blue is the new Hydrangea Hue. It could be called a blue…ish. To me it has a purple tint to it. All I can say is that it is my new favorite.
Stamps
The stamp is a small part of the front of the card. But it definitely sets the tone. Hugs can be very loving and healing. This small sentiment is a great size for many card fronts. Here it fits perfectly layered on the side of the floral pattern. There is a sweet inside sentiment as well. Both of these sentiments are from an upcoing new stamp set titled Phrases & Frames. It is a fabulous sentiment set in the May – August Catalog. Additionally I added a strip of the DSP to coordinate wit the front.
Extras
The Extras on today’s card are very important and part of the beauty. First is the Paradise Garden Hybrid Embossing Folder. These detailed leaves are a perfect pairing for the floral DSP. The detail has great depth. Then there are the fabulous as always Everyday Arches Dies. These were still on my desk from the floral card I shared last week. It sets a scene like you were looking into the garden through an archway. Plus the smallest of the arches was turned sideways for the sentiment. And last but not least are the bling. These are the Natural Matte Dots. I broke my own rule and only used two bling. My rule is to have an odd number. Except the placement was to appear as fasteners for the sentiment layer.
STAMPIN’ REWARDS
You will earn rewards on all orders over $20.00 in products The system will track your rewards for you. And they will be available for use on your next order, or you can save up for a larger purchase. All you need to do is on your first order is agree to participate. You will then begin receiving rewards on qualifying orders.
Orders of $50.00 or more you will still receive an appreciation gift from me. I appreciate you choosing me as your demonstrator!
COMMENTS
Please know that I love to hear from you and answer any questions you may have. My responses generally are not done here on the post. They are made using my phone as I have found it is easier to answer a question for you personally. So you will be receiving an email from me if you make a comment.
Thank you for stopping by today. I hope you enjoyed today’s project and will come back. I do read and reply to all of the comments individually. They mean a lot to me. Please reach out if you have a question.
Smile and Keep On Stamping,
Jackie
Online Exclusives
New Online Exclusives drop every other month. These are amazing products and are a supplement to the Annual and Mini Catalogs. This way you have access to even more New and Awesome products!
You can go directly to these in my Online Store by clicking HERE
The stamp set and Hydrangea Hue products used are not available until May.
Do any of you remember the “scratch and sniff” items that would have been around many moons ago? If you are my age you might. This DSP makes me think of that. But in this case, it is more of a “rub softly” feeling. The Velvet Meadow Designer Series Paper has a “flocked” texture on some of the flowers. I was so surprised when I felt it as it actually did not register what the name might imply. My Stamp Club all ooed and ahhed when they felt it as well. This paper is seriously pretty!
The little white flowers are the flocking!
Papers
I have already mentioned the Velvet Meadow Designer Series Paper. And you can see how gorgeous it is. All of the sheets in the pack are like this. I apologize that there is not a photo of the paper or it’s addition to the supply list. It and the Peaceful Pine Ink are not available until May. So not too long away to wait.
To keep a soft tone I used Cloud Cover as the card base. It is part of the DSP colors, and is a real favorite for me. Most shades of blue, or blue/gray as I think of Cloud Cover, work so well with my ideas.
Stamps
The DSP was so pretty that I could have left it with just the sentiment. But decided to go ahead with the greenery image as well. It is from the Friendly Foliage Bundle and is stamped with the upcoming InColor Peaceful Pine. I thought it might dry a tad lighter than it did. It is a really pretty green however. And it gave my club ladies a chance to play with the new ink pads. That was a definite winner!
The sentiment is from the Friendly Foliage Bundle as well. I think this is a great sentiment and useful for many card uses. To add some definition to the ends, I punched each with the Happy Labels Punch. I hate to see this punch go. But it is still available on the Last Chance List. Or it was on Sunday.
Extras
There are a couple of Extras for this one. First is the Linen Thread on the sentiment. I felt it needed a bit more. It was stamped on a scrap that was quite a bit longer than necessary. And that gave me the idea for a longer layer there. By leaving the sentiment offset I wrapped the Linen Thread and bow to the opposite end.
For the Bling I went subtle. It still qualifies as Bling! These are from the Moody Palette Glossy Dots. I love that Cloud Cover has it’s own bling. This makes me happy. And it was perfect for this DSP with the Cloud Cover in it as well.
STAMPIN’ REWARDS
You will earn rewards on all orders over $20.00 in products The system will track your rewards for you. And they will be available for use on your next order, or you can save up for a larger purchase. All you need to do is on your first order is agree to participate. You will then begin receiving rewards on qualifying orders.
Orders of $50.00 or more you will still receive an appreciation gift from me. I appreciate you choosing me as your demonstrator!
COMMENTS
Please know that I love to hear from you and answer any questions you may have. My responses generally are not done here on the post. They are made using my phone as I have found it is easier to answer a question for you personally. So you will be receiving an email from me if you make a comment.
Thank you for stopping by today. I hope you enjoyed today’s project and will come back. I do read and reply to all of the comments individually. They mean a lot to me. Please reach out if you have a question.
Smile and Keep On Stamping,
Jackie
Online Exclusives
New Online Exclusives drop every other month. These are amazing products and are a supplement to the Annual and Mini Catalogs. This way you have access to even more New and Awesome products!
You can go directly to these in my Online Store by clicking HERE
Today I have a gorgeous Fun Fold and am giving you two versions of it. This was a card for my Stamp Club and I couldn’t decide which they might prefer. One requires a bit of coloring where the other is minimal coloring. Just to let you know, most chose the minimal coloring!
Fun Fold
This card qualifies as a fun fold to me, and it is fun. The arches give it an Old World look that I love. Old arched doors are a favorite of mine when I am traveling. However these arches are much simpler to create.
The Everyday Arches Dies offer large arches like on my card, and smaller ones that are great for a sentiment. One of the best things about the Die set is that there are ten different size arch dies. I love the options with these. I will say that when cutting the card base it does require proper positioning and to run it through the machine twice since you are cutting through two layers. The card base is 8 X 5 1/2 and scored at 4 before Die cutting.
Second Option
The materials used on both cards are the same with the one exception. To create the pop up Spotlight technique I added another Die set. This is a favorite, hope it never goes away, Stylish Shapes Dies. I only used the one Die as I did not think the stamped front layer was quite big enough to support a double layer for the Spotlight.
Stamps
This floral stamp is the Flowers Fair Stamp. It is a large, individual, stamp. The mix of flowers is what grabbed my attention. I stamped using Gray Granite Ink and then colored with Stampin’ Blends. For the sentiment on the front I used the Banner Sayings Bundle. These are all smaller size sentiments with a matching Banner Punch to cut them out. The inside is a mix of the Banner Sayings along with the Addressed To You stamp set for the floral arches.
Extras
This card really did not need a lot of extra as it is sort of busy with the different shape, all the flowers, and the sweet sentiment. However, there must be Bling!, and a bit more in this case. I added the wrap of Bubble Bath Linen Ribbon, and a bow from it, to ground the sentiment. Then for Bling, I used Iridescent Pearls. More on the solid flowers than the popped up one, but the same pearls on both.
STAMPIN’ REWARDS
You will earn rewards on all orders over $20.00 in products The system will track your rewards for you. And they will be available for use on your next order, or you can save up for a larger purchase. All you need to do is on your first order is agree to participate. You will then begin receiving rewards on qualifying orders.
Orders of $50.00 or more you will still receive an appreciation gift from me. I appreciate you choosing me as your demonstrator!
COMMENTS
Please know that I love to hear from you and answer any questions you may have. My responses generally are not done here on the post. They are made using my phone as I have found it is easier to answer a question for you personally. So you will be receiving an email from me if you make a comment.
Thank you for stopping by today. I hope you enjoyed today’s project and will come back. I do read and reply to all of the comments individually. They mean a lot to me. Please reach out if you have a question.
Smile and Keep On Stamping,
Jackie
Online Exclusives
New Online Exclusives drop every other month. These are amazing products and are a supplement to the Annual and Mini Catalogs. This way you have access to even more New and Awesome products!
You can go directly to these in my Online Store by clicking HERE
Today’s card was cased from Laura Seki as a added touch to a simple landscape layout. The additions are fairly simple and are a great extra use of your Taper trimmer. I love adding extra cuts to card layouts as it is showing my Paper Trimmer can do more than simply cut the basic layers. It gives it some extra love.
This extra cut on the top layer of the card could be to simply cut away the strip, or do as I did and glue it down.
Bundle
The real star of this card are the two Die Cut pieces that are basically holding to the two sections of the card front together. These are from the Delicate Whispers Bundle. I do not often use Foil, but this really called for the extra touch. Plus the Gold Foil matches the gold in the paper.
There is such a lot going on with the front of this card. So I kept the sentiment simple. This is from the Delicate Whispers stamp set. It was also placed as to assist in holding the two sections together. This small sentiment can still Pop on such a busy card.
Papers & Ink
The beautiful DSP on the front is really the star of the show. It is the Lovely & Beautiful Designer Series Paper. Of course I had to pull all of the colors from this gorgeous flower print. Fresh Freesia seemed to be the one that called to me the most. I did add the Gold Foil and Old Olive Cardstock for the Die cut pieces.
Since this was a fairly simple sentiment with no expected inside sentiment, I left it blank for a hand written message. However it cannot be left totally blank! So I added the green stem from the stamp set using Old Olive Ink to mimic the front greenery.
Extras
To complete the sentiment, it is punched using the Three Banner Punch. And the Bling are the Iridescent Foil Gems. This is actually a fairly busy front cover for a simple card.
Measurements
This card base is 5 1/2 X 8 1/2, scored at 4 1/4. Then the front is cut from bottom up to the score line at 1 1/4 & 1 1/2. As I said at the beginning, you can glue this strip to the inside of the card, or just remove it. The DSP is cut to 3 3/4 X 4.
STAMPIN’ REWARDS
You will earn rewards on all orders over $20.00 in products The system will track your rewards for you. And they will be available for use on your next order, or you can save up for a larger purchase. All you need to do is on your first order is agree to participate. You will then begin receiving rewards on qualifying orders.
Orders of $50.00 or more you will still receive an appreciation gift from me. I appreciate you choosing me as your demonstrator!
COMMENTS
Please know that I love to hear from you and answer any questions you may have. My responses generally are not done here on the post. They are made using my phone as I have found it is easier to answer a question for you personally. So you will be receiving an email from me if you make a comment.
Thank you for stopping by today. I hope you enjoyed today’s project and will come back. I do read and reply to all of the comments individually. They mean a lot to me. Please reach out if you have a question.
Smile and Keep On Stamping,
Jackie
Online Exclusives
New Online Exclusives drop every other month. These are amazing products and are a supplement to the Annual and Mini Catalogs. This way you have access to even more New and Awesome products!
You can go directly to these in my Online Store by clicking HERE
A notecard can be so handy to have on hand. I try to make some up that are good for most occasions for when I need a last minute acknowledgment. The one I have today is more specific in that it says Hello. That could be changed merely with a different sentiment and everything else staying the same.
But First, please do not forget that today is the last day of the Double Stampin’ Rewards. They end at 11:59 PM Mountain Time.
Notecards are the Best!
Notecards are quick to make as they are smaller. Yet can still be as pretty as a full size card or scrapbook page. The one I have to share today is using some DSP scraps and two stamps. Plus a couple of Extras. Still very quick and simple.
Paper
The White Notecards come with 20 cards and 20 envelopes for the small price of $10.00. Using this DSP scrap layout, that could be a lot of ready to go cards using the small strips leftover from other projects. And no one wants to throw away those beautiful strips!
The DSP used is two sides of the Delicate Dreams Designer Series Paper. This is so gorgeous. Partly because it showcases the beautiful new In Color of Hydrangea Hue. In addition there are some Bronze effects on some of the leaves and flower centers. It did not show well in the photo.
I shared a piece of the Hydrangea Hue cardstock with the tag. That color to me is not only beautiful but it reminds me of the blue/purple hydrangea flowers which are one of my most favorite flowers. Plus it is not like any other color we have. it is truly unique and I love it. The green DSP is the reverse of the beautiful floral and really highlights the greens there.
Stamps
The sentiment as well as the little bird are from the Cutest Crew Stamp set. This stamp set was on it’s way to me as soon as it was available and apparently to a lot of other folks. It has been out of stock, but is expected back the end of the month.
To get the little bird image, I stamped only half of the bird stamp and then fussy cut this one apart from the others. He became a Blue Bird to match the color theme. He is colored using the Hydrangea Hue Stampin’ Blends.
For the sentiment, I stamped it and then fussy cut around the sides and top to give some interest and not cover the entire tag. It also helps the sentiment to stand out a little more when it has some different shapes.
Extras
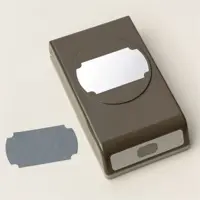
The tag is from the Labeled With Love Punch. This guy is on the Last Chance List for $15.00. I love the unique shape as it does look like a ticket or small tag. To give a bit more texture to the card, I added a bow using Linen Thread. This is always a good choice when you want a ribbon or just some texture and it really goes with almost anything.
Finally I have to add Bling! I have shared a few upcoming products from the May – August Catalog on this little card. All of these are only a couple of weeks away and I felt it was an okay time to bring them out for you to see. These 2026-2028 In Color Dots are in all of the new In Colors. and in two sizes. I used the Hydrangea Hue of course. These have a “pearl” like shine to them so they qualify as true bling.
New Product Reminder
The Hydrangea Hue products will all be available to order beginning on May 5th. I believe you will love this new catalog, And it is in portrait form like the Annual Catalog, not landscape as the Mini Catalogs have been.
STAMPIN’ REWARDS
You will earn rewards on all orders over $20.00 in products The system will track your rewards for you. And they will be available for use on your next order, or you can save up for a larger purchase. All you need to do is on your first order is agree to participate. You will then begin receiving rewards on qualifying orders.
Orders of $50.00 or more you will still receive an appreciation gift from me. I appreciate you choosing me as your demonstrator!
COMMENTS
Please know that I love to hear from you and answer any questions you may have. My responses generally are not done here on the post. They are made using my phone as I have found it is easier to answer a question for you personally. So you will be receiving an email from me if you make a comment.
Thank you for stopping by today. I hope you enjoyed today’s project and will come back. I do read and reply to all of the comments individually. They mean a lot to me. Please reach out if you have a question.
Smile and Keep On Stamping,
Jackie
Online Exclusives
New Online Exclusives drop every other month. These are amazing products and are a supplement to the Annual and Mini Catalogs. This way you have access to even more New and Awesome products!
You can go directly to these in my Online Store by clicking HERE
Stampin’ Up! has a very popular special through tomorrow. Any order that is eligible for Stampin’ Rewards, and that is $20.00 in product, will receive DOUBLE the amount of Rewards! Stampin’ Rewards result in FREE product for you.
I have already placed my order. And I hope you have some items on your wish list. Even if it is to stock up on some cardstock or purchase some Stampin’ Blends. I ordered one Bundle that I was holding out on. That got quite a few rewards!
The Event goes through tomorrow night at 11:59 PM Mountain Time. So you have another day to peruse your Wish List. Or your “I am almost out of ….” List. I did that with some cardstock. Then you will have more rewards for your first order from the May – August Catalog. I promise you that you will be wanting a lot from that catalog!!!
STAMPIN’ REWARDS
You will earn rewards on all orders over $20.00 in products The system will track your rewards for you. And they will be available for use on your next order, or you can save up for a larger purchase. All you need to do is on your first order is agree to participate. You will then begin receiving rewards on qualifying orders.
Orders of $50.00 or more you will still receive an appreciation gift from me. I appreciate you choosing me as your demonstrator!
COMMENTS
Please know that I love to hear from you and answer any questions you may have. My responses generally are not done here on the post. They are made using my phone as I have found it is easier to answer a question for you personally. So you will be receiving an email from me if you make a comment.
Thank you for stopping by today. I hope you enjoyed today’s project and will come back. I do read and reply to all of the comments individually. They mean a lot to me. Please reach out if you have a question.
Smile and Keep On Stamping,
Jackie
Online Exclusives
New Online Exclusives drop every other month. These are amazing products and are a supplement to the Annual and Mini Catalogs. This way you have access to even more New and Awesome products!
You can go directly to these in my Online Store by clicking HERE
The content in this blog is the sole responsibility of Jackie Beers as an Independent Stampin' Up! Demonstrator. The use of and content of classes, services or products offered is not endorsed by Stampin' Up!