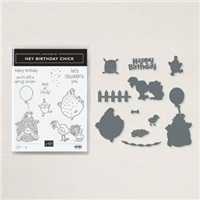
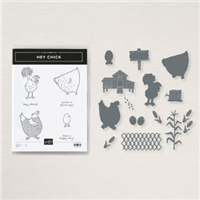
I have a 2 For 1 to share with you today. I am being a little different. I hope you already know that the Hey Chick from a previous Sale-A-Bration is returning. Actually it is already here and was orderable beginning on Monday. PLUS…. it has matching dies ! Oh My!!
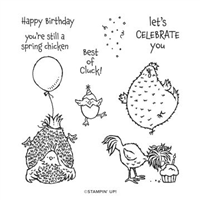
In addition to the previous Hey Chick, there is a new stamp set in this current Mini Catalog named Hey Birthday Chick. It is adorable. Well…..Stampin’ Up! has added dies to match this new Hey Birthday Chick stamp set as well. How Awesome is that???? So I am sharing a pretty simple stamping with the Hey Birthday Chick and then just a second card that is just a touch stepped up.
Isn’t that chick just too stinkin’ cute??? I colored her in not a very flattering way. She looks like maybe she had too much fun at the party. For the background, I used the New Blending Brushes to shade in some Just Jade Ink. Everything is stamped directly onto the Thick White Cardstock using Memento Tuxedo Black Ink. All of the coloring is done using Stampin’ Blends.
Here is the second version.
For this version, I did everything the same as the first card. I then added a layer of Real Red Cardstock to show off the red in the chicken. I stamped the sentiment on scrap paper and punched it using the Classic Label Punch. It is then raised with Mini Stampin’ Dimensionals. For the finishing touch, I added Red Rhinestones scattered around.
It will not be long before I share a new card using this stamp set and the super cute dies that match. Here are a look at both bundles. You can just click on the image for a closer look in the Online Store.
Thank you for stopping by today. I really do appreciate every time you check out my projects! All of the supplies I used in both of the cards today are just below.
HOST CODE
My February Host Code is: MRYR7XY2 Please use this code for orders under $150.00. I will have a small perk for those with orders over $50.00
I was making some 3 X 3 cards for a friend who loves handing them out. The thought struck me to make some Valentine ones for myself as well. These are really quick and simple. The better to make multiples of.
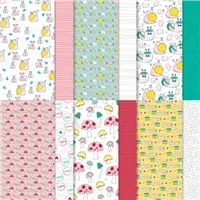
These colors are a bit out of the norm for Valentine, and I love that! I wanted to use the Oh So Ombre Designer Series Paper from Sale-A-Bration (sadly I believe it is all gone now). This is a great project for the 6 X 6 paper stacks or the regular 12 X 12 DSP. The DSP layer is 2 7/8 X 2 7/8, so you can get 4 from one 6 X 6 piece.
I chose the paper first to decide which colors I needed to stamp. Since I went with the Rococo Rose DSP, I stamped the hearts with Rococo Rose Ink. The stamp is from the Valentine Keepsakes stamp set in the Mini Catalog. It is designed to be able to create a continuous background!!
For the coordinating color, I chose Bermuda Bay. It is not one I would normally have paired with Rococo Rose. I chose it because it was a color included in the paper stack. So I knew the colors would work together.
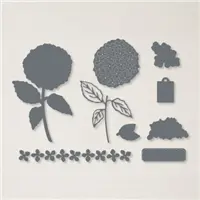
The hearts are both from the Heart Punch Pack. I love punches for the ease of doing multiples! The sentiments are from the Valentine Keepsakes stamp set also. The precious little tag is from the Hydrangea Dies. I knew I had seen a small tag recently so began going through all of the dies until I found it. I stamped the sentiments in Bermuda Bay Ink and then used the Mini Cut & Emboss machine. These being so small , it was quick cutting them out. I did angle the Be Mine just a tad to better fit the tag.
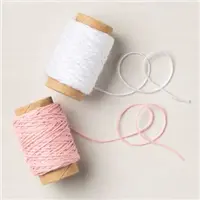
The finishing touch is a little bow tied using the Snail Mail Twine Combo. Although I only used the pink one. It is attached to the top of the tag with a glue dot. I cut an 11″ piece of twine and then tied a finger bow.
Thank you for stopping by today! I hope you like the smaller and quick little cards. Please share your ideas with me.
HOST CODE
My February Host Code is: MRYR7XY2 Please use this code for orders under $150.00. I will have a small perk for those with orders over $50.00
I have been seeing a few more cards that are using the older distressing techniques on the paper. Some are tearing and others are curling and tearing, and aging with ink. I decided to see if I could take myself back quite a few years and make one of these cards.
I had seen a card similar to my center stamped layer that I fell in love with. It was from Rosa Miranda. So I started with that layer first. I stamped the background image from the Very Versailles stamp set using Smoky Slate Ink. I then used the heart stamp from Hearts & Kisses stamp set. It is stamped in Just Jade, Rococo Rose, Bumblebee, and Magenta Madness Inks.
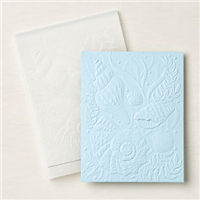
To finish off the distressed part for the main layer, I embossed it using the Old World Paper 3D Embossing Folder. You cannot see the embossed area very well. However, the Smoky Slate layer is also embossed using that folder and you can see the detail in that layer. I also tore the top section and roughed the edges of the Smoky Slate layer.
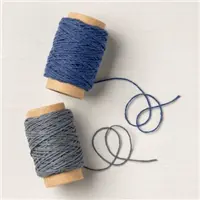
To finish off my card, I distressed the Just Jade layer and then glued everything together. My final thought was the bow. I added a twine bow from the Well Suited Twine Combo Pack. This combo is Night of Navy and Basic Gray. I chose to use the gray to compliment the Smoky Slate.
This is not a “normal” card type for me. But I had a lot of fun playing with different techniques to get the distressed look. You may see me trying more of this style before too long.
Thank you for stopping by today. Since it is the first of the month, please make note that I have a new Host code for February. I greatly appreciate your orders. I have my Blue Star Rewards program (you can see all the details under the Shop button in the menu.
HOST CODE
My February Host Code is: MRYR7XY2 Please use this code for orders under $150.00. I will have a small perk for those with orders over $50.00
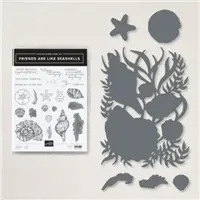
I have used the Friends Are Like Seashells Embossing Folder a couple of times. The detail is simply amazing! Today I have paired the embossed image with the Die that matches it. Oh My!!!
I used Stampin’ Blends to color and highlight some of the details made by the Seashells Embossing Folder. It gives it a watercolor look. The best part is how easily the Die matches up to the embossed panel for cutting. It is such a great idea!
The gorgeous paper behind the die cut is from the Sand & Sea Designer Series Paper. It not only has the flowing water look, but up close it appears to have texture as well.
The sentiment is from the stamp set. And I think it is a wonderful one that will get a lot of repeated use! I stamped it using Calypso Coral Ink and then used the Story Label Punch to cut it out. I added two of the Pastel Pearls to jazz it up just a bit since I did not layer it.
This Seashells Suite is just beautiful, no matter which product you choose to use or pair together! I highly recommend it. It makes me want to be sitting on the beach right now!!
Thank you for stopping by today. I do appreciate you.
Reminder that we are now halfway through this first Sale-A-Bration. If you have any questions, or need any assistance, please do not hesitate to reach out to me.
If you do place an order, please use my host code below if your order is below $150.00.
HOST CODE
My JANUARY Host Code is: AYRTRJCQ Please use this code for orders under $150.00. I will have a small perk for those with orders over $50.00
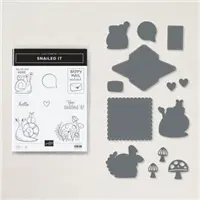
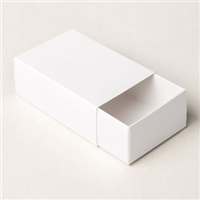
Stampin’ Up! offers a variety of little boxes that are very sturdy and easily decorated. Today I am sharing the latest box. It is the Love You Always Treat Box. To show off the box, I am pairing it with the ever cute little snail from Snailed It.
I think this would be a great little box for a hostess gift, to a friend, a just because, etc. These boxes are surprisingly large on the inside and hold quite a bit. Here is a view of the filled inside.
As you can see, it holds a Bath & Body Hand Sanitizer, and four pieces of chocolate. You could layer a few more chocolates on top of these if you wanted. These are from Amazon and are Biscolata Minis. And they are Very Tasty!!
For decorating the box, I used the Snail Mail Designer Series Paper to wrap around the box. I just wrapped it around as tightly as I could. I then pulled it off and creased the folds I had made with my fingers. Just be sure to leave at least 1/2″ of overlap. You can see from the picture that the band stays on the top of the box. The added benefit of a Matchbox type box!
For the top snail section, I stamped everything using Memento Tuxedo Black Ink. I colored all with Stampin’ Blends. I did not stamp the snail on the White layer. It is stamped on a scrap piece and die cut. To be different, I used my Paper Snips and cut off the packages that sit on top of his shell. After coloring with the Stampin’ Blends, I layered the snail with dimensionals onto the other piece.
To replace the packages on the snail, I stamped the postage stamp “Happy Mail” on some scrap paper and cut out the envelope. I colored it and added it to the snail’s shell as an unexpected gift.
Thank you for stopping in today! I greatly appreciate it.
HOST CODE
My JANUARY Host Code is: AYRTRJCQ Please use this code for orders under $150.00. I will have a small perk for those with orders over $50.00
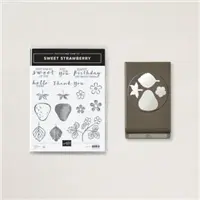
I adore the sentiments with the Sweet Strawberry Stamp Set. The title for today, Hello There, is one of them. The entire Bundle is simply a must have for fun cards. I have a quick one to share today.
I love the stamps in the set and not just the sentiments. They are all wonderful. You can two step stamp to fill the images, or you can stamp the outline and then color the inside area. I did a little of both on this card.
For the “vine” I stamped using Memento Tuxedo Ink. I then colored the leaves with Granny Apple Green Stampin’ Blends. I colored two of the flowers as well. I then stamped a separate flower from the stamp set and added it on top of the upper most flower with a mini glue dot. (There are four pieces that are in the punch: the strawberry, cap, leaf, and flower) To finish the flowers I added an In Color Dot in the Bumblebee to the center of the two full flowers.
The strawberries and their caps are stamped both the outline and centers. I did use a trick for the strawberry caps. I did not want the white area showing that the punch leaves behind. I think it would really shine against the body of the strawberry. So I took the Light Granny Apple Stampin’ Blend and colored it. I am happy with how that worked out.
To add some whimsy to this card, I went with the angled layer of papers. I was going to lay both papers at opposite angles, but it hid too much of the DSP. So I layered those two properly and then angled them. It allows the True Love Designer Series paper to shine as well as the Granny Apple Green cardstock.
Thank you for visiting today! I hope you will return tomorrow for another new project.
HOST CODE
My JANUARY Host Code is: AYRTRJCQ Please use this code for orders under $150.00. I will have a small perk for those with orders over $50.00
The content in this blog is the sole responsibility of Jackie Beers as an Independent Stampin' Up! Demonstrator. The use of and content of classes, services or products offered is not endorsed by Stampin' Up!