Welcome to InKing Royalty’s June Blog Hop! As we prepare for the July 4 holiday ahead, we are sharing projects that celebrate the Red, White & Blue. Not all projects will be patriotic, but you are certain to be inspired by all of them. After you read my post, I hope you’ll hop over to the next person on the list at the base of this post.
My Red, White, & Blue cards are generally stars and stripes. Today’s card went in a different direction after perusing the different stamp sets that would work. Hopefully you will still like it.
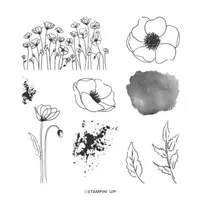
Stamp Sets
This card is a very unique one for me only because of the number of stamp sets I used in making it! It is difficult to say that one is the star over the others. Picking one would probably go to the Alphabet Bundle. It is very unique with having the outlines and Punch. However all of the others play an important part. The flowers are from the Painted Poppies stamp set. They are colored with Stampin’ Blends in a not realistic coloring!
For the center cake, it comes from the Breaking News stamp set. This is one that as soon as I saw it I knew it was for me. All of the little images are the kind I really love! Cakes have become more beautiful and creative over the years. So this one received a striped coloring both inside and outside. Those stripes are created using the same Stampin’ Blends.
Dies, Punches, extras
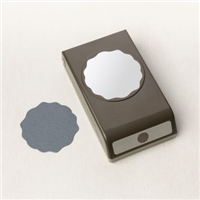
Placing the cake as the center of the card required a special layering. The new Decorative Circle Punch has become a “Go To” for me lately. It is a perfect size with just enough detail around the edges. To add brightness to the layer, I went with the same color as the card base, Sweet Sorbet, and used the Layering Circles Dies.
My favorite of the card is the USA. Those pieces were stamped from the Alphabet stamp and then punched using the matching Best Label Punch. They come as a Bundle to save you 10% and it is one you will definitely want to get. For the finishing touch, I added a few of the Iridescent Rhinestones to the blue, Starry Sky, area.
Thank you for stopping by today. I hope you’ll hop along to the next stop on the blog hop, Lisa Graham at Lisa’s Little Ink Spots. There’s lots of inspiration to be found in this group – and you don’t want to miss it!
Thank you for hopping along with us. If you get stuck during the Blog Hop, please use this line-up as a guide:
Click on the photo to get the complete PDF of retiring products. Pay close attention to discounted items. It may be less expensive to purchase some items that are part of a bundle separately, than at the bundle price! I want you to get the most for your dollars.
HOST CODE
My June Host Code is B4ZVQK6D. Please use this code for orders under $150.00. I will have a small gift for those with orders over $50.00 in addition to the Perk Rewards Program. You can read all of the information at the top of the page in the Menu Bar under SHOP / Perks.
Thank you for stopping by today. I hope you enjoyed today’s project and will come back. I do read and reply to all of the comments individually. They mean a lot to me. Please reach out if you have a question.
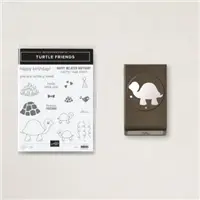
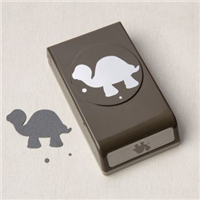
Today’s card is starring the Turtle Friends Punch Bundle and would work for any age. At least I hope it does since I made it for a close friend, who is younger than me, but not a child. I thought the turtly play on words was just perfect.
Stamps and Punch
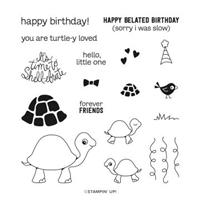
I had not really played with this stamp very much and making this card has given me several ideas for it. Sadly it is on the retiring / almost gone list. (There are only 7 days left of the current Annual Catalog!) For the sweet turtle, I stamped and then colored her body with Crumb Cake Stampin’ Blends. And did you notice her pink toes and lips? The shell is stamped with Old Olive and then punched with the matching Turtle Punch.
The adorable little bird is stamped with Polished Pink and fussy cut using my wonderful Paper Snips. Both the turtle and the bird are raised with Stampin’ Dimensionals. I don’t care for a lot of a solid cardstock. So to alter that part of the Polished Pink I stamped the party streamers tone on tone down the open section. And finally the sweet Turtly sentiment was added on the White with the Turtle and Bird.
Colors
Normally my color choices begin with the DSP. This time the black and white plaid strip from the Pattern Party Designer Series Paper was indeed the original idea. And the Polished Pink came more from “what would go best with this strip of DSP?”. An odd way of getting there but it worked!
There are probably not very many real life pink birds. Maybe a flamingo? But I took creative license and went with it for the little bird. And to add bling for my finishing touch I went with pink again. This time was the 2021-2023 In Color Gems.
Product Share
I am taking orders for the new Annual Catalog Product Share for New Designer Series Paper and Ribbons. The form is on my menu under Shop/Product Share. This is a wonderful way to get a sample of all of the new papers so you can really see their beauty in person. Then you can decide on the ones you like the most. And the ribbon is the same way.
WAVES OF THE OCEAN SUITE …EARLY RELEASE
CLICK ON THE PHOTO TO SEE THE COMPLETE SUITE OF PRODUCTS
ALL TOGETHER … SPECIAL BUNDLE
CLICK ON THE PHOTO TO SEE ALL OF THE PRODUCTS
HOST CODE
My April Host Code is STVD4BDV. Please use this code for orders under $150.00. I will have a small gift for those with orders over $50.00 in addition to the Perk Rewards Program. You can read all of the information at the top of the page in the Menu Bar under SHOP / Perks.
Thank you for stopping by today. I hope you enjoyed today’s project and will come back. I do read and reply to all of the comments individually. They mean a lot to me. Please reach out if you have a question.
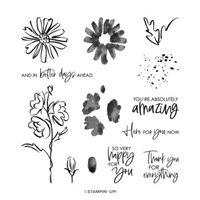
The Sentimental Swirls stamp set may be one that you have overlooked in the Mini Catalog. After seeing it demonstrated prior to the catalog debut, I was hooked on it. The various elements that it contains can be used in so many ways. And it makes a quick and adorable card.
Stamps
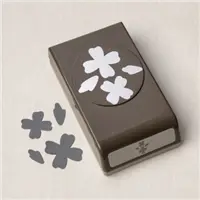
There are two stamp sets used on this sweet card. The first and most used is the Sentimental Swirls that I mentioned at the beginning. As you can see, the swirl is beautiful. And there are different size flowers, with both the outline and the fill. I used the outline for the larger ones and colored using the Stampin’ Blends, and then punched out. The smaller one is a “fill” shape and is stamped directly onto the cardstock.
For the sentiment, I went to a separate stamp set. This great sentiment is from the Hello Beautiful set. I truly love the sentiment and the mix of fonts. The inside of the card has several of the smaller flowers stamped as well as a Happy Birthday from the Sentimental Swirls set.
Punches and Dies
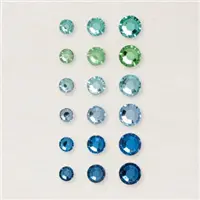
Regarding the sweet flowers mentioned above, I discovered the larger one fits perfectly in the Flowers & Leaves Punch. It contains two different size flowers and this is the smaller of the ones on the punch. For the centers of the flowers, I used the darkest blue of the Rhinestone Waves in the Waves of the Ocean Bundle. (See the specials at the bottom of the post!)
The arrangement of the sentiment was a result of wanting to utilize the beautiful Misty Moonlight piece of DSP from the Abstract Beauty Designer Series Paper. I love the flecks of gold! So the hunt was on for layering pieces that would not totally cover that DSP. The Everyday Label Punch came to the rescue for the DSP piece. It is large enough without being too big. Then I discovered that one of the Layering Circles dies will fit perfectly and leave enough of the great paper showing.
To ground the sentiment, I went with a small strip of the Fresh Freesia paper. Between the flecks of gold in the DSP and the blue rhinestones, you would think I had enough of the bling going. But no…. I had to add one of my current favorite bling items, the Brushed Brass Butterflies. That was the finishing touch the card needed.
SAVINGS ARE IN BLOOM
CLICK ON THE PHOTO FOR A VIEW OF ALL ITEMS DISCOUNTED
WAVES OF THE OCEAN SUITE …EARLY RELEASE
CLICK ON THE PHOTO TO SEE THE COMPLETE SUITE OF PRODUCTS
ALL TOGETHER … SPECIAL BUNDLE
CLICK ON THE PHOTO TO SEE ALL OF THE PRODUCTS
HOST CODE
My March Host Code is JGGHP66J. Please use this code for orders under $150.00. I will have a small gift for those with orders over $50.00 in addition to the Perk Rewards Program. You can read all of the information at the top of the page in the Menu Bar under SHOP / Perks.
Thank you for stopping by today. I hope you enjoyed today’s project and will come back. I do read and reply to all of the comments individually. They mean a lot to me. Please reach out if you have a question.
To pair with the Winter theme from yesterday, I have another Winter card to share with you. This one is more of snow and trees. The idea for this card was from the paper. It is the Beauty of the Earth Designer Series Paper. I love this pack of great designs and color of paper, but find I have not been using it.
Paper
The blue trees of the DSP is what set the tone of this card. Because of the DSP, I did an unusual mix of Misty Moonlight and Soft Succulent. And it makes me happy to say that I love this coordination! The focal tree is also stamped in Soft Succulent and Evening Evergreen, with some snowflakes in Balmy Blue. But the DSP reminds me of a snowy night scene!
Stamps
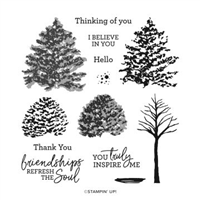
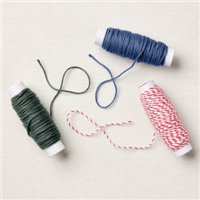
The stamped tree is from the Beauty of Friendship stamp set. It pairs with the paper, and was the perfect tree for my snow scene. For the sentiment, I went with the new Flowing Flowers stamp set. I love that “Time For A Happy Dance”. It reminds me of childhood when it snowed! Just to be different, I fussy cut around the sentiment. Then I layered it onto a scrap of Misty Moonlight and followed my first fussy cutting to create the layer. As a finishing touch, I used the Navy Bakers Twine from the Fan Bakers Twine pack to create the ribbon and bow.
Sale-A-Bration is the Best Time of Year!!
HOST CODE
My January Host Code is GR679MMV. Please use this code for orders under $150.00. I will have a small gift for those with orders over $50.00 in addition to the Perk Rewards Program. You can read all of the information at the top of the page in the Menu Bar under SHOP / Perks.
Thank you for stopping by today. I hope you enjoyed today’s project and will come back. I do read and reply to all of the comments individually. They mean a lot to me. Please reach out if you have a question.
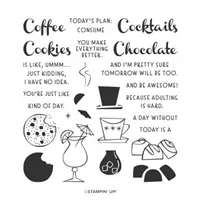
I needed a birthday card for a friend who socializes quite a bit. And there are cocktail parties in her neighborhood every week. So I knew exactly the stamp set to use for this card.
I could not get the foil paper to cooperate in the photo. The foil seemed to deaden the Simply Elegant sheet. It really does shine in person.
Stamps and Dies
The stamp set I immediately thought of is the Nothing Better Than. It has Cocktails, Chocolate, and Cookies. I went with the Cocktails. There are matching dies, but are no longer a bundle, which are the Love You More Dies. Those three words have dies, as well as a few drinks, cookies, and chocolate pieces. I went with the party drink and the word Cocktails.
Paper and Punch
To begin this Cocktail party I started at the bottom, the card base is done with Smoky Slate Cardstock. It pairs well with the silver of the DSP. Next is Gold Foil Paper and then the piece from the Simply Elegant Designer Series Paper. The stamped cocktail is colored with Stampin’ Blends and punched using the Postage Stamp Punch. Even this cute image needed a back layer, so I cut another piece of Gold Foil. That really makes the color in the DSP pop!
To finish the card I needed the die cut Cocktails. I used the Gold from the Gold and Rose Metallic Paper. This shimmery paper is simply gorgeous. It is adhered to a Foam Adhesive Sheet then die cut. All you have to do then is peal off the backing and you have a Cocktail sticker. That simple step and product makes for such an easy word layer.
HOST CODE
My October Host Code is HSUBS7GX. Please use this code for orders under $150.00. I will have a small gift for those with orders over $50.00 in addition to the Perk Rewards Program. You can read all of the information at the top of the page in the Menu Bar under SHOP / Perks.
Thank you for stopping by today. I hope you enjoyed today’s project and will come back. I do read and reply to all of the comments individually. They mean a lot to me. Please reach out if you have a question.
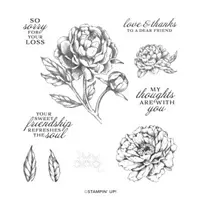
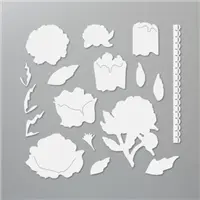
The card I am sharing today is a special one. It was made as a shower card for a sweet young lady I consider to be my Goddaughter. And of course her fiance as well . Pink is not really one of her wedding, or shower, colors. But pink and a peony just seem to go together.
Stamp Sets
The star of this card is the peony. It is from the Prized Peony stamp set and has matching Dies but is no longer a Bundle. The Peony is stamped with Versamark onto Basic White cardstock. I then used White Embossing Powder to heat emboss the image. Next was the fun part. It is an old technique that we used to use the sponges to create. However, now we have the awesome Blending Brushes. I used Polished Pink Ink and a Blending Brush to cover the entire embossed image. After adding the color, I went back over the flower with a tissue and wiped the ink off of the White embossing.
Not to leave well enough alone, I tried a different technique as an addition for the leaves. Using the Just Jade Light Stampin’ Blend, I did basically the same thing except just over the leaves. I then used a tissue to wipe it off of the embossed area. It is not as dark as I anticipated, but I like the subtle shading it gives.
For the sentiment I found this sweet one in the Color & Contour stamp set. I stamped it using the Polished Pink Ink. The ink color matches the darker areas in the Designer Series paper.
Dies and Punches
To cut out the peony image, I used the matching Die set that is aptly named Peony Dies. It really does allow the peony to be the star of the card. After choosing the band of Gold Foil to ground the peony, it left me without an area to stamp the sentiment. Since I love punches, and have all of the current ones, I checked all that would fit the size I needed. The one that fit the bill the best was the Essential Tag Punch. It has just enough of a defining shape without competing with the flower and paper. I did trim about 1/2″ off the bottom as it was a tad larger than I needed.
Paper
It is hard to believe that this fabulous paper is my final area to comment on. For once the Expressions In Ink Designer Series Paper is NOT the star of the card. That is really hard to believe. Because this card was for a special occasion, I went wild with the Gold Foil. That is not something I normally do. Usually less is better. However, when dealing with the gorgeous DSP and the veins of gold, I had to have gold as the background layer. Then I needed a grounding of some kind for the peony and tag. So add a strip of gold instead of a piece of ribbon as I normally would.
The finishing touch is a scattering of tiny Pearls. There are more than I normally would use, but they add to the elegance. I also used the Simply Elegant Trim (It has both Silver and Gold Trim in the Combo pack) to make a tiny bow for the tag. I hope you are as happy with this final result as I am!
The 2nd Sale-A-Bration Is Ending !!
Only today and tomorrow to take advantage of the FREE SAB products. Did you know that purchasing the Prized Peony stamp set and matching Peony Dies would qualify you for one of the $50.00 Free products? That is a great deal !!
Join My Team Promotion During Sale-A-Bration!!
HOST CODE
My September Host Code is NWZNBFH2. Please use this code for orders under $150.00. I will have a small gift for those with orders over $50.00 in addition to the Perk Rewards Program. You can read all of the information at the top of the page in the Menu Bar under SHOP / Perks.
Thank you for stopping by today. I hope you enjoyed today’s project and will come back. I do read and reply to all of the comments individually. They mean a lot to me. Please reach out if you have a question.
The content in this blog is the sole responsibility of Jackie Beers as an Independent Stampin' Up! Demonstrator. The use of and content of classes, services or products offered is not endorsed by Stampin' Up!