If you love Designer Series Paper then today’s card is one you will really like. It is a fun layout that stars a piece of DSP. What could be better.
Layout and DSP
I have to first say that I got this quick and adorable card from The Paper Pixie. She shared this awesome layout and I fell in love. I believe you will as well. The beautiful plaid DSP is from the Dandy Designs Designer Series paper. It is the extra thick pack that is a Sale-A-Bration item.
I love purple and this paper was a quick choice in flipping through the options. Although it is more Fresh Freesia than a purple probably. The plaid DSP piece is cut 3 7/8 X 3 7/8 and scored from one corner to the other, like a diamond. That size, which took my non-math brain a minute to understand, has a center that is 5 1/2″ long. So it fits perfectly down the side of the card. A bonus is that you are also seeing that large triangle of DSP on the inside flap of the card. I really love seeing more DSP!!
Stamps
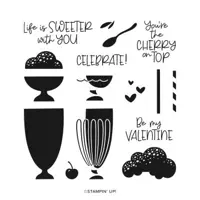
To allow the DSP to shine, I wanted a smaller stamp for the focal layer. This fun desert is in the Share A Milkshake stamp set. As is the sentiment. My color choice may be a bit confusing. First, I took color liberty to help the desert match the DSP. That is definitely allowed. Actually though my favorite ice cream as a child was Grape flavored. And an ice cream shop near my home had Grape. I will say that it drove my Mom crazy! 🙂 But I loved it and that was my first thought on matching the paper.
Finishes
This card is fairly monochromatic in that there are various shades of purple. The plaid DSP, the Fresh Freesia layers and the Gorgeous Grape desert bowl all work together. So to complete this theme I added a few of the Opaque Gems. There are a couple of different sizes and different colors in this assortment. I chose a large in Gorgeous Grape with two smaller sizes of Fresh Freesia.
Thank you for stopping by today. I hope you will give this fun layout a try.
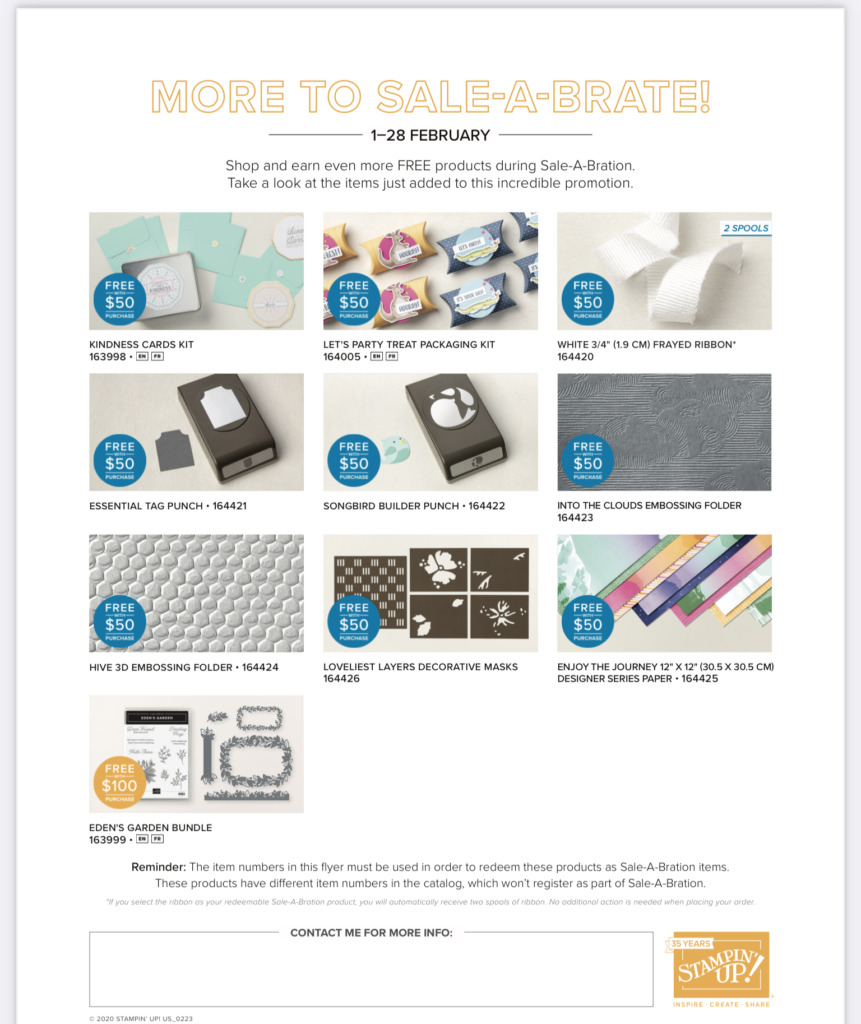
Additional FREE Sale-A-Bration Items for February…..
Sale-A-Bration and Join Promotion
Not only is SAB all about Free Products, but Stampin’ Up! has really upped the rewards if you choose to join my team.
The regular Starter Kit, I call it the Ultimate Bundle, is 125.00 in product for 99.00. You get to choose all of the products yourself. For these two months of SAB, there are three options for you to choose and the rewards are amazing!
Option 1: The exclusive Boho Blue Mini Machine ($63 ) + your choice of $175 of Stampin’ Up! products for only $129 .
Option 2: The original white Mini Machine ($63 ) + your choice of $175 of Stampin’ Up! products for only $129 .
Option 3: Your choice of $175 of Stampin’ Up! products for only $99 .
Options 1 and 2 offer you 50.00 more in product and the Mini Machine for only 30.00 above the regular price.
Option 3 offers you $50 more product than the standard Starter Kit offer for the regular price!
These are the best deals I have seen. If you are interested, please reach out to me and let’s chat about it.
HOST CODE
My February Host Code is FCF2FJVJ. Please use this code for orders under $150.00. I will have a small gift for those with orders over $50.00 in addition to the Perk Rewards Program. You can read all of the information at the top of the page in the Menu Bar under SHOP / Perks.
Thank you for stopping by today. I hope you enjoyed today’s project and will come back. I do read and reply to all of the comments individually. They mean a lot to me. Please reach out if you have a question.
Today’s card is another that qualifies as #simplestamping. This one is a very “clean” card, which is not something I do very often.
Stamps
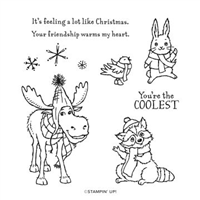
The All Bundled Up stamp set from the Mini Catalog is so cute! The various little critters have been used by me several times since the catalog launched. Animals are a favorite image and these are top notch. These are easy to color and have some wonderful expressions. This little guy was stamped with Memento Tuxedo Black Ink and then colored using Crumb Cake, Pool Party and Balmy Blue Stampin’ Blends. To help ground him, I used the light Pool Party Blend and squiggled a bit of a shadow at his feet.
The second stamp set used on this card is the Peaceful Deer stamp set. Only sentiments were used. There was temptation for a few of the small images of this set. However, I restrained myself and stuck with the simplicity of the single bunny.
Layout
A layout of White on White is such a great choice and makes the perfect “clean” card. But I went just a step further and did some dry embossing on the top layer of White. Using my Simply Scored, I scored all four sides at 1/4″ and 3/8″. It does not show well in the photo. There is a bit at the top you can see. Please trust me that it is on all four sides! With most of the top layer left white, I thought it needed a little something. And a few score lines really add to the card. Plus by raising the top layer with Stampin’ Dimensionals, that gives more depth to the card.
The final touch was adding a little bling. Even a little bunny needs some bling. So there are three of the Fine Sparkle Gems added above the sentiment. To be different, I added two that are a Pool Party color and one of a more Balmy Blue color.
Sale-A-Bration
This is the last few days of Sale-A-Bration for 2022! These Free items go away when the calendar clicks over to September. And there are quite a lot of awesome items which you can get at no cost with a $50.00 or $100.00 order.
Mini Catalog and Sale-A-Bration
Click on either catalog photo and you will be taken to my Online Store where you can download either or both catalogs.
HOST CODE
My August Host Code is H9KF4JUC. Please use this code for orders under $150.00. I will have a small gift for those with orders over $50.00 in addition to the Perk Rewards Program. You can read all of the information at the top of the page in the Menu Bar under SHOP / Perks.
Thank you for stopping by today. I hope you enjoyed today’s project and will come back. I do read and reply to all of the comments individually. They mean a lot to me. Please reach out if you have a question.
Welcome to InKing Royalty’s August Blog Hop! Can you believe it’s already time for schools to start back up?! The return to school after summer vacation is a really big deal for students, teachers, school workers and the parents who are left home alone. To honor this big event, we have created projects with a back to school theme. We are excited to share our creations and hope you love them! After you read my post, I hope you’ll hop over to the next person on the list at the base of this post.
This has been one of the hardest themes for me to wrap my head around! Celebrating Back To School is not anything I have ever participated in since I do not have children. However, I love seeing the creative photos taken each year to document back to school. And that is what I based my card on.
Stamps
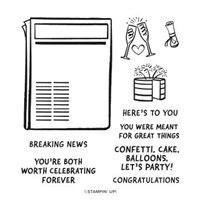
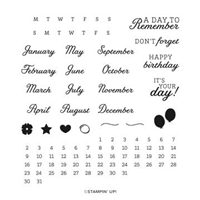
Considering the theme, I was concerned I did not have appropriate stamps for this card. Hopefully what I created fits the idea! Since back to school is a big deal, especially the first year of school, I thought that was Headline worthy. So out came the Breaking News stamp set. The large newspaper is stamped and then cut out. For the sentiment I went with the Days To Remember stamp set. It is the one like a calendar builder. And the sentiment from the set seemed a good fit, as it is a Day To Remember.
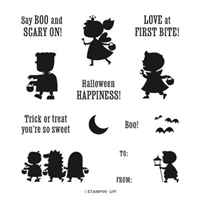
To add to the “newspaper article”, I went back to my first day of school. Apparently I was very hard headed and only wanted to wear my cowgirl outfit! So seeing the little princess in the Scary Cute stamp set seemed appropriate. This same card could work for an invitation or even baby shower with these same images. But I hope it works in your imagination for First Day of School.
Colors and Paper
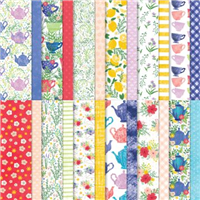
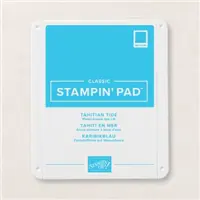
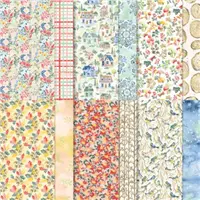
To coordinate with the little princess, I needed bright female colors. Thee were found in a piece of the Tea Boutique 6X6 Designer Series Paper. From there it progressed to the card base of Polished Pink and layer of Tahitian Tide. This resulted in the little girl being pretty in pink. And to add more to the newspaper article, I added a few balloons to continue the celebration.
A finishing touch is Tahitian Tide Metallic Ribbon for a layered bow. It was wrapped twice around the card and then a double bow was added. The last touch is a few embellishments. To keep the colors equal I went with two each of the 2022-2024 Matte Dots in both Tahitian Tide and Sweet Sorbet, alternating size and color.
Thank you for stopping by today. I hope you’ll hop along to the next stop on the blog hop, Pam Morris at Tap Tap Stamp. There’s lots of inspiration to be found in this group – and you don’t want to miss it!
Thank you for hopping along with us. If you get stuck during the Blog Hop, please use this line-up as a guide:
Click on either catalog photo and you will be taken to my Online Store where you can download either or both catalogs.
HOST CODE
My August Host Code is H9KF4JUC. Please use this code for orders under $150.00. I will have a small gift for those with orders over $50.00 in addition to the Perk Rewards Program. You can read all of the information at the top of the page in the Menu Bar under SHOP / Perks.
Thank you for stopping by today. I hope you enjoyed today’s project and will come back. I do read and reply to all of the comments individually. They mean a lot to me. Please reach out if you have a question.
Today’s card is a different layout for a Gatefold Card. Turning the orientation really changed the look. A layered sentiment joins the fold together.
Stamps and Dies
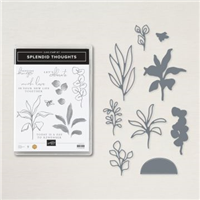
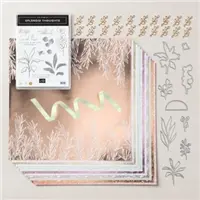
The Splendid Thoughts Bundle includes the Splendid Thoughts Stamp set and the Splendid Stems Dies. The Dies are wonderful and I have used them more than the stamp set. My favorite is the sentiment Die used here. That taco shape with some added definition is great for a lot of sentiments in the catalog.
And the Splendid Stems Dies include a variety of flower and stems. Two of the images above are stamped and then Die cut. But the third Crushed Curry piece is simply Die cut. This more open stem adds quite a lot of texture.
Last, but not least, is the Deckled Rectangles Dies. The NIght of Navy layer is cut using one of those and the edge is very different from any other of the current Dies in the catalog.
Inside View
The inside sentiment is from the Peaceful Moments Stamp set. There is an added touch of one stem of flowers. On the front I stamped the same image on Sweet Sorbet cardstock and then die cut. For the inside one, I stamped on the White and then colored with Sweet Sorbet Stampin’ Blends.
Paper
Stampin’ Up!’s DSP is one of my most favorite things in the catalog. This paper is from the Sale-A-Bration catalog and is FREE with a qualifying order. It is the Rings of Love Designer Series Paper. All of the colors in this sheet are wonderful. And I probably used the majority of them in either cardstock or coloring. The combination of the Night of Navy and Sweet Sorbet are perfect I believe.
Measurements:
The Sweet Sorbet card base is cut to 5 1/2 X 8 1/2 and scored at 2 1/8 and 6 3/8. It may be a bit difficult to see in the photo, but there is a White layer under the DSP. It is two pieces that are each cut 5 1/4 X 1 7/8. And the DSP layers are two pieces cut at 5 1/8 X 1 3/4.
Inside is a regular size White layer cut to 5 1/4 X 4. For the front, theNight of Navy Deckled layer is cut from a piece of scrap that is 2 1/2 X 4. And the Crumb Cake layer is from a piece measuring 2 3/4 X 3 1/2. The Sweet Sorbet image truly was a narrow scrap that was approximately 1 X 3. And and even smaller scrap was used on the Crushed Curry piece.
The stems were adhered to the Night of Navy layer only at the bottom. By leaving the upper parts free it gives a touch more dimension. And the sentiment is adhered with Stampin’ Dimensionals. The whole sentiment / stems layer was centered on the right side of the card with only the upper half adhered to the top flap by using Stampin’ Dimensionals also.
Mini Catalog and Sale-A-Bration
Click on either catalog photo and you will be taken to my Online Store where you can download either or both catalogs.
HOST CODE
My August Host Code is H9KF4JUC. Please use this code for orders under $150.00. I will have a small gift for those with orders over $50.00 in addition to the Perk Rewards Program. You can read all of the information at the top of the page in the Menu Bar under SHOP / Perks.
Thank you for stopping by today. I hope you enjoyed today’s project and will come back. I do read and reply to all of the comments individually. They mean a lot to me. Please reach out if you have a question.
Showcasing beautiful paper is an easy thing to do with Stampin’ Up!’s Designer Series paper. This card is starring the Splendid Day DSP.
This card was created during a Stampin’ Up! creative day for demonstrators. It was a fun day of creating with a presenter with not a real idea of the outcome until the card was complete. All of the cards were great and not something I would have normally thought to do. This one definitely fits that last statement.
Suite of Products
Generally I do not showcase a Suite of products. However, this Suite is amazing and I love all of the products included in the suite. It is all about the Splendid Day Suite today.
PAPER: The star(s) of this card are the little taco shaped DSP pieces. They are cut from the Splendid Day Specialty Designer Series Paper. The paper has a variety of soft colors with one side being a Foil and the other regular DSP images and designs. To show so many different papers on one card is unusual even for me! Last but not least is the card base of Petal Pink and the banner of Soft Sea Foam. Both of these colors are included in the DSP.
DIES: The taco looking pieces were cut using the die from the Splendid Stems Dies. This shape is a favorite of mine. I have used it on a few different cards because the shape and details are so unique. A bonus is that two of the four sentiments included in the stamp set fit on this die cut! And as you see on the card, it is a great size!
STAMPS: To mimic the pattern in the Foil DSP pieces, the large leaf outline was used as Tone on Tone on the card base. The Splendid Thoughts stamp set includes the sentiments I mentioned above plus a bee and two different stem/floral pieces. Each of those have fill stamps as well. Pairing these with the Die set, which has dies for those plus some extra leafy pieces, makes great focal layers.
Finishing Touches
The shine and taco shapes on this card are so pretty on their own. And the added finishing touches simply emphasize these. Even though the sentiment fits on the taco die, that would be a bit much. So the sentiment was stamped on a piece of Soft Sea Foam. Banner tips were cut using Paper Snips.
Also included in the Splendid Day Suite is the Soft Sea Foam 3/8″ Seam Binding Ribbon. If you have used Seam Binding Ribbon before then you know how wonderful and easy it is to work with. This ribbon is the same. Plus we simply wrapped the ribbon around the white layer and tied a knot. It doesn’t get any easier than that!
For the final touch there has to be a bit of bling. Although with the foil DSP pieces there is already a good bit of shine! The bling added to the sentiment is from the 2021-2023 Opal Rounds.
After seeing a bit of a different layout and use of dies, I would love for you to try a similar card and let me know what you think!!
Mini Catalog and Sale-A-Bration
Click on either catalog photo and you will be taken to my Online Store where you can download either or both catalogs.
HOST CODE
My July Host Code is ZMG9Q7EX. Please use this code for orders under $150.00. I will have a small gift for those with orders over $50.00 in addition to the Perk Rewards Program. You can read all of the information at the top of the page in the Menu Bar under SHOP / Perks.
Thank you for stopping by today. I hope you enjoyed today’s project and will come back. I do read and reply to all of the comments individually. They mean a lot to me. Please reach out if you have a question.
For today’s Pals Fun Fold Blog Hop I have a Twisted Card to share with you. Twisted is an odd name for a card but is very appropriate in this instance.
And here is the unfolded card to give you a better idea of the Twist.
Twist Fold
This type of Fun Fold has been around for a while. And I have wanted to make it, but the size was too large. All of the versions I had seen were 5 1/2 X 5 1/2 so required a special envelope. Keeping it simple and working with what we have is my preference. So I fiddled with the measurements and this one will fit inside a regular A2 envelope.
Hopefully my directions in the PDF are understandable. Although I will say the most difficult part is making sure the DSP is cut in the direction you want. It took me two tries to get that correct. And there are videos available for the larger size. The directions would be the same with the exception of the height of the card base.
Both of the sentiments used are from the Celebrate With Tags stamp set. For the front, I stamped the sentiment and then cut it apart to fit on the circle section of the tag. It can work by either cutting straight with a paper trimmer or as I did and just winging it with paper snips! Personally I like the bit of angle to the Let’s and You.
Dies
Two different die sets were used for this fun card. The one I love is the Designer Tags Dies. It includes the tag on the front of the card. The little detail at the top plus the stitched edging adds more than you would expect. And the second die is the Layering Circles Dies for the white and Hues of Happiness circles on the tag. If you happen to still have circle punches, they would work also. The white circle is exactly the width of the tag for reference.
Thank you for visiting and please follow along to the other Fun Folds in the Hop.
Mini Catalog and Sale-A-Bration
Click on either catalog photo and you will be taken to my Online Store where you can download either or both catalogs.
HOST CODE
My July Host Code is ZMG9Q7EX. Please use this code for orders under $150.00. I will have a small gift for those with orders over $50.00 in addition to the Perk Rewards Program. You can read all of the information at the top of the page in the Menu Bar under SHOP / Perks.
Thank you for stopping by today. I hope you enjoyed today’s project and will come back. I do read and reply to all of the comments individually. They mean a lot to me. Please reach out if you have a question.
The content in this blog is the sole responsibility of Jackie Beers as an Independent Stampin' Up! Demonstrator. The use of and content of classes, services or products offered is not endorsed by Stampin' Up!