This past weekend was our scheduled friends who are demonstrators weekend of stamping and fun. The hurricane put a damper on it. Not all of the ladies were able to get out of their states, and the weekend was cut short due to no power. In attempts to save our batteries we were only texting and calling home briefly. It wasn’t until we were home and able to see the news before we realized exactly how lucky we were to only be without power. My heart goes out to all of the people devastatingly effected by this storm.
I do have my cards to share with you though. Those of us who attended were able to make each others cards and still had lots of fun and laughs. The card I am posting today is another of the More Than Autumn Bundle. This set is such a keeper! It has components to fit so many occasions and seasons.
Stamps and Dies
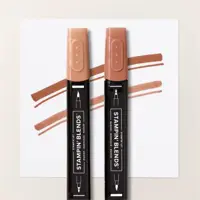
The More Than Autumn Bundle is, as I have said many times, fabulous! All of the images are from this bundle. The cup, foam, cinnamon stick (or straw), and sentiments are from the stamp set. The images are all stamped using Cajun Craze Ink and colored with Stampin’ Blends. The foam is the only exception. It is stamped using Petal Pink Ink. I wanted it to seem like a light pumpkin color.
The images are all Die cut using the matching Die set. The leaves do not have a matching stamp. They are cut and look like the one on the right. However the center pops out as I used it for the left side of the cup. For the circles I used the Deckled Circles Dies. They are 4th and 6th largest. I trimmed off 3/4″ from the right side after layering them together. The cup is raised using Stampin’ Dimensionals.
Sentiment layer
The sentiment was difficult to find a place for. So I created a stand alone pair. Both pieces are stamped onto the Basic Beige card stock and then layered on Petal Pink. For the Fall piece it is simple cut on the trimmer to even distances. The longer sentiment is the same and then snipped on the ends using Paper Snips to create the banner tip.
Paper and Finishes
The papers used were based on the piece of DSP. This is a reverse side of a sheet from the Snowy Scenes Designer Series Paper. I saw this piece and immediately thought it should be paired with this stamp bundle. All of the other paper choices were pulled from the DSP. The base is Calypso Coral with Basic Beige as the layer. With the exception of the Petal Pink for the sentiment layer of course.
The finishes were kept simple since the cup layer was quite a few pieces. I simply added a scattering of the Faux Glass Dots. These come in a couple of Fall colors. I chose the one that closest matched my card colors. And then left them out of the box when I packed for the retreat! DUH!!!
Thank you for stopping in today. I hope all of you are safe.
New Scrapbooking Catalog
The newest addition to Stampin’ Up! is an Online catalog of Scrapbooking products. You can see the catalog by clicking the photo below and save it to your computer.
Online Exclusives
New Online Exclusives have dropped. There are Halloween, Fall, Christmas, and many that are great year round. Of course the new Designer Series Papers and Embellishments are fabulous as well!
You can go directly to these in my Online Store by clicking HERE
HOST CODE
My October Host Code is 2C9JH3D9. Please use this code for orders under $150.00. I will have a small gift for those with orders over $50.00 in addition to the Perk Rewards Program. You can read all of the information at the top of the page in the Menu Bar under SHOP / Perks.
Thank you for stopping by today. I hope you enjoyed today’s project and will come back. I do read and reply to all of the comments individually. They mean a lot to me. Please reach out if you have a question.
The new Season of Elegance Designer Series Paper is the star of today’s card. It is not only for Holiday cards though. I have paired it with Spotlight on Nature to show just that.
Papers
The Season of Elegance Designer Series Paper is part of the Season of Elegance Suite on page 25 of the Mini Catalog. This paper, as you can see, has quite a bit of gold flecks in it. I envision using this for Christmas cards, but saw this sheet that seemed more a milder green. So I paired it with Lost Lagoon card stock. To further carry that idea I used Lost Lagoon and Crushed Curry Stampin’ Write Markers for the flower color. These pull not only the Lost Lagoon but also the gold from the DSP. Of course I tend to add a thin layer between card stock and DSP. So the Basic White was used to also help the circle Pop.
Stamps and Dies
The Spotlight on Nature Bundle has been extremely popular. As soon as it is back in stock then it is gone again. No worries, it is scheduled to be back again the week of September 30. I chose the more simple edged of the Dies for the focal layer. It has just enough detail to not need a backing behind it.
The flowers are a simple technique of ink to rubber with Stampin’ Write Markers. I know this is not as common anymore since you can only purchase markers as a color family and not individually. However to me it is well worth having them. I used the markers of Lost Lagoon and Crushed Curry on the flowers. Then I came back and filled in with the Stampin’ Blends in Lost Lagoon Light and Daffodil Delight Light. The bit of splatter was to mimic the gold in the paper. It is Daffodil Delight Ink and the stamp is from the stamp set.
The butterfly was colored using the same Stampin’ Blends with the addition of a darker green. This is Shaded Spruce. It is fussy cut as there is not matching Die for the butterfly.
Finishes
To add some dimension to the card since everything is glued down, I raised the butterfly with Stampin’ Dimensionals. And of course there is a bit of bling. In this instance I wanted to add a bit more of the gold touch. These Gold Texture Adhesive Dots are new in the Mini Catalog. They fit my need for bling perfectly.
Thank you for stopping by!
New Scrapbooking Catalog
The newest addition to Stampin’ Up! is an Online catalog of Scrapbooking products. You can see the catalog by clicking the photo below and save it to your computer.
Online Exclusives
New Online Exclusives have dropped. There are Halloween, Fall, Christmas, and many that are great year round. Of course the new Designer Series Papers and Embellishments are fabulous as well!
You can go directly to these in my Online Store by clicking HERE
HOST CODE
My SEPTEMBER Host Code is S9CRPBZ4. Please use this code for orders under $150.00. I will have a small gift for those with orders over $50.00 in addition to the Perk Rewards Program. You can read all of the information at the top of the page in the Menu Bar under SHOP / Perks.
Thank you for stopping by today. I hope you enjoyed today’s project and will come back. I do read and reply to all of the comments individually. They mean a lot to me. Please reach out if you have a question.
I have a two for one for you today. Generally it is just as easy to make two cards as one when we are creating. These cards were definitely easily made at the same time. They have a simple technique playing a large role in the creation.
Background and Colors
To begin with the background is not my normal starting point. However with these cards I kind of have to begin there. And you will learn my reason as we go along. I was looking to make a Fall card. Even though it is 90 degrees right now!! Where is my Fall weather!!! That being said, I still wanted a Fall card. I chose the colors based on that.
The colors chosen are Cherry Cobbler, Pumpkin Pie, and Crushed Curry. My idea was a simple “beginner” type “technique” card. To do this fun center technique I used Clear Block H. First I opened the Cherry Cobbler Ink and used the block to touch the ink pad about a third of the way across. Next I turned the block and opened the Pumpkin Pie ink. This time there was no way to get the ink only into the center of the block. Yes, I could have taped part of it off. But I went the simpler route. I inked the rest of the block by touching it to the crushed curry with the Cherry Cobbler hanging off the side. Then I used a damp paper towel to remove the last third. Finally I turned the block and inked that last section with Crushed Curry. (I did make sure it was dry from having wiped off the ink.)
To stamp on the Basic White card stock was only a matter of giving the inked block a little breath of life. In other words I huffed on it. Breath of life sounds so much better. LOL! After stamping the first time I thought there might be enough ink to stamp again. So I gave it more life saving breaths and stamped on the second piece. And there we have two backgrounds.
Stamps
These bright leaves are from the Caring Leaves stamp set. It is in the back of the Mini Catalog and is what I consider a sleeper set. I thought it was cute when I first saw it. But did not really think much after that. Then I saw other’s creations using it and had to look again. Now I am in love with this set.
The outline for the leaves are not totally closed. This gives them a very artistic look. And the filler stamps have the definition to them that leaves shading in places. I used the same inks for the fillers as I did the background strip. But I stamped with Memento Tuxedo Black for the outlines. I am happy with how it turned out. This sweet sentiment is also from the stamp set. It is stamped using Cherry Cobbler Ink.
Finishes
To keep these cards pretty simple I went with all the same colors for the layers as well. One has Cherry Cobbler base with a Crushed Curry layer and the other is the opposite. To give a touch of some bling, I turned to the Regal Foiled Adhesive Dots. These are so pretty with the gold flecks. I used the darker reddish ones. There are a trio scattered around each card.
Thank you for stopping by today!!
New Scrapbooking Catalog
The newest addition to Stampin’ Up! is an Online catalog of Scrapbooking products. You can see the catalog by clicking the photo below and save it to your computer.
Online Exclusives
New Online Exclusives have dropped. There are Halloween, Fall, Christmas, and many that are great year round. Of course the new Designer Series Papers and Embellishments are fabulous as well!
You can go directly to these in my Online Store by clicking HERE
HOST CODE
My SEPTEMBER Host Code is S9CRPBZ4. Please use this code for orders under $150.00. I will have a small gift for those with orders over $50.00 in addition to the Perk Rewards Program. You can read all of the information at the top of the page in the Menu Bar under SHOP / Perks.
Thank you for stopping by today. I hope you enjoyed today’s project and will come back. I do read and reply to all of the comments individually. They mean a lot to me. Please reach out if you have a question.
Yesterday’s card was using a few stamps from the More Than Autumn Bundle. So today I have a complete card using this awesome creation. Additionally this one is a square card.
Stamps and Die Bundle
This card uses quite a lot of the stamp images in this set. And I love that there are matching Dies for most, plus a few more. Since I am not a big coffee fan, I went with Hot Cocoa instead of the coffee for my drink. The fact that there are several beverage names in the set is an added bonus. For the Cocoa I used Foam Adhesive Sheet added to the Pecan Pie card stock before Die cutting. It makes adding the dimension so easy! There are not Dies for the “&” or the doughnuts. I used a small circle punch for the “&” and fussy cut around the “doughnuts”. For the first part of this multiple sentiment, I kept it simple with straight cuts.
The doughnuts are stamped and colored using Stampin’ Blends in Pecan Pie and Peach Pie. Then cut using the matching Die. For the cocoa I stamped the cup onto a piece of DSP before Die cutting. The foam is stamped on Very Vanilla using Wild Wheat ink. Pretend that is a cinnamon sprinkled whipped cream!
Papers
The card base is Pecan Pie card stock measuring 8 1/2 X 4 1/4 to make a 4 1/4 square card. I wanted to be a little different on this one. With the more Fall colors, I opted to pair it with Very Vanilla instead of Basic White. I find I rarely use Very Vanilla and need to rectify that. That layer is cut to 4 X 4.
The DSP is an Online Exclusive. It is the Iconic Celebration Designer Series paper. This paper is fabulous. It has sheets that work for Fall, Winter, Christmas, New Year, and into Valentine’s Day. With a couple of more generic mixed in. It is a pack of 6 X 6 paper. Both of the DSP pieces are from this pack. This piece is cut to 3 X 3. Since it was cut smaller, I allowed the cocoa and the doughnuts to hang over the edge onto the Very Vanilla.
Finishes
This card is a pretty busy one. Because of that I was not really sure about the embellishments. I opted to go along with the Fall colors and went with a couple of colors from the Speckled Dots embellishments. The darker color is in the center of the cup and then two lighter ones around the sentiments.
Thank you for stopping by today!!!
New Scrapbooking Catalog
The newest addition to Stampin’ Up! is an Online catalog of Scrapbooking products. You can see the catalog by clicking the photo below and save it to your computer.
Online Exclusives
New Online Exclusives have dropped. There are Halloween, Fall, Christmas, and many that are great year round. Of course the new Designer Series Papers and Embellishments are fabulous as well!
You can go directly to these in my Online Store by clicking HERE
HOST CODE
My SEPTEMBER Host Code is S9CRPBZ4. Please use this code for orders under $150.00. I will have a small gift for those with orders over $50.00 in addition to the Perk Rewards Program. You can read all of the information at the top of the page in the Menu Bar under SHOP / Perks.
Thank you for stopping by today. I hope you enjoyed today’s project and will come back. I do read and reply to all of the comments individually. They mean a lot to me. Please reach out if you have a question.
Friday was our Anniversary and I made a fun and different Anniversary card. Actually it is cased, somewhat, from Mary Fish’s Friday card. Her use of the More Than Autumn Bundle hit a perfect note for my hubby’s card.
Stamp Bundle
This layout is a mix of Mary Fish’s card and me spilling glue! My direction went from portrait to landscape to cover that error. But it is a regular crafting thing right! I will explain why this was so perfect for an Anniversary, as you probably think it is out in left field. I love everything pumpkin! So my hubby jokes that in the Fall he become my second love while I indulge in pumpkin. LOL!!!
The More Than Autumn Bundle is one I keep using. It has a bit of everything. For this card I used less than usual. On the inside is a piece of pumpkin pie, but the front uses the “pumpkin” , “love you more than”, and then the heart from the die set.
Other Dies
The three layers with the pumpkin are from the Greetings of the Season Dies. These are amazing Dies! Even if you do not want or need more Christmas sentiments, the Die set is definitely worth having. Each one of the three tags has the tag hole. I just layered them to cover it.
The arrow Die with the rest of the sentiment is from the Adventurous Sky Dies. It fit the size of the words perfectly. And added another little layer. I have lots of small layers going on here.
Extras
To add to the layers, I felt like the background needed some texture. I did not want the card to seem just a pile of different colors. Well the Forever Plaid Embossing Folder fixed that little problem wonderfully! I know you can see the serious detail of the impressions. Sadly it is currently out of stock, but will be back the week of October 7.
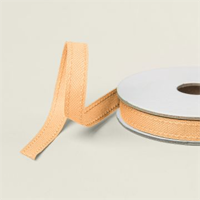
To tie in with the Pumpkin I used the Peach Pie Ribbon for the top tag. And then added a simple bow using the Linen Thread. I felt the ribbon itself was a bit large to tie off on it’s own. Plus I just love Linen Thread! And the final addition is the bling. Although this does not have a very shiny touch. These are the Faux Glass Dots. There are a four different Fall colors that look like old glass. I love them, and they fit the card.
Thank you for stopping by today!!
New Scrapbooking Catalog
The newest addition to Stampin’ Up! is an Online catalog of Scrapbooking products. You can see the catalog by clicking the photo below and save it to your computer.
Online Exclusives
New Online Exclusives have dropped. There are Halloween, Fall, Christmas, and many that are great year round. Of course the new Designer Series Papers and Embellishments are fabulous as well!
You can go directly to these in my Online Store by clicking HERE
HOST CODE
My SEPTEMBER Host Code is S9CRPBZ4. Please use this code for orders under $150.00. I will have a small gift for those with orders over $50.00 in addition to the Perk Rewards Program. You can read all of the information at the top of the page in the Menu Bar under SHOP / Perks.
Thank you for stopping by today. I hope you enjoyed today’s project and will come back. I do read and reply to all of the comments individually. They mean a lot to me. Please reach out if you have a question.
This is the second version of this “view” card I have made. You can see the other version HERE. It is such a great way to make a quick card, but to also show off gorgeous DSP paper and scenes.
Paper
As with the previous card using this layout, the paper is the star really. For this card I have pulled out the beautiful Winter Meadow Designer Series Paper. I loved this paper last Holiday catalog and was so thrilled that it was carrying over. Of course I had to grab another pack of it with the DSP Sale earlier. This card is great to make multiples of as it only takes a small piece of DSP. I cut the DSP to 3 X 2 3/4. And then cut it into 1″ strips. The hardest part is keeping the strips in the proper order when cutting for multiples. Ask me how I know that!!!
To compliment the DSP, I chose the gorgeous Misty Moonlight as the card base. I love the blue gray and how it really pulls the color from the DSP. For the scene layer I went with Shaded Spruce to stand out a little bit. Even though it is another darker color, it does stand out. And in my figuring out the sentiment part, I cut the background from Misty Moonlight, when it should also have been Shaded Spruce. Duh! I did correct it for my Club ladies.
Stamps
There are two stamp sets used on the front of the card. The first is the background stamp on Misty Moonlight. It is a texture look that is stamped tone on tone with Misty Moonlight Ink. That stamp is from the Lovely & Sweet stamp set. Small background stamps are great to have on hand for adding small touches like this.
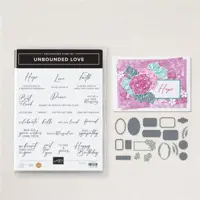
The second stamp used is the Unbounded Love stamp set for the sentiment. It is a sentiment only stamp set. This is actually a Bundled set with Dies that fit all of the sentiments. The small sentiment is bold and with a jaunty font as well. It is a tad large for the Die, but it works. The Die cuts the outside ruffled edge as well as the inside in one cutting. So I layered the White and Blue and cut it one time. With the Basic White being a thinner paper it was not a problem at all. I have a little tip for adhering these together. Place the White inside the scalloped outer section. And place them face down on your table. Add Stampin’ Dimensionals in each corner so it overlaps the center and the outer section. Very easy and it holds well.
Finishes
To add bling to a darker card can be a little tricky. For the bling portion of the finish I added a single Iridescent Pearl. Then I had to use the new Natural Tones Linen Thread as the add on to the paper view. I chose the dark blue, probably a Night of Navy. This is a bit thicker than the regular Linen Thread but not so thick that it is difficult to work with.
Thank you for stopping by today!!
New Scrapbooking Catalog
The newest addition to Stampin’ Up! is an Online catalog of Scrapbooking products. You can see the catalog by clicking the photo below and save it to your computer.
Online Exclusives
New Online Exclusives have dropped. There are Halloween, Fall, Christmas, and many that are great year round. Of course the new Designer Series Papers and Embellishments are fabulous as well!
You can go directly to these in my Online Store by clicking HERE
HOST CODE
My SEPTEMBER Host Code is S9CRPBZ4. Please use this code for orders under $150.00. I will have a small gift for those with orders over $50.00 in addition to the Perk Rewards Program. You can read all of the information at the top of the page in the Menu Bar under SHOP / Perks.
Thank you for stopping by today. I hope you enjoyed today’s project and will come back. I do read and reply to all of the comments individually. They mean a lot to me. Please reach out if you have a question.
The content in this blog is the sole responsibility of Jackie Beers as an Independent Stampin' Up! Demonstrator. The use of and content of classes, services or products offered is not endorsed by Stampin' Up!