I cannot find my notes as to where I saw this card recently. It was called a Tuxedo Card by the one I saw. This is a card I have made previously but without the little extra section on the inside. It is great when we can take an older layout and revamp it.
The ribbon layer pulls out to be a bookmark or to simply reveal an additional message or gift card. But wait….there is more!
There is also an inside of the card. And it has a special little spot for whatever you want to add. I would place a gift card here I believe.
Designer Series Paper
This card is simple to create and is perfect to showcase fun patterns from DSP. All of the DSP used is from the Hobby Haven Designer Series Paper. The inside triangle is the reverse of one of the front pieces. This paper has generic patterns on one side and various hobbies on the opposite. I chose the books. But there is sewing, self care, cooking, gardening, etc.
To create the triangles, I finally had a “light bulb moment”! In trying to cut the paper so I had the books orientated properly for where that piece would go. I turned the square several times. Then the light bulb went off. So make note if you are like me and get confused: If you want the piece to fit in the Bottom Left corner, as I did here, then you cut from the Top Left to bottom right. That is so simple, but took me forever to sink in. Duh!! LOL!!!
Stamps and Dies Bundle
The Creative Haven Bundle has great sentiments with fun shapes that fit each one. I love the Deep Breath and the long oval that it fits. Everyone could use that thought occasionally. And I thought it paired well with the books as that is my relax and unwind method.
Paper and Ink
A color I seem to not focus on is Coastal Cabana. So I was thrilled when it was a part of this DSP and seemed to highlight the rest of the colors better than some of the others. Since it is paired with Basic White mostly, it is a bright card.
The stamping is all done using Lost Lagoon Ink. This is , to me anyway, a darker version of Coastal Cabana. This card could be made with any colors of cardstock and DSP to fit an occasion. And I am always looking for new ways to share a gift card.
Measurements
The card begins with a standard side fold A2 card measuring 5 1/2 X 8 1/2, scored at 4 1/4. There is a White layer on the front of the card measuring 4 X 5 1/4. For the pull out card you need a layer cut to 3 X 4, with a White layer at 2 7/8 X 3 7/8. There is an additional White layer on the inside that measures 4 X 5 1/4. The DSP is 3 3/4 X 3 3/4 that are cut on the diagonal. You will need three triangles it you add the inside pocket as I did. All of the triangles are only adhered along the outside and bottom edge with liquid glue and close to the edge so as not to impede the paper being slid inside. *Remember my light bulb moment if you have a directional paper.
Extras
The two extras for today are simple. One is the White Frayed Ribbon, which sadly is retired. I apologize as I did not realize that when I used it. But I am sure you have some white ribbon on hand. And the bling is the Delightful Decorative Dots. They are wonderful and low profile.
STAMPIN’ REWARDS
You will earn rewards on all orders over $20.00 in products The system will track your rewards for you. And they will be available for use on your next order, or you can save up for a larger purchase. All you need to do is on your first order is agree to participate. You will then begin receiving rewards on qualifying orders.
Orders of $50.00 or more you will still receive an appreciation gift from me. I appreciate you choosing me as your demonstrator!
COMMENTS
Please know that I love to hear from you and answer any questions you may have. My responses generally are not done here on the post. They are made using my phone as I have found it is easier to answer a question for you personally. So you will be receiving an email from me if you make a comment.
Thank you for stopping by today. I hope you enjoyed today’s project and will come back. I do read and reply to all of the comments individually. They mean a lot to me. Please reach out if you have a question.
Smile and Keep On Stamping,
Jackie
Online Exclusives
New Online Exclusives drop every other month. These are amazing products and are a supplement to the Annual and Mini Catalogs. This way you have access to even more New and Awesome products!
You can go directly to these in my Online Store by clicking HERE
I have a Bookmark Card using the new For The Books Stamp set as the highlight. The basics are pretty simple and offer so many ways to decorate. This is a case from Connie Stewart and is fairly quick to make.
Stampin’ Up!, For The Books, Jackie Beers
STAMPS
There are actually two different stamp sets used on today’s card. First is the new For The Books set. These stacked books on the front, along with the adorable glasses, are from the stamp set. I also added additional books on the inside as well as a fun sentiment from the set. Plus the bookmark itself has a funny sentiment that is perfectly fitting.
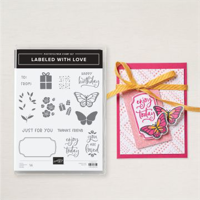
The front sentiment is from the Labeled With Love stamp set. This set has some “go to” stamps for me. The front one is one of those, as is the inside Happy Birthday. It is small and a nice mix of fonts. Here are the other two views of this card.
The addition of the strip of the DSP helps give the books a shelf to sit on. And I love that fun 5 star rating!
The DSP is added to all aspects of the card, including the bookmark. And this is another of the fun sentiments from the For The Books stamp set.
PAPERS
This card base was pulled from the DSP of course. The base is Basic Beige, which is a fabulous Neutral to have on hand. But the star is this Timeless Plaid Designer Series Paper. Sadly it is still out of stock, but supposed to be back before long. I added a layer of Boho Blue cardstock behind the front DSP and to back the books on the front.
EXTRAS
There are several Extras today. First is the Forever Plaid 3D Embossing Folder on the front bookmark holder. I felt this was appropriate to pair with the DSP. Next is the Heartfelt Hexagon Punch for the stack of books. I also punched from Boho Blue and cut that piece in half to act as a layer behind the White. It needed a bit of color to stand out some.
To finish off the bookmark, I used one of the Postage Stamp Dies to cut the bookmark sentiment. And added the Beige and Wild Wheat Ribbon as the ribbon pull. Finally, because there really were a lot of extras, the bling is a trio of the 2024-2026 Shimmer Gems.
HOST CODE
My January Host Code is KSG3THS3. Orders of $50.00 or more will receive an appreciation gift from me. I appreciate you choosing me as your demonstrator!
Thank you for stopping by today. I hope you enjoyed today’s project and will come back. I do read and reply to all of the comments individually. They mean a lot to me. Please reach out if you have a question.
Smile and Keep On Stamping,
Jackie
New Scrapbooking Catalog
The newest addition to Stampin’ Up! is an Online catalog of Scrapbooking products. You can see the catalog by clicking the photo below and save it to your computer.
Online Exclusives
New Online Exclusives have dropped. There are Halloween, Fall, Christmas, and many that are great year round. Of course the new Designer Series Papers and Embellishments are fabulous as well!
You can go directly to these in my Online Store by clicking HERE
I love making little treat holders to hand out to the nice people I encounter regularly. The ones I have to share today have been around for some time. Actually I had a lady message me asking exactly how it went together. So after playing with it to help her, I decided I should make some to hand out. It is a Double Treat Holder. I have used it for Ghirardelli Chocolates and Tea Bags. This one has gorgeous DSP to make it extra special.
I have the directions at the bottom of the post. They are pretty simple to score and fold.
STAMPS & DIES
This sweet stamp is is from the Mixed Labels Bundle. And the adorable Die cut shape is made using one of the matching Dies. I love the stitching with detail around the edge. Plus the new shape is wonderful. On The opposite side of the treat holder I added a little note card. The sentiment from it is from the fabulous So Sincere stamp set. It is definitely one that is a keeper for some great sentiments.
The the opposite side of the treat holder is the exact same size as the front. You could add a second treat there in place of a note. Here is a view of that side.
PAPERS
This gorgeous paper is the Marbled Elegance Designer Series Paper. It is back in stock now so Woohoo!! The gold marbling is on one side with red, cherry cobbler, pretty in pink, white, and gold. The stamping was done on good ol’ Basic White. So a simple supply project as well.
EXTRAS
The Cherry Cobbler and Gold ribbon used to hold the sides together is from Holiday Catalog that just went out. It is still available but with low inventory. For the bling I used the Gold Textured Adhesive Dots. There are three different sizes and I used the middle size to add a touch of gold to the main sentiment.
DIRECTIONS
The treat holder uses a 6X6 piece of DSP. Use your Simply Scored Scoring Tool. I have drawn a line down the center of mine from the 6″ mark using a Black Sharpie. This makes the steps for this project much easier. So….place the DSP on the scoring tool with a point at the 6″ mark and the other lines up in the 6″ line. You have a diamond shape. Score at 4 1/2 and 7 1/2. Make a turn in either direction and score at 5 1/4, 6, and 6 3/4.
Fold and burnish on all of the score lines. Decide which paper you want to be on the outside front folds, like where my sentiment is. Now fold the two side score folds towards the center. They overlap a bit and that is perfect. Then fold the three center scores with the center one making a mountain. Fold the other two so they meet to make the shape. There is no adhesive needed! Here is a view of the side so you can see those center score lines as they need to fold. Let me know if you have any problems.
HOST CODE
My January Host Code is KSG3THS3. Orders of $50.00 or more will receive an appreciation gift from me. I appreciate you choosing me as your demonstrator!
Thank you for stopping by today. I hope you enjoyed today’s project and will come back. I do read and reply to all of the comments individually. They mean a lot to me. Please reach out if you have a question.
Smile and Keep On Stamping,
Jackie
New Scrapbooking Catalog
The newest addition to Stampin’ Up! is an Online catalog of Scrapbooking products. You can see the catalog by clicking the photo below and save it to your computer.
Online Exclusives
New Online Exclusives have dropped. There are Halloween, Fall, Christmas, and many that are great year round. Of course the new Designer Series Papers and Embellishments are fabulous as well!
You can go directly to these in my Online Store by clicking HERE
I have been out of commission for a couple of weeks now. It seems that my run of good health has taken a turn off the tracks. But I am back with only coughs to get rid of. I have missed my craft space and have missed posting for you all. Hopefully I have had my share of this bad stuff for a while!
Today’s card is one I had made for a class last month actually. It is a Bookmark card that I cased from Karen Titus. It is such a fun and simple card with the added bonus of an easy bookmark. Sadly it doesn’t work on my Kindle, LOL!!!!, but it does on my regular books.
Bookmark
The bookmark here is a case from Karen Titus but I have done an easy PDF for the card and the bookmark. All it takes is a square of 5X5 DSP. Here is the PDF if you are interested. CLICK FOR PDF.
Stamps
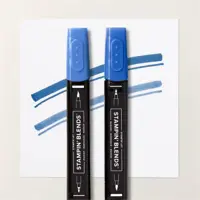
The two stamp sets used here both have carried over to the new Annual Catalog. That is a good thing as both are wonderful sets for a variety of uses. The cup seemed perfect for a bookmark as it represents a relaxing moment to me. Wether you are a coffee or tea person, it works. I stamped it using Memento Tuxedo Black Ink and then colored with Stampin’ Blends.
The sentiment on the front and inside are both from the Sentimental Park stamp set. And it carried over as well. This has sentiments for a various occasions and little stamps to go along. The inside little circles is from the set as well. It adds just a little bit of detail. Here is a view of the inside.
This open view also shows the back side of the bookmark as it is slipped over the corner.
Papers
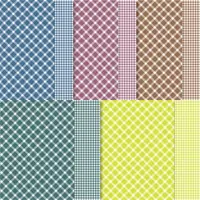
The two different DSP used on this card are both retired now. I thought I had shared this card and realized that I had not. But obviously you could use any DSP that works together. Or you may have both of these in your stash. These are the Glorious Gingham 6X6 Designer Series paper from the last Annual Catalog and the Flight & Airy that was a Sale-A-Bration paper. They are paired with Blueberry Bushel for the rich blue.
Thank you for stopping by today!! I hope you will check back tomorrow.
May Join Promotion
New demonstrators who join during the month of May will receive the following products in their Starter Kit at no additional cost:
2024–2026 In Color Classic Stampin’ Pad Bundle
2024–2026 In Color 8-1/2″ x 11″ (21.6 x 27.9 cm) Cardstock
2024–2026 In Color 6″ x 6″ (15.2 x 15.2 cm) Designer Series Paper
2024–2026 In Color Stampin’ Write Markers
HOST CODE
My MAY Host Code is 96AT2UNW. Please use this code for orders under $150.00. I will have a small gift for those with orders over $50.00 in addition to the Perk Rewards Program. You can read all of the information at the top of the page in the Menu Bar under SHOP / Perks.
Thank you for stopping by today. I hope you enjoyed today’s project and will come back. I do read and reply to all of the comments individually. They mean a lot to me. Please reach out if you have a question.
Today’s project is a partner to yesterday’s Thank You cards. I love the different 3D projects my friend, and fellow demonstrator, Julie DiMatteo makes. She had made a little clutch that held a variety of things. I decided to use that to hold my cards. And it is large enough to add some extra items as well. The clutch stars the Fresh As A Daisy Designer Series Paper. It also emphasizes the beautiful Wanted To Say Dies.
The Clutch
This is a really simple and quick project with some simple score lines. Julie is a master at these type projects. So instead of me trying to explain the procedure to you. Here is a link to her tutorial. Click Here
Decorations
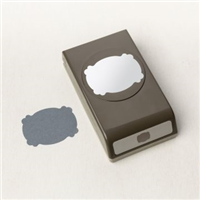
To decorate the clutch, I used the Lasting Label Punch for the clasp. It is folded over the top and adhered to the front with a velcro dot. The little wooden heart button is from my Stampin’ Up! stash. I had actually written on the top of the little round container the date. It is from a 2017 Mini Catalog! I really do need to clean out my stash!!!
Dies
There are two different Die sets used for this pretty sentiment on the clutch. The background is one of the Nested Essentials Dies. I love these shapes and the various sizes. And that they work wonderfully wether placed vertical or horizontally.
The second Die set is the Wanted To Say. This set is amazing! It has the double layers for a 3D look to the words. One of the most important things to remember on these dies is to add the Adhesive Sheet to the back of the card stock before cutting the thinner words. It makes life so much easier! For this one, I used Crushed Curry for the shadow cut and then Basic White for the lettering. Once they were adhered together they are added to the Nested Essential die with Stampin’ Dimensionals. And of course a few pearls were necessary to complete the project.
Open View
This is a view of how large the inside of the clutch is. I have 10 notecards with envelopes as well as an added gift. As I said, it is surprisingly large on the inside. (When closed, the extra gift is laying on it’s side not flat in the bottom.) Hopefully my friend will love this as much as I do!
Starter Kit promotion is ending on October 31! Please do not let it pass you by!!
Reminder of the Join Promotion!!! I would love to have you join my team. There is no pressure to ever place another order. Although you do get a discount being a demonstrator!! Plus we have so much fun sharing our ideas and just enjoying ourselves while stamping. Please reach out if you have any questions. I would love to talk with you. 🙂
Online exclusives are here to stay! Click on the photo and be taken directly to them in my online store. If you place an order, please use my Host Code listed just below.
HOST CODE
My OCTOBER Host Code is NYVXHUMX. Please use this code for orders under $150.00. I will have a small gift for those with orders over $50.00 in addition to the Perk Rewards Program. You can read all of the information at the top of the page in the Menu Bar under SHOP / Perks.
Thank you for stopping by today. I hope you enjoyed today’s project and will come back. I do read and reply to all of the comments individually. They mean a lot to me. Please reach out if you have a question.
This month, our blog hop team made projects to celebrate Random Acts of Kindness Week, which is February 14-20! We hope you will be inspired by all the beautiful creations the Pals made for you! As you hop from blog to blog, we would love for you to leave a comment. You will find the lineup at the end of my post to help you “hop” along from Pal to Pal.
I love making little Random Act of Kindness cards and gifts. The one for today is a larger version of one I make around Christmas.
Design
Hopefully from the photo you can see that this is one of the old Matchbook treats. When I first began stamping it was a common creation with a variety of notes and treats. I have revitalizing this quick and easy treat for you. Here is a look at the inside.
And Oh My!!! That White Chocolate Sugar Cookie Ghirardelli is amazing !!!! Just saying ! 🙂
Stamps
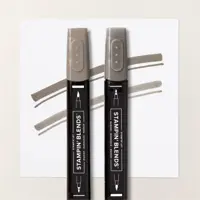
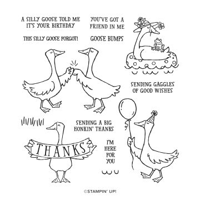
The fun goose with the awesome Thanks is from the Silly Goose stamp set. Yes, I am a sucker for the cute animal stamps. They are my favorites for hoping to give someone a smile. This image is all it took for the front of this treat. It is stamped using Memento Tuxedo Black Ink and then colored with Stampin’ Blends. Although there were only the bill, feet, and the sign to color. Again, a quick and easy treat to make.
For the inside sentiment I went to the Ringed With Nature stamp set. I love the bold Just For You. A perfect match for the treat.
Paper
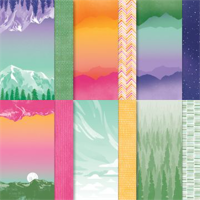
To make the treat I wanted a color matching the goose. Since I went with a White Goose, that didn’t leave a lot of choices, except for the feet and bill. I chose a darker yellow/orange and went to Mango Melody. It is a favorite color of mine. And I found the perfect matching paper in the Enjoy The Journey Designer Series Paper. This piece with slashes of Mango Melody and Melon Mambo was a match at first sight. And it gave me the pink for the Thanks banner!
Finishes
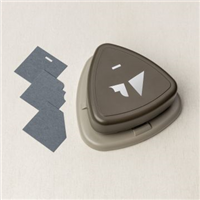
The finishing touch was to give the decorative detail on the corners of the Goose layer. This was accomplished with the Very Best Trio Punch. And to compliment the pink again, I added one of the 2021-2023 Opal Dots in the pink shade for a touch of bling.
Measurements:
The treat base is Mango Melody cut to 3 1/4 X 7 and scored at 3/4, 4, and 4 1/4. The DSP is cut to 3 X 2 1/2 and 3 X 1/2 . I stapled the 3/4″ fold with two staples closer to each side and lower than half way. This allows the front to tuck in behind easily. Staple and then add the small strip of DSP to hide the staples.
The goose layer is a piece of Basic White cut 2 1/8 X 2 3/8. And the inside sentiment White is 3 X 2 1/2. To add the White Chocolate Sugar Cookie treasure, I used a single Glue Dot. They are strong but pull away fairly easily.
Thanks for visiting today !!
More inspiration awaits, so use the lineup below to visit the rest of the Design Team. The Pals are excited to show you what they’ve created! Then, please mark your calendars for our next blog hop on March 8th, when our theme will be Party Time, showcasing cards/projects that celebrate our family and friends.
Not only is SAB all about Free Products, but Stampin’ Up! has really upped the rewards if you choose to join my team.
The regular Starter Kit, I call it the Ultimate Bundle, is 125.00 in product for 99.00. You get to choose all of the products yourself. For these two months of SAB, there are three options for you to choose and the rewards are amazing!
Option 1: The exclusive Boho Blue Mini Machine ($63 ) + your choice of $175 of Stampin’ Up! products for only $129 .
Option 2: The original white Mini Machine ($63 ) + your choice of $175 of Stampin’ Up! products for only $129 .
Option 3: Your choice of $175 of Stampin’ Up! products for only $99 .
Options 1 and 2 offer you 50.00 more in product and the Mini Machine for only 30.00 above the regular price.
Option 3 offers you $50 more product than the standard Starter Kit offer for the regular price!
These are the best deals I have seen. If you are interested, please reach out to me and let’s chat about it.
HOST CODE
My January Host Code is HEMUVZZK. Please use this code for orders under $150.00. I will have a small gift for those with orders over $50.00 in addition to the Perk Rewards Program. You can read all of the information at the top of the page in the Menu Bar under SHOP / Perks.
Thank you for stopping by today. I hope you enjoyed today’s project and will come back. I do read and reply to all of the comments individually. They mean a lot to me. Please reach out if you have a question.
The content in this blog is the sole responsibility of Jackie Beers as an Independent Stampin' Up! Demonstrator. The use of and content of classes, services or products offered is not endorsed by Stampin' Up!