I have a super sunset card to share with you today. And I may recommend a stamp set for you to order as well. I did not get the set/bundle, and after creating this simple card I so wish that I had. It will be on my next order. I believe you might feel the same way as well.
Scenic Coast Designer Series Paper
These two gorgeous papers are from the Scenic Coast DSP package. All of the sheets are water views on one side and then matching variegated colors on the opposite side. I chose an unusual mix of colors to create this card but all are pulled from the sunset paper. These sheets are a 6X6 package. I cut each in half and then trimmed a bit from the top and bottom. The purple is 3 X 5 1/8 and the sunset is 3 X 4 7/8. To complete the scene, I used a strip that was cut from the top of the sunset to stamp the sentiment on.
To decide on a matching card base was a tad hard to do. I tried Balmy Blue and Crushed Curry but neither seemed just right. Then I opted for an orange to match a part of the beautiful sky. The winner is Timid Tiger.
Stamp set (s)
The sentiment is from the Oh So Perfect sentiment set of Banner Sayings. I love these little sentiments. They work on card fronts, gift tags, small gifts and table favors, you name it! I had to search for an appropriate addition to the fabulous scene because I did not order the matching Bundle to the paper. This is the reason for the (s) at the heading. This bundle will be on my next order. It would have been so easy to add a die cut to this sunset and call it finished. Here is a sample from Stampin’ Up! that should have you agreeing with me. And maybe adding it to your next order. I will say that I am thrilled with my card as I do Love #simplestamping!
If all you did was add the circle with the lighthouse, it would be a completed card! (**This is a SU website photo from the design team.)
Extras
There is really only one Extra today. That is the Bling! The bling I chose is actually part of this suite of products named Scenic Coast Suite. They are the Sunset Sparkle Sequins. I love a lined up trio of embellishments. Actually I left that right edge wider just so I could add the bling there.
STAMPIN’ REWARDS
You will earn rewards on all orders over $20.00 in products The system will track your rewards for you. And they will be available for use on your next order, or you can save up for a larger purchase. All you need to do is on your first order is agree to participate. You will then begin receiving rewards on qualifying orders.
Orders of $50.00 or more you will still receive an appreciation gift from me. I appreciate you choosing me as your demonstrator!
COMMENTS
Please know that I love to hear from you and answer any questions you may have. My responses generally are not done here on the post. They are made using my phone as I have found it is easier to answer a question for you personally. So you will be receiving an email from me if you make a comment.
Thank you for stopping by today. I hope you enjoyed today’s project and will come back. I do read and reply to all of the comments individually. They mean a lot to me. Please reach out if you have a question.
Smile and Keep On Stamping,
Jackie
Online Exclusives
New Online Exclusives drop every other month. These are amazing products and are a supplement to the Annual and Mini Catalogs. This way you have access to even more New and Awesome products!
You can go directly to these in my Online Store by clicking HERE
I last shared a card using the Sea Horse stamp from a wonderful new Online Exclusive I was late in discovering. Today I have two versions of cards to show using another stamp from the set. This is a Peacock, and it is truly Majestic!
Natural Artistry Stamp Set
This stamp set is aptly named with the Artistry. The images are so special. Stampin’ Up! has some very talented artists doing the creating of our products. And this one is at the top I believe. I stamped this peacock to highlight the majestic look he has. You may wonder why the card is blue and the peacock is green. I chose Pretty Peacock (LOL) because peacocks have a green shade to them. Especially from a distance. ***** Don’t forget to look further down, I have a second Peacock card in a tad simpler version.
Background
To create a somewhat special background, I used the Everyday Arches. These are a favorite of course. They remind me of taking a photo through an arched opening. That is where the royal stage began for my peacock. The second arch of Secret Sea cardstock really helps to highlight the White one. I added some shading using Hydrangea Hue Ink and a Blending Brush to the White background.
Next is an embossed layer from Hydrangea Hue cardstock. This is the Fern & Flora 3D Embossing Folder. Not only does is have the Fern, but it has the fun curlycue you see on the top left, and other leaves. A perfect fit for the peacock surroundings. Last is the card base of Secret Sea as well.
Sentiment
This small but mighty sentiment is from the Phrases & Frames stamp set. I love that it is on the smaller side. But it still has the mixed font and totally works inside or in a starring role on a card. I chose to fussy cut the sentiment so it lays along the bottom of the peacock layer.
Extras
There are a couple of Extras on this card. I added the Hydrangea Hue Ribbon across the bottom of the peacock to tie everything together. And it is a perfect place for the sentiment to sit. For the Bling, I added a trio of the Natural Matte Dots. They are in Secret Sea and are great in color and that they are relatively flat embellishments. This group of dots are in more neutral tones and to have Secret Sea dots is extra special.
The extra card is a simpler version of the one above. But just as majestic I believe. I used the same two Everyday Arches Dies, 2nd and 3rd largest, in a different way. A negative was cut of the smaller one to do the Blending and then that is cut out with the larger Die to create the border. This card is Pretty Peacock and Golden Glow.
STAMPIN’ REWARDS
You will earn rewards on all orders over $20.00 in products The system will track your rewards for you. And they will be available for use on your next order, or you can save up for a larger purchase. All you need to do is on your first order is agree to participate. You will then begin receiving rewards on qualifying orders.
Orders of $50.00 or more you will still receive an appreciation gift from me. I appreciate you choosing me as your demonstrator!
COMMENTS
Please know that I love to hear from you and answer any questions you may have. My responses generally are not done here on the post. They are made using my phone as I have found it is easier to answer a question for you personally. So you will be receiving an email from me if you make a comment.
Thank you for stopping by today. I hope you enjoyed today’s project and will come back. I do read and reply to all of the comments individually. They mean a lot to me. Please reach out if you have a question.
Smile and Keep On Stamping,
Jackie
Online Exclusives
New Online Exclusives drop every other month. These are amazing products and are a supplement to the Annual and Mini Catalogs. This way you have access to even more New and Awesome products!
You can go directly to these in my Online Store by clicking HERE
Now that Stampin’ Up! has the Online Exclusives coming out on a regular basis, I sometimes forget to really go through the new offerings. I am working on that, and now I really have a great reason for doing so. One of the last OnLine Exclusive releases included the fabulous stamp set named Natural Artistry. The images are amazing and that stamp just as beautifully! It would have been extremely sad if I had missed out on this stamp set. I now have one of the images to share today.
Stamps
I hope you are loving what you see of these Sea Horses. They are a single horse that I stamped three times partially touching the previous one. The detail on all of the images in this fabulous Natural Artistry stamp set are really wonderful. And do you see the “sand” at the bottom. I was a bit quirky and carried the sand over to the background layer.
The sentiment is from this stamp set as well. I think this will be a nice stamp for a variety of occasions. Those are my favorite stamps that have versatility. And I believe the sea horses could be masculine as well as feminine.
Papers & Ink
Blues are my favorite colors and what I tend to gravitate to in some way. This card base is Cloud Cover and I have always considered it a part of the Blue family. Yesterday I shared with you a card using a sheet from the Vally In Bloom Designer Series Paper. The piece the sea horses are stamped on is the top section of that sheet. The flowers go around each side and the bottom with the top and center looking like sky. Or in this case look like water. You can see the color detail in the photo fairly well. Do not be afraid to stamp on your DSP!!
The Cloud Cover matches the DSP layer, but I was unsure what to add as a layer. I finally settled on Basic Beige. I felt it was a soft “sand” look. And then I added some sand to it. The sea horses are stamped using Basic Beige Ink also. This is a color that seems to react differently when stamped on different colors. To me the sea horses seem to have a green tone. I still love them!! And the sentiment is stamped using Crumb Cake Ink to go along with the sand theme.
Extras
The first Extra is the Die shape for the sentiment. This is from the Nested Essentials Dies. It fits the sentiment perfectly. And for the Bling, I went with some Sparkle! These sparkly sequins are named Sunset Sparkle Sequins. There are four different colors included in the pack. But they all seem to pick up a bit of the color they are next to. I used a small, large, and then another small.
STAMPIN’ REWARDS
You will earn rewards on all orders over $20.00 in products The system will track your rewards for you. And they will be available for use on your next order, or you can save up for a larger purchase. All you need to do is on your first order is agree to participate. You will then begin receiving rewards on qualifying orders.
Orders of $50.00 or more you will still receive an appreciation gift from me. I appreciate you choosing me as your demonstrator!
COMMENTS
Please know that I love to hear from you and answer any questions you may have. My responses generally are not done here on the post. They are made using my phone as I have found it is easier to answer a question for you personally. So you will be receiving an email from me if you make a comment.
Thank you for stopping by today. I hope you enjoyed today’s project and will come back. I do read and reply to all of the comments individually. They mean a lot to me. Please reach out if you have a question.
Smile and Keep On Stamping,
Jackie
Online Exclusives
New Online Exclusives drop every other month. These are amazing products and are a supplement to the Annual and Mini Catalogs. This way you have access to even more New and Awesome products!
You can go directly to these in my Online Store by clicking HERE
I have a great layout to share today. My card contains fun DSP and two Die Cut shapes to make this a sweet Birthday card. You could change this up with the DSP and the shapes to create many different versions very easily. I say Yay to simple and versatile.
Shapes& Sentiments
The two Die cut scalloped pieces are from the new Scalloped Blooms Bundle. The Dies are Bundled with the wonderful Scalloped Blooms stamp set which is all sentiments. And in my opinion, the Happy Birthday sentiment is a forever keeper. Many years ago I purchased a single wooden stamp that was very similar to this one. I used it until the rubber crumbled. To say I am excited to have this is an understatement.
The Die set contains seven scalloped circles, some plain and some with detail. Additionally there are about as many smaller tag like Dies. And the sentiments are all wonderful messages. Each post I am saying this is my favorite from the new catalog, so here I am again on this Bundle!! It is a wonderful one. Even though the Vellum scallop is fairly large, because it is vellum it does not overwhelm the card. I forget to use vellum and I pulled it out for this exact reason in creating this layering.
Papers
This fun DSP has a fun name as well. It is the Beautiful Ordinary Life Designer Series Paper. There is nothing Ordinary about this pack of paper. I will give you the Beautiful part. To me it is sort of retro. Back to stencils and some tie-die in fun colors. Actually the paper has most of the new 2026-2028 In Colors in it, as well as others. I chose this sheet only because I liked the image so much. It really reminds me of a stencil just using different colors in each one.
The DSP is paired with Flirty Flamingo as the card base and then Lost Lagoon for the layer. Again that is not a normal pairing, at least not for me. But they are paired in the “stencil”, so why not!
Extras
There are a couple of Extras and one is actually a stamp set. I was going on about the Scalloped Blooms stamp set and the gorgeous Happy Birthday. Then I forgot that there was an image stamped behind that. I used the flower sprig from Fern & Flora as a way of adding a touch more color to the white. It is stamped using Lost Lagoon, but stamped off first. I colored the leaves and highlights on the flowers with Light Soft Sea Foam and Light Flirty Flamingo Stampin’ Blends. That gave just enough color for you to know the flowers are there.
The second Extra is the Darling Duckling Ribbon. This is on the Last Chance List but was still available today. I wanted to ground the scalloped layers and it brought in yet another color from the DSP pattern. Finally the third Extra is the Bling. There is only one and it is from the Sunset Sparkle Sequins. These are in a couple of different colors but work with more than those few. The sequins seem to adapt the color around them quite a bit. Another Yay on bling that goes further!
STAMPIN’ REWARDS
You will earn rewards on all orders over $20.00 in products The system will track your rewards for you. And they will be available for use on your next order, or you can save up for a larger purchase. All you need to do is on your first order is agree to participate. You will then begin receiving rewards on qualifying orders.
Orders of $50.00 or more you will still receive an appreciation gift from me. I appreciate you choosing me as your demonstrator!
COMMENTS
Please know that I love to hear from you and answer any questions you may have. My responses generally are not done here on the post. They are made using my phone as I have found it is easier to answer a question for you personally. So you will be receiving an email from me if you make a comment.
Thank you for stopping by today. I hope you enjoyed today’s project and will come back. I do read and reply to all of the comments individually. They mean a lot to me. Please reach out if you have a question.
Smile and Keep On Stamping,
Jackie
Online Exclusives
New Online Exclusives drop every other month. These are amazing products and are a supplement to the Annual and Mini Catalogs. This way you have access to even more New and Awesome products!
You can go directly to these in my Online Store by clicking HERE
Stamping on pretty DSP causes me to hesitate just a second. I am afraid of dropping the stamp or stamping crooked! Only because I have done those things. For today’s card I managed to stamp straight with no malfunctions. All of that aside, this is a great card layout using a leftover piece of DSP.
A Die Cut Frame
This layer was cut previously for a different card and did not use it. (I also still had the piece cut from the center !) Then I happened to have this beautiful DSP on my table as well and I thought it would make a fabulous frame. This is a layering Die from the Beautifully Celebrated Dies. These were in the previous Mini and are still available as an OLE. It is bundled with a great stamp set also. Additionally there are other fun Dies besides these layering ones.
The center cut out shape was used on this card also. This is the 2nd largest Die from the layering ones. I used the next smaller and cut from Basic White. These are then layered on the inside of the card for a fancier touch.
Papers
The beautiful DSP is one I used last week. It is from the Valley In Bloom Designer Series Paper. These little bells are so pretty. They have the softest touch of Blackberry Bliss. And that was what my Die cut piece is. A win for me. There are a few different greens in the art work and it was a little back and forth to choose which to use. I decided to go with Bright, and ended with Granny Apple Green to draw out the brightness of the leaves.
Stamps
The gorgeous mix of fonts, and the sweet sentiments are from a new stamp set. It is titled Sending Salutations. And these are wonderful sentiments. It is an all sentiment set and I am good with that. This covers a variety of needs in a very beautiful way. To continue the Granny Apple of the cardstock, I used that for the stamping. It seemed not too bold for the stamping on the DSP.
Extras
The only Extra is a subtle Bling. I know I have used these several times previously, but they are my favorite Bling in the new catalog. They are the 2026-2028 In Color Butterflies. I went with the Blush Color for a very subtle touch next to the sentiment. That is not a normal Bling thing to be subtle. I just though this was such a pretty picture, that subtle would work.
STAMPIN’ REWARDS
You will earn rewards on all orders over $20.00 in products The system will track your rewards for you. And they will be available for use on your next order, or you can save up for a larger purchase. All you need to do is on your first order is agree to participate. You will then begin receiving rewards on qualifying orders.
Orders of $50.00 or more you will still receive an appreciation gift from me. I appreciate you choosing me as your demonstrator!
COMMENTS
Please know that I love to hear from you and answer any questions you may have. My responses generally are not done here on the post. They are made using my phone as I have found it is easier to answer a question for you personally. So you will be receiving an email from me if you make a comment.
Thank you for stopping by today. I hope you enjoyed today’s project and will come back. I do read and reply to all of the comments individually. They mean a lot to me. Please reach out if you have a question.
Smile and Keep On Stamping,
Jackie
Online Exclusives
New Online Exclusives drop every other month. These are amazing products and are a supplement to the Annual and Mini Catalogs. This way you have access to even more New and Awesome products!
You can go directly to these in my Online Store by clicking HERE
I have paired some fabulous DSP with an easy Fun Fold to share with you. I have been going through old cards I have saved for inspiration and found this Fun Fold. I thought the DSP I used is perfect for this layout to use the continuing pattern. I hope you like it.
This is the stand up and be seen position. Next is the laying flat to fit in the envelope. The Flower pot was exactly the correct size Die cut. Whew!
Gorgeous DSP
This beautiful DSP is the Vally In Bloom Designer Series Paper. It is part of the Suite which includes the Lily of the Valley stamp set and other products. The sheet I chose to use has the flowers across the bottom and up each side. I cut it so that I could continue the pattern from the top of the card, which turns into the back when open, down to the bottom of the inside. When closed, as in the second photo, you see the top and middle with a peek of the inside. Then in the first photo you see the middle section and the bottom which is where the sentiment / stopper is location.
I began with a piece of the DSP cut to 5 1/4 Wide and 5 1/8 tall. The top and middle sections are cut beginning at the top of the 5 1/8 and are each 1 7/8 X 5 1/4. Then the inside strip is what is left at the bottom. Personally, I love being able to do a continuous picture with DSP. The card base measures 5 1/2 X 8 1/2 and is scored on the long side at 2 1/8 and 4 1/4.
Stamps
The flower pot image is from the Life In Bloom stamp set. This set contains some larger sentiments for scrapbooking, but I love it for card making as well. I chose this stamp set because of the blooms in the pot matching the DSP. The colors used for coloring are pulled from the paper as well. The Blackberry Bliss of the pot may be a bit brighter than I expected, but that is ok.
The sentiment is from the Phrases & Frames stamp set. This set has some simply perfect sentiments. And of course the mix of fonts is perfection. The sentiment is stamped using Berry Burst, which actually matched the urn fairly well.
Extras
The Extras today are fairly big ones. LOL!! The Dies used for the sentiment and flowers are from the Nested Essentials Die Set. I love this set. It is a partner to my other favorite Die set in Stylish Shapes. Both of these sets are layering shapes. The vase was an issue being tall and skinny. I felt this shape fit it perfectly. That is the second largest of that Die shape. And the sentiment layer is the smallest one. It is raised using Stampin’ Dimensionals to make the stopper for the Fun Fold to rest against for display
There must always be Bling! These today are real shimmery bling. They are from the Shimmering Dots. I placed one on the sentiment layer and then two around the vase. The color matches the Granny Apple Green and Lemon Lime Twist in the DSP. And it compliments the Pretty Peacock of the card base.
STAMPIN’ REWARDS
You will earn rewards on all orders over $20.00 in products The system will track your rewards for you. And they will be available for use on your next order, or you can save up for a larger purchase. All you need to do is on your first order is agree to participate. You will then begin receiving rewards on qualifying orders.
Orders of $50.00 or more you will still receive an appreciation gift from me. I appreciate you choosing me as your demonstrator!
COMMENTS
Please know that I love to hear from you and answer any questions you may have. My responses generally are not done here on the post. They are made using my phone as I have found it is easier to answer a question for you personally. So you will be receiving an email from me if you make a comment.
Thank you for stopping by today. I hope you enjoyed today’s project and will come back. I do read and reply to all of the comments individually. They mean a lot to me. Please reach out if you have a question.
Smile and Keep On Stamping,
Jackie
Online Exclusives
New Online Exclusives drop every other month. These are amazing products and are a supplement to the Annual and Mini Catalogs. This way you have access to even more New and Awesome products!
You can go directly to these in my Online Store by clicking HERE
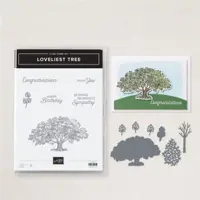
This tree has been in the Stampin’ UP! collection in two different stamp sets. It is the perfect tree for so many cards. I have kept this tree pretty plain as it is a sympathy card and I wanted it to be a calm and quiet one.
Loveliest Tree Bundle
The Loveliest Tree is the second version of Lovely As A Tree that was available for probably twenty years. This is a simpler version that has the matching dies. However, it is now on the Last Chance List if you are interested in it.
This beautiful tree, with it’s perfect shape, did not need much color. I stamped it using Early Espresso Ink onto a Basic Beige layer. Next I added a bit of green around it using a Blending Brush and Old Olive Ink. This just gave it a bit of grounding without a lot of background or additional color.
The little Die cut leaves are from the Die set in the bundle. A trio of them were cut from Old Olive cardstock and scattered around. They match the Old Olive layer. To get the burnt look around the edges, I tore the paper and then dragged it across the Crumb Cake Ink pad. I was not really expecting it to go as dark as it did. But I do like the outcome.
Extras
This card really did not seem to want any bling. I really debated about it and brought out different blings to try. To add a bit more depth to the card, I did add a double layer of Linen Thread along with a Double Bow. That seemed to tie everything together. Here is also a look at the inside of the card. I do not normally add an additional layer there, but felt it was needed for this one.
STAMPIN’ REWARDS
You will earn rewards on all orders over $20.00 in products The system will track your rewards for you. And they will be available for use on your next order, or you can save up for a larger purchase. All you need to do is on your first order is agree to participate. You will then begin receiving rewards on qualifying orders.
Orders of $50.00 or more you will still receive an appreciation gift from me. I appreciate you choosing me as your demonstrator!
COMMENTS
Please know that I love to hear from you and answer any questions you may have. My responses generally are not done here on the post. They are made using my phone as I have found it is easier to answer a question for you personally. So you will be receiving an email from me if you make a comment.
Thank you for stopping by today. I hope you enjoyed today’s project and will come back. I do read and reply to all of the comments individually. They mean a lot to me. Please reach out if you have a question.
Smile and Keep On Stamping,
Jackie
Online Exclusives
New Online Exclusives drop every other month. These are amazing products and are a supplement to the Annual and Mini Catalogs. This way you have access to even more New and Awesome products!
You can go directly to these in my Online Store by clicking HERE
As I was making cards today and looking for an appropriate sentiment, I had an Ah Hah moment. We all have friends wether ones we talk to every day or every now and then. They are all friends and should not be forgotten. Since I make a lot of cards to post, I wondered why I do not send out more Friend cards. Maybe “just because” type cards. Yes, I know the cost of mailing cards continues to escalate, but aren’t our friends worth a little bit of stamp money. I do believe they are. Do you have Ah Hah moments when you are stamping??
Z folds are such a great way to “up” a simple card.
Embossing Folders
Stampin’ Up! has some amazing 3D Embossing Folders. The one I have used today is really special. It is the Floral Spray 3D Embossing Folder. This one has different types of flowers and greenery and a whole lot of definition to go with them. Plus it is pretty enough to be the star of the card. Trying for an appropriate sentiment led me to the Friend narrative from the beginning today. Because that is all this card needed to complete it.
Papers
The detail of the embossing folder shows up very well on any color. But I was going for a dark and light combination. The card base and embossed layer are Lemon Lolly. That is one I do not use very often. And I paired it with Peaceful Pine. I am not really a Green person. However this one is gorgeous and if you follow my posts you know I have used it several times already!
Fern & Flora Bundle
This Bundle, and the Suite is included in this statement, may be my favorite of this new catalog. The paper is gorgeous. But the details in the stamps and sweet sentiments are just as good. I could have used the Fern Embossing Folder but have used it quite a few times already so opted for this one. And the layer for the sentiment has just enough detail with those notched corners. I also added a sprig of the greenery Die cut from the Peaceful Pine cardstock.
Extras
The extra to go along with the floral details was a lot of bling. I scattered around a trio of the Iridescent Pearls. They really shine up against both of the light and dark colors. That is a win.
The Z Fold is a simple one if you are new to card making. The cardstock is cut to 11 X 4 1/4 and then scored at 2 3/4 and 5 1/2. The 5 1/2 is the center fold. And the 2 3/4 is the Z portion. Fold it backwards and adhere the focal layer to only that small panel. There you are with a bit of extra for a simple card.
STAMPIN’ REWARDS
You will earn rewards on all orders over $20.00 in products The system will track your rewards for you. And they will be available for use on your next order, or you can save up for a larger purchase. All you need to do is on your first order is agree to participate. You will then begin receiving rewards on qualifying orders.
Orders of $50.00 or more you will still receive an appreciation gift from me. I appreciate you choosing me as your demonstrator!
COMMENTS
Please know that I love to hear from you and answer any questions you may have. My responses generally are not done here on the post. They are made using my phone as I have found it is easier to answer a question for you personally. So you will be receiving an email from me if you make a comment.
Thank you for stopping by today. I hope you enjoyed today’s project and will come back. I do read and reply to all of the comments individually. They mean a lot to me. Please reach out if you have a question.
Smile and Keep On Stamping,
Jackie
Online Exclusives
New Online Exclusives drop every other month. These are amazing products and are a supplement to the Annual and Mini Catalogs. This way you have access to even more New and Awesome products!
You can go directly to these in my Online Store by clicking HERE
I am sure you have viewed the new Catalog by now. Oh My! This may be one of the better ones in a while. The stamp sets are great. But the DSP is over the top in my book. I have shared before one of my favorites. And I am giving you another look at yet a different, but still gorgeous, sheet from the same pack of DSP.
The Gorgeous Paper
This amazing DSP sheet is from the Moonlit Flora Designer Series Paper. It is a nod to the “night blooming” flowers that we rarely see. The pops of pink against the different greens makes this seem like you are there in real life.
I went softer on the complimentary colors than I tend to do. The card base is Soft Sea Foam with the touch of Strawberry Slush for the strip and ruffle. Strawberry Slush or Berry Burst are the two closest to this pink I think.
Stamps & Dies
The beautifully scripted Happy Birthday is from the amazing Scalloped Blooms Bundle. As is the sentiment layer. The stamp set is all sentiments that have a mix of great fonts. You know how I love mixed fonts! And the Die set is several sizes of scalloped circles, but also some more regular tags. The sentiment layer is one of those extras. I love the scallop along the bottom edge. And it was simple to add the Strawberry Slush ruffle as an accent.
Extras
The 2026-2028 In Color Butterflies are one I have shared a few times. Well here they are again. They work for so many different card ideas. I am not sure if butterflies are flying around at night though. My butterflies are anyway.
Measurements
This is a very simple looking card, but it has a bit of a twist. The card base is 5 1/4 X 5 1/2 and is scored at 1″ on the 5 1/4 side. That is where you see the strip of Strawberry Slush. Next I cut a piece of Basic White that measures 4 1/8 X 5 1/2. It is added to the inside of that narrow strip to make a complete card front. (I did this because using DSP to complete the card front like this is nice, but the reverse side of the DSP does not always really go along with the card. This way you have a blank slate on the inside to stamp or do as you wish.)
The Strawberry Slush strip measures 3/4 X 5 1/4 and the DSP measures 3 1/4 X 5 1/2. The DSP aligns with the top, bottom, and right edge then butts up against the folded over card base and adheres to the Basic White layer we added. Another bonus for adding the White layer is that you are using less of the DSP.
STAMPIN’ REWARDS
You will earn rewards on all orders over $20.00 in products The system will track your rewards for you. And they will be available for use on your next order, or you can save up for a larger purchase. All you need to do is on your first order is agree to participate. You will then begin receiving rewards on qualifying orders.
Orders of $50.00 or more you will still receive an appreciation gift from me. I appreciate you choosing me as your demonstrator!
COMMENTS
Please know that I love to hear from you and answer any questions you may have. My responses generally are not done here on the post. They are made using my phone as I have found it is easier to answer a question for you personally. So you will be receiving an email from me if you make a comment.
Thank you for stopping by today. I hope you enjoyed today’s project and will come back. I do read and reply to all of the comments individually. They mean a lot to me. Please reach out if you have a question.
Smile and Keep On Stamping,
Jackie
Online Exclusives
New Online Exclusives drop every other month. These are amazing products and are a supplement to the Annual and Mini Catalogs. This way you have access to even more New and Awesome products!
You can go directly to these in my Online Store by clicking HERE
If there was every a way to elevate a card, I have it for you today with a touch of Velvet. Actually I have shared a bit of the velvet previously. The card I have today is all about the DSP. And it has the Velvet look and feel.
Paper
The paper, particularly the DSP is most definitely the star of this card. It even outshines the fabulous new Bundle I have included. As you can see from the first photo, the paper looks like the white flowers are raised. They actually are and have a velvety texture to them. The gorgeous paper is from the Velvet Meadow Designer Series Paper. This is included in the new May – August Catalog and it is available for you to order from TODAY!!!! That is really worth a Woohoo!!. All of the sheets in this pack have some of the velvet texture to them. I shared one last week. This sheet is covered in the velvet though.
Stamp & Die Bundle
The new and unique label on the front of the card is the next fabulous addition. This is from the Phrases & Frames Bundle. It is also in the new catalog. It is a sentiment stamp set with these amazing frames that work with the sentiments. This Die set will also work with the new Silicone Empressions Plate that you can use with the Cut & Emboss Machine and instead of cutting, it embosses the paper, or you can do both. But this label was only Die cut. And it still did a good bit of embossing without the additional run through the machine. Here is a look at the inside of the card for another of the sentiments in the set.
Paper, Ink, & Extras
This card was actually quick to make as it only has the one Die cut and stamped image on the front and a simple sentiment on the inside. I used the Peaceful Pine cardstock and Ink as it matches the DSP and is a new In Color.
The Extra is the 2026-2028 In Color Butterflies. I have given you sneak peeks of those last week, and they will be something you see fairly regularly. I really love these adorable little butterflies.
Measurements
This quick card is really easy to create with any focal layer. The card base measures 5 1/2 X 8 1/2, score at 4 1/4. Then cut off 1 1/2 from one side. That short side becomes your front. (or simply cut the cardstock 5 1/2 X 7 and score at 4 1/4 from one end.
The DSP measures 5 1/4 X 4 and then I cut 1 1/2 from the bottom. I did the bottom as my piece is directional and I wanted to continue the pattern when the card is closed. If not directional then it does not matter. Next the inside White is 5 1/4 X 4 also and the bottom cut off section of DSP is added flush to the bottom of it. Simply add the large DSP to the front of the card, then add the White layer that includes the strip of DSP to the inside. Easy Peasy!!!
STAMPIN’ REWARDS
You will earn rewards on all orders over $20.00 in products The system will track your rewards for you. And they will be available for use on your next order, or you can save up for a larger purchase. All you need to do is on your first order is agree to participate. You will then begin receiving rewards on qualifying orders.
Orders of $50.00 or more you will still receive an appreciation gift from me. I appreciate you choosing me as your demonstrator!
COMMENTS
Please know that I love to hear from you and answer any questions you may have. My responses generally are not done here on the post. They are made using my phone as I have found it is easier to answer a question for you personally. So you will be receiving an email from me if you make a comment.
Thank you for stopping by today. I hope you enjoyed today’s project and will come back. I do read and reply to all of the comments individually. They mean a lot to me. Please reach out if you have a question.
Smile and Keep On Stamping,
Jackie
Online Exclusives
New Online Exclusives drop every other month. These are amazing products and are a supplement to the Annual and Mini Catalogs. This way you have access to even more New and Awesome products!
You can go directly to these in my Online Store by clicking HERE
The content in this blog is the sole responsibility of Jackie Beers as an Independent Stampin' Up! Demonstrator. The use of and content of classes, services or products offered is not endorsed by Stampin' Up!