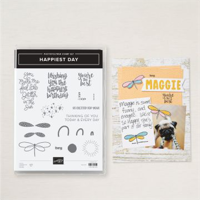
I have another of the possible Overlooked stamp sets. This one is the Happiest Day set. It makes me smile and I hope it will you as well.
Stamps
This is a one stamp set card. You know how I love these for a quick card. These dragonflies are so fun. You can stamp them and color the wings, stamp a design from the set for the wings, or do as I did and stamp on DSP. I stamped on the DSP and then also stamped on White. There are no matching dies for this set. But fussy cutting the dragonflies is not a time consuming or hard thing. After cutting out the wings, I glued them to the image that was stamped on Basic White card stock. Easy peasy!!
The sentiment is from the set as well. I will say I do love the sentiment. And at the same time I am not a fan of glitter that flies around. When I get it on me, it wants to stay forever. Or on my desk forever as well. This glitter in the sentiment is a good glitter! LOL!!
Other Products
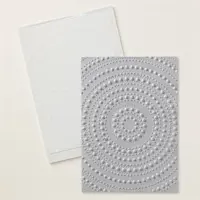
To finish the sentiment layer, I used the Nested Essentials Dies. The 3rd Largest is the one I used to die cut the sweet sentiment. Having just the small touch of the dots around the edge was perfect. And to complete the sentiment I added some Wink of Stella touches around the sentiment. In person you can see the “glitter” a bit better.
The gorgeous background is the Dotted Circles 3D Embossing Folder. This is one that I originally was not sure I needed. I could not picture how I would use it with the type cards I make. Well…..I was so wrong! This is a beautiful and stand out type embossing folder that is a great one for your collection. It really does pop the card. And if you can believe it, I did not add any further bling! I know that is a shocker. But the embossed with the dragonflies seemed good to go. And the bit of shine from Wink of Stella was enough.
Thank you for stopping by today!
Designer Series Paper Sale begins on August 6 – 31st.
Papers included in the sale are:
Bright & Beautiful
Countryside Inn
Country Lace
Country Woods
Full of Life
Lily Pond Lane
Mediterranean Blooms
Perennial Lavender
Take To The Sky
Thoughtful Journey
To Market
Unbounded Beauty
Wildly Flowering
Winter Meadow
Online Exclusives
New Online Exclusives have dropped. There are Halloween, Fall, Christmas, and many that are great year round. Of course the new Designer Series Papers and Embellishments are fabulous as well!
You can go directly to these in my Online Store by clicking HERE
HOST CODE
My AUGUST Host Code is NB9XKFUZ. Please use this code for orders under $150.00. I will have a small gift for those with orders over $50.00 in addition to the Perk Rewards Program. You can read all of the information at the top of the page in the Menu Bar under SHOP / Perks.
Thank you for stopping by today. I hope you enjoyed today’s project and will come back. I do read and reply to all of the comments individually. They mean a lot to me. Please reach out if you have a question.
Today is the final day of Bonus Days! This is the last day to earn Bonus Coupons to spend beginning tomorrow, August 1. I really am having a hard time realizing it is August already. Where is time going!
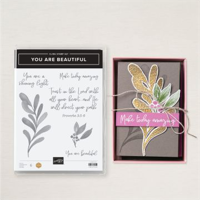
For today’s card I have a wonderful pairing of beautiful paper and Dies. The stamp set is one you may have overlooked, but I have fallen in love with it. After this, I hope you will as well.
Papers
The products used on this card are all wonderful. And this made choosing the star a difficult job. However the paper truly does stand out as I have used quite a lot of it. This is the Country Woods Designer Series Paper. All of the patterns are various wood photos. This piece of different faded painted planks is my favorite. But I also used the tag as a way of using a second piece of this fabulous paper.
To give the tag more depth and to help pop it from the painted planks, I added a second tag of Smoky Slate. Of course this is the card base as well. The Smoky Slate plays well with all of the colors of painted planks. And especially the Misty Moonlight ink.
Stamps
The hidden stamp set I mentioned is what contains both this fun image as well as the sweet sentiment. It is the You Are Beautiful set. The set is on page 93 of the Annual Catalog. The image has the faded look. And the sweet sentiment is written in a fabulous font. I love the majority of Stampin’ Up!’s fonts they use.
Dies
The maybe Star of this card is the tag (s). This great tag is from the Greetings of the Season Dies. They are an Online Exclusive with a wonderful stamp set of sentiments. I only used the tag though. It is a great size for the card. The little stitching around the edges adds the perfect amount of extra to it.
Finishes
To complete the double tags, I added a bow from Linen Thread. I love this as a country or masculine finish for a card. Plus it is so simple to work with. I doubled the thread to make a bit more substantial bow. And my bling is also one of the new Online Exclusives. These are Pecan Pie and Clear Ribbon Adhesive Dots. The ones used are the Pecan Pie. And they do look as if there is ribbon underneath.
Thank you for stopping by today!!
Online Exclusives
New Online Exclusives have dropped. There are Halloween, Fall, Christmas, and many that are great year round. Of course the new Designer Series Papers and Embellishments are fabulous as well!
You can go directly to these in my Online Store by clicking HERE
Bonus Days are winding down……
Do you have a wish list? I always have one on my desk. Bonus days are a good time to get some of those items. You then have a discount for next month’s order of a few more from that list. I call that a Win!
HOST CODE
My JULY Host Code is 2GCQ4HB6. Please use this code for orders under $150.00. I will have a small gift for those with orders over $50.00 in addition to the Perk Rewards Program. You can read all of the information at the top of the page in the Menu Bar under SHOP / Perks.
Thank you for stopping by today. I hope you enjoyed today’s project and will come back. I do read and reply to all of the comments individually. They mean a lot to me. Please reach out if you have a question.
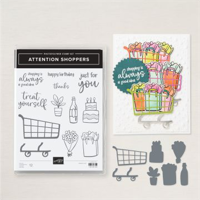
The fabulous Attention Shoppers Bundle has been so much fun to play with. For today’s card I have one I made for a dear friend’s birthday. There are a lot of elements but the Bundle makes it so very easy.
Bundle
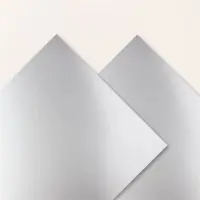
The Attention Shoppers Bundle has amazing items in both the Stamp set and the matching Die set. And I used quite a lot of them on this card. The three items you see inside the shopping card were all cut with matching Dies. As was the Shopping Cart! I cut the card from Silver Foil. All of the items were stamped with Memento Tuxedo Black Ink and then colored using Stampin’ Blends.
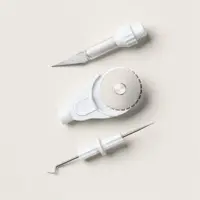
The sentiment is from the stamp set as well. I really had a time trying to find the proper placement for it. Finally I thought of it sticking out of the gift bag. So I used the craft knife on the Take Your Pick Tool Crafters Tips group. With a slit cut across the center of the “tissue paper” I could slide the end of the sentiment inside.
Additional Dies
The base of the shopping cart scene is the largest of the Spotlight On Nature Dies. These are a favorite of mine, and everyone else’s apparently. They are out of stock again. But will be back mid to end of August. That is just in time for you to use your Bonus Days Coupons on them! They are definitely worth it.
Papers
The mix of papers may not exactly go together as all colors being in the DSP. However I wanted a somewhat bright card. So the layer of DSP is from the Unbounded Beauty Designer Series paper. And just to add some of that bright color, I used Lemon Lolly as the card base. It is tied in further by the yellow Bakers Twiner around the cart. It makes the entire shopping cart the gift!
Finishes
To complete the bling on the card, I had to have more that simply the Silver Foil. So I went with some of the In Color Shimmer Dots. I used five of them scattered around the circle. These are the lighter green of Summer Splash. And they pair great with the DSP.
Thank you for stopping by today!! Don’t forget there is only today and tomorrow to earn Bonus Coupons.
Online Exclusives
New Online Exclusives have dropped. There are Halloween, Fall, Christmas, and many that are great year round. Of course the new Designer Series Papers and Embellishments are fabulous as well!
You can go directly to these in my Online Store by clicking HERE
Bonus Days are winding down……
Do you have a wish list? I always have one on my desk. Bonus days are a good time to get some of those items. You then have a discount for next month’s order of a few more from that list. I call that a Win!
HOST CODE
My JULY Host Code is 2GCQ4HB6. Please use this code for orders under $150.00. I will have a small gift for those with orders over $50.00 in addition to the Perk Rewards Program. You can read all of the information at the top of the page in the Menu Bar under SHOP / Perks.
Thank you for stopping by today. I hope you enjoyed today’s project and will come back. I do read and reply to all of the comments individually. They mean a lot to me. Please reach out if you have a question.
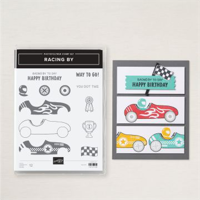
I am channeling my favorite racing series today. I love Formula 1 Racing and when I saw the Racing By stamp set, I knew it was for me. And I have a sweet little friend that just turned 4 who loves race cards as well.
Stamp Sets
The Racing By stamp set includes the cards, driver, flag, and sentiment. I love being able to make a card from one stamp set. The only extra are the stars. I felt it needed a touch more for the victory. These come from the Merriest Trees stamp set.
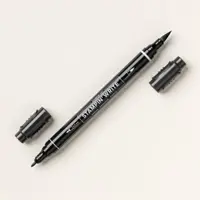
The cards are Blueberry Bushel and Poppy Parade. With the drivers in Crushed Curry. To make the flag pole, I used a ruler and the Basic Black Stampin’ Write Marker to simply draw the line. I went over it twice to give a bit more darkness.
Papers and Punch
There are no DSP on this card. I know that is amazing to those who follow me regularly! Sometimes it just happens. LOL!!! The card base is Blueberry Bushel with a layer of Poppy Parade. The sentiment is stamped on Crushed Curry card stock and then punched using the Happy Labels Punch.
Thank you for stopping by today!!
Online Exclusives
New Online Exclusives have dropped. There are Halloween, Fall, Christmas, and many that are great year round. Of course the new Designer Series Papers and Embellishments are fabulous as well!
You can go directly to these in my Online Store by clicking HERE
Bonus Days are winding down……
Do you have a wish list? I always have one on my desk. Bonus days are a good time to get some of those items. You then have a discount for next month’s order of a few more from that list. I call that a Win!
HOST CODE
My JULY Host Code is 2GCQ4HB6. Please use this code for orders under $150.00. I will have a small gift for those with orders over $50.00 in addition to the Perk Rewards Program. You can read all of the information at the top of the page in the Menu Bar under SHOP / Perks.
Thank you for stopping by today. I hope you enjoyed today’s project and will come back. I do read and reply to all of the comments individually. They mean a lot to me. Please reach out if you have a question.
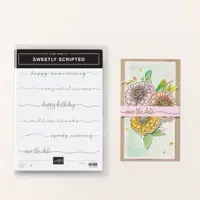
Today’s card is a quick and easy Anniversary card. Although if you change the sentiment it could be a variety of occasions. The Sweetly Scripted set is the star of the card.
Stamp Set
The Sweetly Scripted stamp set is a definite keeper in my book. This versatile set is only sentiments. And they are all like the Happy Anniversary above. They are all long and beautifully scripted. The set contains the most common sentiments plus I was thrilled for the beautiful Anniversary one. Sometimes that can be difficult to find.
Papers
This gold and white DSP is from the Natures Sweetness Designer Series Paper. My friend loves plants. So this paper seemed so appropriate for her. I paired the shiny paper with the Wild Wheat for the card base. It does appear to have gold when placed with the other paper. And to give the stamping space, I used a layer of Basic White.
The Basic White is cut 5 1/4 X 4. And the DSP is cut 5 X 3 3/4. I then decided how much space I needed to stamp and “guesstimated” the amount to cut out of the center. The start was to cut the piece in half diagonally. And then trim x amount off eat side. I apologize for not getting that measurement.
Finishes
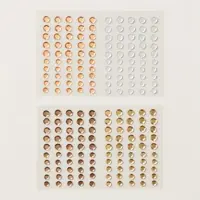
To add just a touch of bling I looked for an embellishment to match the gold. I found it with the Adhesive Backed Neutrals Sequins. There are two different sizes of a few different neutral shades. I chose the gold and placed a large at each end of the sentiment. Then added a scattering of the smaller ones. Gold bling may be the best bling!
Thank you for stopping in today!!
Online Exclusives
New Online Exclusives have dropped. There are Halloween, Fall, Christmas, and many that are great year round. Of course the new Designer Series Papers and Embellishments are fabulous as well!
You can go directly to these in my Online Store by clicking HERE
Bonus Days are winding down……
Do you have a wish list? I always have one on my desk. Bonus days are a good time to get some of those items. You then have a discount for next month’s order of a few more from that list. I call that a Win!
HOST CODE
My JULY Host Code is 2GCQ4HB6. Please use this code for orders under $150.00. I will have a small gift for those with orders over $50.00 in addition to the Perk Rewards Program. You can read all of the information at the top of the page in the Menu Bar under SHOP / Perks.
Thank you for stopping by today. I hope you enjoyed today’s project and will come back. I do read and reply to all of the comments individually. They mean a lot to me. Please reach out if you have a question.
Reminder that today is Free Shipping on orders of $75.00 or more!!
I am back from my knee replacements! Woohoo!! I really missed stamping. But my craft space is in the basement and it took me a couple weeks to comfortably get down there and be able to sit for any amount of time with my leg not elevated. Thankfully there was not a lot of pain, only discomfort. I appreciate those who checked on me very much!
Today’s card is using the Changing Leaves Bundle. And it is in stock for today’s Free Shipping, plus it would earn a $5.00 bonus coupon to use next month. This bundle is amazing. I first thought I did not need another leaves set. Well…..this one is unlike any of the others!! Wait until you see the embossing!
Changing Leaves Bundle
This bundle contains three parts. It has the stamp set with a couple of sentiments and several leaves. There are matching dies for the leaves plus some sentiment shape dies. And then there is the Embossing Folder. Oh My!! The embossing folder is what created this gorgeous background. The detail in the embossing is fabulous. To add to all this greatness, it is a Hybrid Embossing Folder. There is a large die that cuts three leaves, including the large center one, and embosses them at the same time. Plus there are so many different uses for this set.
Sentiment Layer
The sentiment and the leaves are all part of the bundle. This is a one bundle card! The leaves are die cut with two dies. One cuts the left and right leaves at the same time connecting them at the stem. The center leaf is individual. And the sentiment is cut using one of the three sentiment dies. There is a circle plus a smaller version of this one.
Wild Wheat
The Wild Wheat card stock was my first choice for this card, even if unexpected. I looked through all of the different colors and simply decided the goldish hue was exactly what the leaves needed. And oh my was it ever! Then to keep things clean and simple, I went with the Wild Wheat card base. Next came the sentiment layer and I thought it was a great time to use the Basic Beige. That worked perfectly I believe. And that made me realize that I wanted a thin layer of it behind the embossed layer instead of going tone on tone.
Inside View
This is a simple card good for any occasion. And with the front sentiment it really does not need a reason or an inside sentiment really. So I left that part blank. But I could not resist using one more leaf. I stamped a leaf using Wild Wheat Ink. But I did need to stamp off first. My ink is really juicy. And I like the softer image. Here is that view.
Thank you for stopping by today!!
Online Exclusives
New Online Exclusives have dropped. There are Halloween, Fall, Christmas, and many that are great year round. Of course the new Designer Series Papers and Embellishments are fabulous as well!
You can go directly to these in my Online Store by clicking HERE
Bonus Days are winding down……
Do you have a wish list? I always have one on my desk. Bonus days are a good time to get some of those items. You then have a discount for next month’s order of a few more from that list. I call that a Win!
HOST CODE
My JULY Host Code is 2GCQ4HB6. Please use this code for orders under $150.00. I will have a small gift for those with orders over $50.00 in addition to the Perk Rewards Program. You can read all of the information at the top of the page in the Menu Bar under SHOP / Perks.
Thank you for stopping by today. I hope you enjoyed today’s project and will come back. I do read and reply to all of the comments individually. They mean a lot to me. Please reach out if you have a question.
Tomorrow is Free Shipping on orders of $75.00 or more.
Stampin’ Up! has added a Free Shipping Day. It is tomorrow, July 23, only. Get your Wish list out. Not only will you get Free Shipping, but Bonus Days are ongoing as well. So for every $50.00 you get a $5.00 coupon to use in August. I feel like this is a double win for getting great products.
Online Exclusives
New Online Exclusives have dropped. There are Halloween, Fall, Christmas, and many that are great year round. Of course the new Designer Series Papers and Embellishments are fabulous as well! Come back tomorrow to see one of my most favorite Bundles in this last Exclusives drop.
You can go directly to these in my Online Store by clicking HERE
Bonus Days are winding down……
Do you have a wish list? I always have one on my desk. Bonus days are a good time to get some of those items. You then have a discount for next month’s order of a few more from that list. I call that a Win!
HOST CODE
My JULY Host Code is 2GCQ4HB6. Please use this code for orders under $150.00. I will have a small gift for those with orders over $50.00 in addition to the Perk Rewards Program. You can read all of the information at the top of the page in the Menu Bar under SHOP / Perks.
Thank you for stopping by today. I hope you enjoyed today’s project and will come back. I do read and reply to all of the comments individually. They mean a lot to me. Please reach out if you have a question.
I wanted to get out this reminder that the Bundle Sale will close on the 30th. You have one more week to shop the Stamp and Die Bundles, or either of the Stamp Cut & Emboss Machines for an additional 10% off. This sale does not include Punch Bundles, Only Die Bundles! And several of the ones that were out of stock are back now. One of my favorites is the Spotlight On Nature Bundle!
Update
I did not post all of the last week and I will be out for a week or so now. I am having knee replacement surgery today. So it will take about a week before I can get down the stairs to my craft room. Hopefully the surgery goes well and the pain is manageable. I had intended to have posts ready to go, but with doctor appointments and trying to get the house ready, my time slipped by. Life Happens, right!!!
Extra 10% on Bundles, and the Stamp Cut & Emboss Machine, both regular and Mini…
HOST CODE
My JUNE Host Code is VGC9HN6B. Please use this code for orders under $150.00. I will have a small gift for those with orders over $50.00 in addition to the Perk Rewards Program. You can read all of the information at the top of the page in the Menu Bar under SHOP / Perks.
Thank you for stopping by today. I hope you enjoyed today’s project and will come back. I do read and reply to all of the comments individually. They mean a lot to me. Please reach out if you have a question.
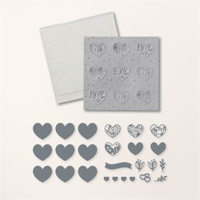
Instead of one card, I have to cards for you today. These are cards that are fabulous for multiples and are fairly quick to make. I cased my top Upline, Mary Fish for these.
Dies
The Adoring Hearts Dies and Hybrid Embossing Folder are a pair that is a time saver if you wanted to make multiples of these cards. The Die I used cuts nine hearts at one time. And when used in conjunction with the Hybrid Embossing Folder, they are each embossed at the same time. (The Dies and Hybrid Folder come together as one.) There are three different embossed designs. So nine cards partially made with one pass through the Stampin’ Cut & Emboss Machine! I call that a winner!!
Stamps
To make the “stem” for my heart flower, I used the awesome Sweetly Scripted stamp set. This is an Online Exclusive set that is a favorite. The set includes the same type script for a Birthday, Anniversary, Thanks, Congratulations, Speedy Recovery, and Save The Date. This is a must have set for sure. I stamped the script in the In Color Summer Splash to match the DSP.
Papers
The different papers used here are pretty matchy. I matched the card base to the DSP. Both patterns of DSP are from the Unbounded Beauty Designer Series Paper. You all know I love this paper as I have used it multiple times already. I do love the vibrant colors and patterns. I paired the card on the left with Petunia Pop card stock to pull out the tiny flowers in the DSP. And the right side card is Summer Splash card stock. The hearts are cut from Bubble Bath card stock. I love this soft color. It really shows the embossed design.
Extras
These cards are intended to be quick ones and to not require a lot of products. So the only extras are the 2024-2-26 In Color Shimmer Gems. The left is the Summer Splash and the right is the Petunia Pop. How easy are these!!!
Thank you for stopping in today.
Extra 10% on Bundles, and the Stamp Cut & Emboss Machine, both regular and Mini…
HOST CODE
My JUNE Host Code is VGC9HN6B. Please use this code for orders under $150.00. I will have a small gift for those with orders over $50.00 in addition to the Perk Rewards Program. You can read all of the information at the top of the page in the Menu Bar under SHOP / Perks.
Thank you for stopping by today. I hope you enjoyed today’s project and will come back. I do read and reply to all of the comments individually. They mean a lot to me. Please reach out if you have a question.
I am sharing a card I made as a bonus to my Newsletter subscribers for this month. This card stars the Spotlight On Nature Bundle.
Stamp Bundle
This card is made using one stamp set. That is something that I always love! Don’t get me wrong, I love mixing and matching sets. But I also love sharing one that is all inclusive. And this set, Spotlight On Nature, is a great one. I will also admit that the Die set is what sold me on this Bundle. It is a mix of circles with different edgings on them. You can mix and match or use all the same edges. This card only has one circle so not an issue here.
The images are all stamped with Memento Tuxedo Black Ink and then colored using Stampin’ Blends. For the right edge of the card, I stamped the leaf that is included as a tone on tone. The base is Basic Beige and I used Basic Beige Ink.
Papers
The card base is the Basic Beige mentioned above. The layers are Shy Shamrock paired with Petunia Pop. The angles were done free hand for a different look and a place to add the butterfly that was not on several layers. I did add the little strip that grounds the sentiment circle. It was a scrap that simply caught my eye.
Finishes
To complete the card I raised the sentiment layer with the strip of Petunia Pop underneath. And I added the butterfly with Dimensionals as well. For the Bling today I used the 2024-2026 In Color Shimmer Gems. These are so pretty. Plus they are not very tall so no problem for mailing.
Thank you for stopping by today!!!!
Extra 10% on Bundles, and the Stamp Cut & Emboss Machine, both regular and Mini…
HOST CODE
My JUNE Host Code is VGC9HN6B. Please use this code for orders under $150.00. I will have a small gift for those with orders over $50.00 in addition to the Perk Rewards Program. You can read all of the information at the top of the page in the Menu Bar under SHOP / Perks.
Thank you for stopping by today. I hope you enjoyed today’s project and will come back. I do read and reply to all of the comments individually. They mean a lot to me. Please reach out if you have a question.
The content in this blog is the sole responsibility of Jackie Beers as an Independent Stampin' Up! Demonstrator. The use of and content of classes, services or products offered is not endorsed by Stampin' Up!