One of my favorite sets of the Mini Catalog is the Sweetest Star Bundle. I have previously shared a couple of cards using this set. The “stars” are a gingerbread, and Mr and Mrs Claus. How cute is that! So today I am showcasing Mrs Claus. And as my title says, she is the sweetest!
STAMPS, PUNCHES, & DIES
This card is actually pretty simple. The most time consuming is coloring Mrs. Claus. But it does not take that long. She is stamped using Memento Tuxedo Black Ink and colored with Real Red and Granny Apple Green Stampin’ Blends. Then she is punched out using the matching Sweetest Star Punch. The other stamping is the sentiment. This sentiment is also included in the stamp set. I used Versamark Ink and White Embossing Powder to create this popping sentiment layer.
The next layer is the Granny Apple Green Die cut layer. This is made using the Stylish Shapes Dies. I love the subtle detail of the stitching around the edge. This Die set has circles, squares, and banners. And all have the subtle stitching.
The extra Punch detail is on Mrs. Claus’s apron. I used the Humble Home Punch to get the heart for the center of her apron. It is a simple, but I believe to be perfect, adornment.
PAPERS
There are a variety of colors of paper on this card. All of the colors are pulled from the DSP strips and are used multiple times. The DSP strips are from the Take A Bow 6 X 6 Designer Series Paper. Previously, when I shared the little snow globe cards, I used strips of this paper. There were some left so I put them to use again by adding brightness to the background of Mrs. Claus.
This card is actually a square card. It may be hard to tell from the photo. The Real Red cardstock is cut to 4 1/4 X 8 1/2 and folded at 4 1/4. The Granny Apple Green layer is 3 3/4 X 3 3/4 and the Basic White layer is 3 1/2 X 3 1/2. The strips of DSP measure 3 1/4 X 3/4.
EXTRAS
The extras for today have partially been mentioned. The heart on Mrs. Claus’s apron is from the Humble Home Punch. I also added a Rhinestone colored with Cherry Cobbler Stampin’ Blend to put in her hair, like a little pin. The Cherry Cobbler gave a deeper red than Real Red would have.
The sentiment layer is sort of an extra. It is raised with Stampin’ Dimensionals and the ends are snips using the Paper Snips to create banner ends. I love the White Embossing of the sentiment. It really helps it to pop!
HOST CODE
My DECEMBER Host Code is SAQE7VYU. Please use this code for orders under $150.00. I will have a small gift for those with orders over $50.00 in addition to the Perk Rewards Program. You can read all of the information at the top of the page in the Menu Bar under SHOP / Perks.
Thank you for stopping by today. I hope you enjoyed today’s project and will come back. I do read and reply to all of the comments individually. They mean a lot to me. Please reach out if you have a question.
Smile and Keep On Stamping,
Jackie
New Scrapbooking Catalog
The newest addition to Stampin’ Up! is an Online catalog of Scrapbooking products. You can see the catalog by clicking the photo below and save it to your computer.
Online Exclusives
New Online Exclusives have dropped. There are Halloween, Fall, Christmas, and many that are great year round. Of course the new Designer Series Papers and Embellishments are fabulous as well!
You can go directly to these in my Online Store by clicking HERE
Sometimes Thank You cards can be difficult to make. The gorgeous Stampin’ Up! DSP makes this pretty easy in my opinion. I have one of these to share today. All it takes is a little bit of extra parts.
STAMPS
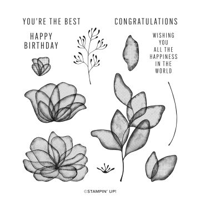
The stamps used on this card are the most simple parts of the card. This front simple, but exactly right, sentiment is from the Translucent Florals stamp set. This is a Thank You for someone who has been a life saver in a way. How do you express Thanks to someone who goes the extra mile besides this sentiment. I think it is perfect.
PAPERS
The DSP is really the star of the card. The lady loves scenery and what could be better than this gorgeous paper. It is from the Splendid Autumn Designer Series Paper. There are several different and equally beautiful scenes. I used this pretty scene as the color choices for the rest of the card. The Azure Afternoon is not one I have ever paired with Fresh Freesia before. If it works in the scene, then it works for me. And it really does!
EXTRAS
To give some additional texture and to help draw your eye to the sentiment, I added an embossed layer to separate the parts of the card. It also saved from adding stamping or additional DSP to the background. I used the Exposed Brick 3D Embossing Folder for this layer. It really has great texture.
The bling on this card is two gold pieces from the Mini Catalog. Behind the sentiment is a strip of Wild Wheat Rustic Stripe Ribbon. Just the little strip was a perfect touch. And of course bling! A single Gold Texture Adhesive Dot was the final touch.
HOST CODE
My DECEMBER Host Code is SAQE7VYU. Please use this code for orders under $150.00. I will have a small gift for those with orders over $50.00 in addition to the Perk Rewards Program. You can read all of the information at the top of the page in the Menu Bar under SHOP / Perks.
Thank you for stopping by today. I hope you enjoyed today’s project and will come back. I do read and reply to all of the comments individually. They mean a lot to me. Please reach out if you have a question.
Smile and Keep On Stamping,
Jackie
New Scrapbooking Catalog
The newest addition to Stampin’ Up! is an Online catalog of Scrapbooking products. You can see the catalog by clicking the photo below and save it to your computer.
Online Exclusives
New Online Exclusives have dropped. There are Halloween, Fall, Christmas, and many that are great year round. Of course the new Designer Series Papers and Embellishments are fabulous as well!
You can go directly to these in my Online Store by clicking HERE
The card I am sharing today is one I cased from the stamping retreat swaps. I changed the pieces just a bit for a sweet Thank You card. There are parts from different products. I love mixing and matching products.
STAMPSAND DIES
The flower / leaves pieces are from the fabulous Changing Leaves Dies. My favorite part is the large leaf with all of the detail. This is created with the Changing Leaves Hybrid Embossing Folder. It creates great detail on a variety of leaves, but also can Die cut this large one. I used Blending Brushes to add color to the leaf.
The additional leaves are Die cut from blackberry Bliss and Gold Foil. For the large background circle I used the largest of the Spotlight on Nature Dies. It is a perfect background with all of the colors of leaves on top.
To create the sentiment I added a sweet one from the Changing Leaves stamp set. The sentiment is a shortened version of the actual one. There are two layers to this one, but I only wanted the upper words. Quick and easily I covered the bottom row with a small post it note when inking the stamp. (Always remember to remove the post it before touching paper!) The sentiment layer is a Die cut from the Changing Leaves Dies also.
LAYER
The background layer is difficult to see in the photo. If you look closely to the upper right you can see the embossing. This is the Forever Plaid 3D Embossing Folder. In person it really stands out. The dark color makes it more difficult to photograph. Trust me when I say it adds quite a lot of detail.
PAPERS
The large Die cut circle is cut from the Natures Sweetness Designer Series Paper. I love the gold flecks in this paper. It makes a perfect match to the Gold Foil used on the Die cut leaves. For a strong overall color Blackberry Bliss is a perfect choice. It is the card base as well as the embossed layer. And is tied together with the little twigs die cut from Blackberry Bliss.
EXTRAS
To give a bit more texture I added some of the Linen Thread as a bow behind the sentiment. And then there must be bling. The Purple Shimmer Gems, the darkest shades, matched perfectly. So I scattered some around the circle and placed a single one on the sentiment layer.
HOST CODE
My DECEMBER Host Code is SAQE7VYU. Please use this code for orders under $150.00. I will have a small gift for those with orders over $50.00 in addition to the Perk Rewards Program. You can read all of the information at the top of the page in the Menu Bar under SHOP / Perks.
Thank you for stopping by today. I hope you enjoyed today’s project and will come back. I do read and reply to all of the comments individually. They mean a lot to me. Please reach out if you have a question.
Smile and Keep On Stamping,
Jackie
New Scrapbooking Catalog
The newest addition to Stampin’ Up! is an Online catalog of Scrapbooking products. You can see the catalog by clicking the photo below and save it to your computer.
Online Exclusives
New Online Exclusives have dropped. There are Halloween, Fall, Christmas, and many that are great year round. Of course the new Designer Series Papers and Embellishments are fabulous as well!
You can go directly to these in my Online Store by clicking HERE
Happy Thanksgiving to all of you. Hoping you are having a wonderful day. Especially for those of you having to work on this holiday. That was me for over 30 years, I know how tough it can be. I am grateful for your staying with me on my stamping journey.
Today’s card is one that expresses gratitude and could be used for any occasion that requires it. We all have the need for these type cards.
STAMPS
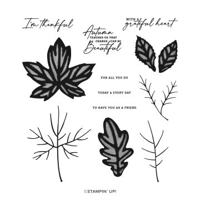
There are a mix of Autumn products used today. The sentiment is from the Autumn Leaves stamp set. This is a stamp set ,with matching dies, that carried over. I was thrilled that it did. The leaves are gorgeous and it has great sentiments.
DIES and EMBOSSING
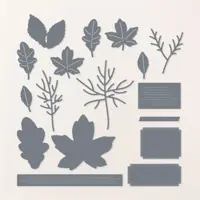
To create the fun focal layer I used a mix of Dies from the Autumn Leaves Die set. The sentiment and the two leaves are from that Die set. There are additional leaves, as well as some detail dies and another sentiment frame.
The background of this card has a special feature. Sadly it does not show very well. I used the Changing Leaves Embossing Folder to emboss the DSP. This is the first time I have ever embossed DSP. I have stamped on it , and Die cut it, but never embossed. Woohoo! A new adventure! And to add some additional detail, I used a Blending Brush and Shaded Spruce Ink to go over the embossed leaves to help them stand out. I did not go very dark, just a light color. That may be why it doesn’t show as well in the photo. Sorry about that.
PAPERS
The star paper is this gorgeous background layer. This is from the Splendid Autumn Designer Series Paper. It is one of the reverse sides of the watercolor sheets. I used a layer of Blackberry Bliss to help pull out the darker splotches. To add green to the purple colors I went with a bright, but dark, shade. I chose Shaded Spruce. I love it and Blackberry Bliss together. I will keep this in mind.
EXTRAS
The Die cut pieces are wonderful “extras”. Additionally I have used the Woven Gold Leaves. These are a great standout for any card where leaves work. And there must be more. To add my bling, I opted for the Purple Shimmer Dots. I chose the darkest of the shades. They are scattered around the card.
HOST CODE
My DECEMBER Host Code is SAQE7VYU. Please use this code for orders under $150.00. I will have a small gift for those with orders over $50.00 in addition to the Perk Rewards Program. You can read all of the information at the top of the page in the Menu Bar under SHOP / Perks.
Thank you for stopping by today. I hope you enjoyed today’s project and will come back. I do read and reply to all of the comments individually. They mean a lot to me. Please reach out if you have a question.
Smile and Keep On Stamping,
Jackie
New Scrapbooking Catalog
The newest addition to Stampin’ Up! is an Online catalog of Scrapbooking products. You can see the catalog by clicking the photo below and save it to your computer.
Online Exclusives
New Online Exclusives have dropped. There are Halloween, Fall, Christmas, and many that are great year round. Of course the new Designer Series Papers and Embellishments are fabulous as well!
You can go directly to these in my Online Store by clicking HERE
Yesterday’s card was a fun tag card and today I have the companion tag. While cutting the snow globes from the Snowy Scenes Designer Series Paper, I cut a couple of them. They are a great beginning to a card, or a sweet Gift Tag. But today I have used it for another card.
STAMPS
The Snowy Wonder stamp set has great pieces for a number of fun cards. I love the “Let It Snow” stamp with the mix of fonts. That and the different size snowflakes are the only ones I used for today. But the little penguin and snowman are really cute.
PAPERS
The papers are the star of the show once again. The Snowy Scenes Designer Series Paper is what the snow globe is cut from. This is the same as yesterday’s card and snow globe. I love the orange base on this one. It is a surprising color for a Christmas card, but after adding the Pumpkin Pie sentiment, it really works!
The background is another sheet from the same Snowy Scenes DSP. That led to the extra snow on the tag. And the strip of green DSP is from the Take A Bow Designer Series Paper. This one is another of the scraps from cleaning off my desk the other day. LOL!! Once again, it worked perfectly as a grounding for my snow globe.
EXTRAS
The tag is again from the Merriest Trees Dies. I truly love this Die set. And the stamp set is pretty great also. The ribbon is same as yesterday but just left original in Pool Party. And the final bling is the Regal Foiled Dots. A single one of the green was all that was needed.
Here is yesterday’s snow globe card so you have them together. Some easy cutting and you have these adorable snow globes without having to create them. Although you can from the Snowy Wonder Bundle.
HOST CODE
My DECEMBER Host Code is SAQE7VYU. Please use this code for orders under $150.00. I will have a small gift for those with orders over $50.00 in addition to the Perk Rewards Program. You can read all of the information at the top of the page in the Menu Bar under SHOP / Perks.
Thank you for stopping by today. I hope you enjoyed today’s project and will come back. I do read and reply to all of the comments individually. They mean a lot to me. Please reach out if you have a question.
Smile and Keep On Stamping,
Jackie
New Scrapbooking Catalog
The newest addition to Stampin’ Up! is an Online catalog of Scrapbooking products. You can see the catalog by clicking the photo below and save it to your computer.
Online Exclusives
New Online Exclusives have dropped. There are Halloween, Fall, Christmas, and many that are great year round. Of course the new Designer Series Papers and Embellishments are fabulous as well!
You can go directly to these in my Online Store by clicking HERE
I am still on a Christmas card roll again this week. I hope you are working on yours. Yesterday a radio person said it was 4 weeks until Christmas! Oh My that is soon.
The card I have for you includes a Tag. I got the idea from finding some gift tags I had made last year. Tags are actually pretty versatile but mine is attached to a card front today.
DIES
There are several products of equal “star” rating today. One of them is the tag. This perfect sized tag is a Die from the Merriest Trees Die set. This was a bundle that carried over to the Annual Catalog. Now the stamp set and matching Die set are not available as a bundled price. But are definitely worth having in your stash. The size of this tag makes it perfect for a card front as I have used it, and also as a gift tag. It is not going to get lost on the gift!
STAMPS
There are actually two different stamp sets used for this cute tag. The first is for the background trees. These are from the Snowy Wonder stamp set. The darkest one is full strength of Garden Green, the center one is stamped again, and the lightest is stamped a third time. All of them are from the one inking of the stamp. How cool is that!
The adorable little sentiment is from one of my favorite sets in the Mini Catalog. It is the Humble Home stamp set. This fun set, with the matching punch, is one that works year round. Personally I love the little hand written look of the sentiment. To help it match the other tag properties, I simply fussy cut square edges around it. It was really easy.
PAPERS
The papers used today are several. I began with the card base and tag as Thick Basic White cardstock. Then the holly layer of DSP is from the Snowy Scene Designer Series Paper. The small strip of polka dot paper to ground the snow globe is from the Take A Bow Designer Series Paper. This was from scraps left from my cutting for a card swap. I hate throwing away DSP strips!
The star of the tag is the snow globe. This piece is actually cut from the Snowy Scenes Designer Series Paper also. There are two different size snow globes on two different sheets included in the pack. This is one of the smaller ones. I thought the little penguin’s red ear muffs were the bright spot. And that is what prompted the background holly piece. And the little tree next to the penguin is what prompted the trees behind him. Since I usually say my cards begin with the DSP, this one was really lead by this little cut out snow globe.
EXTRAS
There must be bling on a card. However this one is a really busy card. So I had a tough time coming up with the bling. I finally decided on the Real Red & White Peppermint dot. It matched the colors perfectly and seem to go along with the cute penqin.
The idea of this card was partly from the Mini Catalog sample for this stamp set and papers. Then I noticed they showed coloring the Pool Party Pom Pom ribbon with a Stampin’ Write Marker. So I gave it a try to get the red with white pompoms. I used the Real Red marker and it came out quite a bit darker. It looks more like Cherry Cobbler. But I like it. Since the ribbon is a bit wider than I would usually use on a tag, I opted to simple tie a bow using White Bakers’ Twine. This comes in a multi pack of basic colors.
HOST CODE
My DECEMBER Host Code is SAQE7VYU. Please use this code for orders under $150.00. I will have a small gift for those with orders over $50.00 in addition to the Perk Rewards Program. You can read all of the information at the top of the page in the Menu Bar under SHOP / Perks.
Thank you for stopping by today. I hope you enjoyed today’s project and will come back. I do read and reply to all of the comments individually. They mean a lot to me. Please reach out if you have a question.
Smile and Keep On Stamping,
Jackie
New Scrapbooking Catalog
The newest addition to Stampin’ Up! is an Online catalog of Scrapbooking products. You can see the catalog by clicking the photo below and save it to your computer.
Online Exclusives
New Online Exclusives have dropped. There are Halloween, Fall, Christmas, and many that are great year round. Of course the new Designer Series Papers and Embellishments are fabulous as well!
You can go directly to these in my Online Store by clicking HERE
It always surprises me what I find on my desk when I resort to cleaning it off. The card I have for today is from an extra class packet from the beginning of the month. As I went to put the pieces away I looked at the opposite side of the DSP and had an idea. It resulted in the same layout as previously, but a different look. I will share both cards.
STAMP BUNDLE
The stamps used are from the Reindeer Fun Bundle. This is such a fun stamp set. The Dies offer a lot more extras than there are stamps for. To create this sentiment, I used a stamp that I needed to separate. Since I was not going to cut the stamp apart, I used the mask method to cover the section not wanted. First I covered everything except Christmas, and inked that with Real Red Ink. I removed the mask and then stamped it between the DSP pieces. Next I masked the Christmas and inked the rest with Garden Green Ink. A simple thing to do that has really nice results. **Remember to clean the stamp well between stamping! Additionally, since this is a photopolymer stamp set, it is really easy to stamp exactly where you want.
The extra where the Die set came into play is the little set of bells in the upper left corner. My color choices were red or green. With the bells being against the Christmas, I opted for green bells. Maybe that isn’t traditional, but I think they work okay. The Die leaves enough of a white border to help the red ribbon stand out from the red layer. Sometimes I wish that white border wasn’t there but not this time.
PAPERS
This adorable scenery of different deer is from the Reindeer Days Designer Series Paper. The opposite side is the large plaid . That was the side used on the previous card. When I saw these sweet scenes, I knew I had to use this some way. Then when I saw the sentiment I used everything came together. At least in my mind! Plus I agree that Christmas is better together!
To get the other colors I always refer to the DSP. In this case, I replaced one color that had been in the packet . I kept the Garden Green and replaced Granny Apple Green with Real Red for the layers.
EXTRAS
The bling on this card is one I had to modify. I wanted red accents and did not have any. So I pulled regular Rhinestones and colored them with Real Red Stampin’ Blends. There is one on the ribbon of the bells, and then one on each end of the sentiment.
MEASUREMENTS
The card base of Garden Green is 4 1/4 X 11, with a layer of Real Red measuring 3 3/4 X 5. The DSP is a 3 1/2 square piece that is cut on the diagonal. It is then layered on a piece of Basic White measuring 3 1/2 X 4 3/4. The DSP is added flush with the top and side, or bottom and side. Only the center of the Basic White shows.
Here is the previous card I mentioned. It is the same layout with the DSP raised using dimensionals.
My DECEMBER Host Code is SAQE7VYU. Please use this code for orders under $150.00. I will have a small gift for those with orders over $50.00 in addition to the Perk Rewards Program. You can read all of the information at the top of the page in the Menu Bar under SHOP / Perks.
Thank you for stopping by today. I hope you enjoyed today’s project and will come back. I do read and reply to all of the comments individually. They mean a lot to me. Please reach out if you have a question.
Smile and Keep On Stamping,
Jackie
New Scrapbooking Catalog
The newest addition to Stampin’ Up! is an Online catalog of Scrapbooking products. You can see the catalog by clicking the photo below and save it to your computer.
Online Exclusives
New Online Exclusives have dropped. There are Halloween, Fall, Christmas, and many that are great year round. Of course the new Designer Series Papers and Embellishments are fabulous as well!
You can go directly to these in my Online Store by clicking HERE
Fun Fold cards are my favorite to make. And cute animals are a close second in favorites. So today I joined the two using Christmas Friends Bundle.
STAMPS
The star of this card is the Christmas Friends Bundle and this adorable Moose. He looks so happy ice skating through the woods with his warm scarf. I stamped him using Early Espresso Ink and then colored with Stampin’ Blends. All of the colors are in the Supply List at the bottom of the post. The trees and stars are also part of the stamp set and matching Dies. The garland at the bottom, as well as the circle, are also part of the Die set. There are a lot of goodies here that you should check out.
There are two additional stamp sets for the sentiments. This front one is from the Humble Home stamp set. I love the small and simple handwriting look to the Merry Christmas. And the inside sentiment is from the Peaceful Season stamp set.
PAPERS
The DSP is where all of the other papers were pulled from. These pretty snowflakes are from the Snowy Scenes Designer Series Paper. This sheet has the snowglobes on the reverse side. From this I pulled the Garden Green as the card base. The small card is Pool Party which is also part of the DSP.
EXTRAS
The bling for this card is a bit brighter than usual. At least it stands out in the photo very well. They are a trio of the Earth Tone Shimmer Gems from the Mini Catalog. I thought the darker green would pop better and highlight the card base. And I believe they do.
Fun Fold Directions
To create this card you begin with a piece of cardstock measuring 5 1/2 X 8 1/2. Score it at 4 1/4. Then with the 8 1/2 along the top and the score line down the center, place the score line on the trimmer cutting channel. Hold that in place and rotate the cardstock so that the left side bottom point is also in the cutting channel. Cut that angle off. Next is the DSP. The inside panel measures 4 X 5 1/4. Cut two of these. One goes on the inside of the card. The other gets cut at an angle to go on the front of the card. Cut from the top right to the bottom left.
The small card measures 3 X 8 and is scored at 4. And the inside Basic White measures 2 3/4 X 3 3/4. Here are photos of the two other views of the card.
When the small card is added, align it with equal borders as you would any layer. Just ensure the front flap will close. I suggest doing a dry fit before adding adhesive. Please let me know if you have any questions.
HOST CODE
My DECEMBER Host Code is SAQE7VYU. Please use this code for orders under $150.00. I will have a small gift for those with orders over $50.00 in addition to the Perk Rewards Program. You can read all of the information at the top of the page in the Menu Bar under SHOP / Perks.
Thank you for stopping by today. I hope you enjoyed today’s project and will come back. I do read and reply to all of the comments individually. They mean a lot to me. Please reach out if you have a question.
Smile and Keep On Stamping,
Jackie
New Scrapbooking Catalog
The newest addition to Stampin’ Up! is an Online catalog of Scrapbooking products. You can see the catalog by clicking the photo below and save it to your computer.
Online Exclusives
New Online Exclusives have dropped. There are Halloween, Fall, Christmas, and many that are great year round. Of course the new Designer Series Papers and Embellishments are fabulous as well!
You can go directly to these in my Online Store by clicking HERE
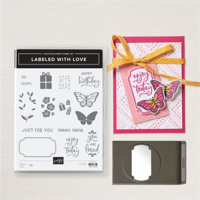
The idea for a happy Daisy Birthday card came from two sources. The first is I cased from a card that was part of our retreat during Hurricane Helene. The other spark was that I have been seeing Daffodils and other flowers blooming because of this crazy weather. Who said daisies aren’t good for November!
STAMPS and Dies and Punches
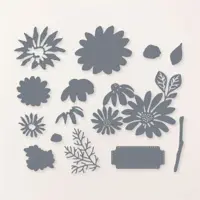
The Cheerful Daisy Dies are really the star of this card. The daisies are one Die cut that I then cut apart. I had to then cut the leaves again from Lemon Lime Twist. I like them better separated. The detail of the flowers and leaves really make them stand out. I used the included backing for the centers of the flowers. But had to cut it down some for the two smaller ones.
The Labeled With Love Bundle is a great one to have on hand. This is one of the bundles that you get to choose between the Punch or a Die. I personally love punches so that was my choice. The sentiment, label outline and then punch are all from the Labeled With Love Punch Bundle. I really like that simple outline inside the label.
PAPERS
The gorgeous Petunia Pop striped paper is from the Unbounded Beauty Designer Series Paper. That is a fabulous pack of DSP. This piece is part of the card highlights to me. It is layered on a piece of Basic White. The card base is also Petunia Pop, as are the daisies. For the Pop of color, I used Lemon Lime Twist to cut the leaves. And there is the bit of Daffodil Delight behind the flowers to show the centers.
EXTRAS
To complete the card, wanted some more of the bright green. I felt like the leaves were all alone. In looking through all of my different bling, I found these Tensile Gems. Sadly they are discontinued. They fit great with the Lemon Lime Twist. If you are like me and love the embellishments in every catalog, you probably have one that would work. And if all else fails, you can color a Pearl using the Stampin’ Blends to create your own. I thought that was what I was going to have to do!
HOST CODE
My DECEMBER Host Code is SAQE7VYU. Please use this code for orders under $150.00. I will have a small gift for those with orders over $50.00 in addition to the Perk Rewards Program. You can read all of the information at the top of the page in the Menu Bar under SHOP / Perks.
Thank you for stopping by today. I hope you enjoyed today’s project and will come back. I do read and reply to all of the comments individually. They mean a lot to me. Please reach out if you have a question.
Smile and Keep On Stamping,
Jackie
New Scrapbooking Catalog
The newest addition to Stampin’ Up! is an Online catalog of Scrapbooking products. You can see the catalog by clicking the photo below and save it to your computer.
Online Exclusives
New Online Exclusives have dropped. There are Halloween, Fall, Christmas, and many that are great year round. Of course the new Designer Series Papers and Embellishments are fabulous as well!
You can go directly to these in my Online Store by clicking HERE
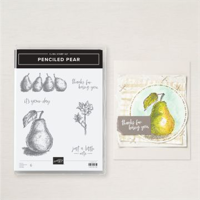
I swear my brain is leaving me. My posts are usually completed the evening before posting. And it totally went out of my brain last night. So today’s post is a bit late. Not that it hasn’t happened before! So today’s card uses one of the hidden gems in the Annual Catalog. This is the Penciled Pear set.
STAMPS
The Penciled Pear stamp set is towards the back of the Annual Catalog. It is placed with watercolor products. There are some simple sentiments like Just A Note, and Thinking of You, along with a line of pears. I opted for the single large pear as the artists had done in the catalog. Actually I copied a bit of their color choices.
The artists used ink pads with a water painter for their coloring. My pear is stamped using Basic Gray Ink. I took the easy route and used Stampin’ Blends. But I did use some of their ideas. My colors are light Daffodil Delight, both Wild Wheat, both Lemon Lime Twist, and both Granny Apple Green. The light Pool Party outline is something I do fairly often but generally only at the bottom as a shadow. I love how this one turned out.
PAPERS
To pull the brightness of the pear colors, I used Lemon Lime Twist as the card base. And then a thin layer of Basic White to help the pear panel pop. The beautiful textured coloring of the gold layer is from the Splendid Autumn Designer Series Paper stack. The front of these sheets are beautiful water color paintings and the backs are like watercolor washes. Finding a gold one fit my needs perfectly.
EXTRAS
The pear panel is cut using a Deckled Rectangle Die. This is the 5th from smallest. The size works out great with the layers on the card for even spacing. And just that bit of an edge the Die leaves is enough of a design I think.
To finish the card I wanted to add one of the simple sentiments. However with the layers as they are, there was not really a good place for it. So I decided on leaving it as is. Now it’s almost like a painting. (Maybe a rough looking one!) And I added a trio of the Faux Glass Dots from the Mini Catalog. There are a couple of different colors. I thought the green would look best. But as it turned out it was the gold that seemed to fit just right.
Measurements
The card base is Lemon Lime Twist cut 4 1/4 X 11 and scored at 5 1/2. The layer of Basic White measures 3 7/8 X 5 1/8 and the gold DSP measures 3 3/4 X 5. For the Die cut panel I used a scrap, but for that size a piece at 3 X 4 1/4 should be large enough.
HOST CODE
My DECEMBER Host Code is SAQE7VYU. Please use this code for orders under $150.00. I will have a small gift for those with orders over $50.00 in addition to the Perk Rewards Program. You can read all of the information at the top of the page in the Menu Bar under SHOP / Perks.
Thank you for stopping by today. I hope you enjoyed today’s project and will come back. I do read and reply to all of the comments individually. They mean a lot to me. Please reach out if you have a question.
Smile and Keep On Stamping,
Jackie
New Scrapbooking Catalog
The newest addition to Stampin’ Up! is an Online catalog of Scrapbooking products. You can see the catalog by clicking the photo below and save it to your computer.
Online Exclusives
New Online Exclusives have dropped. There are Halloween, Fall, Christmas, and many that are great year round. Of course the new Designer Series Papers and Embellishments are fabulous as well!
You can go directly to these in my Online Store by clicking HERE
The content in this blog is the sole responsibility of Jackie Beers as an Independent Stampin' Up! Demonstrator. The use of and content of classes, services or products offered is not endorsed by Stampin' Up!