My card today is another Fun Fold. I found this with directions from a few different people and none referred to anyone else. So I really do not know who to give credit to. I shrunk it a tiny bit so that it fits in a regular envelope.
The Fold
I am calling this a Diamond Fold. It is actually very similar to the Kite Fold or the fold used for graduation hat cards. The other fold names usually do not stand open. I love that about this one.
To allow this to fit in a regular A2 envelope, 4 1/4 X 5 1/2, I used a piece of 4 1/4 X 8 1/2 piece of cardstock. It is scored at 2 1/8 and 4 1/4. You then mark the center of the 4 1/4 end of the paper that has the 2 1/8 score line. Cut from the score line to that center mark from each side. This makes the front point. Fold the card in half and use the already cut edges to make the same cut on the bottom. It is actually very easy and quick to get all of this done.
The Paper
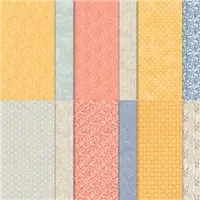
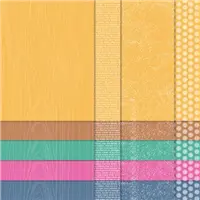
I used the Harvest Meadow Designer Series Paper. I love these patterns for Fall , or anytime, cards. I have used three different patterns from the paper pack. For a layer between the DSP and Calypso Coral, I added Soft Succulent. The Bumblebee diamond shape pieces are cut 2 @ 2 3/4 X 2 3/4 with a Soft Succulent cut 2@ 2 7/8 X 2 7/8. The wide strips, there is one on the inside as well as the one on the top, is cut 2 @ 4 X 1 7/8 with a Soft Succulent layer of 2 @ 4 1/8 X 2. And finally the corners are a SS layer of 2 X 2, and the DSP 1 7/8 X 1 7/8. Each of these squares is then cut in half to make two triangles. (Simply place them on your cutter with a top and bottom point in the cutting track.
You can see all of the paper placements in the photo. Only one is not shown and it is the inside wide strip. It is just like the top one and I added a piece of White cardstock for a signature. The top Diamond shape is only adhered on the front half to allow it to stand up. Here is a view of the card folded flat for mailing.
It is not laying totally flat. The picture is a bit deceiving in that the point in the back actually is flush with the back of the fold.
The Finishing Touches
I used the Pretty Pumpkin Bundle for this card. Fall is probably my favorite season. I LOVE Christmas, but Fall seems to get a bit overlooked.
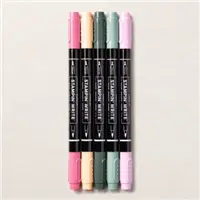
The DSP pumpkin is another sheet from the Harvest Meadows DSP. The stamped and Die cut pumpkin is from the stamp set. I used a variety of the both the 2020-2022 and 2021-2023 In Color Markers to color the various leaves and berries. Both of the pumpkins are raised with Stampin’ Dimensionals.
The sentiment is from the stamp set also. It is cut with the Stitched Rectangle Dies and only adhered in the center so that it hangs over the diamond shape. The final touch was a single gem from the Elegant Faceted Gems.
The 2nd Sale-A-Bration Is Here!!
Join My Team Promotion During Sale-A-Bration!!
HOST CODE
My August Host Code is Y4GZ7QNY. Please use this code for orders under $150.00. I will have a small gift for those with orders over $50.00 in addition to the Perk Rewards Program. You can read all of the information at the top of the page in the Menu Bar under SHOP / Perks.
Thank you for stopping by today. I hope you enjoyed today’s project and will come back. I do read and reply to all of the comments individually. They mean a lot to me. Please reach out if you have a question.
In the past Stampin’ Up has created stamps that are a definition of a word. These have always been a favorite of mine. They make a quick and simple card easily. And now there is a new definition set. I am so excited!!
Stamp Set
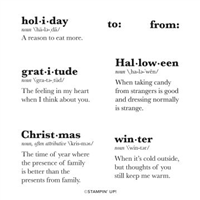
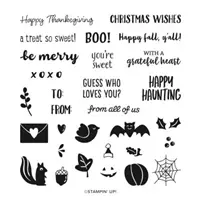
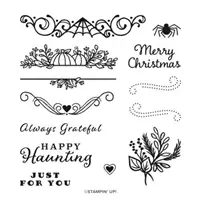
This adorable definition stamp is part of the Well Defined stamp set. It is new in the Mini Catalog which just became available. The stamp set is on page 62. The other definitions are for Halloween, Holiday, Christmas, Winter, and a To / From. These would make wonderful tags for gifts!
I wanted this to be a fairly clean looking card, so the definition is the focal point. It is stamped using Memento Tuxedo Black Ink and die cut with the frames from the Hippo & Friends Dies.
Paper and Embellishments
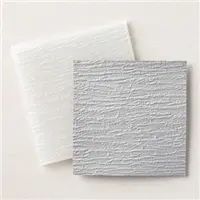
Since I tend to think of Gratitude along with Thanksgiving and Fall, I used a fall themed DSP. This piece is from the Harvest Meadow Designer Series Paper. It is another new item from the Mini Catalog. The embossed background is the Bark 3D Embossing Folder. It plays wonderfully with the Crumb Cake and Fall theme.
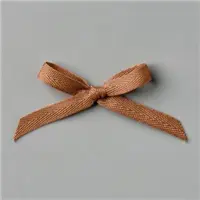
The finishing touch for the card was simply layering the sentiment with the Hippo & Friends Dies. I then added a three strip length of Linen Thread which I tied into a bow. Linen Thread is a favorite for masculine and nature type cards. Plus it is so easy to work with.
The 2nd Sale-A-Bration Is Here!!
Join My Team Promotion During Sale-A-Bration!!
HOST CODE
My August Host Code is Y4GZ7QNY. Please use this code for orders under $150.00. I will have a small gift for those with orders over $50.00 in addition to the Perk Rewards Program. You can read all of the information at the top of the page in the Menu Bar under SHOP / Perks.
Thank you for stopping by today. I hope you enjoyed today’s project and will come back. I do read and reply to all of the comments individually. They mean a lot to me. Please reach out if you have a question.
I love little 3 X 3 cards to have as Random Act of Kindness cards. I have handed out quite a few during this crazy year. A friend of mine loves them as well. So I keep her supplied, which in turn inspires me to use them. Here are the latest ones I made for her to use.
I made five of each version. There are only two versions, I just liked the picture with the three. LOL!
I used the Banner Year stamp said and paired it with the Plaid Tidings Designer Series Paper. REMINDER: That is one of the DSP in the 15% Off Sale at the bottom of the post. It ends on Saturday!!!
The base of the card is Thick Whisper White card stock cut to 6 X 3 and folded in half. The DSP is cut 2 7/8 X 2 7/8. The stamped piece is regular Whisper White and is cut 2 X 2. I placed those on the diamond shape just as a contrast to all the plaid.
All of the stamped images are from the Banner Year stamp set. This is a wonderful set that has greetings and images for most times of the year, but especially the Fall through Valentine.
As a finishing touch, I used the Daffodil Ruched Ribbon on the Pretty Peacock Plaid and Cinnamon Cider Ribbon for the bolder pattern. The gold heart at the top is a retired item. I felt that because of the sentiment , With A Grateful Heart, I needed a heart!
Thank you for stopping by today. I appreciate your visits and your comments. Please come back tomorrow for another new project.
HOST CODE
My October Host Code is SXDVJZF3 Please use this code for orders under $150.00. I will have a small perk for those with orders over $50.00
As I said yesterday, I am sharing a Slim Line Card today. I was late getting on the wagon for these cards, but have made quite a few now. This one is a favorite, as I love the DSP in it. Sadly, this is a DSP that is not included in the sale 🙁 But the paper is wonderful and really shines on the card.
I believe this paper is gorgeous!! It is the Gilded Autumn Designer Series Paper. The gold in the pumpkins really shines. I did not want to cover up that paper, so went with as small of a stamped layer as possible. This is probably a first for me in that I did not add a layer beneath the focal layer! A testament to the beauty of the DSP!
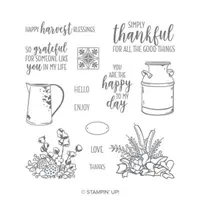
The stamped image is from the Country Home stamp set. I do love this set. The Milk Can and the Pitcher that the different flowers fit on top of are both favorites. They remind me of my younger growing up time. I actually have a milk can that was my Mom’s.
That sweet sentiment is also from the stamp set. I stamped it in the Mossy Meadow that is predominant in the flower arrangement. To finish it off, I added a single Gold Glitter Enamel Dot beneath the sentiment.
Thank you for visiting today. I very much appreciate your support. Monday I will have another new project and hope will you stop by.
HOST CODE
My October Host Code is SXDVJZF3 Please use this code for orders under $150.00. I will have a small perk for those with orders over $50.00
It is so hot and muggy these days here in the south that I have been wishing for Fall. In prepping for my card club and going through stamp sets, I stopped on a new one that made Fall seem a bit closer.
The stamp set I stopped on was Celebration Tidings. It is a very versatile set that pairs with the Celebration Dies that are a varying size of the same layering die. I chose to use the floral image and this gorgeous sentiment. I love the beautiful cursive font used here.
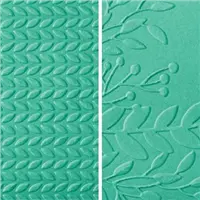
The background is the Greenery pair of Embossing folders. There are two different , smaller size, embossing folders. This is the one I named #1. Because it is narrow, it leaves a mark along the top and bottom if you use a full size layer of card stock as I did. I was careful to get the card stock centered in the die, so the line is on the top and bottom like it is supposed to be there!
The dies used for the image and the background are the Tasteful Labels Dies. The DSP is the Cinnamon Cider DSP from the 2020-2022 In Color 6×6 DSP. I adore the texture shown in the paper. I used the Banner Pick A Punch for the sentiment layer.
Thank you very much for visiting today! I love to hear from and appreciate your comments.
HOST CODE
My August Host Code is 6M4NU6C2 Please use this code for orders under $150.00. I will have a small perk for those with orders over $50.00
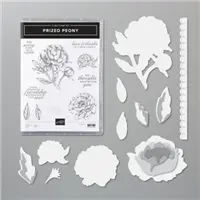
My favorite flower is a Peony. So when Stampin’ Up! debuted the beautiful Prized Peony stamp set, I knew it was coming to my house. Today’s card is the first time I have inked it up. I am in love once again!
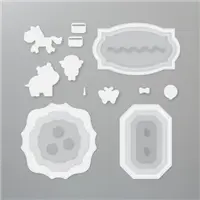
This is another time I purchased the entire Suite of products for the Prized Peony. All of the items are wonderful. With the exception of the tag punch I used for the sentiment, everything is from the suite of products.
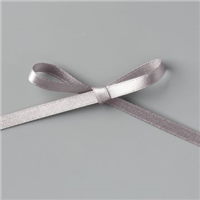
The colors of the Peony suite are gray and pink. I used Petal Pink and Gray Granite for the card stock colors. The DSP, Peony Garden Designer Series Paper, shares those colors as well. The ribbon is a shimmery Gray Granite.
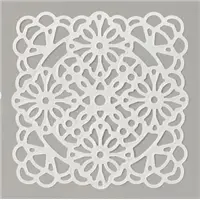
I stamped the flower in Gray Granite Ink and colored with the Petal Pink Stampin’ Blends and Old Olive Light Stampin’ Blend. It is die cut using the matching dies. It may be a bit hard to see in the photo, but behind the flower is the Square Vellum Doilies that are also part of the suite. The vellum is just enough for some added texture.
The sentiment is from the stamp set and it stamped in Old Olive Ink. It is punched using the Lovely Label Punch. I found a tip for the cutting of the label length from another demonstrator and then could not find it again. So I say Thank You and I apologize for not making note of your name when I saw the tip.
Stamp your sentiment and then punch with the Lovely Label punch, either side works the same. The tip is to save the little piece that was cut off. Now lay it on the strip of your sentiment at the proper length away from the sentiment to center it.
Now simply trim the strip at the outside of the little piece and then punch. You should have a perfectly centered sentiment for your project. Woohoo!!
Thank you for stopping by today. I hope you have a fun and relaxing weekend.
Now is a great time to join my Blue Line Stars Team. During June purchasing the Starter Kit, which is a fabulous deal any time, is an even better Bang For Your Buck. The regular cost of the Starter Kit is $99.00 and you receive $125.00 in products of your choice. For this month, you get to add one of the Bundles listed in the flyer below. It can be a Stamp/Punch Bundle, or a Stamp/Die Bundle. The most expensive one is a value of $60.25. And did I mention that shipping is FREE as well. If you have any questions, please do not hesitate to contact me.
HOST CODE
My June Host Code is WYRUJVGW. Please use this code for orders under $150.00. I will have a small perk for those with orders over $50.00
The content in this blog is the sole responsibility of Jackie Beers as an Independent Stampin' Up! Demonstrator. The use of and content of classes, services or products offered is not endorsed by Stampin' Up!