Welcome to the Stampin’ Pretty Pals’ Blog Hop! This month, the theme is “Wonderful Cards/Projects from the Garden” where our design team showcase projects from things found in a garden, such as flowers, vegetables, fruits, or even a garden scene. We really hope that you enjoy and will be inspired by them! As you hop from blog to blog, don’t forget to leave comments because we love hearing from you. Once you finish here, you will find the lineup at the end of my post to help you “hop” along from Pal to Pal.
I have to say that I LOVE flowers, but somewhere along the way I lost my green thumb! That being said, I think it makes me appreciate and love the Stampin’ Up! beautiful Designer Series Paper even more. Of course, the paper is the star of the card I have to share with you. And I have added a bit of a Fun Fold for good measure.
I am calling this card a Standing Double Easel Card. Instead of making the front easel section on a quarter piece of cardstock, I added it to the front of a regular size top folded card. This gives a much easier way to personalize and write a note to the recipient without trying to add that to the fun fold sections.
Paper
Since this is a garden theme, I chose my favorite of the flower papers currently available. The Hand-Penned Designer Series Paper is such a pretty “hand drawn” looking paper. The colors from the DSP created the additional colors I chose. The Cinnamon Cider is a bit unexpected at first, but them is very appropriate with the garden thinking.
Folded Card View
Folded, the card fits easily into a regular A2 envelope. The front folded section is Basic White and DSP, so not very much thickness is added.
Stamps
The Hand-Penned Petals stamp set matches the DSP extremely well. So much so that after I colored the stamped images with Stampin’ Blends, it almost blended in to the DSP! There are two different large images included in the stamp set. I stamped one of each image on the two focal layers using Memento Tuxedo Black Ink and then colored them similar to the flowers of the DSP.
The only sentiment showing is on the front of the inside section of the easel. A simple Thanks is all that was needed. It is stamped using the Cinnamon Cider Ink.
Finishing
To complete the card, I added one of the upcoming Mini Catalog Brushed Metallic Dots to the large front flower. These dots are fabulous!! When adhering the front stamped image, I found it best to lay the card flat and press the folds flat. The front stamped layer is the same size as the inside stamped layer. I lined up the front image directly over top of the inside one and then added adhesive to the bottom section only.
Measurements
The base card of Cinnamon Cider is a top fold cut to 4 1/4 X 11
The Basic White layer is cut to 4 X 9 3/4 and scored at 2 1/4 & 4 1/2
The large DSP piece is cut to 3 3/4 X 5
The two small DSP pieces are cut to 3 3/4 X 2, there is one on the front and one on the inside of the fold
The Mint Macaroon layer is cut to 2 1/2 X 4 1/4
The two Basic White stamped pieces are cut to 2 1/4 X 4
More inspiration awaits, so use the lineup below to visit the rest of the Design Team, because the Pals are excited to show you what they’ve created! Then, please mark your calendars for our next blog hop on August 11th. Our theme will be “My Happiest Season” when our Design Team creates a project showcase projects inspired by their favorite season of the year. Until then, have fun in your craft space.
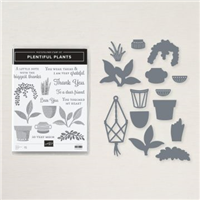
Have there been stamp sets that you first see and have absolutely no interest in? I have those from time to time. LOL!! They are very few that strike me that way. The Plentiful Plants Bundle, and Suite even, first struck me that way. Of course I have since seen many beautiful projects and cards from that bundle and had to have it. So I am sharing a card using some of the unexpected pieces of the DSP, as well as a Fun Fold.
Due to the Fun Fold, I had to photograph this card differently. Please forgive my finger.
Paper
You all know that for me, the first step after choosing a stamp set, is choosing the paper. And sometimes the paper is my first choice and then I find a stamp set that pairs with it. The paper first was the beginning of this card.
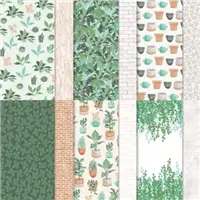
I saw this gorgeous piece of the Bloom Where You’re Planted Designer Series Paper, and knew I had to make it the star of a card. Next was me noticing the flower pots and plants on other sheets in the pack. And then remembering that the dies in the bundle would cut out those pots and plants! Oh My!!!
Fun Fold
I have seen a few cards similar to this fold of late, and new I wanted to try it. (There is already a different version with a twist that is finished! But for another day.) Here is the open card.
I apologize that he photo does not do it justice. Because of the folded out size, it did not work well inside my light box.
The base of the card is Evening Evergreen cut to a quarter sheet size of 5 1/2 X 4 1/4. The Basic White layer is 5 1/4 X 4, with the DSP layer being 5 1/8 X 3 7/8. This has become my current favorite layering sizes. The folded section of Soft Succulent is cut 4 X 9 3/4 and is scored on the long side at 3 1/4 & 6 1/2. (Be sure to burnish these folds well for this section to lay as flat as possible.) For the white layers in the sections, I cut those 3 1/8 X 3 7/8.
Finishing
The DSP strip on the center fold was a scrap that I cut to 3 3/4 tall. All of the plants and pots are die cut using the Perfect Plants Dies that are part of the Bundle. There is one exception. The center section cactus is fussy cut. Sadly there is not a die to fit it.
All of the plants / pots are glued down with the exception of the front terracotta pot. For the front of the card I decided to raise that one using Stampin’ Dimensionals. The inside and front sentiments are from the Plentiful Plants stamp set. They are stamped using Cinnamon Cider Ink. I originally stamped the front sentiment and used that ink to coordinate with the terracotta pot. Then it only seemed reasonable to use the same ink for the inside one.
Once again I have showcased one of the Designer Series Paper Packs that is included in the Designer Series Paper Sale. 15% off of the original price is a good deal for this gorgeous paper. I hope you will take advantage of it! The picture below shows all of the papers that are included in the sale. Please use my Host code which is shown just below that papers.
The picture below shows the Designer Series Papers that are included in the Sale. There are 9 to choose from!!
HOST CODE
My July Host Code is 2GKGF4Q7. Please use this code for orders under $150.00. I will have a small gift for those with orders over $50.00 in addition to the Perk Rewards Program. You can read all of the information at the top of the page in the Menu Bar under SHOP / Perks.
Thank you for stopping by today. I hope you enjoyed today’s project and will come back. I do read and reply to all of the comments individually. They mean a lot to me. Please reach out if you have a question.
I am sharing another card using the Hand-Penned products. I love the delicacy of these gorgeous stamps and papers. They truly look like someone sat down with Pen and Paper and drew the designs, then colored them using watercolors. A card is pretty much finished as soon as you add the paper and stamps, they are that pretty on their own.
Hand-Penned
The Hand-Penned Suite of products includes the stamp set, Hand-Penned Petals, the matching dies , Penned Flowers Dies, the DSP, Hand-Penned Designer Series Paper, and finally the Genial Gems. All of these products are wonderful.
I used the stamps and DSP for today’s card. The layout is actually a very simple one. The base card is a basic 8 1/2 X 5 1/2 folded in half. I used a strip of the DSP cut to 1 X 5 1/2 and placed that along the cut edge on the front of the card. The layer beneath the stamped image is a second piece of the DSP. It is cut 2 1/2 X 2 3/4. The stamped Basic White is cut to 2 1/8 X 2 3/8.
Colors and Finishes
The base card I chose is darker than the colors in the DSP. There is a Misty Moonlight in the paper, but I went a tad darker with Night of Navy. The darker color helps the Highland Heather of the front layer stand out a bit more. The flower is stamped using Fresh Freesia and Soft Succulent.
To finish the card, I stamped the Thanks using Memento Tuxedo Black Ink. I felt it needed to be darker to pop. One of the final additions is a bow. The Soft Succulent Open Weave Ribbon was the choice I made. It makes an easy bow, and ties the stamped layer to the DSP layer along the edge of the card. For the touch of bling, I added a trio of Pearls to a couple of the Freesia flowers. I have to have some bling!!
DSP Sale
The information for the Designer Series Paper sale is just below. The Hand-Penned used today is included in the sale! Woohoo!!!
The picture below shows the Designer Series Papers that are included in the Sale. There are 9 to choose from!!
HOST CODE
My July Host Code is 2GKGF4Q7. Please use this code for orders under $150.00. I will have a small gift for those with orders over $50.00 in addition to the Perk Rewards Program. You can read all of the information at the top of the page in the Menu Bar under SHOP / Perks.
Thank you for stopping by today. I hope you enjoyed today’s project and will come back. I do read and reply to all of the comments individually. They mean a lot to me. Please reach out if you have a question.
I have another 4 X 4 card that is full of Friendship and Thanks. It is part of a 4 pack gift I made. The other card I shared last week. I used most of the same products in both cards. They use different pieces to make each more individual. There are two of each card.
If you missed the card from last week, you can see it HERE.
Layout
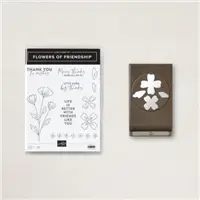
As I mentioned in the beginning of the post, the two cards are basically the same. The size of the cards are the same. The layers are a little different. For this one though I used the Flowers of Friendship Bundle. This bundle is a stamp and punch. You know how I love punches, so this was on my first order from the new catalog!
The difference for this card are the flowers and the sweet sentiment. They are both from the stamp set. I layered the smaller flower on top of the larger one. And glued the leaves to the back side of the larger flower.
The sentiment is stamped and then punched using the Label Me Fancy Punch. I like the rounded edges this punch leaves. Plus it tucks just below the flowers very nicely.
Finishing Touches
This card would qualify as a #simplestamping card so it does not have, or require , much in the finishing. I did add one Gold Gilded Gem to the center of the flower. I also used Stampin’ Dimensionals to raise the flower up. I had also used my bone folder to curl the petals on the smaller flower for some added dimension.
Measurements
Card base of Merry Merlot is cut 4 X 8 and folded in half
Crushed Curry layer is cut 2 1/2 X 3 3/4
DSP layer is cut 2 3/8 X 3 5/8
Layer is positioned equally on the left side aligned with Top, Bottom, and Left edge.
Options for the Punched Images
The punch will punch the two sizes of flower and the two leaves at one time. There are a couple of ways to make the punching more efficient. I just used scrap strips of my cardstock to stamp the images. But first, I turned the punch over and saw the direction each of the components were facing. That way I knew which way to place the stamped images for ease in cutting.
You can also use your Stamparatus and make a template. To do this, take a square of cardstock and punch all four pieces at once to make a template. Then place the template on the stamping surface of your stamparatus. Place the stamps in the template. Pick the flowers up with one plate and then pick the leaves up with the second plate. Now you can stamp and punch multiples easily.
January – June Mini Catalog Last Chance Sale
Click on the image below to get the 4 page pdf of the sale. A reminder, in some cases a Bundle is cheaper to purchase the stamp set and dies individually. Some dies are discounted up to 50% off.
If you order through me, and it is as easy as clicking on the Shop Now button on the Menu Bar, I have a Rewards Program. For every $50.00 in product you purchase, you earn a Blue Star. When you have gathered 10 Blue Stars, you get a $50.00 shopping on me. Plus every time you spend $50.00 I will add a small gift for you. Please use my Host Code listed below.
HOST CODE
My June Host Code is HCX2WT2A Please use this code for orders under $150.00. I will have a small perk for those with orders over $50.00
Thank you for stopping by today. I hope you enjoyed today’s project and will come back. I do read and reply to all of the comments individually. They mean a lot to me. Please reach out if you have a question.
Today’s card is pretty much as easy as it can get. The Stampin’ Up! Designer Series Paper is almost always a starting point for me in creating a card. I worry that it may be too often! But the beauty of the paper cannot be denied. Today I have made a #simplestamping card using the Hydrangea Hill Designer Series Paper.
This piece of the DSP has this pattern along the top and the bottom of a 12 X 12 sheet. The middle section is the gorgeous light blue background. I cut the sheet 5 1/8 X 3 7/8 and made four cards exactly like this one. I pulled the card base and layer colors from the paper. The card base is Gorgeous Grape with a layer of Purple Posy added in.
The only stamping on this card is the sentiment. It is from the Oval Occasions stamp set. The stamp set is retiring but , thankfully, the Double Oval Punch is carrying over. I stamped the sentiment using Gorgeous Grape Ink. I debated on adding a few embellishments but this is a #simplestamping card. So I stayed true to the Stamps, Ink, and Paper theme. Simple cards can , and are, very pretty and I believe this card shows that very well.
The measurements for this layout are also quite simple. The base card is 5 1/2 X 8 1/2, the layer is 5 1/4 X 4, and the DSP is 5 1/8 X 3 7/8. I have the supplies at the bottom of the post. I believe this is the smallest supply list I have posted! LOL!!
Thank you for stopping by today. I hope you have a fun weekend whatever you may be doing.
HOST CODE
My April Host Code is QGPT9TJG Please use this code for orders under $150.00. I will have a small perk for those with orders over $50.00
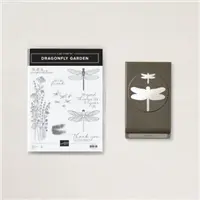
I have a cute card to share for a Thank You card using the Dragonfly Garden Bundle.
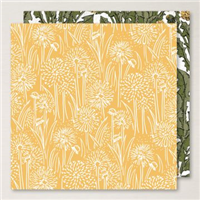
I combined several of the Garden products to make this card. I started with the DSP. As you know, I Love layers! And what is better than layering DSP. I used Four different sheets of the Dandy Garden Designer Series Paper. That may be a new record for me!
I started with the base card that I chose from the DSP. It is Terracotta Tile Cardstock. I then added the Bumblebee DSP layer and topped it with the Mossy Meadow DSP layer. That is all my “base” layer.
For the focal layer, I added yet another DSP piece that is a Terracotta Tile color and layered it onto Bumblebee cardstock. That was the #3 layer!! For the 4th layer, I simply used the Dragonfly punch and punched one of the beautiful dragonflies on one of the sheets of DSP. How easy is this? Have you realized that I have not stamped yet? I am just layering paper! LOL!!!!
I did finally stamp using the sweet sentiment from the stamp set. I stamped and layered that piece on a strip of Bumblebee cardstock. For the finishing touch, I added a couple of the Holiday Rhinestones that are a gold/orange color. I could have used the 2020-2022 In Color Enamel Dots of Cinnamon Cider. It is wonderful that some of these product types tend to change a bit when placed near a similar color. What a great advantage.
I hope you enjoyed this many layer card. I really enjoyed making it and combining the various colors and layers. I hope you will give one of these type cards a try. How many strips of DSP can you use?
Here are all of my measurements:
5 1/2 X 8 1/2 base
1st DSP layer 5 1/4 X 4
2nd DSP layer 4 3/4 X 3 1/2
2 7/8 X 2 7/8 Bumblee
2 3/4 X 2 3/4 3rd DSP layer
1 1/4 X 2 1/2 Bumblee
1 1/8 X 2 1/8 sentiment
Thanks for stopping in today! I hope you have a fun and safe weekend!I want to tell you a bit more Retiring Product news. Below is the link to the Annual Catalog List just click on the picture.
HOST CODE
My March Host Code is: B6JC9CHE Please use this code for orders under $150.00. I will have a small perk for those with orders over $50.00
The content in this blog is the sole responsibility of Jackie Beers as an Independent Stampin' Up! Demonstrator. The use of and content of classes, services or products offered is not endorsed by Stampin' Up!